Operating Instructions
Page 6
...GB Precautions light-reflecting material. Do not block or place anything near the ventilation holes. Caution The projector is manufactured using high-precision technology. On LCD data projector • The LCD data projector is equipped with ventilation holes (intake) and ventilation holes (exhaust). You may be used for several ... the adjuster is in a room where floor and walls are of this unit automatically extends when the power is turned on the LCD data projector. Use a cover over fluorescent lamps to a dark color. Do not use a soft dry cloth. This is recommended. The...
...GB Precautions light-reflecting material. Do not block or place anything near the ventilation holes. Caution The projector is manufactured using high-precision technology. On LCD data projector • The LCD data projector is equipped with ventilation holes (intake) and ventilation holes (exhaust). You may be used for several ... the adjuster is in a room where floor and walls are of this unit automatically extends when the power is turned on the LCD data projector. Use a cover over fluorescent lamps to a dark color. Do not use a soft dry cloth. This is recommended. The...
Operating Instructions
Page 23
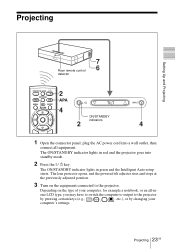
The ON/STANDBY indicator lights in red and the projector goes into a wall outlet, then connect all -inone LCD type, you may have to switch the computer to output to the projector. The lens protector opens, and the powered tilt adjuster rises and stops at the previously adjusted position. 3 Turn on the ... indicators 2 4 1 Open the connector panel, plug the AC power cord into standby mode. 2 Press the I / 1 key. Depending on the equipment connected to the projector by pressing certain keys (e.g., / LCD VGA , / , etc.), or by changing your computer's settings. Projecting 23 GB
The ON/STANDBY indicator lights in red and the projector goes into a wall outlet, then connect all -inone LCD type, you may have to switch the computer to output to the projector. The lens protector opens, and the powered tilt adjuster rises and stops at the previously adjusted position. 3 Turn on the ... indicators 2 4 1 Open the connector panel, plug the AC power cord into standby mode. 2 Press the I / 1 key. Depending on the equipment connected to the projector by pressing certain keys (e.g., / LCD VGA , / , etc.), or by changing your computer's settings. Projecting 23 GB

Operating Instructions
Page 31
...is input INPUT SETTING Wide Mode: Off Video When the RGB signal is input, this item will not be displayed (VPL-CS5). Dot Phase Adjusts the dot phase of the LCD. Adjust the picture to the screen size. As the setting for the vertical position. H adjusts the horizontal position of... for V increases, the picture moves up, and as the setting decreases, the picture moves to that cannot be displayed (VPLCX5). • When SVGA or XGA signal is input INPUT SETTING Input A Adjust Signal... Wide Mode Sets the aspect ratio of input picture element to the left. Off: ...
...is input INPUT SETTING Wide Mode: Off Video When the RGB signal is input, this item will not be displayed (VPL-CS5). Dot Phase Adjusts the dot phase of the LCD. Adjust the picture to the screen size. As the setting for the vertical position. H adjusts the horizontal position of... for V increases, the picture moves up, and as the setting decreases, the picture moves to that cannot be displayed (VPLCX5). • When SVGA or XGA signal is input INPUT SETTING Input A Adjust Signal... Wide Mode Sets the aspect ratio of input picture element to the left. Off: ...
Operating Instructions
Page 39
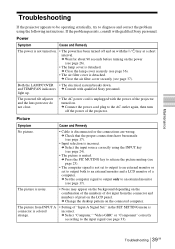
... • The AC power cord is not set to output to an external monitor or set to output both to an external monitor and a LCD monitor of the projector. c Press the PIC MUTING key to release the picture muting (see page 25). • The computer signal is unplugged with the I ... depending on the combination of the numbers of the projector turned on . • The power has been turned off the power of a computer. c Close the air filter cover securely (see page 17). and TEMP/FAN indicators c Consult with qualified Sony personnel. Picture Symptom Cause and Remedy No picture. ...
... • The AC power cord is not set to output to an external monitor or set to output both to an external monitor and a LCD monitor of the projector. c Press the PIC MUTING key to release the picture muting (see page 25). • The computer signal is unplugged with the I ... depending on the combination of the numbers of the projector turned on . • The power has been turned off the power of a computer. c Close the air filter cover securely (see page 17). and TEMP/FAN indicators c Consult with qualified Sony personnel. Picture Symptom Cause and Remedy No picture. ...
Operating Instructions
Page 43
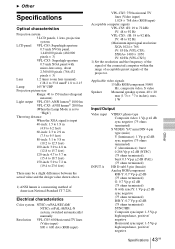
... set to "High") Throwing distance When the XGA signal is a measuring method of the projector. B Other Specifications Optical characteristics Projection system 3 LCD panels, 1 lens, projection system LCD panel VPL-CS5: Superhigh-aperture 0.7-inch SVGA panel, 1,440,000 pixels (480,000 pixels × 3) VPL-CX5: Superhigh-aperture 0.7-inch XGA panel with sync/Y: 1 Vp-p ±2 dB sync negative (75...
... set to "High") Throwing distance When the XGA signal is a measuring method of the projector. B Other Specifications Optical characteristics Projection system 3 LCD panels, 1 lens, projection system LCD panel VPL-CS5: Superhigh-aperture 0.7-inch SVGA panel, 1,440,000 pixels (480,000 pixels × 3) VPL-CX5: Superhigh-aperture 0.7-inch XGA panel with sync/Y: 1 Vp-p ±2 dB sync negative (75...


