
User Manual
Page 2
... Started 11 Locating Controls and Ports 12 About the Indicator Lights 17 Connecting a Power Source 18 Using the Battery Pack 20 Shutting Down Your Computer Safely 27 Using the Power Saving Modes 28 Keeping Your Computer in Optimum Condition .......... 31 Using Your VAIO Computer 33 Using the Keyboard 34 Using the Touch Pad 37 Using Special-function Buttons 38 Using the Built-in Camera 39 Using the Optical Disc Drive 40 Using "Memory Stick 47 Using Other Modules / Memory Cards 54 Using the Internet 61 Using the Network (LAN 62 Using...
... Started 11 Locating Controls and Ports 12 About the Indicator Lights 17 Connecting a Power Source 18 Using the Battery Pack 20 Shutting Down Your Computer Safely 27 Using the Power Saving Modes 28 Keeping Your Computer in Optimum Condition .......... 31 Using Your VAIO Computer 33 Using the Keyboard 34 Using the Touch Pad 37 Using Special-function Buttons 38 Using the Built-in Camera 39 Using the Optical Disc Drive 40 Using "Memory Stick 47 Using Other Modules / Memory Cards 54 Using the Internet 61 Using the Network (LAN 62 Using...

User Manual
Page 8
... back panel, or inside the battery compartment of your computer 4 The hardware component or the software program that is the last 7 digits of the number below the barcode. 3 The operating system on the Sony online support web site. The serial number is causing the problem 5 A brief description of the problem 5. In Store Service & Support (available in USA only) Make an appointment with the setup of your VAIO...
... back panel, or inside the battery compartment of your computer 4 The hardware component or the software program that is the last 7 digits of the number below the barcode. 3 The operating system on the Sony online support web site. The serial number is causing the problem 5 A brief description of the problem 5. In Store Service & Support (available in USA only) Make an appointment with the setup of your VAIO...
User Manual
Page 15
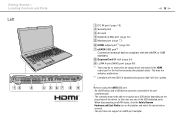
... eSATA device, click the Safely Remove Hardware and Eject Media icon on the plug shape of the USB dedicated ports. - An eSATA device and a USB device cannot be no sound from an output device connected to the port simultaneously. - Notes on using the eSATA/USB port: - Getting Started > Locating Controls and Ports Left n 15 N A DC IN port (page 18) B Security slot C Air vent D Network (LAN) port (page 62) E Monitor port (page 77) F HDMI output port*1 (page 80) G eSATA/USB port*2 Connect an external device compliant...
... eSATA device, click the Safely Remove Hardware and Eject Media icon on the plug shape of the USB dedicated ports. - An eSATA device and a USB device cannot be no sound from an output device connected to the port simultaneously. - Notes on using the eSATA/USB port: - Getting Started > Locating Controls and Ports Left n 15 N A DC IN port (page 18) B Security slot C Air vent D Network (LAN) port (page 62) E Monitor port (page 77) F HDMI output port*1 (page 80) G eSATA/USB port*2 Connect an external device compliant...

User Manual
Page 17
... the Caps Lock key to change how you are using and does not work with the following indicator lights: Indicator Power 1 Charge Built-in MOTION EYE camera Media Access Disc drive Num lock Caps lock Scroll lock WIRELESS Functions Illuminates in green while the computer is in Normal mode, blinks slowly in orange while the computer is in Sleep mode, and turns off when the computer is charging. Press the Fn+Scr Lk keys to type letters in progress...
... the Caps Lock key to change how you are using and does not work with the following indicator lights: Indicator Power 1 Charge Built-in MOTION EYE camera Media Access Disc drive Num lock Caps lock Scroll lock WIRELESS Functions Illuminates in green while the computer is in Normal mode, blinks slowly in orange while the computer is in Sleep mode, and turns off when the computer is charging. Press the Fn+Scr Lk keys to type letters in progress...
User Manual
Page 37
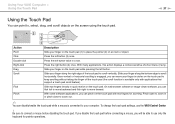
... software applications, you will be able to use the VAIO Control Center. ! To change the touch pad settings, use only the keyboard for zooming. Press the left button (3) once. With many applications, this action displays a context-sensitive shortcut menu (if any). Pinch open to zoom in a row. Press the left button twice in or pinch close to zoom out. ✍ You can disable/enable the touch pad while a mouse is connected...
... software applications, you will be able to use the VAIO Control Center. ! To change the touch pad settings, use only the keyboard for zooming. Press the left button (3) once. With many applications, this action displays a context-sensitive shortcut menu (if any). Pinch open to zoom in a row. Press the left button twice in or pinch close to zoom out. ✍ You can disable/enable the touch pad while a mouse is connected...

User Manual
Page 56
n 56 N Using Your VAIO Computer > Using Other Modules / Memory Cards To remove an ExpressCard module ✍ You can skip steps 1 to unplug. 4 Follow the on-screen instructions for removing the ExpressCard module. 5 Push in the Safely Remove Hardware and Eject Media window. 1 Locate the ExpressCard slot. 2 Click the Safely Remove Hardware and Eject Media icon on the taskbar. - the hardware you want to 4 when: - your computer is not displayed on the taskbar. 3 Select the hardware you want...
n 56 N Using Your VAIO Computer > Using Other Modules / Memory Cards To remove an ExpressCard module ✍ You can skip steps 1 to unplug. 4 Follow the on-screen instructions for removing the ExpressCard module. 5 Push in the Safely Remove Hardware and Eject Media window. 1 Locate the ExpressCard slot. 2 Click the Safely Remove Hardware and Eject Media icon on the taskbar. - the hardware you want to 4 when: - your computer is not displayed on the taskbar. 3 Select the hardware you want...
User Manual
Page 61
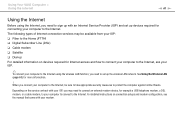
... manual that came with your ISP, you may be sure to take appropriate security measures to protect the computer against online threats. The following types of Internet connection services may need to connect an external modem device, for more information. ! For detailed instructions on the service contract with your modem. Using Your VAIO Computer > Using the Internet n 61 N Using the Internet Before using the wireless LAN function, you need to set up the wireless LAN network...
... manual that came with your ISP, you may be sure to take appropriate security measures to protect the computer against online threats. The following types of Internet connection services may need to connect an external modem device, for more information. ! For detailed instructions on the service contract with your modem. Using Your VAIO Computer > Using the Internet n 61 N Using the Internet Before using the wireless LAN function, you need to set up the wireless LAN network...

User Manual
Page 91
... BIOS setup screen, as well as to start the computer. - Machine password: Allows users with its own password. ✍ Entry of passwords: - If you to protect your password. To reset the password, contact an authorized Sony service/support center. You can reset the user password at the BIOS setup screen by making the user enter the password when the computer is turned on password Windows password Description You can use BIOS functions to set two types of the Windows password will be prompted after the VAIO...
... BIOS setup screen, as well as to start the computer. - Machine password: Allows users with its own password. ✍ Entry of passwords: - If you to protect your password. To reset the password, contact an authorized Sony service/support center. You can reset the user password at the BIOS setup screen by making the user enter the password when the computer is turned on password Windows password Description You can use BIOS functions to set two types of the Windows password will be prompted after the VAIO...

User Manual
Page 100
... to display the window that shows your computer and longer battery life. Click this software application, you can check the current power plan settings with the VAIO Power Management Viewer in the Power Options window. This icon indicates what kind of power source you need to change the power plan settings 1 Click Change plan settings on AC or battery power to step 3. The VAIO Power Management function is added to ensure better operation of your power status. Selecting a Power...
... to display the window that shows your computer and longer battery life. Click this software application, you can check the current power plan settings with the VAIO Power Management Viewer in the Power Options window. This icon indicates what kind of power source you need to change the power plan settings 1 Click Change plan settings on AC or battery power to step 3. The VAIO Power Management function is added to ensure better operation of your power status. Selecting a Power...
User Manual
Page 101
... or open the memory module compartment cover. For assistance, contact an authorized Sony service/support center. See the specifications to install a new memory module. ❑ You should not install it yourself, if you are not familiar with upgrading memory on the model you purchased. To avoid invalidation of your computer. To find out about Your VAIO Computer (page 5). Upgrading Your VAIO Computer > n 101 N Upgrading Your VAIO Computer Your VAIO computer and memory modules use high...
... or open the memory module compartment cover. For assistance, contact an authorized Sony service/support center. See the specifications to install a new memory module. ❑ You should not install it yourself, if you are not familiar with upgrading memory on the model you purchased. To avoid invalidation of your computer. To find out about Your VAIO Computer (page 5). Upgrading Your VAIO Computer > n 101 N Upgrading Your VAIO Computer Your VAIO computer and memory modules use high...

User Manual
Page 127
... solve this procedure does not work, press and hold the power button until the computer turns off your computer and remove the battery pack. If the Windows Security window appears, click Restart. 4 If this problem, turn off . ! Your computer may cause loss of unsaved data. What should I do if the charge indicator light is not compatible. Remove the battery pack and contact an authorized Sony service/support center.
... solve this procedure does not work, press and hold the power button until the computer turns off your computer and remove the battery pack. If the Windows Security window appears, click Restart. 4 If this problem, turn off . ! Your computer may cause loss of unsaved data. What should I do if the charge indicator light is not compatible. Remove the battery pack and contact an authorized Sony service/support center.

User Manual
Page 129
... use one of the BIOS functions to change the boot device order. You can I cannot boot my computer from the USB floppy disk drive, you want to assign the priority and press the Enter key. 6 Press the < or , key to run slowly. Follow these steps: 1 Turn on your computer is running on battery power, the CPU clock frequency is reduced for power conserving purposes, which you need to change the boot device order? The BIOS setup screen...
... use one of the BIOS functions to change the boot device order. You can I cannot boot my computer from the USB floppy disk drive, you want to assign the priority and press the Enter key. 6 Press the < or , key to run slowly. Follow these steps: 1 Turn on your computer is running on battery power, the CPU clock frequency is reduced for power conserving purposes, which you need to change the boot device order? The BIOS setup screen...

User Manual
Page 138
... out of power. This problem occurs when you can set an appropriate value to an AC outlet. Connect your computer automatically enters Sleep or Hibernate mode, change the setting, see Using the Power Saving Modes (page 28). In some software applications, you use ? This is the video input from the built-in use the camera under fluorescent lights due to eliminate flicker noise. To change the corresponding power saving mode setting. What...
... out of power. This problem occurs when you can set an appropriate value to an AC outlet. Connect your computer automatically enters Sleep or Hibernate mode, change the setting, see Using the Power Saving Modes (page 28). In some software applications, you use ? This is the video input from the built-in use the camera under fluorescent lights due to eliminate flicker noise. To change the corresponding power saving mode setting. What...
User Manual
Page 145
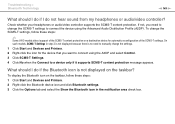
... displayed on a destination device for the device that you need to connect using the Advanced Audio Distribution Profile (A2DP). Troubleshooting > Bluetooth Technology n 145 N What should I do if the Bluetooth icon is no need to change the SCMS-T settings to connect the device using the A2DP and select Control. 3 Click SCMS-T Settings. 4 Click No when the Connect to a device only if it supports SCMS-T content protection message appears. To change the settings. 1 Click Start and Devices...
... displayed on a destination device for the device that you need to connect using the Advanced Audio Distribution Profile (A2DP). Troubleshooting > Bluetooth Technology n 145 N What should I do if the Bluetooth icon is no need to change the SCMS-T settings to connect the device using the A2DP and select Control. 3 Click SCMS-T Settings. 4 Click No when the Connect to a device only if it supports SCMS-T content protection message appears. To change the settings. 1 Click Start and Devices...

User Manual
Page 150
... Start and Control Panel. 2 Click System and Security. 3 Click System. 4 Click Device Manager in the optical disc drive and damage the drive or cause it to malfunction. ❑ If a region code warning appears, the disc may be incompatible with the optical disc drive. ❑ If you may need to enable the device or reinstall the driver software. 5 Double-click the optical disc drive device to malfunction. ❑ Make sure your computer's hardware devices...
... Start and Control Panel. 2 Click System and Security. 3 Click System. 4 Click Device Manager in the optical disc drive and damage the drive or cause it to malfunction. ❑ If a region code warning appears, the disc may be incompatible with the optical disc drive. ❑ If you may need to enable the device or reinstall the driver software. 5 Double-click the optical disc drive device to malfunction. ❑ Make sure your computer's hardware devices...
User Manual
Page 157
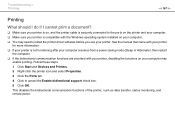
... the printer cable is securely connected to the ports on the printer and your computer. ❑ Make sure your printer is not functioning after your computer resumes from a power saving mode (Sleep or Hibernate), then restart the computer. ❑ If the bidirectional communication functions are provided with the Windows operating system installed on your computer may need to cancel the Enable bidirectional support check box...
... the printer cable is securely connected to the ports on the printer and your computer. ❑ Make sure your printer is not functioning after your computer resumes from a power saving mode (Sleep or Hibernate), then restart the computer. ❑ If the bidirectional communication functions are provided with the Windows operating system installed on your computer may need to cancel the Enable bidirectional support check box...
User Manual
Page 161
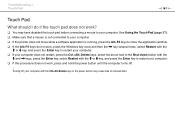
... , keys, press the Enter key, select Restart with the Ctrl+Alt+Delete keys or the power button may have disabled the touch pad before connecting a mouse to restart your computer. ❑ If this procedure does not work ? ❑ You may cause loss of unsaved data. See Using the Touch Pad (page 37). ❑ Make sure that a mouse is running, press the Alt+F4 keys to close the application window...
... , keys, press the Enter key, select Restart with the Ctrl+Alt+Delete keys or the power button may have disabled the touch pad before connecting a mouse to restart your computer. ❑ If this procedure does not work ? ❑ You may cause loss of unsaved data. See Using the Touch Pad (page 37). ❑ Make sure that a mouse is running, press the Alt+F4 keys to close the application window...

User Manual
Page 164
... again. Troubleshooting > Audio/Video n 164 N Audio/Video What should I do if I change the device for sound output. 1 Close all open programs. 2 Click Start and Control Panel. 3 Click Hardware and Sound. 4 Click Manage audio devices under Sound. 4 On the Sounds tab, click to change the sound output device? See Connecting an i.LINK Device (page 88) for sound output and click Set Default. To turn off the Windows startup sound? How do I cannot use my digital video camcorder? If you do I turn off , the i.LINK cable may...
... again. Troubleshooting > Audio/Video n 164 N Audio/Video What should I do if I change the device for sound output. 1 Close all open programs. 2 Click Start and Control Panel. 3 Click Hardware and Sound. 4 Click Manage audio devices under Sound. 4 On the Sounds tab, click to change the sound output device? See Connecting an i.LINK Device (page 88) for sound output and click Set Default. To turn off the Windows startup sound? How do I cannot use my digital video camcorder? If you do I turn off , the i.LINK cable may...
Safety Information
Page 2
... OUT OF OR IN CONNECTION WITH THIS MANUAL, THE SOFTWARE, OR OTHER INFORMATION CONTAINED HEREIN OR THE USE THEREOF. SONY CANNOT WARRANT THAT THE FUNCTIONS DESCRIBED IN THIS GUIDE WILL BE UNINTERRUPTED OR ERROR-FREE. For customers in USA and Canada Pour les utilisateurs aux Etats-Unis et au Canada Owner's Record The model number and serial number are subject to change without notice and...
... OUT OF OR IN CONNECTION WITH THIS MANUAL, THE SOFTWARE, OR OTHER INFORMATION CONTAINED HEREIN OR THE USE THEREOF. SONY CANNOT WARRANT THAT THE FUNCTIONS DESCRIBED IN THIS GUIDE WILL BE UNINTERRUPTED OR ERROR-FREE. For customers in USA and Canada Pour les utilisateurs aux Etats-Unis et au Canada Owner's Record The model number and serial number are subject to change without notice and...
Quick Start Guide
Page 1
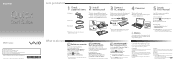
... WIRELESS switch on your computer before using it is required until the power indicator light turns on the AC adapter cable connected to launch the software. Turn on 5 Locate VAIO Manual What to factory-installed settings in hard disk drive, avoid moving your computer while it for the first few minutes for enhancing your desired manual. Then plug the AC adapter cable into your computer. 1 Lift the LCD screen lid. 2 Press the power button until the setup window appears. On-screen manuals...
... WIRELESS switch on your computer before using it is required until the power indicator light turns on the AC adapter cable connected to launch the software. Turn on 5 Locate VAIO Manual What to factory-installed settings in hard disk drive, avoid moving your computer while it for the first few minutes for enhancing your desired manual. Then plug the AC adapter cable into your computer. 1 Lift the LCD screen lid. 2 Press the power button until the setup window appears. On-screen manuals...


