Safety
Page 2
... to the model and serial numbers when you call your Sony VAIO® computer. This manual and the software described herein, in whole or in part, may not be transported or used outside the United States. IN NO EVENT SHALL SONY ELECTRONICS INC. SONY CANNOT WARRANT THAT THE FUNCTIONS DESCRIBED IN THIS GUIDE WILL BE UNINTERRUPTED OR ERROR-FREE. Some of your Sony Service Center. Reproduction in...
... to the model and serial numbers when you call your Sony VAIO® computer. This manual and the software described herein, in whole or in part, may not be transported or used outside the United States. IN NO EVENT SHALL SONY ELECTRONICS INC. SONY CANNOT WARRANT THAT THE FUNCTIONS DESCRIBED IN THIS GUIDE WILL BE UNINTERRUPTED OR ERROR-FREE. Some of your Sony Service Center. Reproduction in...

Safety
Page 4
..., make sure it becomes warm and causes discomfort. ❑ To prevent possible damage and risk of these items needs to be replaced during normal operation and over time could result in discomfort or burns. ❑ Do not place the AC adapter in contact with any Sony battery pack. ❑ Do not use or store your computer in a location subject...
..., make sure it becomes warm and causes discomfort. ❑ To prevent possible damage and risk of these items needs to be replaced during normal operation and over time could result in discomfort or burns. ❑ Do not place the AC adapter in contact with any Sony battery pack. ❑ Do not use or store your computer in a location subject...
Startup Guide
Page 1
... setup tools, tutorials, and FAQs. Battery pack The illustrations in case of the screen displayed when using it is required until the power indicator light turns on 1 Slide the battery LOCK switch inward. 2 Slide the battery pack diagonally into an AC outlet. Be sure to connect the AC adapter to factory-installed settings in this document may vary and are not provided with the SmartWi Connection Utility for the first startup...
... setup tools, tutorials, and FAQs. Battery pack The illustrations in case of the screen displayed when using it is required until the power indicator light turns on 1 Slide the battery LOCK switch inward. 2 Slide the battery pack diagonally into an AC outlet. Be sure to connect the AC adapter to factory-installed settings in this document may vary and are not provided with the SmartWi Connection Utility for the first startup...

Users Guide
Page 2
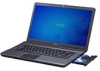
... Started 11 Locating Controls and Ports 12 About the Indicator Lights 18 Connecting a Power Source 19 Using the Battery Pack 21 Shutting Down Your Computer Safely 27 Using the Power Saving Modes 28 Updating Your Computer 31 Using Your VAIO Computer 32 Using the Keyboard 33 Using the Touch Pad 35 Using Special-function Buttons 36 Using the Quick Web Access Function 37 Using the Built-in Camera 39 Using the Optical Disc Drive 40 Using "Memory Stick 47 Using Other Modules / Memory Cards 53 Using the Internet 59 Using the Network (LAN 60 Using the Wireless LAN...
... Started 11 Locating Controls and Ports 12 About the Indicator Lights 18 Connecting a Power Source 19 Using the Battery Pack 21 Shutting Down Your Computer Safely 27 Using the Power Saving Modes 28 Updating Your Computer 31 Using Your VAIO Computer 32 Using the Keyboard 33 Using the Touch Pad 35 Using Special-function Buttons 36 Using the Quick Web Access Function 37 Using the Built-in Camera 39 Using the Optical Disc Drive 40 Using "Memory Stick 47 Using Other Modules / Memory Cards 53 Using the Internet 59 Using the Network (LAN 60 Using the Wireless LAN...
Users Guide
Page 8
In order to find it on the bottom, the back panel, or inside the battery compartment of the display on the computer. 2 Your computer's serial number You can find the information you do not find the contact numbers on your new VAIO PC, system optimization, data rescue, and any repair service you may call Sony directly. The serial number is causing the problem 5 A brief description of...
In order to find it on the bottom, the back panel, or inside the battery compartment of the display on the computer. 2 Your computer's serial number You can find the information you do not find the contact numbers on your new VAIO PC, system optimization, data rescue, and any repair service you may call Sony directly. The serial number is causing the problem 5 A brief description of...

Users Guide
Page 18
... Lk keys to turn it a second time to the built-in storage device or the optical disc drive is in progress. Getting Started > About the Indicator Lights n 18 N About the Indicator Lights Your computer is equipped with the following indicator lights: Indicator Power 1 Charge Built-in MOTION EYE camera Media Access Disc drive Num lock Caps lock Scroll lock WIRELESS Functions Illuminates in green while the computer is on the program you are using and does not work...
... Lk keys to turn it a second time to the built-in storage device or the optical disc drive is in progress. Getting Started > About the Indicator Lights n 18 N About the Indicator Lights Your computer is equipped with the following indicator lights: Indicator Power 1 Charge Built-in MOTION EYE camera Media Access Disc drive Num lock Caps lock Scroll lock WIRELESS Functions Illuminates in green while the computer is on the program you are using and does not work...

Users Guide
Page 25
... the charge and power indicator lights blink, you should save your data frequently. Charging a partially discharged battery pack does not affect the life of power while the computer is in use, your computer may not enter Hibernate mode even when the remaining battery life becomes short. When the battery pack is running on the battery, you should save your data frequently and manually activate a power management mode, such as Sleep...
... the charge and power indicator lights blink, you should save your data frequently. Charging a partially discharged battery pack does not affect the life of power while the computer is in use, your computer may not enter Hibernate mode even when the remaining battery life becomes short. When the battery pack is running on the battery, you should save your data frequently and manually activate a power management mode, such as Sleep...

Users Guide
Page 36
... change the button assignment with the VAIO Control Center. Turns off . ! Slide your finger on the LCD backlight with a USB device, such as the muting button while the Quick Web Access function is activated. Special-function button WEB button Muting (S1) button DISPLAY OFF button Functions While the computer is in Normal mode, the WEB button launches the web browser assigned to the button by default. While the computer is in Sleep mode or Hibernate mode. To turn...
... change the button assignment with the VAIO Control Center. Turns off . ! Slide your finger on the LCD backlight with a USB device, such as the muting button while the Quick Web Access function is activated. Special-function button WEB button Muting (S1) button DISPLAY OFF button Functions While the computer is in Normal mode, the WEB button launches the web browser assigned to the button by default. While the computer is in Sleep mode or Hibernate mode. To turn...

Users Guide
Page 54
... take hold of the ExpressCard module and pull it out of the slot. the hardware you want to 4 when: - the Safely Remove Hardware icon is not displayed in the Safely Remove Hardware window. 1 Locate the ExpressCard slot. 2 Double-click the Safely Remove Hardware icon on the taskbar. 3 Select the hardware you use the most recent driver software provided by the ExpressCard module manufacturer. n 54 N To remove an ExpressCard module ✍ You can skip...
... take hold of the ExpressCard module and pull it out of the slot. the hardware you want to 4 when: - the Safely Remove Hardware icon is not displayed in the Safely Remove Hardware window. 1 Locate the ExpressCard slot. 2 Double-click the Safely Remove Hardware icon on the taskbar. 3 Select the hardware you use the most recent driver software provided by the ExpressCard module manufacturer. n 54 N To remove an ExpressCard module ✍ You can skip...
Users Guide
Page 59
... external modem device, for more information. ! Depending on connection setups and modem configuration, see the manual that came with your ISP: ❑ Fiber to the Home (FTTH) ❑ Digital Subscriber Line (DSL) ❑ Cable modem ❑ Satellite ❑ Dial-up the wireless LAN network. See Using the Wireless LAN (page 61) for example a USB telephone modem, a DSL modem, or a cable modem, to your modem. For detailed instructions...
... external modem device, for more information. ! Depending on connection setups and modem configuration, see the manual that came with your ISP: ❑ Fiber to the Home (FTTH) ❑ Digital Subscriber Line (DSL) ❑ Cable modem ❑ Satellite ❑ Dial-up the wireless LAN network. See Using the Wireless LAN (page 61) for example a USB telephone modem, a DSL modem, or a cable modem, to your modem. For detailed instructions...
Users Guide
Page 80
.... Once you have to change all the setup options in a secure place. The Windows password comes in handy when you have set two types of Password Power-on password Windows password Description You can reset the user password at the BIOS setup screen by making the user enter the password when the computer is turned on password, you cannot start the computer. - Type of passwords: - If you forget the machine password and need servicing to set the power-on or returns to...
.... Once you have to change all the setup options in a secure place. The Windows password comes in handy when you have set two types of Password Power-on password Windows password Description You can reset the user password at the BIOS setup screen by making the user enter the password when the computer is turned on password, you cannot start the computer. - Type of passwords: - If you forget the machine password and need servicing to set the power-on or returns to...

Users Guide
Page 84
... change or remove the power-on password (user password) 1 Turn on the computer. 2 Press the F2 key when the VAIO logo appears. To remove the password, leave the Enter New Password and Confirm New Password fields blank and press the Enter key. 6 Press the < or , key to display the Security tab, select Set User Password, and then press the Enter key. 5 On the password entry screen, enter the current password once and a new password twice, and then press the Enter key. The BIOS setup screen appears...
... change or remove the power-on password (user password) 1 Turn on the computer. 2 Press the F2 key when the VAIO logo appears. To remove the password, leave the Enter New Password and Confirm New Password fields blank and press the Enter key. 6 Press the < or , key to display the Security tab, select Set User Password, and then press the Enter key. 5 On the password entry screen, enter the current password once and a new password twice, and then press the Enter key. The BIOS setup screen appears...

Users Guide
Page 89
... VAIO Control Center. Change the Sleep mode and display settings as needed. 2 If you start the computer, a power status icon appears on AC or battery power to step 3. Otherwise, click Save changes. 3 Click the VAIO Power Management tab. Customizing Your VAIO Computer > Using the VAIO Power Management n 89 N Using the VAIO Power Management Power management helps you are currently using. This icon indicates what kind of your desired power plan. With this icon to the Windows Power Options. The VAIO Power Management function is added to display the window...
... VAIO Control Center. Change the Sleep mode and display settings as needed. 2 If you start the computer, a power status icon appears on AC or battery power to step 3. Otherwise, click Save changes. 3 Click the VAIO Power Management tab. Customizing Your VAIO Computer > Using the VAIO Power Management n 89 N Using the VAIO Power Management Power management helps you are currently using. This icon indicates what kind of your desired power plan. With this icon to the Windows Power Options. The VAIO Power Management function is added to display the window...
Users Guide
Page 90
The type of module and the amount of memory installed on your computer may differ depending on the model you are not familiar with upgrading memory on a computer. ❑ You should not touch the connectors or open the memory module compartment cover. See the specifications to find the nearest center or agent, see Finding More about the configuration of the warranty during your product warranty...
The type of module and the amount of memory installed on your computer may differ depending on the model you are not familiar with upgrading memory on a computer. ❑ You should not touch the connectors or open the memory module compartment cover. See the specifications to find the nearest center or agent, see Finding More about the configuration of the warranty during your product warranty...
Users Guide
Page 118
... the < or , key to select Boot. 4 Press the M or m key to change the boot device order? The BIOS setup screen appears. Troubleshooting > Computer n 118 N What should I do if I do if my game software does not work or it . A reset fee will be charged. At the confirmation prompt, press the Enter key. How can use one of the game if there are any patches or updates to download. ❑ Make sure you...
... the < or , key to select Boot. 4 Press the M or m key to change the boot device order? The BIOS setup screen appears. Troubleshooting > Computer n 118 N What should I do if I do if my game software does not work or it . A reset fee will be charged. At the confirmation prompt, press the Enter key. How can use one of the game if there are any patches or updates to download. ❑ Make sure you...

Users Guide
Page 125
Connect your computer automatically enters Sleep or Hibernate mode, change the corresponding power saving mode setting. In some software applications, you use ? This is used. ❑ the CPU load increases. To change the direction of the camera or the brightness of camera images. The video input may be suspended for a few seconds if: ❑ a shortcut key with the Fn key is normal and does not indicate a malfunction. This problem occurs when you...
Connect your computer automatically enters Sleep or Hibernate mode, change the corresponding power saving mode setting. In some software applications, you use ? This is used. ❑ the CPU load increases. To change the direction of the camera or the brightness of camera images. The video input may be suspended for a few seconds if: ❑ a shortcut key with the Fn key is normal and does not indicate a malfunction. This problem occurs when you...

Users Guide
Page 131
... open a list of the optical disc drives of your computer, do not use the computer for at least one hour. Follow these steps: 1 Click Start and Control Panel. 2 Click System and Security. 3 Click System. 4 Click Device Manager in the optical disc drive and damage the drive or cause it to malfunction. ❑ If a region code warning appears, the disc may need to enable the device or reinstall the driver software...
... open a list of the optical disc drives of your computer, do not use the computer for at least one hour. Follow these steps: 1 Click Start and Control Panel. 2 Click System and Security. 3 Click System. 4 Click Device Manager in the optical disc drive and damage the drive or cause it to malfunction. ❑ If a region code warning appears, the disc may need to enable the device or reinstall the driver software...
Users Guide
Page 137
... securely connected to the ports on the printer and your computer. ❑ Make sure your printer is not functioning after your computer resumes from a power saving mode (Sleep or Hibernate), then restart the computer. ❑ If the bidirectional communication functions are provided with the Windows operating system installed on your computer may need to cancel the Enable bidirectional support check box. 5 Click OK. This disables...
... securely connected to the ports on the printer and your computer. ❑ Make sure your printer is not functioning after your computer resumes from a power saving mode (Sleep or Hibernate), then restart the computer. ❑ If the bidirectional communication functions are provided with the Windows operating system installed on your computer may need to cancel the Enable bidirectional support check box. 5 Click OK. This disables...

Users Guide
Page 141
.... See Using the Touch Pad (page 35). ❑ Make sure that a mouse is not connected to your computer. ❑ If the pointer does not move while a software application is running, press the Alt+F4 keys to close the application window. ❑ If the Alt+F4 keys do if the touch pad does not work , press and hold the power button until the computer turns off your...
.... See Using the Touch Pad (page 35). ❑ Make sure that a mouse is not connected to your computer. ❑ If the pointer does not move while a software application is running, press the Alt+F4 keys to close the application window. ❑ If the Alt+F4 keys do if the touch pad does not work , press and hold the power button until the computer turns off your...

Users Guide
Page 144
.... Troubleshooting > Audio/Video n 144 N Audio/Video What should I do I change the device for sound output. 1 Close all open programs. 2 Click Start and Control Panel. 3 Click Hardware and Sound. 4 Click Manage audio devices under Sound. 4 On the Sounds tab, click to change the sound output device? How do not hear sound from the device connected to a port, such as the USB port, HDMI output port, optical output port, or headphones jack, you do I cannot use my digital video camcorder? How do if I turn off the Windows startup sound? Unplug...
.... Troubleshooting > Audio/Video n 144 N Audio/Video What should I do I change the device for sound output. 1 Close all open programs. 2 Click Start and Control Panel. 3 Click Hardware and Sound. 4 Click Manage audio devices under Sound. 4 On the Sounds tab, click to change the sound output device? How do not hear sound from the device connected to a port, such as the USB port, HDMI output port, optical output port, or headphones jack, you do I cannot use my digital video camcorder? How do if I turn off the Windows startup sound? Unplug...


