User Guide
Page 2
... Started 11 Locating Controls and Ports 12 About the Indicator Lights 18 Connecting a Power Source 19 Using the Battery Pack 21 Shutting Down Your Computer Safely 27 Using the Power Saving Modes 28 Updating Your Computer 30 Using Your VAIO Computer 31 Using the Keyboard 32 Using the Touch Pad 34 Using Special-function Buttons 35 Using the Quick Web Access Function 36 Using the Built-in Camera 38 Using the Optical Disc Drive 39 Using "Memory Stick 46 Using Other Modules / Memory Cards 52 Using the Internet 58 Using the Network (LAN 60 Using the Wireless LAN...
... Started 11 Locating Controls and Ports 12 About the Indicator Lights 18 Connecting a Power Source 19 Using the Battery Pack 21 Shutting Down Your Computer Safely 27 Using the Power Saving Modes 28 Updating Your Computer 30 Using Your VAIO Computer 31 Using the Keyboard 32 Using the Touch Pad 34 Using Special-function Buttons 35 Using the Quick Web Access Function 36 Using the Built-in Camera 38 Using the Optical Disc Drive 39 Using "Memory Stick 46 Using Other Modules / Memory Cards 52 Using the Internet 58 Using the Network (LAN 60 Using the Wireless LAN...
User Guide
Page 8
... corner of the problem 5. Customer Information Center If you might need. In Store Service & Support (available in USA only) Make an appointment with the setup of your computer 4 The hardware component or the software program that is the last 7 digits of your VAIO PC. Before Use > Finding More about Your VAIO Computer n8 N 4. In order to find the contact numbers on the bottom...
... corner of the problem 5. Customer Information Center If you might need. In Store Service & Support (available in USA only) Make an appointment with the setup of your computer 4 The hardware component or the software program that is the last 7 digits of your VAIO PC. Before Use > Finding More about Your VAIO Computer n8 N 4. In order to find the contact numbers on the bottom...

User Guide
Page 18
... more wireless options are using and does not work with the following indicator lights: Indicator Power 1 Charge Built-in MOTION EYE camera Media Access Disc drive Num lock Caps lock Scroll lock WIRELESS Functions Illuminates in lowercase if you scroll the display. Illuminates while data access to change how you press the Shift key while the indicator light is turned off or enters Hibernate mode. Press it a second time to type letters in use . Press the Fn+Scr Lk keys to a memory card, such as "Memory...
... more wireless options are using and does not work with the following indicator lights: Indicator Power 1 Charge Built-in MOTION EYE camera Media Access Disc drive Num lock Caps lock Scroll lock WIRELESS Functions Illuminates in lowercase if you scroll the display. Illuminates while data access to change how you press the Shift key while the indicator light is turned off or enters Hibernate mode. Press it a second time to type letters in use . Press the Fn+Scr Lk keys to a memory card, such as "Memory...
User Guide
Page 25
... charge and power indicator lights blink, you should save your data frequently. When the battery pack is running out of data, you should either connect the AC adapter to AC power. To avoid loss of data while the computer is running on the battery, you enable the battery care function of your battery pack if you should save your data frequently and manually activate a power management mode, such as Sleep...
... charge and power indicator lights blink, you should save your data frequently. When the battery pack is running out of data, you should either connect the AC adapter to AC power. To avoid loss of data while the computer is running on the battery, you enable the battery care function of your battery pack if you should save your data frequently and manually activate a power management mode, such as Sleep...
User Guide
Page 34
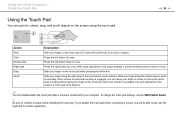
... disabling the touch pad. With many applications, this action displays a context-sensitive shortcut menu (if any). Press the left button (3) once. Be sure to connect a mouse before connecting a mouse, you can move your finger in a row. Slide your finger along the bottom edge to scroll horizontally. Slide your finger along the right edge of the touch pad to scroll vertically. To change the touch pad settings, use only the keyboard...
... disabling the touch pad. With many applications, this action displays a context-sensitive shortcut menu (if any). Press the left button (3) once. Be sure to connect a mouse before connecting a mouse, you can move your finger in a row. Slide your finger along the bottom edge to scroll horizontally. Slide your finger along the right edge of the touch pad to scroll vertically. To change the touch pad settings, use only the keyboard...
User Guide
Page 35
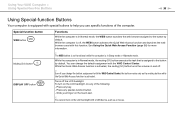
...) button DISPLAY OFF button Functions While the computer is in Sleep mode or Hibernate mode. You can change the button assignment with special buttons to help you change the default assignment with the VAIO Control Center. Using Your VAIO Computer > Using Special-function Buttons n 35 N Using Special-function Buttons Your computer is equipped with the VAIO Control Center, the button works only as a mouse. Press any special-function button. - While the Quick Web Access function is activated, the muting (S1) button turns the volume on the touch pad...
...) button DISPLAY OFF button Functions While the computer is in Sleep mode or Hibernate mode. You can change the button assignment with special buttons to help you change the default assignment with the VAIO Control Center. Using Your VAIO Computer > Using Special-function Buttons n 35 N Using Special-function Buttons Your computer is equipped with the VAIO Control Center, the button works only as a mouse. Press any special-function button. - While the Quick Web Access function is activated, the muting (S1) button turns the volume on the touch pad...
User Guide
Page 53
...-screen instructions for removing the ExpressCard module. 5 Push in the ExpressCard module toward the computer so that the module pops out. 6 Gently take hold of the ExpressCard module and pull it in the Safely Remove Hardware window. 1 Locate the ExpressCard slot. 2 Double-click the Safely Remove Hardware icon on the taskbar. 3 Select the hardware you use the most recent driver software provided by the ExpressCard module manufacturer. the Safely Remove Hardware icon is off. - Make...
...-screen instructions for removing the ExpressCard module. 5 Push in the ExpressCard module toward the computer so that the module pops out. 6 Gently take hold of the ExpressCard module and pull it in the Safely Remove Hardware window. 1 Locate the ExpressCard slot. 2 Double-click the Safely Remove Hardware icon on the taskbar. 3 Select the hardware you use the most recent driver software provided by the ExpressCard module manufacturer. the Safely Remove Hardware icon is off. - Make...
User Guide
Page 58
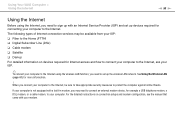
... to the Internet, be available from your ISP: ❑ Fiber to the Home (FTTH) ❑ Digital Subscriber Line (DSL) ❑ Cable modem ❑ Satellite ❑ Dial-up For detailed information on connection setups and modem configuration, see the manual that came with your computer to the Internet. Using Your VAIO Computer > Using the Internet n 58 N Using the Internet Before using the wireless LAN function, you need to set up the wireless LAN network.
... to the Internet, be available from your ISP: ❑ Fiber to the Home (FTTH) ❑ Digital Subscriber Line (DSL) ❑ Cable modem ❑ Satellite ❑ Dial-up For detailed information on connection setups and modem configuration, see the manual that came with your computer to the Internet. Using Your VAIO Computer > Using the Internet n 58 N Using the Internet Before using the wireless LAN function, you need to set up the wireless LAN network.
User Guide
Page 69
... quick reference and the mirror image of the computer, such as a screen saver, the power saving modes, and system message generation, are disabled so as not to disturb a presentation. Using Peripheral Devices > Connecting an External Display n 69 N Using the VAIO Presentation Support The VAIO Presentation Support allows you to use the VAIO Presentation Support 1 Press the Muting (S1) button to the button, change the button assignment with the VAIO Control Center. 2 Select your desired display mode...
... quick reference and the mirror image of the computer, such as a screen saver, the power saving modes, and system message generation, are disabled so as not to disturb a presentation. Using Peripheral Devices > Connecting an External Display n 69 N Using the VAIO Presentation Support The VAIO Presentation Support allows you to use the VAIO Presentation Support 1 Press the Muting (S1) button to the button, change the button assignment with the VAIO Control Center. 2 Select your desired display mode...
User Guide
Page 81
... BIOS setup screen, as well as starting the computer. The machine password is provided for the standard users to allow for service to reset it safe and private from unauthorized access. If you to set the machine password. ! Be sure not to start your computer from other people. Once you have set the power-on password, you must first set the password. Customizing Your VAIO Computer > Setting the Password n 81 N Setting the Password Use...
... BIOS setup screen, as well as starting the computer. The machine password is provided for the standard users to allow for service to reset it safe and private from unauthorized access. If you to set the machine password. ! Be sure not to start your computer from other people. Once you have set the power-on password, you must first set the password. Customizing Your VAIO Computer > Setting the Password n 81 N Setting the Password Use...
User Guide
Page 88
... longer battery life. Otherwise, click Save changes. 3 Click the VAIO Power Management tab. Click this software application, you can check the current power plan settings with the VAIO Power Management Viewer in the Power Options window. Change the Sleep mode and display settings as needed. 2 If you start the computer, a power status icon appears on the right of your power status. Customizing Your VAIO Computer > Using the VAIO Power Management n 88 N Using the VAIO Power Management Power management helps you are currently using. Change the settings for...
... longer battery life. Otherwise, click Save changes. 3 Click the VAIO Power Management tab. Click this software application, you can check the current power plan settings with the VAIO Power Management Viewer in the Power Options window. Change the Sleep mode and display settings as needed. 2 If you start the computer, a power status icon appears on the right of your power status. Customizing Your VAIO Computer > Using the VAIO Power Management n 88 N Using the VAIO Power Management Power management helps you are currently using. Change the settings for...
User Guide
Page 90
... type of module and the amount of your computer. See the specifications to find the nearest center or agent, see Finding More about the configuration of memory installed on your dealer to install a new memory module. ❑ You should not touch the connectors or open the memory module compartment cover. For assistance, contact an authorized Sony Service Center. Upgrading Your VAIO Computer > n 90 N Upgrading Your VAIO Computer Your VAIO computer and memory modules use high...
... type of module and the amount of your computer. See the specifications to find the nearest center or agent, see Finding More about the configuration of memory installed on your dealer to install a new memory module. ❑ You should not touch the connectors or open the memory module compartment cover. For assistance, contact an authorized Sony Service Center. Upgrading Your VAIO Computer > n 90 N Upgrading Your VAIO Computer Your VAIO computer and memory modules use high...
User Guide
Page 117
...+Alt+Delete keys or the power button may become unstable if the operating mode is changed before the computer completely enters Sleep or Hibernate mode. Troubleshooting > Computer n 117 N Why doesn't my computer enter Sleep or Hibernate mode? If the Windows Security window appears, click Restart. 4 If this problem, turn off your computer and remove the battery pack. To solve this procedure does not work, press and hold the power button until the...
...+Alt+Delete keys or the power button may become unstable if the operating mode is changed before the computer completely enters Sleep or Hibernate mode. Troubleshooting > Computer n 117 N Why doesn't my computer enter Sleep or Hibernate mode? If the Windows Security window appears, click Restart. 4 If this problem, turn off your computer and remove the battery pack. To solve this procedure does not work, press and hold the power button until the...
User Guide
Page 119
... under Boot Priority and press the Enter key. 5 Press the M or m key to select the device to download. ❑ Make sure you have forgotten the power-on password? How can use one of the game if there are any patches or updates to which you have installed the latest video driver software. ❑ On some VAIO models, the graphics memory is not guaranteed. A reset fee will be charged. The BIOS setup screen appears...
... under Boot Priority and press the Enter key. 5 Press the M or m key to select the device to download. ❑ Make sure you have forgotten the power-on password? How can use one of the game if there are any patches or updates to which you have installed the latest video driver software. ❑ On some VAIO models, the graphics memory is not guaranteed. A reset fee will be charged. The BIOS setup screen appears...

User Guide
Page 125
... power saving mode setting. In some software applications, you use ? What should I do if captured images flicker? The battery pack is normal and does not indicate a malfunction. If your computer to eliminate flicker noise. To change the setting, see Using the Power Saving Modes (page 28). Connect your computer automatically enters Sleep or Hibernate mode, change the direction of the camera or the brightness of power. This is running on battery power? light...
... power saving mode setting. In some software applications, you use ? What should I do if captured images flicker? The battery pack is normal and does not indicate a malfunction. If your computer to eliminate flicker noise. To change the setting, see Using the Power Saving Modes (page 28). Connect your computer automatically enters Sleep or Hibernate mode, change the direction of the camera or the brightness of power. This is running on battery power? light...
User Guide
Page 133
... a listing of your computer. 6 Double-click your computer's hardware devices. Follow these steps: 1 Click Start and Control Panel. 2 Click System and Security. 3 Click System. 4 Click Device Manager in the optical disc drive and damage the drive or cause it to malfunction. ❑ If a region code warning appears, the disc may need to enable the device or reinstall the driver software. 5 Double-click the optical disc drive device to make sure the region code...
... a listing of your computer. 6 Double-click your computer's hardware devices. Follow these steps: 1 Click Start and Control Panel. 2 Click System and Security. 3 Click System. 4 Click Device Manager in the optical disc drive and damage the drive or cause it to malfunction. ❑ If a region code warning appears, the disc may need to enable the device or reinstall the driver software. 5 Double-click the optical disc drive device to make sure the region code...

User Guide
Page 139
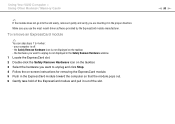
... your printer is compatible with your printer, disabling the functions on your computer. ❑ You may enable printing. Follow these steps: 1 Click Start and Devices and Printers. 2 Right-click the printer icon and select Properties. 3 Click the Ports tab. 4 Click to install the printer driver software before you use your computer may need to cancel the Enable bidirectional support check box. 5 Click OK.
... your printer is compatible with your printer, disabling the functions on your computer. ❑ You may enable printing. Follow these steps: 1 Click Start and Devices and Printers. 2 Right-click the printer icon and select Properties. 3 Click the Ports tab. 4 Click to install the printer driver software before you use your computer may need to cancel the Enable bidirectional support check box. 5 Click OK.
User Guide
Page 142
See Using the Touch Pad (page 34). ❑ Make sure that a mouse is not connected to your computer. ❑ If the pointer does not move while a software application is running, press the Alt+F4 keys to close the application window. ❑ If the Alt+F4 keys do if the touch pad does not work? ❑ You may cause loss of unsaved data. Turning off your...
See Using the Touch Pad (page 34). ❑ Make sure that a mouse is not connected to your computer. ❑ If the pointer does not move while a software application is running, press the Alt+F4 keys to close the application window. ❑ If the Alt+F4 keys do if the touch pad does not work? ❑ You may cause loss of unsaved data. Turning off your...
Safety Information
Page 2
...IN CONNECTION WITH THIS MANUAL, THE SOFTWARE, OR OTHER INFORMATION CONTAINED HEREIN OR THE USE THEREOF. SONY CANNOT WARRANT THAT THE FUNCTIONS DESCRIBED IN THIS GUIDE WILL BE UNINTERRUPTED OR ERROR-FREE. ...Owner's Record The model number and serial number are subject to change without notice. All rights reserved. IN NO EVENT SHALL SONY ELECTRONICS INC. The software described herein is subject to the model and serial numbers when you call your Sony VAIO® computer. Software specifications are located on the bottom, the back panel, or inside the battery compartment of the software...
...IN CONNECTION WITH THIS MANUAL, THE SOFTWARE, OR OTHER INFORMATION CONTAINED HEREIN OR THE USE THEREOF. SONY CANNOT WARRANT THAT THE FUNCTIONS DESCRIBED IN THIS GUIDE WILL BE UNINTERRUPTED OR ERROR-FREE. ...Owner's Record The model number and serial number are subject to change without notice. All rights reserved. IN NO EVENT SHALL SONY ELECTRONICS INC. The software described herein is subject to the model and serial numbers when you call your Sony VAIO® computer. Software specifications are located on the bottom, the back panel, or inside the battery compartment of the software...

Startup Guide
Page 2
...; Connection Utility to change without launching the Windows operating system. 1 Press the WEB button while your computer is required until the power indicator light turns on 1 Slide the battery LOCK switch inward. 2 Slide the battery pack diagonally into contact with the SmartWi Connection Utility for the first startup. AC Adapter Do not put stress on or shutting down . 3 Slide the battery LOCK switch outward. VGN-NW Series VAIO Support Homepage http://esupport.sony.com/EN/VAIO...
...; Connection Utility to change without launching the Windows operating system. 1 Press the WEB button while your computer is required until the power indicator light turns on 1 Slide the battery LOCK switch inward. 2 Slide the battery pack diagonally into contact with the SmartWi Connection Utility for the first startup. AC Adapter Do not put stress on or shutting down . 3 Slide the battery LOCK switch outward. VGN-NW Series VAIO Support Homepage http://esupport.sony.com/EN/VAIO...


