User Guide
Page 3
...75 Connecting External Speakers ...76 Connecting an External Display ...77 Selecting Display Modes...82 Using the Multiple Monitors Function ...84 Connecting an External Microphone ...86 Connecting a Universal Serial Bus (USB) Device...87 Connecting a Printer ...90 Connecting an i.LINK Device ...91 Connecting to a Network (LAN) ...93 Customizing Your VAIO Computer ...94 Setting the Password ...95 Setting Up Your Computer with VAIO Control Center 98 Using the Power Saving Modes ...99 Managing Power with VAIO Power Management ...104 Upgrading Your VAIO Computer...105 Adding and Removing Memory...
...75 Connecting External Speakers ...76 Connecting an External Display ...77 Selecting Display Modes...82 Using the Multiple Monitors Function ...84 Connecting an External Microphone ...86 Connecting a Universal Serial Bus (USB) Device...87 Connecting a Printer ...90 Connecting an i.LINK Device ...91 Connecting to a Network (LAN) ...93 Customizing Your VAIO Computer ...94 Setting the Password ...95 Setting Up Your Computer with VAIO Control Center 98 Using the Power Saving Modes ...99 Managing Power with VAIO Power Management ...104 Upgrading Your VAIO Computer...105 Adding and Removing Memory...
User Guide
Page 8
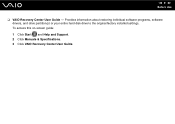
n8 N Before Use ❑ VAIO Recovery Center User Guide - Provides information about restoring individual software programs, software drivers, and drive partition(s) or your entire hard disk drive to the original factory installed settings. To access this on-screen guide: 1 Click Start and Help and Support. 2 Click Manuals & Specifications. 3 Click VAIO Recovery Center User Guide.
n8 N Before Use ❑ VAIO Recovery Center User Guide - Provides information about restoring individual software programs, software drivers, and drive partition(s) or your entire hard disk drive to the original factory installed settings. To access this on-screen guide: 1 Click Start and Help and Support. 2 Click Manuals & Specifications. 3 Click VAIO Recovery Center User Guide.
User Guide
Page 9
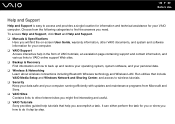
.... n9 N Before Use Help and Support Help and Support is easy to back up and restore your operating system, system software, and your personal data. ❑ Wireless & Networking Learn about wireless connections including Bluetooth Wireless technology and Wireless LAN. To access Help and Support, click Start and Help and Support. ❑ Manuals & Specifications Here you how to find interesting and useful. ❑ VAIO Tutorials Sony provides guided help tutorials that help you need. It can...
.... n9 N Before Use Help and Support Help and Support is easy to back up and restore your operating system, system software, and your personal data. ❑ Wireless & Networking Learn about wireless connections including Bluetooth Wireless technology and Wireless LAN. To access Help and Support, click Start and Help and Support. ❑ Manuals & Specifications Here you how to find interesting and useful. ❑ VAIO Tutorials Sony provides guided help tutorials that help you need. It can...

User Guide
Page 20
...-in MOTION EYE camera is in MOTION EYE camera Media Access Optical disc drive Hard disk drive Num lock Caps lock Scroll lock Bluetooth technology * Functions Illuminates when the power of power, and double-blinks when the battery pack is off , the memory card is not being used . Press the Scr Lk key to change how you press the Shift key while the indicator is read from or written to type letters in lowercase if you scroll the display.
...-in MOTION EYE camera is in MOTION EYE camera Media Access Optical disc drive Hard disk drive Num lock Caps lock Scroll lock Bluetooth technology * Functions Illuminates when the power of power, and double-blinks when the battery pack is off , the memory card is not being used . Press the Scr Lk key to change how you press the Shift key while the indicator is read from or written to type letters in lowercase if you scroll the display.
User Guide
Page 33
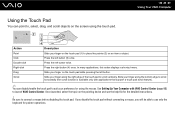
... pointing device and see the help file for pointer operations. If you disable the touch pad without connecting a mouse, you will be able to use only the keyboard for the detailed instructions. ! n 33 N Using Your VAIO Computer Action Description Point Click Slide your finger on the touch pad (1) to place the pointer (2) on the screen using the mouse. Double-click Right-click Drag Scroll Press the left button. Slide...
... pointing device and see the help file for pointer operations. If you disable the touch pad without connecting a mouse, you will be able to use only the keyboard for the detailed instructions. ! n 33 N Using Your VAIO Computer Action Description Point Click Slide your finger on the touch pad (1) to place the pointer (2) on the screen using the mouse. Double-click Right-click Drag Scroll Press the left button. Slide...
User Guide
Page 39
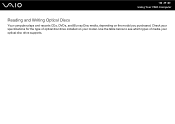
Use the table below to see which types of optical disc drive installed on the model you purchased. n 39 N Using Your VAIO Computer Reading and Writing Optical Discs Your computer plays and records CDs, DVDs, and Blu-ray Disc media, depending on your optical disc drive supports. Check your specifications for the type of media your model.
Use the table below to see which types of optical disc drive installed on the model you purchased. n 39 N Using Your VAIO Computer Reading and Writing Optical Discs Your computer plays and records CDs, DVDs, and Blu-ray Disc media, depending on your optical disc drive supports. Check your specifications for the type of media your model.

User Guide
Page 46
... Disc software to use the software, see the help file on selected models only. For instructions on selected models only. See the online specifications to find out about the supported disc media. See the online specifications to find out about the supported disc media. The Blu-ray Disc playback function is available on your optical disc drive, and then Reading and Writing Optical Discs (page 39) to find out the type...
... Disc software to use the software, see the help file on selected models only. For instructions on selected models only. See the online specifications to find out about the supported disc media. See the online specifications to find out about the supported disc media. The Blu-ray Disc playback function is available on your optical disc drive, and then Reading and Writing Optical Discs (page 39) to find out the type...
User Guide
Page 64
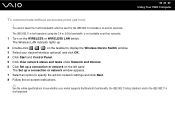
The Wireless LAN indicator lights up. 2 Double-click ( / ) on the taskbar to display the Wireless Device Switch window. 3 Select your desired wireless option(s) and click OK. 4 Click Start and Control Panel. 5 Click View network status and tasks under Network and Internet. 6 Click Set up a connection or network window appears. 7 Select an option to specify the ad-hoc network settings and click Next. 8 Follow the on ad-hoc networks. The IEEE 802.11n draft standard, using the 2.4 or...
The Wireless LAN indicator lights up. 2 Double-click ( / ) on the taskbar to display the Wireless Device Switch window. 3 Select your desired wireless option(s) and click OK. 4 Click Start and Control Panel. 5 Click View network status and tasks under Network and Internet. 6 Click Set up a connection or network window appears. 7 Select an option to specify the ad-hoc network settings and click Next. 8 Follow the on ad-hoc networks. The IEEE 802.11n draft standard, using the 2.4 or...
User Guide
Page 68
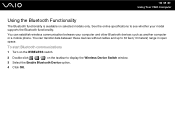
... phone. You can establish wireless communication between these devices without cables and up to display the Wireless Device Switch window. 3 Select the Enable Bluetooth Device option. 4 Click OK. n 68 N Using Your VAIO Computer Using the Bluetooth Functionality The Bluetooth functionality is available on the taskbar to 33 feet (10 meters) range in open space. To start Bluetooth communications 1 Turn on the WIRELESS switch. 2 Double-click ( / ) on selected models only. You can transfer data between your model supports the Bluetooth functionality.
... phone. You can establish wireless communication between these devices without cables and up to display the Wireless Device Switch window. 3 Select the Enable Bluetooth Device option. 4 Click OK. n 68 N Using Your VAIO Computer Using the Bluetooth Functionality The Bluetooth functionality is available on the taskbar to 33 feet (10 meters) range in open space. To start Bluetooth communications 1 Turn on the WIRELESS switch. 2 Double-click ( / ) on selected models only. You can transfer data between your model supports the Bluetooth functionality.

User Guide
Page 75
... functionality to your VAIO computer by using the various ports on the computer. ❑ Connecting External Speakers (page 76) ❑ Connecting an External Display (page 77) ❑ Selecting Display Modes (page 82) ❑ Using the Multiple Monitors Function (page 84) ❑ Connecting an External Microphone (page 86) ❑ Connecting a Universal Serial Bus (USB) Device (page 87) ❑ Connecting a Printer (page 90) ❑ Connecting an i.LINK Device (page 91) ❑ Connecting to a Network (LAN) (page 93) n 75 N Using Peripheral Devices
... functionality to your VAIO computer by using the various ports on the computer. ❑ Connecting External Speakers (page 76) ❑ Connecting an External Display (page 77) ❑ Selecting Display Modes (page 82) ❑ Using the Multiple Monitors Function (page 84) ❑ Connecting an External Microphone (page 86) ❑ Connecting a Universal Serial Bus (USB) Device (page 87) ❑ Connecting a Printer (page 90) ❑ Connecting an i.LINK Device (page 91) ❑ Connecting to a Network (LAN) (page 93) n 75 N Using Peripheral Devices

User Guide
Page 77
... connect a computer display 1 If necessary, plug one end of your external display after connecting all other cables. n 77 N Using Peripheral Devices Connecting an External Display You can connect a computer display (monitor) to your computer. Connecting a Computer Display You can connect an external display (not supplied) to the HDMI port on the computer. 3 If your computer includes the NVIDIA video controller and you can use an HDMI cable (not supplied) and an HDMI to DVI-D adapter (not supplied) to connect...
... connect a computer display 1 If necessary, plug one end of your external display after connecting all other cables. n 77 N Using Peripheral Devices Connecting an External Display You can connect a computer display (monitor) to your computer. Connecting a Computer Display You can connect an external display (not supplied) to the HDMI port on the computer. 3 If your computer includes the NVIDIA video controller and you can use an HDMI cable (not supplied) and an HDMI to DVI-D adapter (not supplied) to connect...
User Guide
Page 85
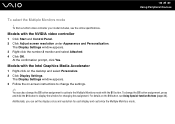
... video controller 1 Click Start and Control Panel. 2 Click Adjust screen resolution under Appearance and Personalization. Additionally, you can also change the S1 button assignment to display the window for each display and customize the Multiple Monitors mode. The Display Settings window appears. 3 Right-click the number 2 monitor and select Attached. 4 Click OK. The Display Settings window appears. 3 Follow the on-screen instructions to change the S1 button assignment, press and hold the S1 button to activate the Multiple Monitors mode...
... video controller 1 Click Start and Control Panel. 2 Click Adjust screen resolution under Appearance and Personalization. Additionally, you can also change the S1 button assignment to display the window for each display and customize the Multiple Monitors mode. The Display Settings window appears. 3 Right-click the number 2 monitor and select Attached. 4 Click OK. The Display Settings window appears. 3 Follow the on-screen instructions to change the S1 button assignment, press and hold the S1 button to activate the Multiple Monitors mode...

User Guide
Page 102
... the hard disk drive and power is off in Hibernate mode, you cannot insert a disc. The power indicator light is turned off. Even when the battery runs down and resuming. Alternatively, you the time of shutting down , no data will be activated. This power saving mode saves you can click Start, the arrow next to the Lock button, and Hibernate to be lost. Hibernate mode uses less power than Sleep mode to...
... the hard disk drive and power is off in Hibernate mode, you cannot insert a disc. The power indicator light is turned off. Even when the battery runs down and resuming. Alternatively, you the time of shutting down , no data will be activated. This power saving mode saves you can click Start, the arrow next to the Lock button, and Hibernate to be lost. Hibernate mode uses less power than Sleep mode to...

User Guide
Page 106
...; Turn off your computer and disconnect it from ESD. Notes on adding/removing memory modules ❑ Be careful when changing memory. The package protects the module from its power source (that are ready to change the module. n 106 N Upgrading Your VAIO Computer Adding and Removing Memory If you want to expand the functionality of your computer, you can increase the memory by the computer or the Windows operating...
...; Turn off your computer and disconnect it from ESD. Notes on adding/removing memory modules ❑ Be careful when changing memory. The package protects the module from its power source (that are ready to change the module. n 106 N Upgrading Your VAIO Computer Adding and Removing Memory If you want to expand the functionality of your computer, you can increase the memory by the computer or the Windows operating...

User Guide
Page 141
... reinstall the driver software for your computer automatically enters Sleep or Hibernate mode, change the corresponding power saving mode setting. If another software application is in use the built-in MOTION EYE camera? ❑ The built-in MOTION EYE camera. ❑ If your camera and click Update Driver Software. Follow these steps: 1 Click Start, Control Panel, Hardware and Sound, and Device Manager. 2 Double-click Imaging devices. 3 Right-click the device name for the camera. n 141 N Troubleshooting Why can...
... reinstall the driver software for your computer automatically enters Sleep or Hibernate mode, change the corresponding power saving mode setting. If another software application is in use the built-in MOTION EYE camera? ❑ The built-in MOTION EYE camera. ❑ If your camera and click Update Driver Software. Follow these steps: 1 Click Start, Control Panel, Hardware and Sound, and Device Manager. 2 Double-click Imaging devices. 3 Right-click the device name for the camera. n 141 N Troubleshooting Why can...

User Guide
Page 144
... list both for Wireless Adapter Settings in the Power Options window. Selecting any access point you may be using. ❑ Make sure the WIRELESS or WIRELESS LAN switch is on and the Wireless LAN indicator is lit on your computer. ❑ Make sure power to the access point is on the taskbar and select Power Options. 2 Click Change plan settings under Network and Internet. 3 Click Connect to a network to move your access point is selected. ❑ Make sure the encryption key...
... list both for Wireless Adapter Settings in the Power Options window. Selecting any access point you may be using. ❑ Make sure the WIRELESS or WIRELESS LAN switch is on and the Wireless LAN indicator is lit on your computer. ❑ Make sure power to the access point is on the taskbar and select Power Options. 2 Click Change plan settings under Network and Internet. 3 Click Connect to a network to move your access point is selected. ❑ Make sure the encryption key...

User Guide
Page 154
... the type of DVD recordable media do if I cannot play Blu-ray Disc media? ! See the online specifications to play such contents, download and install the latest updates for WinDVD BD using the correct DVD recordable media. ❑ Check which DVD recordable format is compatible with an affixed adhesive label could cause a write error or other damage. n 154 N Troubleshooting What should I do not work. ❑ The preinstalled software...
... the type of DVD recordable media do if I cannot play Blu-ray Disc media? ! See the online specifications to play such contents, download and install the latest updates for WinDVD BD using the correct DVD recordable media. ❑ Check which DVD recordable format is compatible with an affixed adhesive label could cause a write error or other damage. n 154 N Troubleshooting What should I do not work. ❑ The preinstalled software...

User Guide
Page 155
The DVD±RW/±R DL/RAM drive does not support it. ❑ BD-R Disc media are not rewritable. This Q & A entry applies to or from the BD-R Disc media. You cannot add or erase data to selected models only. n 155 N Troubleshooting Why can't I write data to find out about the supported disc media. ❑ Make sure your optical disc drive supports the Blu-ray Disc writing function. See the online specifications to find out the type of your optical disc drive, and then Reading and Writing Optical Discs (page 39) to Blu-ray Disc media? !
The DVD±RW/±R DL/RAM drive does not support it. ❑ BD-R Disc media are not rewritable. This Q & A entry applies to or from the BD-R Disc media. You cannot add or erase data to selected models only. n 155 N Troubleshooting Why can't I write data to find out about the supported disc media. ❑ Make sure your optical disc drive supports the Blu-ray Disc writing function. See the online specifications to find out the type of your optical disc drive, and then Reading and Writing Optical Discs (page 39) to Blu-ray Disc media? !

User Guide
Page 161
... printer, disabling the functions on your computer. ❑ You may need to install the printer driver software before you use your computer may enable printing. This change to cancel the Enable bidirectional support check box. 6 Click OK. n 161 N Troubleshooting Printing What should I do if I cannot print a document? ❑ Make sure your printer is on, and the printer cable is securely connected to the ports on the...
... printer, disabling the functions on your computer. ❑ You may need to install the printer driver software before you use your computer may enable printing. This change to cancel the Enable bidirectional support check box. 6 Click OK. n 161 N Troubleshooting Printing What should I do if I cannot print a document? ❑ Make sure your printer is on, and the printer cable is securely connected to the ports on the...

User Guide
Page 170
... applies to models with the NVIDIA video controller only. ❑ Once you have connected a device to the HDMI port, you need to change the sound output device, follow these steps: 1 Close all open programs. 2 Click Start and Control Panel. 3 Click Hardware and Sound. 4 Click Manage audio devices under Sound. 5 On the Playback tab, select the desired device for sound output and click Set Default. ❑ If you want to hear sound from the sound output device, follow these...
... applies to models with the NVIDIA video controller only. ❑ Once you have connected a device to the HDMI port, you need to change the sound output device, follow these steps: 1 Close all open programs. 2 Click Start and Control Panel. 3 Click Hardware and Sound. 4 Click Manage audio devices under Sound. 5 On the Playback tab, select the desired device for sound output and click Set Default. ❑ If you want to hear sound from the sound output device, follow these...


