User Guide
Page 2
... 32 Using Special-function Buttons 33 Using the Built-in Camera 34 Using the Optical Disc Drive 35 Using the Memory Stick 42 Using Other Modules / Memory Cards 47 Using the Internet 53 Using the Network (LAN 55 Using the Wireless LAN 56 Using the Bluetooth Function...Connecting an External Microphone 79 Connecting a USB Device 80 Connecting an i.LINK Device 82 Customizing Your VAIO Computer 84 Setting the Password 85 Using the VAIO Control Center 90 Using the Power Saving Modes 91 Using the VAIO Power Management 96 Upgrading Your VAIO Computer 98 Adding and Removing Memory 99
... 32 Using Special-function Buttons 33 Using the Built-in Camera 34 Using the Optical Disc Drive 35 Using the Memory Stick 42 Using Other Modules / Memory Cards 47 Using the Internet 53 Using the Network (LAN 55 Using the Wireless LAN 56 Using the Bluetooth Function...Connecting an External Microphone 79 Connecting a USB Device 80 Connecting an i.LINK Device 82 Customizing Your VAIO Computer 84 Setting the Password 85 Using the VAIO Control Center 90 Using the Power Saving Modes 91 Using the VAIO Power Management 96 Upgrading Your VAIO Computer 98 Adding and Removing Memory 99

User Guide
Page 3
... Source 107 Handling Your Computer 108 Handling the Built-in Camera 111 Handling Discs 112 Using the Battery Pack 113 Using Headphones 115 Handling the Memory Stick 116 Handling the Built-in Storage Device 117 Troubleshooting 118 Computer 120 System Security 128 Battery 129 Built-in Camera 131 Internet 133 Networking... Bluetooth Technology 138 Optical Discs 142 Display 146 Printing 151 Microphone 152 Speakers 153 Touch Pad 154 Keyboard 155 Floppy Disks 156 Audio/Video 157 Memory Stick 160 Peripherals 161 Trademarks 162 Notice 164
... Source 107 Handling Your Computer 108 Handling the Built-in Camera 111 Handling Discs 112 Using the Battery Pack 113 Using Headphones 115 Handling the Memory Stick 116 Handling the Built-in Storage Device 117 Troubleshooting 118 Computer 120 System Security 128 Battery 129 Built-in Camera 131 Internet 133 Networking... Bluetooth Technology 138 Optical Discs 142 Display 146 Printing 151 Microphone 152 Speakers 153 Touch Pad 154 Keyboard 155 Floppy Disks 156 Audio/Video 157 Memory Stick 160 Peripherals 161 Trademarks 162 Notice 164
User Guide
Page 12
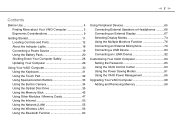
... (page 32) H Charge indicator (page 18) I Disc drive indicator (page 18) J WIRELESS switch (page 56) K WIRELESS indicator (page 18) L Media Access indicator (page 18) M SD memory card slot (page 49) N Memory Stick slot* (page 42) O Headphones jack (page 66) P Microphone jack (page 79) * Your computer supports both the standard-size...
... (page 32) H Charge indicator (page 18) I Disc drive indicator (page 18) J WIRELESS switch (page 56) K WIRELESS indicator (page 18) L Media Access indicator (page 18) M SD memory card slot (page 49) N Memory Stick slot* (page 42) O Headphones jack (page 66) P Microphone jack (page 79) * Your computer supports both the standard-size...

User Guide
Page 17
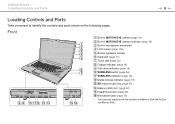
Getting Started > Locating Controls and Ports Bottom n 17 N A Air vents B Memory module compartment cover (page 99)
Getting Started > Locating Controls and Ports Bottom n 17 N A Air vents B Memory module compartment cover (page 99)
User Guide
Page 18
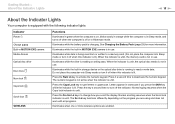
... Num Lk key to type letters in uppercase. Press the Caps Lock key to activate the numeric keypad. Press the Fn+Scr Lk keys to a memory card. (Do not place the computer into Sleep mode or turn off when this indicator is lit.) When the indicator is unlit, the... memory card is not in storage device or the optical disc drive is lit. Illuminates while the built-in use. Illuminates while the drive is in ...
... Num Lk key to type letters in uppercase. Press the Caps Lock key to activate the numeric keypad. Press the Fn+Scr Lk keys to a memory card. (Do not place the computer into Sleep mode or turn off when this indicator is lit.) When the indicator is unlit, the... memory card is not in storage device or the optical disc drive is lit. Illuminates while the built-in use. Illuminates while the drive is in ...
User Guide
Page 30
...most out of using your VAIO computer. ❑ Using the Keyboard (page 31) ❑ Using the Touch Pad (page 32) ❑ Using Special-function Buttons (page 33) ❑ Using the Built-in Camera (page 34) ❑ Using the Optical Disc Drive (page 35) ❑ Using the Memory Stick (page 42) ...❑ Using Other Modules / Memory Cards (page 47) ❑ Using the Internet (page 53) ❑ Using the Network (LAN) (page 55) ❑ Using the ...
...most out of using your VAIO computer. ❑ Using the Keyboard (page 31) ❑ Using the Touch Pad (page 32) ❑ Using Special-function Buttons (page 33) ❑ Using the Built-in Camera (page 34) ❑ Using the Optical Disc Drive (page 35) ❑ Using the Memory Stick (page 42) ...❑ Using Other Modules / Memory Cards (page 47) ❑ Using the Internet (page 53) ❑ Using the Network (LAN) (page 55) ❑ Using the ...
User Guide
Page 38
...settings are not compliant with the High-bandwidth Digital Content Protection (HDCP) standard, you buy pre-recorded or blank discs for use memory-resident utility software when playing or writing a disc. Be aware that are required for optimum compatibility and viewing quality. As with your...discs that the audio side (non-DVD side) of the recordable disc. ✍ 8 cm disc writing is not possible. Sony does NOT guarantee the compatibility of VAIO optical disc drives with your external display is a two sided disc product which mates DVD recorded material on one side with ...
...settings are not compliant with the High-bandwidth Digital Content Protection (HDCP) standard, you buy pre-recorded or blank discs for use memory-resident utility software when playing or writing a disc. Be aware that are required for optimum compatibility and viewing quality. As with your...discs that the audio side (non-DVD side) of the recordable disc. ✍ 8 cm disc writing is not possible. Sony does NOT guarantee the compatibility of VAIO optical disc drives with your external display is a two sided disc product which mates DVD recorded material on one side with ...

User Guide
Page 42
...and large data capacity capabilities. For the latest information about the Memory Stick, visit the Memory Stick web site at http://www.memorystick.com/en/. and Duo-size media and supports Memory Stick PRO, Memory Stick PRO Duo, and Memory Stick PRO-HG Duo with compatible products, such as digital cameras... and other devices. Because it is a compact, portable, and versatile IC recording media especially designed for external data storage. Using Your VAIO Computer > Using the Memory Stick n 42 N Using the Memory Stick The Memory Stick is removable, it can accommodate both standard-
...and large data capacity capabilities. For the latest information about the Memory Stick, visit the Memory Stick web site at http://www.memorystick.com/en/. and Duo-size media and supports Memory Stick PRO, Memory Stick PRO Duo, and Memory Stick PRO-HG Duo with compatible products, such as digital cameras... and other devices. Because it is a compact, portable, and versatile IC recording media especially designed for external data storage. Using Your VAIO Computer > Using the Memory Stick n 42 N Using the Memory Stick The Memory Stick is removable, it can accommodate both standard-

User Guide
Page 43
If nothing appears on the Memory Stick are displayed. Using Your VAIO Computer > Using the Memory Stick n 43 N Inserting and Removing a Memory Stick To insert a Memory Stick 1 Locate the Memory Stick slot. 2 Hold the Memory Stick with the arrow facing upward and pointing toward the slot. 3 Carefully slide the Memory Stick into the slot until it clicks into place...
If nothing appears on the Memory Stick are displayed. Using Your VAIO Computer > Using the Memory Stick n 43 N Inserting and Removing a Memory Stick To insert a Memory Stick 1 Locate the Memory Stick slot. 2 Hold the Memory Stick with the arrow facing upward and pointing toward the slot. 3 Carefully slide the Memory Stick into the slot until it clicks into place...

User Guide
Page 44
... or M2 Duo adaptor. Always remove the Memory Stick gently, or it from the slot. Do not remove the Memory Stick while the Media Access indicator light is additionally inserted into the slot. Large volumes of the slot. ! Using Your VAIO Computer > Using the Memory Stick n 44 N ! To avoid damaging... your computer or the media, do , you cannot insert it into the slot if you may lose data. The Memory Stick Micro in the correct direction as you may not ...
... or M2 Duo adaptor. Always remove the Memory Stick gently, or it from the slot. Do not remove the Memory Stick while the Media Access indicator light is additionally inserted into the slot. Large volumes of the slot. ! Using Your VAIO Computer > Using the Memory Stick n 44 N ! To avoid damaging... your computer or the media, do , you cannot insert it into the slot if you may lose data. The Memory Stick Micro in the correct direction as you may not ...
User Guide
Page 45
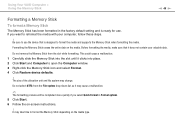
Using Your VAIO Computer > Using the Memory Stick n 45 N Formatting a Memory Stick To format a Memory Stick The Memory Stick has been formatted in Format options. 5 Click Start. 6 Follow the on-screen instructions. ! The size of the allocation unit and file system may ... Before formatting the media, make sure that is ready for use the device that it does not contain your computer, follow these steps. ! Formatting the Memory Stick erases the entire data on the media type. Do not select NTFS from the slot while formatting. This could cause a malfunction. 1 Carefully slide...
Using Your VAIO Computer > Using the Memory Stick n 45 N Formatting a Memory Stick To format a Memory Stick The Memory Stick has been formatted in Format options. 5 Click Start. 6 Follow the on-screen instructions. ! The size of the allocation unit and file system may ... Before formatting the media, make sure that is ready for use the device that it does not contain your computer, follow these steps. ! Formatting the Memory Stick erases the entire data on the media type. Do not select NTFS from the slot while formatting. This could cause a malfunction. 1 Carefully slide...

User Guide
Page 46
... Your VAIO Computer > Using the Memory Stick n 46 N Notes on your computer and the media. Improper insertion of January 2009. Use a Memory Stick with the MagicGate logo to use , it is the general name of the copyright protection technology developed by Sony. Accordingly, the Memory Stick ... such copyrighted data can be used only within the law. ❑ The Memory Stick slot on Using the Memory Stick ❑ Your computer has been tested and found compatible with Sony branded Memory Stick with multiple conversion adaptors is not guaranteed of compatibility. ❑ MagicGate...
... Your VAIO Computer > Using the Memory Stick n 46 N Notes on your computer and the media. Improper insertion of January 2009. Use a Memory Stick with the MagicGate logo to use , it is the general name of the copyright protection technology developed by Sony. Accordingly, the Memory Stick ... such copyrighted data can be used only within the law. ❑ The Memory Stick slot on Using the Memory Stick ❑ Your computer has been tested and found compatible with Sony branded Memory Stick with multiple conversion adaptors is not guaranteed of compatibility. ❑ MagicGate...

User Guide
Page 47
... into the slot easily, remove it into the slot. ✍ If the module does not go into place. Using Your VAIO Computer > Using Other Modules / Memory Cards n 47 N Using Other Modules / Memory Cards Using the ExpressCard Module Your computer is equipped with an ExpressCard/34 slot* for transferring data among digital cameras, camcorders...
... into the slot easily, remove it into the slot. ✍ If the module does not go into place. Using Your VAIO Computer > Using Other Modules / Memory Cards n 47 N Using Other Modules / Memory Cards Using the ExpressCard Module Your computer is equipped with an ExpressCard/34 slot* for transferring data among digital cameras, camcorders...
User Guide
Page 48
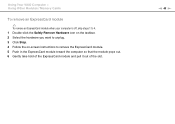
n 48 N Using Your VAIO Computer > Using Other Modules / Memory Cards To remove an ExpressCard module ✍ To remove an ExpressCard module when your computer is off, skip steps 1 to 4. 1 Double-click the Safely Remove Hardware icon on the taskbar. 2 Select the hardware you want to unplug. 3 Click Stop. 4 Follow the on-screen instructions to remove the ExpressCard module. 5 Push in the ExpressCard module toward the computer so that the module pops out. 6 Gently take hold of the ExpressCard module and pull it out of the slot.
n 48 N Using Your VAIO Computer > Using Other Modules / Memory Cards To remove an ExpressCard module ✍ To remove an ExpressCard module when your computer is off, skip steps 1 to 4. 1 Double-click the Safely Remove Hardware icon on the taskbar. 2 Select the hardware you want to unplug. 3 Click Stop. 4 Follow the on-screen instructions to remove the ExpressCard module. 5 Push in the ExpressCard module toward the computer so that the module pops out. 6 Gently take hold of the ExpressCard module and pull it out of the slot.

User Guide
Page 49
... appropriate support web site. You can use the SD memory card The SD memory card slot on your computer supports the following memory cards: ❑ SD memory card ❑ SDHC memory card ❑ MultiMediaCard (MMC) For the latest information on compatible memory cards, see Finding More about Your VAIO Computer (page 5) to transfer data among digital cameras...
... appropriate support web site. You can use the SD memory card The SD memory card slot on your computer supports the following memory cards: ❑ SD memory card ❑ SDHC memory card ❑ MultiMediaCard (MMC) For the latest information on compatible memory cards, see Finding More about Your VAIO Computer (page 5) to transfer data among digital cameras...

User Guide
Page 50
Using Your VAIO Computer > Using Other Modules / Memory Cards To insert an SD memory card 1 Locate the SD memory card slot. 2 Hold the SD memory card with the arrow facing upward and pointing toward the slot. 3 Carefully slide the SD memory card into the slot until it in the proper direction. Do not force the card into place. n 50 N ✍ If the SD memory card does not go into the slot easily, remove it gently and verify you are inserting it clicks into the slot.
Using Your VAIO Computer > Using Other Modules / Memory Cards To insert an SD memory card 1 Locate the SD memory card slot. 2 Hold the SD memory card with the arrow facing upward and pointing toward the slot. 3 Carefully slide the SD memory card into the slot until it in the proper direction. Do not force the card into place. n 50 N ✍ If the SD memory card does not go into the slot easily, remove it gently and verify you are inserting it clicks into the slot.

User Guide
Page 51
Using Your VAIO Computer > Using Other Modules / Memory Cards To remove an SD memory card 1 Check that the Media Access indicator light is unlit. 2 Push in the SD memory card toward the computer and release. n 51 N The SD memory card ejects. 3 Pull the SD memory card out of the slot.
Using Your VAIO Computer > Using Other Modules / Memory Cards To remove an SD memory card 1 Check that the Media Access indicator light is unlit. 2 Push in the SD memory card toward the computer and release. n 51 N The SD memory card ejects. 3 Pull the SD memory card out of the slot.
User Guide
Page 52
...your computer. ❑ Be sure to hold the memory card with the arrow pointing in removing from the slot. Using Your VAIO Computer > Using Other Modules / Memory Cards n 52 N Notes on Using Memory Cards General notes on using the SD memory card ❑ Your computer has been tested and ...found compatible with your computer. ❑ The SD memory card slot on your computer does ...
...your computer. ❑ Be sure to hold the memory card with the arrow pointing in removing from the slot. Using Your VAIO Computer > Using Other Modules / Memory Cards n 52 N Notes on Using Memory Cards General notes on using the SD memory card ❑ Your computer has been tested and ...found compatible with your computer. ❑ The SD memory card slot on your computer does ...

User Guide
Page 83
You cannot access the pictures stored on your compatible i.LINK device. See the manual that came with the device for more information. Using Peripheral Devices > Connecting an i.LINK Device n 83 N Connecting a Digital Video Camcorder To connect a digital video camcorder Plug one end of an i.LINK cable (1) (not supplied) into the i.LINK port (2) on the computer and the other end into the DV In/ Out port (3) on the digital video camcorder. ✍ The connection procedure varies depending on a Memory Stick when using an i.LINK connection.
You cannot access the pictures stored on your compatible i.LINK device. See the manual that came with the device for more information. Using Peripheral Devices > Connecting an i.LINK Device n 83 N Connecting a Digital Video Camcorder To connect a digital video camcorder Plug one end of an i.LINK cable (1) (not supplied) into the i.LINK port (2) on the computer and the other end into the DV In/ Out port (3) on the digital video camcorder. ✍ The connection procedure varies depending on a Memory Stick when using an i.LINK connection.
User Guide
Page 98
... to find the nearest center or agent, see Finding More about Your VAIO Computer (page 5). Upgrading Your VAIO Computer > n 98 N Upgrading Your VAIO Computer Your VAIO computer and memory modules use high precision components and electronic connectors technology. For assistance, contact an authorized Sony Service Center. The type of module and the amount of the warranty...
... to find the nearest center or agent, see Finding More about Your VAIO Computer (page 5). Upgrading Your VAIO Computer > n 98 N Upgrading Your VAIO Computer Your VAIO computer and memory modules use high precision components and electronic connectors technology. For assistance, contact an authorized Sony Service Center. The type of module and the amount of the warranty...


