VAIO User Guide
Page 10
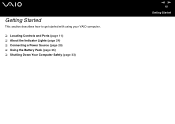
Getting Started This section describes how to get started with using your VAIO computer. ❑ Locating Controls and Ports (page 11) ❑ About the Indicator Lights (page 24) ❑ Connecting a Power Source (page 25) ❑ Using the Battery Pack (page 26) ❑ Shutting Down Your Computer Safely (page 33) nN 10 Getting Started
Getting Started This section describes how to get started with using your VAIO computer. ❑ Locating Controls and Ports (page 11) ❑ About the Indicator Lights (page 24) ❑ Connecting a Power Source (page 25) ❑ Using the Battery Pack (page 26) ❑ Shutting Down Your Computer Safely (page 33) nN 10 Getting Started
VAIO User Guide
Page 11
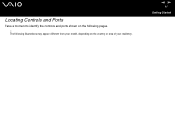
The following pages. ! nN 11 Getting Started Locating Controls and Ports Take a moment to identify the controls and ports shown on the following illustrations may appear different from your model, depending on the country or area of your residency.
The following pages. ! nN 11 Getting Started Locating Controls and Ports Take a moment to identify the controls and ports shown on the following illustrations may appear different from your model, depending on the country or area of your residency.
VAIO User Guide
Page 12
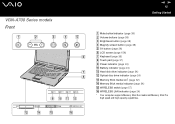
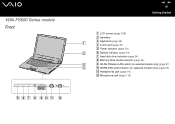
VGN-A700 Series models Front nN 12 Getting Started A Mute button/indicator (page 38) B Volume buttons (page 38) C Brightness button (page 38) D Magnify screen button (page 38) E S1 button (page 38) F LCD screen (page 158) G Keyboard (page 35) H Touch pad (page 37) I Power indicator (page 24) J Battery indicator (page 24) K Hard disk drive indicator (page 24) L Optical disc drive indicator (page 24) M Memory Stick...
VGN-A700 Series models Front nN 12 Getting Started A Mute button/indicator (page 38) B Volume buttons (page 38) C Brightness button (page 38) D Magnify screen button (page 38) E S1 button (page 38) F LCD screen (page 158) G Keyboard (page 35) H Touch pad (page 37) I Power indicator (page 24) J Battery indicator (page 24) K Hard disk drive indicator (page 24) L Optical disc drive indicator (page 24) M Memory Stick...
VAIO User Guide
Page 14
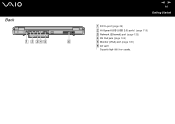
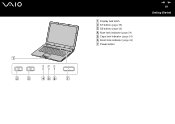
Back nN 14 Getting Started A DC In port (page 25) B Hi-Speed USB (USB 2.0) ports* (page 116) C Network (Ethernet) port (page 123) D AV Out jack (page 104) E Monitor (VGA) port (page 100) F Air vent * Supports high-/full-/low- speeds.
Back nN 14 Getting Started A DC In port (page 25) B Hi-Speed USB (USB 2.0) ports* (page 116) C Network (Ethernet) port (page 123) D AV Out jack (page 104) E Monitor (VGA) port (page 100) F Air vent * Supports high-/full-/low- speeds.
VAIO User Guide
Page 15
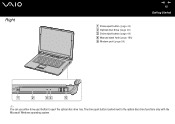
Right A Drive eject button (page 40) B Optical disc drive (page 40) C Drive eject button (page 40) D Manual eject hole (page 186) E Modem port (page 56) nN 15 Getting Started ✍ You can use either drive eject button to the optical disc drive functions only with the Microsoft Windows operating system. The drive eject button located next to eject the optical disc drive tray.
Right A Drive eject button (page 40) B Optical disc drive (page 40) C Drive eject button (page 40) D Manual eject hole (page 186) E Modem port (page 56) nN 15 Getting Started ✍ You can use either drive eject button to the optical disc drive functions only with the Microsoft Windows operating system. The drive eject button located next to eject the optical disc drive tray.
VAIO User Guide
Page 16
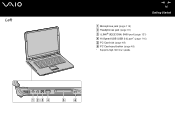
Left nN 16 Getting Started A Microphone jack (page 115) B Headphones jack (page 91) C i.LINK® (IEEE1394) S400 port (page 121) D Hi-Speed USB (USB 2.0) port* (page 116) E PC Card slot (page 48) F PC Card eject button (page 48) * Supports high-/full-/low- speeds.
Left nN 16 Getting Started A Microphone jack (page 115) B Headphones jack (page 91) C i.LINK® (IEEE1394) S400 port (page 121) D Hi-Speed USB (USB 2.0) port* (page 116) E PC Card slot (page 48) F PC Card eject button (page 48) * Supports high-/full-/low- speeds.
VAIO User Guide
Page 17
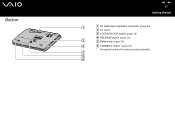
Bottom nN 17 Getting Started A AV station/port replicator connector (page 66) B Air vents C LOCK/UNLOCK switch (page 26) D RELEASE switch (page 26) E Battery bay (page 26) F CONNECT button* (page 87) * On selected models with wireless mouse functionality.
Bottom nN 17 Getting Started A AV station/port replicator connector (page 66) B Air vents C LOCK/UNLOCK switch (page 26) D RELEASE switch (page 26) E Battery bay (page 26) F CONNECT button* (page 87) * On selected models with wireless mouse functionality.
VAIO User Guide
Page 18
VGN-FS600 Series models Front nN 18 Getting Started A LCD screen (page 158) B Speakers C Keyboard (page 35) D Touch pad (page 37) E Power indicator (page 24) F Battery indicator (page 24) G Hard disk drive indicator (page 24) H Memory Stick media indicator (page 24) I WLAN (Wireless LAN) switch (on selected models only) (page 57) J WIRELESS LAN indicator (on selected models only) (page 24) K Headphones jack (page 91) L Microphone jack (page 115)
VGN-FS600 Series models Front nN 18 Getting Started A LCD screen (page 158) B Speakers C Keyboard (page 35) D Touch pad (page 37) E Power indicator (page 24) F Battery indicator (page 24) G Hard disk drive indicator (page 24) H Memory Stick media indicator (page 24) I WLAN (Wireless LAN) switch (on selected models only) (page 57) J WIRELESS LAN indicator (on selected models only) (page 24) K Headphones jack (page 91) L Microphone jack (page 115)
VAIO User Guide
Page 19
A Display lock latch B S1 button (page 38) C S2 button (page 38) D Num lock indicator (page 24) E Caps lock indicator (page 24) F Scroll lock indicator (page 24) G Power button nN 19 Getting Started
A Display lock latch B S1 button (page 38) C S2 button (page 38) D Num lock indicator (page 24) E Caps lock indicator (page 24) F Scroll lock indicator (page 24) G Power button nN 19 Getting Started
VAIO User Guide
Page 20
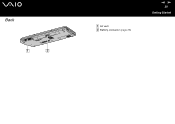
Back A Air vent B Battery connector (page 26) nN 20 Getting Started
Back A Air vent B Battery connector (page 26) nN 20 Getting Started
VAIO User Guide
Page 25
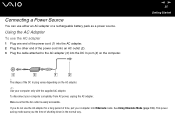
... down in the normal way. nN 25 Getting Started ! To disconnect your computer completely from AC power, unplug the AC adapter. See Using Hibernate Mode (page 136).
... down in the normal way. nN 25 Getting Started ! To disconnect your computer completely from AC power, unplug the AC adapter. See Using Hibernate Mode (page 136).
VAIO User Guide
Page 34
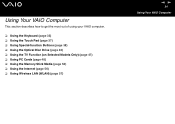
Using Your VAIO Computer This section describes how to get the most out of using your VAIO computer. ❑ Using the Keyboard (page 35) ❑ Using the Touch Pad (page 37) ❑ Using Special-function Buttons (page 38) ❑ Using the Optical Disc Drive (page 40) ❑ Using the TV Function (on Selected Models Only) (page 47) ❑ Using PC Cards (page 48) ❑ Using the Memory Stick Media (page 52) ❑ Using the Internet (page 56) ❑ Using Wireless LAN (WLAN) (page 57) nN 34 Using Your VAIO Computer
Using Your VAIO Computer This section describes how to get the most out of using your VAIO computer. ❑ Using the Keyboard (page 35) ❑ Using the Touch Pad (page 37) ❑ Using Special-function Buttons (page 38) ❑ Using the Optical Disc Drive (page 40) ❑ Using the TV Function (on Selected Models Only) (page 47) ❑ Using PC Cards (page 48) ❑ Using the Memory Stick Media (page 52) ❑ Using the Internet (page 56) ❑ Using Wireless LAN (WLAN) (page 57) nN 34 Using Your VAIO Computer
VAIO User Guide
Page 36
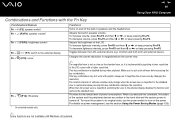
To decrease volume, press Fn+F3 and then m or To increase volume, press Fn+F4 and then M or ,, or keep pressing Fn+F4. Functions Turns on and off the built-in speaker volume. nN 36 Using Your VAIO Computer Combinations and Functions with the Fn Key Combinations/Feature Fn + % (F2): speaker switch* Fn + 2 (F3/F4): speaker volume* Fn + 8 (F5/F6): brightness control Fn + Fn + /T (F7): switch to the external display (F10): zoom* Fn + (F12): Hibernate * On selected models only. Adjusts the built-in speakers and the headphones.
To decrease volume, press Fn+F3 and then m or To increase volume, press Fn+F4 and then M or ,, or keep pressing Fn+F4. Functions Turns on and off the built-in speaker volume. nN 36 Using Your VAIO Computer Combinations and Functions with the Fn Key Combinations/Feature Fn + % (F2): speaker switch* Fn + 2 (F3/F4): speaker volume* Fn + 8 (F5/F6): brightness control Fn + Fn + /T (F7): switch to the external display (F10): zoom* Fn + (F12): Hibernate * On selected models only. Adjusts the built-in speakers and the headphones.

VAIO User Guide
Page 38
...those that you use the DVD player. : S1 button The S1 button, by default, launches the VAIO Zone software. See Setting Up Your Computer with VAIO Control Center (page 131). The LED turns on when the volume is adjusted accordingly. This setting applies only when the ...brightness intensity. Magnify screen button (Zoom) Changes the image resolution in all applications, except in Setting Up Your Computer with VAIO Control Center (page 131). VGN-A700 Series models Special-function button Functions Mute button Turns the volume on . When the screen is set the display to...
...those that you use the DVD player. : S1 button The S1 button, by default, launches the VAIO Zone software. See Setting Up Your Computer with VAIO Control Center (page 131). The LED turns on when the volume is adjusted accordingly. This setting applies only when the ...brightness intensity. Magnify screen button (Zoom) Changes the image resolution in all applications, except in Setting Up Your Computer with VAIO Control Center (page 131). VGN-A700 Series models Special-function button Functions Mute button Turns the volume on . When the screen is set the display to...
VAIO User Guide
Page 39
... execute often. The Magnify screen button may not work with VAIO Control Center (page 131). When the LCD screen view is magnified, switching the view to quit such software before pressing the Magnify screen button. VGN-FS600 Series models Special-function button Functions S1/S2 buttons By default...See Setting Up Your Computer with graphic images because it magnifies the screen view by changing the resolution. nN 39 Using Your VAIO Computer ✍ When an external display is connected to these shortcut buttons another action that does not support change when the screen...
... execute often. The Magnify screen button may not work with VAIO Control Center (page 131). When the LCD screen view is magnified, switching the view to quit such software before pressing the Magnify screen button. VGN-FS600 Series models Special-function button Functions S1/S2 buttons By default...See Setting Up Your Computer with graphic images because it magnifies the screen view by changing the resolution. nN 39 Using Your VAIO Computer ✍ When an external display is connected to these shortcut buttons another action that does not support change when the screen...
VAIO User Guide
Page 40
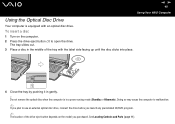
nN 40 Using Your VAIO Computer Using the Optical Disc Drive Your computer is in a power saving mode (Standby or Hibernate). See Locating Controls and Ports (page 11). To insert a disc 1 Turn on the model you purchased. The tray slides out. 3 Place a disc in gently. ! Doing so may cause the computer to ...
nN 40 Using Your VAIO Computer Using the Optical Disc Drive Your computer is in a power saving mode (Standby or Hibernate). See Locating Controls and Ports (page 11). To insert a disc 1 Turn on the model you purchased. The tray slides out. 3 Place a disc in gently. ! Doing so may cause the computer to ...
VAIO User Guide
Page 45
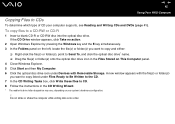
.... 8 Follow the instructions in the Files Stored on your computer supports, see Reading and Writing CDs and DVDs (page 41). Do not strike or shake the computer while writing data onto a disc. nN 45 Using Your VAIO Computer Copying Files to CDs To determine which type of CD your system's hardware configuration. !
.... 8 Follow the instructions in the Files Stored on your computer supports, see Reading and Writing CDs and DVDs (page 41). Do not strike or shake the computer while writing data onto a disc. nN 45 Using Your VAIO Computer Copying Files to CDs To determine which type of CD your system's hardware configuration. !
VAIO User Guide
Page 47
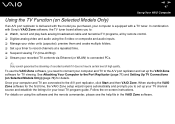
... TV are connected to the Port Replicator (page 71) and Setting Up TV Connections (on Selected Models Only) If an A/V port replicator is equipped with a TV tuner. Follow the on using the S-video or composite and audio inputs. ❑ Manage your computer is delivered with Sony's VAIO Zone software, the TV tuner board...
... TV are connected to the Port Replicator (page 71) and Setting Up TV Connections (on Selected Models Only) If an A/V port replicator is equipped with a TV tuner. Follow the on using the S-video or composite and audio inputs. ❑ Manage your computer is delivered with Sony's VAIO Zone software, the TV tuner board...
VAIO User Guide
Page 53
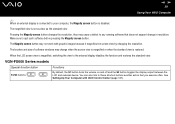
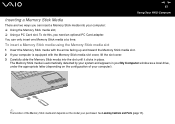
nN 53 Using Your VAIO Computer Inserting a Memory Stick Media There are two ways you need an optional PC Card adapter. The Memory Stick media is equipped with the Memory ... and toward the Memory Stick media slot. 2 If your computer is automatically detected by your system and appears in place. See Locating Controls and Ports (page 11). To do this, you can only insert one Memory Stick media at a time.
nN 53 Using Your VAIO Computer Inserting a Memory Stick Media There are two ways you need an optional PC Card adapter. The Memory Stick media is equipped with the Memory ... and toward the Memory Stick media slot. 2 If your computer is automatically detected by your system and appears in place. See Locating Controls and Ports (page 11). To do this, you can only insert one Memory Stick media at a time.

VAIO User Guide
Page 65
...) ❑ Using the Mouse (on Selected Models Only) (page 87) ❑ Connecting External Speakers (page 91) ❑ Using the Remote Commander (page 97) ❑ Connecting an External Display (page 100) ❑ Selecting Display Modes (page 108) ❑ Using the Multiple Monitors Function (page 111) ❑ Connecting an External Microphone (page 115) ❑ Connecting a Universal Serial Bus (USB...
...) ❑ Using the Mouse (on Selected Models Only) (page 87) ❑ Connecting External Speakers (page 91) ❑ Using the Remote Commander (page 97) ❑ Connecting an External Display (page 100) ❑ Selecting Display Modes (page 108) ❑ Using the Multiple Monitors Function (page 111) ❑ Connecting an External Microphone (page 115) ❑ Connecting a Universal Serial Bus (USB...