
User Guide
Page 2
... and Ports...14 About the Indicator Lights ...21 Connecting a Power Source ...23 Using the Battery Pack ...24 Shutting Down Your Computer Safely ...31 Using Your VAIO Computer ...32 Using the Keyboard ...33 Using the Touch Pad ...34 Using Special-function Buttons ...35 Using the Built-in MOTION EYE Camera...37 Using... the Optical Disc Drive ...40 Using the TV Function ...49 Using the ExpressCard Module ...63 Using the Memory Stick ...66 Using the SD Memory Card ...72 Using the CF Memory Card ...76 Using the Internet...80
... and Ports...14 About the Indicator Lights ...21 Connecting a Power Source ...23 Using the Battery Pack ...24 Shutting Down Your Computer Safely ...31 Using Your VAIO Computer ...32 Using the Keyboard ...33 Using the Touch Pad ...34 Using Special-function Buttons ...35 Using the Built-in MOTION EYE Camera...37 Using... the Optical Disc Drive ...40 Using the TV Function ...49 Using the ExpressCard Module ...63 Using the Memory Stick ...66 Using the SD Memory Card ...72 Using the CF Memory Card ...76 Using the Internet...80

User Guide
Page 3
... External Microphone ...100 Connecting a Universal Serial Bus (USB) Device...101 Connecting a Printer ...104 Connecting an i.LINK Device ...105 Connecting to a Network (LAN) ...107 Customizing Your VAIO Computer ...108 Setting the Password ...109 Using Fingerprint Authentication ...116 Setting Up Your Computer with...
... External Microphone ...100 Connecting a Universal Serial Bus (USB) Device...101 Connecting a Printer ...104 Connecting an i.LINK Device ...105 Connecting to a Network (LAN) ...107 Customizing Your VAIO Computer ...108 Setting the Password ...109 Using Fingerprint Authentication ...116 Setting Up Your Computer with...

User Guide
Page 4
n4 N Precautions ...139 Handling the LCD Screen ...140 Using the Power Source ...141 Handling Your Computer ...142 Handling the Built-in MOTION EYE Camera...144 Handling Floppy Disks ...145 Handling Discs ...146 Using the Battery Pack ...147 Using Headphones ...149 Handling the Memory Stick ...150 Handling the Hard Disk ...151 Updating Your Computer ...152 Troubleshooting ...153 Computer ...155 System Security ...164 Battery...165 Built-in MOTION EYE Camera...167 Internet ...170 Networking ...172 Bluetooth Technology ...175 Optical Discs ...180 Display ...184 Printing ...188 Microphone ...189
n4 N Precautions ...139 Handling the LCD Screen ...140 Using the Power Source ...141 Handling Your Computer ...142 Handling the Built-in MOTION EYE Camera...144 Handling Floppy Disks ...145 Handling Discs ...146 Using the Battery Pack ...147 Using Headphones ...149 Handling the Memory Stick ...150 Handling the Hard Disk ...151 Updating Your Computer ...152 Troubleshooting ...153 Computer ...155 System Security ...164 Battery...165 Built-in MOTION EYE Camera...167 Internet ...170 Networking ...172 Bluetooth Technology ...175 Optical Discs ...180 Display ...184 Printing ...188 Microphone ...189

User Guide
Page 5
n5 N Mouse ...190 Speakers ...191 Touch Pad...193 Keyboard...194 Floppy Disks ...195 Audio/Video...196 Memory Stick ...199 Peripherals ...201 Support Options ...202 Sony Support Information ...203 Program Support Information...207 Trademarks ...218
n5 N Mouse ...190 Speakers ...191 Touch Pad...193 Keyboard...194 Floppy Disks ...195 Audio/Video...196 Memory Stick ...199 Peripherals ...201 Support Options ...202 Sony Support Information ...203 Program Support Information...207 Trademarks ...218

User Guide
Page 8
... at the following URLs: http://esupport.sony.com/EN/VAIO/ for customers in USA http://www.sony.ca/support/ for customers in Canada http://esupport.sony.com/ES/VAIO/ for customers in Spanish-speaking Latin American countries or areas http://esupport.sony.com/ES/VAIO/BR/ for customers in flash memory storage drives along with two built-in...
... at the following URLs: http://esupport.sony.com/EN/VAIO/ for customers in USA http://www.sony.ca/support/ for customers in Canada http://esupport.sony.com/ES/VAIO/ for customers in Spanish-speaking Latin American countries or areas http://esupport.sony.com/ES/VAIO/BR/ for customers in flash memory storage drives along with two built-in...

User Guide
Page 15
... speakers (stereo) F Fingerprint sensor*1 (page 116) G Numeric keypad Use the numeric keypad to type numbers or to this sensor for operations. and Duo-size Memory Stick. H Keyboard (page 33) I Touch pad (page 34) J Charge indicator (page 21) K Hard disk drive/Optical disc drive indicator (page 21)... L WIRELESS indicator (page 21) M Media Access indicator (page 21) N Memory Stick slot*2 (page 66) O Remote sensor*1 Point the supplied remote commander to perform basic math calculations. P WIRELESS switch (page 81) Q SD...
... speakers (stereo) F Fingerprint sensor*1 (page 116) G Numeric keypad Use the numeric keypad to type numbers or to this sensor for operations. and Duo-size Memory Stick. H Keyboard (page 33) I Touch pad (page 34) J Charge indicator (page 21) K Hard disk drive/Optical disc drive indicator (page 21)... L WIRELESS indicator (page 21) M Media Access indicator (page 21) N Memory Stick slot*2 (page 66) O Remote sensor*1 Point the supplied remote commander to perform basic math calculations. P WIRELESS switch (page 81) Q SD...

User Guide
Page 19
Left n 19 N Getting Started A DC IN port (page 23) B Security slot C Air vent D Hi-Speed USB (USB 2.0) port*1 (page 101) E Monitor port*2 (page 93) F HDMI port*2 (page 93) G ExpressCard/34 slot (page 63) H CF (CompactFlash) memory card slot*3 (page 76) I CF memory card release button*3 (page 76) J CF memory card indicator*3 (page 21) K i.LINK 4-pin (S400) port (page 105) *1 Supports high-/full-/low- speeds. *2 These two ports are mutually exclusive. When one port has an external display connected, the other is disabled. *3 On selected models only.
Left n 19 N Getting Started A DC IN port (page 23) B Security slot C Air vent D Hi-Speed USB (USB 2.0) port*1 (page 101) E Monitor port*2 (page 93) F HDMI port*2 (page 93) G ExpressCard/34 slot (page 63) H CF (CompactFlash) memory card slot*3 (page 76) I CF memory card release button*3 (page 76) J CF memory card indicator*3 (page 21) K i.LINK 4-pin (S400) port (page 105) *1 Supports high-/full-/low- speeds. *2 These two ports are mutually exclusive. When one port has an external display connected, the other is disabled. *3 On selected models only.

User Guide
Page 20
Bottom n 20 N Getting Started A Subwoofer speakers for bass frequencies B Air vents C Memory module compartment cover (page 133)
Bottom n 20 N Getting Started A Subwoofer speakers for bass frequencies B Air vents C Memory module compartment cover (page 133)

User Guide
Page 21
...program you are using and does not work with the following indicator lights: Indicator Power 1 Charge Built-in MOTION EYE camera Media Access CF memory card*1 Optical disc drive Hard disk drive*2 /Optical disc drive Num lock Caps lock Scroll lock Functions Illuminates in green when the computer ... is equipped with all programs. Illuminates while the battery pack is off when this indicator is lit.) When the indicator is unlit, the memory card is not in uppercase. Illuminates while data is being read from or written to deactivate the numeric keypad. Illuminates while data is being...
...program you are using and does not work with the following indicator lights: Indicator Power 1 Charge Built-in MOTION EYE camera Media Access CF memory card*1 Optical disc drive Hard disk drive*2 /Optical disc drive Num lock Caps lock Scroll lock Functions Illuminates in green when the computer ... is equipped with all programs. Illuminates while the battery pack is off when this indicator is lit.) When the indicator is unlit, the memory card is not in uppercase. Illuminates while data is being read from or written to deactivate the numeric keypad. Illuminates while data is being...

User Guide
Page 22
See the online specifications to find out about your storage device configuration. n 22 N Getting Started Indicator Functions WIRELESS Illuminates when the WIRELESS switch is turned on. *1 On selected models only. *2 Your computer may be equipped with two built-in flash memory storage drives along with a hard disk drive depending on the model you purchased.
See the online specifications to find out about your storage device configuration. n 22 N Getting Started Indicator Functions WIRELESS Illuminates when the WIRELESS switch is turned on. *1 On selected models only. *2 Your computer may be equipped with two built-in flash memory storage drives along with a hard disk drive depending on the model you purchased.

User Guide
Page 32
... This section describes how to get the most out of using your VAIO computer. ❑ Using the Keyboard (page 33) ❑ Using the Touch Pad (page 34) ❑ Using Special-function Buttons (page 35) ❑ Using the Built-... 40) ❑ Using the TV Function (page 49) ❑ Using the ExpressCard Module (page 63) ❑ Using the Memory Stick (page 66) ❑ Using the SD Memory Card (page 72) ❑ Using the CF Memory Card (page 76) ❑ Using the Internet (page 80) ❑ Using Wireless LAN (WLAN) (page 81) ❑ Using...
... This section describes how to get the most out of using your VAIO computer. ❑ Using the Keyboard (page 33) ❑ Using the Touch Pad (page 34) ❑ Using Special-function Buttons (page 35) ❑ Using the Built-... 40) ❑ Using the TV Function (page 49) ❑ Using the ExpressCard Module (page 63) ❑ Using the Memory Stick (page 66) ❑ Using the SD Memory Card (page 72) ❑ Using the CF Memory Card (page 76) ❑ Using the Internet (page 80) ❑ Using Wireless LAN (WLAN) (page 81) ❑ Using...

User Guide
Page 33
... press Fn+F6 and then M or ,. Combinations/Feature Functions Fn + 8 (F5/F6): brightness control Changes the LCD brightness of your computer screen. n 33 N Using Your VAIO Computer Using the Keyboard Your keyboard is finished launching.
... press Fn+F6 and then M or ,. Combinations/Feature Functions Fn + 8 (F5/F6): brightness control Changes the LCD brightness of your computer screen. n 33 N Using Your VAIO Computer Using the Keyboard Your keyboard is finished launching.
User Guide
Page 35
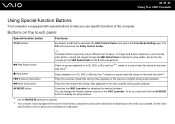
To change the default software options in flash memory storage drives along with a hard disk drive depending on the hard disk drive*2. . To do so, press and hold either button or launch and navigate through the VAIO Control Center to display the setup window. *1 Use the WinDVD BD ...-ray Disc*1 media or a music/video file stored on the model you use specific functions of the computer. n 35 N Using Your VAIO Computer Using Special-function Buttons Your computer is equipped with special buttons to find out about your storage device configuration. See the help you purchased...
To change the default software options in flash memory storage drives along with a hard disk drive depending on the hard disk drive*2. . To do so, press and hold either button or launch and navigate through the VAIO Control Center to display the setup window. *1 Use the WinDVD BD ...-ray Disc*1 media or a music/video file stored on the model you use specific functions of the computer. n 35 N Using Your VAIO Computer Using Special-function Buttons Your computer is equipped with special buttons to find out about your storage device configuration. See the help you purchased...

User Guide
Page 45
...; Region code indicators are labeled on the discs or packages to indicate in most regions of player you can play the disc. n 45 N Using Your VAIO Computer Notes on your computer. Notes on what type of the world. If the region code for your computer to malfunction. ❑ Do not plug... optical disc drive. ❑ Do not strike or shake your computer while the optical disc drive is writing data to a disc. ❑ Do not use memory-resident utility software while the optical disc drive is writing data to a disc.
...; Region code indicators are labeled on the discs or packages to indicate in most regions of player you can play the disc. n 45 N Using Your VAIO Computer Notes on your computer. Notes on what type of the world. If the region code for your computer to malfunction. ❑ Do not plug... optical disc drive. ❑ Do not strike or shake your computer while the optical disc drive is writing data to a disc. ❑ Do not use memory-resident utility software while the optical disc drive is writing data to a disc.

User Guide
Page 66
n 66 N Using Your VAIO Computer Using the Memory Stick Memory Stick is removable, it can be used for exchanging and sharing digital data with compatible products, such as digital cameras, mobile phones, and other devices. Because it is a compact, portable, and versatile IC recording media especially designed for external data storage.
n 66 N Using Your VAIO Computer Using the Memory Stick Memory Stick is removable, it can be used for exchanging and sharing digital data with compatible products, such as digital cameras, mobile phones, and other devices. Because it is a compact, portable, and versatile IC recording media especially designed for external data storage.

User Guide
Page 67
... of compatibility. Accordingly, the Memory Stick with multiple conversion adapters is against the copyright law to insert it from the respective copyright holders. n 67 N Using Your VAIO Computer Before You Use the Memory Stick The Memory Stick slot on your personal use...both standard- Before using a Memory Stick Duo adaptor. ! However, not all Memory Stick that are guaranteed of the copyright protection technology developed by Sony. The Memory Stick slot on your computer can insert a Duo-size Memory Stick directly into the Memory Stick slot without prior consent ...
... of compatibility. Accordingly, the Memory Stick with multiple conversion adapters is against the copyright law to insert it from the respective copyright holders. n 67 N Using Your VAIO Computer Before You Use the Memory Stick The Memory Stick slot on your personal use...both standard- Before using a Memory Stick Duo adaptor. ! However, not all Memory Stick that are guaranteed of the copyright protection technology developed by Sony. The Memory Stick slot on your computer can insert a Duo-size Memory Stick directly into the Memory Stick slot without prior consent ...

User Guide
Page 68
... Start, Computer, and double-click the Memory Stick icon. ! The Memory Stick is automatically detected by your computer and the media. n 68 N Using Your VAIO Computer Inserting a Memory Stick To insert a Memory Stick 1 Locate the Memory Stick slot. 2 Hold the Memory Stick with the arrow pointing in the ...correct direction as you cannot insert it smoothly. Be sure to hold the Memory Stick with the arrow facing upward...
... Start, Computer, and double-click the Memory Stick icon. ! The Memory Stick is automatically detected by your computer and the media. n 68 N Using Your VAIO Computer Inserting a Memory Stick To insert a Memory Stick 1 Locate the Memory Stick slot. 2 Hold the Memory Stick with the arrow pointing in the ...correct direction as you cannot insert it smoothly. Be sure to hold the Memory Stick with the arrow facing upward...

User Guide
Page 69
... process will be completed more quickly if you want to reformat the media with your valuable data. The size of data files saved in the Memory Stick. Be sure to use the device that it clicks into the slot until it does not contain your computer, follow these steps. ! Formatting the... Restore device defaults. ! Do not select NTFS from the slot while formatting. Do not remove the Memory Stick from the File system drop-down list as it may change. Before formatting the media, make sure that is ready for use. n 69 N Using Your VAIO Computer To view the contents on the media.
... process will be completed more quickly if you want to reformat the media with your valuable data. The size of data files saved in the Memory Stick. Be sure to use the device that it clicks into the slot until it does not contain your computer, follow these steps. ! Formatting the... Restore device defaults. ! Do not select NTFS from the slot while formatting. Do not remove the Memory Stick from the File system drop-down list as it may change. Before formatting the media, make sure that is ready for use. n 69 N Using Your VAIO Computer To view the contents on the media.

User Guide
Page 70
n 70 N Using Your VAIO Computer It may take time to format the Memory Stick depending on -screen instructions. ! 5 Click Start. 6 Follow the on the media type.
n 70 N Using Your VAIO Computer It may take time to format the Memory Stick depending on -screen instructions. ! 5 Click Start. 6 Follow the on the media type.

User Guide
Page 71
To remove a Memory Stick 1 Check that the Media Access indicator light is unlit before removing the Memory Stick. Large volumes of the slot. ! The Memory Stick ejects. 3 Pull the Memory Stick out of data may take time to load, so make sure the indicator is unlit. 2 Push in the Memory Stick toward the computer and release. n 71 N Using Your VAIO Computer Removing a Memory Stick ! Do not remove the Memory Stick while the Media Access indicator light is lit. If you do, you may pop out unexpectedly. Always remove the Memory Stick gently, or it may lose data.
To remove a Memory Stick 1 Check that the Media Access indicator light is unlit before removing the Memory Stick. Large volumes of the slot. ! The Memory Stick ejects. 3 Pull the Memory Stick out of data may take time to load, so make sure the indicator is unlit. 2 Push in the Memory Stick toward the computer and release. n 71 N Using Your VAIO Computer Removing a Memory Stick ! Do not remove the Memory Stick while the Media Access indicator light is lit. If you do, you may pop out unexpectedly. Always remove the Memory Stick gently, or it may lose data.


