User Guide
Page 2
... Started ...13 Locating Controls and Ports...14 About the Indicator Lights ...19 Setting Up Your Computer ...20 Shutting Down Your Computer Safely ...36 Using Your VAIO Computer ...37 Using the Keyboard ...38 Using the Touch Pad ...42 Using the Mouse ...43 Using the Built-in MOTION EYE Camera...46 Using the... Optical Disc Drive ...50 Using the TV Function ...60 Using the HDMI Input Function ...79 Using the ExpressCard Module ...88 Using the Memory Stick ...92 Using the SD Memory Card ...98 Using...
... Started ...13 Locating Controls and Ports...14 About the Indicator Lights ...19 Setting Up Your Computer ...20 Shutting Down Your Computer Safely ...36 Using Your VAIO Computer ...37 Using the Keyboard ...38 Using the Touch Pad ...42 Using the Mouse ...43 Using the Built-in MOTION EYE Camera...46 Using the... Optical Disc Drive ...50 Using the TV Function ...60 Using the HDMI Input Function ...79 Using the ExpressCard Module ...88 Using the Memory Stick ...92 Using the SD Memory Card ...98 Using...
User Guide
Page 3
n3 N Using the Network (LAN) ...102 Using the Wireless LAN (WLAN) ...104 Using the Bluetooth Function ...107 Using Peripheral Devices...112 Connecting External Speakers ...113 Connecting a Universal Serial Bus (USB) Device...115 Connecting a Printer ...117 Connecting an i.LINK Device ...118 Customizing Your VAIO Computer ...120 Setting the Password ...121 Setting Up Your Computer with the VAIO Control Center 126 Using the Power Saving Mode...127 Upgrading Your VAIO Computer...130 Adding and Removing Memory...131 Adding the Hard Disk Drive...138
n3 N Using the Network (LAN) ...102 Using the Wireless LAN (WLAN) ...104 Using the Bluetooth Function ...107 Using Peripheral Devices...112 Connecting External Speakers ...113 Connecting a Universal Serial Bus (USB) Device...115 Connecting a Printer ...117 Connecting an i.LINK Device ...118 Customizing Your VAIO Computer ...120 Setting the Password ...121 Setting Up Your Computer with the VAIO Control Center 126 Using the Power Saving Mode...127 Upgrading Your VAIO Computer...130 Adding and Removing Memory...131 Adding the Hard Disk Drive...138

User Guide
Page 6
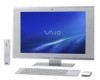
... purchase of this User Guide is intended for users of -the-art personal computing experience. ! Sony has combined leading-edge technology in the supplied manuals including this Sony VAIO® computer, and welcome to provide state-of the VAIO computers with the 64-bit operating system. Information in audio, video, computing, and communications to...
... purchase of this User Guide is intended for users of -the-art personal computing experience. ! Sony has combined leading-edge technology in the supplied manuals including this Sony VAIO® computer, and welcome to provide state-of the VAIO computers with the 64-bit operating system. Information in audio, video, computing, and communications to...

User Guide
Page 8
...: 1 Connect to the Internet. 2 Go to the Sony online support web site at the following URLs: http://esupport.sony.com/EN/VAIO/ for customers in USA http://www.sony.ca/support/ for customers in Canada http://esupport.sony.com/LA/ for customers in Spanish-speaking Latin American countries... or areas http://esupport.sony.com/BR/ for customers in this manual) - Contains an overview of your VAIO computer. It also includes information on your VAIO computer. Explains features of your computer must be connected to the Internet. ...
...: 1 Connect to the Internet. 2 Go to the Sony online support web site at the following URLs: http://esupport.sony.com/EN/VAIO/ for customers in USA http://www.sony.ca/support/ for customers in Canada http://esupport.sony.com/LA/ for customers in Spanish-speaking Latin American countries... or areas http://esupport.sony.com/BR/ for customers in this manual) - Contains an overview of your VAIO computer. It also includes information on your VAIO computer. Explains features of your computer must be connected to the Internet. ...

User Guide
Page 9
To access this on-screen guide: 1 Click Start and Help and Support. 2 Click Use my VAIO. 3 Click VAIO Recovery Center User Guide. Provides information about restoring individual software programs, hardware drivers, and drive partition(s) or your entire hard disk drive to the original factory settings. n9 N Before Use ❑ VAIO Recovery Center User Guide -
To access this on-screen guide: 1 Click Start and Help and Support. 2 Click Use my VAIO. 3 Click VAIO Recovery Center User Guide. Provides information about restoring individual software programs, hardware drivers, and drive partition(s) or your entire hard disk drive to the original factory settings. n9 N Before Use ❑ VAIO Recovery Center User Guide -

User Guide
Page 10
... information. ❑ Troubleshoot my VAIO Maintain and troubleshoot your VAIO computer with Internet and wireless setup, security setup, personalizing your VAIO computer, and creating recovery DVDs and more. ❑ Use my VAIO Access your VAIO computer. To access Help and ...VAIO tutorials, how-to find the answers you need. n 10 N Before Use Help and Support Help and Support is easy to access and provides a single location for general information and technical assistance for your VAIO user guide, interactive help with VAIO Care, system restore, backup and recovery, and contact Sony...
... information. ❑ Troubleshoot my VAIO Maintain and troubleshoot your VAIO computer with Internet and wireless setup, security setup, personalizing your VAIO computer, and creating recovery DVDs and more. ❑ Use my VAIO Access your VAIO computer. To access Help and ...VAIO tutorials, how-to find the answers you need. n 10 N Before Use Help and Support Help and Support is easy to access and provides a single location for general information and technical assistance for your VAIO user guide, interactive help with VAIO Care, system restore, backup and recovery, and contact Sony...

User Guide
Page 13
Be sure to get started using your VAIO computer. ! Before starting your computer for example, a printer, an external hard disk drive, a scanner, and so on) at a time, following the manufacturers' instructions. ❑ Locating ... Your Computer Safely (page 36) n 13 N Getting Started Getting Started This section describes how to start up your computer with your computer. Upon completion, connect one device (for the first time, do not connect any other hardware that did not originally come with only the supplied accessories connected and set up...
Be sure to get started using your VAIO computer. ! Before starting your computer for example, a printer, an external hard disk drive, a scanner, and so on) at a time, following the manufacturers' instructions. ❑ Locating ... Your Computer Safely (page 36) n 13 N Getting Started Getting Started This section describes how to start up your computer with your computer. Upon completion, connect one device (for the first time, do not connect any other hardware that did not originally come with only the supplied accessories connected and set up...
User Guide
Page 37
... This section describes how to get the most out of using your VAIO computer. ❑ Using the Keyboard (page 38) ❑ Using the Touch Pad (page 42) ❑ Using the Mouse (page ...43) ❑ Using the Built-in MOTION EYE Camera (page 46) ❑ Using the Optical Disc Drive (page 50) ❑ Using the TV Function (page 60) ❑ Using the HDMI Input Function (page 79) ❑ Using the ExpressCard Module (page 88) ❑ Using the Memory... (page 102) ❑ Using the Wireless LAN (WLAN) (page 104) ❑ Using the Bluetooth Function (page 107) n 37 N Using Your VAIO Computer
... This section describes how to get the most out of using your VAIO computer. ❑ Using the Keyboard (page 38) ❑ Using the Touch Pad (page 42) ❑ Using the Mouse (page ...43) ❑ Using the Built-in MOTION EYE Camera (page 46) ❑ Using the Optical Disc Drive (page 50) ❑ Using the TV Function (page 60) ❑ Using the HDMI Input Function (page 79) ❑ Using the ExpressCard Module (page 88) ❑ Using the Memory... (page 102) ❑ Using the Wireless LAN (WLAN) (page 104) ❑ Using the Bluetooth Function (page 107) n 37 N Using Your VAIO Computer
User Guide
Page 38
... (page 29) for the detailed procedure. Using incompatible batteries or mixing used ) and new batteries when replacing batteries in the wireless keyboard. n 38 N Using Your VAIO Computer Using the Keyboard A wireless keyboard is supplied with manganese batteries. The wireless keyboard uses a standard key arrangement with additional keys that the supplied AA...
... (page 29) for the detailed procedure. Using incompatible batteries or mixing used ) and new batteries when replacing batteries in the wireless keyboard. n 38 N Using Your VAIO Computer Using the Keyboard A wireless keyboard is supplied with manganese batteries. The wireless keyboard uses a standard key arrangement with additional keys that the supplied AA...
User Guide
Page 39
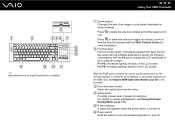
...LCD brightness of your computer screen. The task associated with each function key varies among software applications except the following combinations with the VAIO Control Center for more information. Fn+F6: Increases lighting intensity of power consumption. When the HDMI input is turned on. C Disc... Saving Mode (page 127). Fn+F5: Decreases lighting intensity of an image or a document displayed on and off. n 39 N Using Your VAIO Computer A Zoom buttons Changes the size of the LCD screen. ✍ Illustrated above is the English keyboard as an example. F Power switch Slide...
...LCD brightness of your computer screen. The task associated with each function key varies among software applications except the following combinations with the VAIO Control Center for more information. Fn+F6: Increases lighting intensity of power consumption. When the HDMI input is turned on. C Disc... Saving Mode (page 127). Fn+F5: Decreases lighting intensity of an image or a document displayed on and off. n 39 N Using Your VAIO Computer A Zoom buttons Changes the size of the LCD screen. ✍ Illustrated above is the English keyboard as an example. F Power switch Slide...
User Guide
Page 40
...page 80) for more in certain software applications. In such a case, you cannot use (page 29). See Setting Up Your Computer with the VAIO Control Center. L Directional arrow keys Move the pointer on and off. J S1 button Opens the Start menu of the Windows Media Center by...connection between the computer and the wireless keyboard is in place to indicate that the keyboard is selected, you can change the assignment with the VAIO Control Center (page 126) and find out more information. I Muting button Turns the volume on the computer screen. H Volume control buttons ...
...page 80) for more in certain software applications. In such a case, you cannot use (page 29). See Setting Up Your Computer with the VAIO Control Center. L Directional arrow keys Move the pointer on and off. J S1 button Opens the Start menu of the Windows Media Center by...connection between the computer and the wireless keyboard is in place to indicate that the keyboard is selected, you can change the assignment with the VAIO Control Center (page 126) and find out more information. I Muting button Turns the volume on the computer screen. H Volume control buttons ...
User Guide
Page 41
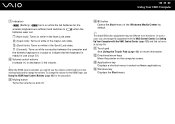
C Battery compartment Storage compartment for the AA batteries. B CONNECT button (page 29) Press to enable the wireless keyboard to adjust the keyboard angle. n 41 N Using Your VAIO Computer A Keyboard feet Flip open to communicate with the computer.
C Battery compartment Storage compartment for the AA batteries. B CONNECT button (page 29) Press to enable the wireless keyboard to adjust the keyboard angle. n 41 N Using Your VAIO Computer A Keyboard feet Flip open to communicate with the computer.

User Guide
Page 42
... edge of the touch pad to scroll vertically. Press the left button twice. To change other touch pad settings, click Start, All Programs, VAIO Control Center, Keyboard and Mouse and Pointing Device. It is recommended that keeps moving the pointer or scrolling when your computer. You can disable... on the touch pad while pressing the left button. Slide your finger along the right edge of the touch pad. n 42 N Using Your VAIO Computer Action Point Click Double-click Right-click Drag Scroll Description Slide your finger on an item or object. In such a case, take your ...
... edge of the touch pad to scroll vertically. Press the left button twice. To change other touch pad settings, click Start, All Programs, VAIO Control Center, Keyboard and Mouse and Pointing Device. It is recommended that keeps moving the pointer or scrolling when your computer. You can disable... on the touch pad while pressing the left button. Slide your finger along the right edge of the touch pad. n 42 N Using Your VAIO Computer Action Point Click Double-click Right-click Drag Scroll Description Slide your finger on an item or object. In such a case, take your ...
User Guide
Page 43
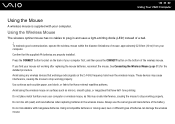
... of the battery. If you find your mouse not working properly. See Connecting the Wireless Mouse (page 31) for the detailed procedure. n 43 N Using Your VAIO Computer Using the Mouse A wireless mouse is supplied with manganese batteries. Avoid using the wireless mouse on surfaces such as mirrors, smooth glass, or magazines...
... of the battery. If you find your mouse not working properly. See Connecting the Wireless Mouse (page 31) for the detailed procedure. n 43 N Using Your VAIO Computer Using the Mouse A wireless mouse is supplied with manganese batteries. Avoid using the wireless mouse on surfaces such as mirrors, smooth glass, or magazines...
User Guide
Page 44
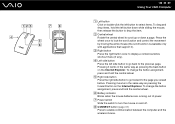
... way as pressing the forward button on and off. G Power switch Slide the switch to turn the mouse on the Internet Explorer. n 44 N Using Your VAIO Computer A Left button Click or double-click the left button to select items. To drag and drop items, hold the central wheel. To change the...
... way as pressing the forward button on and off. G Power switch Slide the switch to turn the mouse on the Internet Explorer. n 44 N Using Your VAIO Computer A Left button Click or double-click the left button to select items. To drag and drop items, hold the central wheel. To change the...

User Guide
Page 45
Adjusting the Mouse Functions 1 Click Start and Control Panel. 2 Click Mouse under Hardware and Sound. The Mouse Properties window appears. 3 Change the settings. n 45 N Using Your VAIO Computer
Adjusting the Mouse Functions 1 Click Start and Control Panel. 2 Click Mouse under Hardware and Sound. The Mouse Properties window appears. 3 Change the settings. n 45 N Using Your VAIO Computer
User Guide
Page 46
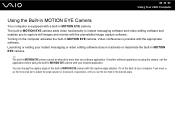
... software. Push down or up the horizontal bar to capture still images and movies with a built-in MOTION EYE camera. n 46 N Using Your VAIO Computer Using the Built-in MOTION EYE Camera Your computer is equipped with the preinstalled image capture software. The built-in MOTION EYE camera adds... to adjust the angle upward or downward, respectively, until you see the live feed in MOTION EYE camera cannot be shared by more than one software application. Turning on the computer activates the built-in MOTION EYE camera with the capture angle adjuster (1) on the back of the built...
... software. Push down or up the horizontal bar to capture still images and movies with a built-in MOTION EYE camera. n 46 N Using Your VAIO Computer Using the Built-in MOTION EYE Camera Your computer is equipped with the preinstalled image capture software. The built-in MOTION EYE camera adds... to adjust the angle upward or downward, respectively, until you see the live feed in MOTION EYE camera cannot be shared by more than one software application. Turning on the computer activates the built-in MOTION EYE camera with the capture angle adjuster (1) on the back of the built...

User Guide
Page 47
You cannot operate the built-in MOTION EYE camera with the Microsoft Windows Movie Maker software. The viewer window may show some noise, for example horizontal streaks, if you view a rapid-moving object. This is normal and does not indicate a malfunction. n 47 N Using Your VAIO Computer !
You cannot operate the built-in MOTION EYE camera with the Microsoft Windows Movie Maker software. The viewer window may show some noise, for example horizontal streaks, if you view a rapid-moving object. This is normal and does not indicate a malfunction. n 47 N Using Your VAIO Computer !
User Guide
Page 48
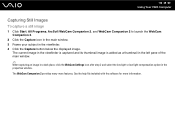
... step 2 and select the low light or low light compensation option in the viewfinder. 4 Click the Capture button below the displayed image. n 48 N Using Your VAIO Computer Capturing Still Images To capture a still image 1 Click Start, All Programs, ArcSoft WebCam Companion 2, and WebCam Companion 2 to launch the WebCam Companion 2. 2 Click the...
... step 2 and select the low light or low light compensation option in the viewfinder. 4 Click the Capture button below the displayed image. n 48 N Using Your VAIO Computer Capturing Still Images To capture a still image 1 Click Start, All Programs, ArcSoft WebCam Companion 2, and WebCam Companion 2 to launch the WebCam Companion 2. 2 Click the...
User Guide
Page 49
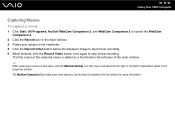
See the help file included with the software for more features. n 49 N Using Your VAIO Computer Capturing Movies To capture a movie 1 Click Start, All Programs, ArcSoft WebCam Companion 2, and WebCam Companion 2 to launch the WebCam Companion 2. 2 Click the Record icon ...
See the help file included with the software for more features. n 49 N Using Your VAIO Computer Capturing Movies To capture a movie 1 Click Start, All Programs, ArcSoft WebCam Companion 2, and WebCam Companion 2 to launch the WebCam Companion 2. 2 Click the Record icon ...


