User Guide
Page 3
... an i.LINK Device ...105 Connecting to a Network (LAN) ...107 Customizing Your VAIO Computer ...109 Setting the Password ...110 Setting Up Your Computer with VAIO Control Center 115 Using the Power Saving Mode...116 Upgrading Your VAIO Computer...119 Adding and Removing Memory...120 Adding the Hard Disk Drive...126 Precautions ...132 On Handling the LCD Screen ...133 On Using...
... an i.LINK Device ...105 Connecting to a Network (LAN) ...107 Customizing Your VAIO Computer ...109 Setting the Password ...110 Setting Up Your Computer with VAIO Control Center 115 Using the Power Saving Mode...116 Upgrading Your VAIO Computer...119 Adding and Removing Memory...120 Adding the Hard Disk Drive...126 Precautions ...132 On Handling the LCD Screen ...133 On Using...
User Guide
Page 119
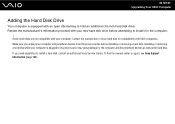
..., if you are not familiar with upgrading memory on a computer. ❑ You should contact your model, see Sony Support Information (page 185). ❑ Adding and Removing Memory (page 120) ❑ Adding the Hard Disk Drive (page 126) For assistance, contact an authorized Sony Service Center. n 119 N Upgrading Your VAIO Computer Upgrading Your VAIO Computer Your VAIO computer and memory modules use high precision components...
..., if you are not familiar with upgrading memory on a computer. ❑ You should contact your model, see Sony Support Information (page 185). ❑ Adding and Removing Memory (page 120) ❑ Adding the Hard Disk Drive (page 126) For assistance, contact an authorized Sony Service Center. n 119 N Upgrading Your VAIO Computer Upgrading Your VAIO Computer Your VAIO computer and memory modules use high precision components...
User Guide
Page 126
...attempting to the computer and the peripheral devices as well as the hard disk. Installing or removing a hard disk while your computer. If you unplug your hard disk for compatibility with VAIO computers. n 126 N Upgrading Your VAIO Computer Adding the Hard Disk Drive Your computer is plugged to... computer. ! Some hard disks are not compatible with your new hard disk drive before installing or removing a hard disk. Review the manufacturer's information provided with your computer is equipped with an open internal bay to install a hard disk, contact an authorized Sony Service...
...attempting to the computer and the peripheral devices as well as the hard disk. Installing or removing a hard disk while your computer. If you unplug your hard disk for compatibility with VAIO computers. n 126 N Upgrading Your VAIO Computer Adding the Hard Disk Drive Your computer is plugged to... computer. ! Some hard disks are not compatible with your new hard disk drive before installing or removing a hard disk. Review the manufacturer's information provided with your computer is equipped with an open internal bay to install a hard disk, contact an authorized Sony Service...
User Guide
Page 127
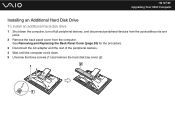
See Removing and Replacing the Back Panel Cover (page 20) for the procedure. 3 Disconnect the AC adapter and the rest of the peripheral devices. 4 Wait until the computer cools down the computer, turn off all peripheral devices, and disconnect peripheral devices from the accessible ports and jacks. 2 Remove the back panel cover from the computer. n 127 N Upgrading Your VAIO Computer Installing an Additional Hard Disk Drive To install an additional hard disk drive 1 Shut down . 5 Unscrew the three screws (1) and remove the hard disk bay cover (2).
See Removing and Replacing the Back Panel Cover (page 20) for the procedure. 3 Disconnect the AC adapter and the rest of the peripheral devices. 4 Wait until the computer cools down the computer, turn off all peripheral devices, and disconnect peripheral devices from the accessible ports and jacks. 2 Remove the back panel cover from the computer. n 127 N Upgrading Your VAIO Computer Installing an Additional Hard Disk Drive To install an additional hard disk drive 1 Shut down . 5 Unscrew the three screws (1) and remove the hard disk bay cover (2).
User Guide
Page 128
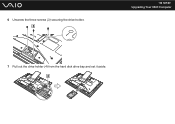
6 Unscrew the three screws (3) securing the drive holder. n 128 N Upgrading Your VAIO Computer 7 Pull out the drive holder (4) from the hard disk drive bay and set it aside.
6 Unscrew the three screws (3) securing the drive holder. n 128 N Upgrading Your VAIO Computer 7 Pull out the drive holder (4) from the hard disk drive bay and set it aside.

User Guide
Page 129
Do not overtighten these screws when securing the drive to the drive holder. 10 Slide the drive holder into the hard disk bay until it clicks into the drive holder and align the holes on each side of the drive bay. 9 Secure the drive to the drive holder with the screws. ! Be sure to connect the Serial ATA power cable and the Serial ATA cable. n 129 N Upgrading Your VAIO Computer 8 Place a new drive into place and secure it with screws, through the holes on each side of the drive holder. ! A new hard disk drive comes with the necessary screws.
Do not overtighten these screws when securing the drive to the drive holder. 10 Slide the drive holder into the hard disk bay until it clicks into the drive holder and align the holes on each side of the drive bay. 9 Secure the drive to the drive holder with the screws. ! Be sure to connect the Serial ATA power cable and the Serial ATA cable. n 129 N Upgrading Your VAIO Computer 8 Place a new drive into place and secure it with screws, through the holes on each side of the drive holder. ! A new hard disk drive comes with the necessary screws.
User Guide
Page 131
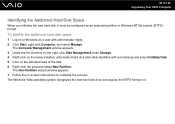
... hard disk drive and applies the NTFS format to complete the process. The New Partition wizard window appears. 7 Follow the on-screen instructions to it must be configured as a user with red marking) and select Initialize Disk. 5 Click on the newly installed, unformatted hard disk... format. The Computer Management window appears. 3 Under the file directory on the right, click Disk Management under Storage. 4 Right-click on the allocated area of the disk. 6 Right-click the area and select New Partition. n 131 N Upgrading Your VAIO Computer Identifying the Additional Hard Disk Space When ...
... hard disk drive and applies the NTFS format to complete the process. The New Partition wizard window appears. 7 Follow the on-screen instructions to it must be configured as a user with red marking) and select Initialize Disk. 5 Click on the newly installed, unformatted hard disk... format. The Computer Management window appears. 3 Under the file directory on the right, click Disk Management under Storage. 4 Right-click on the allocated area of the disk. 6 Right-click the area and select New Partition. n 131 N Upgrading Your VAIO Computer Identifying the Additional Hard Disk Space When ...
Safety Information / Renseignements relatifs à la sécurité
Page 3
...AGREEMENT TO APPLICABLE END USER AGREEMENTS AND FULL COMPLIANCE WITH APPLICABLE PRODUCT ACTIVATION PROCEDURES. Sony, VAIO, and the VAIO logo are trademarks or registered trademarks of the computer, and may be detailed during initial launch of the software product(s), or upon ...hard disk drive, confirm their respective owners. Before connecting compatible i.LINK PC peripherals to U.S. Use of Sony Corporation used only to designate that are available to your compatible i.LINK device for Canadian customers: Your new VAIO® computer includes certain software versions or upgrades...
...AGREEMENT TO APPLICABLE END USER AGREEMENTS AND FULL COMPLIANCE WITH APPLICABLE PRODUCT ACTIVATION PROCEDURES. Sony, VAIO, and the VAIO logo are trademarks or registered trademarks of the computer, and may be detailed during initial launch of the software product(s), or upon ...hard disk drive, confirm their respective owners. Before connecting compatible i.LINK PC peripherals to U.S. Use of Sony Corporation used only to designate that are available to your compatible i.LINK device for Canadian customers: Your new VAIO® computer includes certain software versions or upgrades...


