User Guide
Page 8
... Support. 2 Click Manuals & Specifications. 3 Click Media Center User Guide. To access this on -screen guide: 1 Click Start and Help and Support. 2 Click Manuals & Specifications. 3 Click VAIO Recovery Center User Guide. ❑ Media Center User Guide (Selected models only) - Provides information about restoring individual software programs, software drivers, and drive partition(s) or...
... Support. 2 Click Manuals & Specifications. 3 Click Media Center User Guide. To access this on -screen guide: 1 Click Start and Help and Support. 2 Click Manuals & Specifications. 3 Click VAIO Recovery Center User Guide. ❑ Media Center User Guide (Selected models only) - Provides information about restoring individual software programs, software drivers, and drive partition(s) or...
User Guide
Page 9
...need. Choose from Microsoft and Sony. ❑ VAIO Sites Contains links to other VAIO documents, and system and software information for your computer. ❑ VAIO Support Access interactive help you how to do it step by step. Run utilities that include VAIO Media Setup and Windows Network and Sharing Center, ...and access to wireless tutorials. ❑ Security Keep your data safe and your VAIO computer. It can either perform the task for you or show you accomplish...
...need. Choose from Microsoft and Sony. ❑ VAIO Sites Contains links to other VAIO documents, and system and software information for your computer. ❑ VAIO Support Access interactive help you how to do it step by step. Run utilities that include VAIO Media Setup and Windows Network and Sharing Center, ...and access to wireless tutorials. ❑ Security Keep your data safe and your VAIO computer. It can either perform the task for you or show you accomplish...
User Guide
Page 12
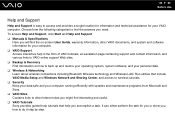
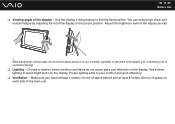
... reduce eye strain and muscle fatigue by adjusting the tilt of the speaker grill, to your comfort and work efficiency. ❑ Ventilation - Choose a location where windows and lights do not exert excessive pressure on your computer, especially on each side of mechanical damage. ❑ Lighting - Make sure you leave at least...
... reduce eye strain and muscle fatigue by adjusting the tilt of the speaker grill, to your comfort and work efficiency. ❑ Ventilation - Choose a location where windows and lights do not exert excessive pressure on your computer, especially on each side of mechanical damage. ❑ Lighting - Make sure you leave at least...
User Guide
Page 25
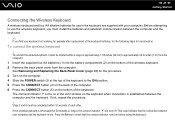
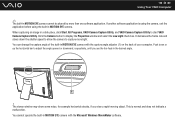
... CONNECT button (4) on the back of the computer. 6 Press the CONNECT button (5) on the bottom of the keyboard. Before attempting to use in the LCD window on the keyboard when connection is established between your computer. If the wireless keyboard is lost.
... CONNECT button (4) on the back of the computer. 6 Press the CONNECT button (5) on the bottom of the keyboard. Before attempting to use in the LCD window on the keyboard when connection is established between your computer. If the wireless keyboard is lost.

User Guide
Page 27
If the wireless keyboard is not being used for its battery power level. n 27 N Getting Started ✍ You can check the battery indicator ( or ) in a more 'ergonomic' position, flip open the keyboard feet. If the wireless keyboard does not operate properly, the batteries may need to avoid possible damage from battery leakage. If you want to put the wireless keyboard in the LCD window on the wireless keyboard for an extended period of time, remove the batteries to be replaced.
If the wireless keyboard is not being used for its battery power level. n 27 N Getting Started ✍ You can check the battery indicator ( or ) in a more 'ergonomic' position, flip open the keyboard feet. If the wireless keyboard does not operate properly, the batteries may need to avoid possible damage from battery leakage. If you want to put the wireless keyboard in the LCD window on the wireless keyboard for an extended period of time, remove the batteries to be replaced.
User Guide
Page 36
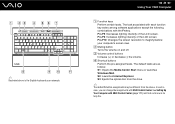
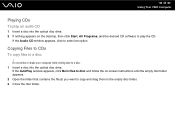
... Up Your Computer with the Fn key. The task associated with each function key varies among software applications except the following combinations with VAIO Control Center (page 111) and find out more in its help file. S2: Launches Internet Explorer. Fn+F10: Changes the screen... assignments may be different from the above is the English keyboard as follows: S1: Opens the Media Center Start menu or launches Windows Mail. n 36 N Using Your VAIO Computer A Function keys Perform certain tasks. C Volume control buttons Increase (+) or decrease (-) the volume. The default tasks are as...
... Up Your Computer with the Fn key. The task associated with each function key varies among software applications except the following combinations with VAIO Control Center (page 111) and find out more in its help file. S2: Launches Internet Explorer. Fn+F10: Changes the screen... assignments may be different from the above is the English keyboard as follows: S1: Opens the Media Center Start menu or launches Windows Mail. n 36 N Using Your VAIO Computer A Function keys Perform certain tasks. C Volume control buttons Increase (+) or decrease (-) the volume. The default tasks are as...
User Guide
Page 37
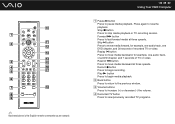
... place to perform basic math calculations. J Directional arrow keys Move the pointer on power management, see Using the Power Saving Mode (page 112). H Windows key Displays the Start menu. when the (Num lock): Turns on while in the Num Lock state. (Caps lock): Turns on while in the...K Numeric keypad Use the numeric keypad to type numbers or to indicate that the keyboard is in certain software applications. n 37 N Using Your VAIO Computer E Sleep button Provides for the wireless keyboard are sufficient and switches to turn on and off the wireless keyboard. F POWER switch Slide the ...
... place to perform basic math calculations. J Directional arrow keys Move the pointer on power management, see Using the Power Saving Mode (page 112). H Windows key Displays the Start menu. when the (Num lock): Turns on while in the Num Lock state. (Caps lock): Turns on while in the...K Numeric keypad Use the numeric keypad to type numbers or to indicate that the keyboard is in certain software applications. n 37 N Using Your VAIO Computer E Sleep button Provides for the wireless keyboard are sufficient and switches to turn on and off the wireless keyboard. F POWER switch Slide the ...
User Guide
Page 41
n 41 N Using Your VAIO Computer The Mouse Properties window appears. 3 Change the settings. Adjusting the Mouse Functions 1 Click Start and Control Panel. 2 Click Mouse under Hardware and Sound.
n 41 N Using Your VAIO Computer The Mouse Properties window appears. 3 Change the settings. Adjusting the Mouse Functions 1 Click Start and Control Panel. 2 Click Mouse under Hardware and Sound.
User Guide
Page 43
...the desired angle. ! You cannot operate the built-in a dark place, click Start, All Programs, VAIO Camera Capture Utility, and VAIO Camera Capture Utility to capture more than one software application. It decreases the frame rate and slows down or up the horizontal bar to display the ...Properties window and select the Low Light check box. The viewer window may show some noise, for example horizontal...
...the desired angle. ! You cannot operate the built-in a dark place, click Start, All Programs, VAIO Camera Capture Utility, and VAIO Camera Capture Utility to capture more than one software application. It decreases the frame rate and slows down or up the horizontal bar to display the ...Properties window and select the Low Light check box. The viewer window may show some noise, for example horizontal...
User Guide
Page 52
... the desktop, then click Start, All Programs, and the desired CD software to the empty disc folder. 3 Close the disc folder. If the Audio CD window appears, click to a disc ! Do not strike or shake your computer while writing data to a disc. 1 Insert a disc into the optical disc drive. 2 If nothing... play an audio CD 1 Insert a disc into the optical disc drive. Copying Files to CDs To copy files to select an option. n 52 N Using Your VAIO Computer Playing CDs To play the CD.
... the desktop, then click Start, All Programs, and the desired CD software to the empty disc folder. 3 Close the disc folder. If the Audio CD window appears, click to a disc ! Do not strike or shake your computer while writing data to a disc. 1 Insert a disc into the optical disc drive. 2 If nothing... play an audio CD 1 Insert a disc into the optical disc drive. Copying Files to CDs To copy files to select an option. n 52 N Using Your VAIO Computer Playing CDs To play the CD.

User Guide
Page 55
... boards installed: one analog tuner board and one ATSC tuner board, or one analog tuner board only. See the on-screen Media Center User Guide for more information on Media Center features. n 55 N Using Your VAIO Computer Using the TV Function To enhance your audio and visual experience in conjunction with Windows Media Center, your computer...
... boards installed: one analog tuner board and one ATSC tuner board, or one analog tuner board only. See the on-screen Media Center User Guide for more information on Media Center features. n 55 N Using Your VAIO Computer Using the TV Function To enhance your audio and visual experience in conjunction with Windows Media Center, your computer...
User Guide
Page 68
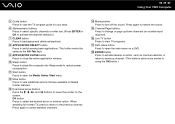
... previously recorded TV programs. Record z button Press to begin recording. D Recorded TV button Press to move media backward, for example, one audio track, one DVD chapter, and 7 seconds of recorded TV or video. Forward M button Press to pause media playback. n 68 N Using Your VAIO Computer A Pause... X button Press to fast-forward media at three speeds. B Back button Press to return to stop media playback or TV recording session. ✍ Illustrated above is the English remote commander as an example. Stop x button Press to the previous window.
... previously recorded TV programs. Record z button Press to begin recording. D Recorded TV button Press to move media backward, for example, one audio track, one DVD chapter, and 7 seconds of recorded TV or video. Forward M button Press to pause media playback. n 68 N Using Your VAIO Computer A Pause... X button Press to fast-forward media at three speeds. B Back button Press to return to stop media playback or TV recording session. ✍ Illustrated above is the English remote commander as an example. Stop x button Press to the previous window.
User Guide
Page 69
... your area. J Sleep button Press to place the computer into Sleep mode to backspace and delete entered text. n 69 N Using Your VAIO Computer E Guide button Press to view the TV program guide for Media Center features. This button works the same as the Alt+Tab keys. K Start button Press to close the...
... your area. J Sleep button Press to place the computer into Sleep mode to backspace and delete entered text. n 69 N Using Your VAIO Computer E Guide button Press to view the TV program guide for Media Center features. This button works the same as the Alt+Tab keys. K Start button Press to close the...
User Guide
Page 76
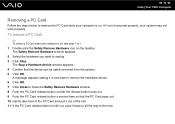
... can be safely removed from the system. 5 Click OK. The Stop a Hardware device window appears. 4 Confirm that the PC Card pops out. 10 Gently take hold of the PC Card and pull it out of the slot. 11 If the PC Card release button is still out, push it back in all the way... to the end. n 76 N Using Your VAIO Computer Removing a PC Card Follow the steps below to remove the PC Card while your computer is on the taskbar. If it is not removed properly, your system may not work properly. A message appears...
... can be safely removed from the system. 5 Click OK. The Stop a Hardware device window appears. 4 Confirm that the PC Card pops out. 10 Gently take hold of the PC Card and pull it out of the slot. 11 If the PC Card release button is still out, push it back in all the way... to the end. n 76 N Using Your VAIO Computer Removing a PC Card Follow the steps below to remove the PC Card while your computer is on the taskbar. If it is not removed properly, your system may not work properly. A message appears...

User Guide
Page 80
...system. 5 Click OK. To remove an ExpressCard module ✍ To remove an ExpressCard module when your system may not work properly. The Safely Remove Hardware window appears. 2 Select the hardware you want to unplug. 3 Click Stop. If it is not removed properly, your computer is off, skip steps 1 ...to 7. 1 Double-click the Safely Remove Hardware icon on . A message appears stating it is on the taskbar. n 80 N Using Your VAIO Computer Removing an ExpressCard Module Follow the steps below to remove the ExpressCard module while your computer is now safe to remove the device. 6 Click...
...system. 5 Click OK. To remove an ExpressCard module ✍ To remove an ExpressCard module when your system may not work properly. The Safely Remove Hardware window appears. 2 Select the hardware you want to unplug. 3 Click Stop. If it is not removed properly, your computer is off, skip steps 1 ...to 7. 1 Double-click the Safely Remove Hardware icon on . A message appears stating it is on the taskbar. n 80 N Using Your VAIO Computer Removing an ExpressCard Module Follow the steps below to remove the ExpressCard module while your computer is now safe to remove the device. 6 Click...
User Guide
Page 84
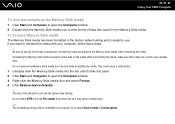
..., make sure that is ready for use the device that it clicks into place. 2 Click Start and Computer to open the Computer window. 2 Double-click the Memory Stick media icon to open the Computer window. 3 Right-click the Memory Stick media icon and select Format. 4 Click Restore device defaults. ! n 84 N Using Your...
..., make sure that is ready for use the device that it clicks into place. 2 Click Start and Computer to open the Computer window. 2 Double-click the Memory Stick media icon to open the Computer window. 3 Right-click the Memory Stick media icon and select Format. 4 Click Restore device defaults. ! n 84 N Using Your...
User Guide
Page 91
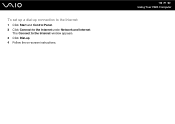
The Connect to the Internet under Network and Internet. n 91 N Using Your VAIO Computer To set up a dial-up connection to the Internet 1 Click Start and Control Panel. 2 Click Connect to the Internet window appears. 3 Click Dial-up. 4 Follow the on-screen instructions.
The Connect to the Internet under Network and Internet. n 91 N Using Your VAIO Computer To set up a dial-up connection to the Internet 1 Click Start and Control Panel. 2 Click Connect to the Internet window appears. 3 Click Dial-up. 4 Follow the on-screen instructions.
User Guide
Page 95
...point (ad-hoc) ! The Wireless LAN indicator lights up. 2 Click Start, All Programs, and VAIO Control Center. 3 Double-click Network Connections and VAIO Smart Network. ✍ For information on the VAIO Smart Network software, see the help file on the software. 4 Click the button next to or above... your desired wireless option(s). 5 Click Start and Control Panel. 6 Click View network status and tasks under Network and Internet. 7 Click Set up a connection or network window appears. 8...
...point (ad-hoc) ! The Wireless LAN indicator lights up. 2 Click Start, All Programs, and VAIO Control Center. 3 Double-click Network Connections and VAIO Smart Network. ✍ For information on the VAIO Smart Network software, see the help file on the software. 4 Click the button next to or above... your desired wireless option(s). 5 Click Start and Control Panel. 6 Click View network status and tasks under Network and Internet. 7 Click Set up a connection or network window appears. 8...
User Guide
Page 98
Turning off the wireless LAN functionality while accessing remote documents, files, or resources may result in the VAIO Smart Network window. ! n 98 N Using Your VAIO Computer Stopping Wireless LAN Communication To stop wireless LAN communication Click the button next to or above the WLAN icon in data loss.
Turning off the wireless LAN functionality while accessing remote documents, files, or resources may result in the VAIO Smart Network window. ! n 98 N Using Your VAIO Computer Stopping Wireless LAN Communication To stop wireless LAN communication Click the button next to or above the WLAN icon in data loss.
User Guide
Page 101
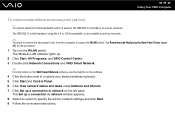
A message appears stating it is on or off , skip steps 1 to malfunction. The Safely Remove Hardware window appears. 3 Select the floppy disk drive you want to close the Safely Remove Hardware window. 9 Disconnect the floppy disk drive from the system. 6 Click OK. n 101 N Using Peripheral Devices... Disconnecting a USB floppy disk drive You can be safely removed from the computer. The Stop a Hardware device window appears. 5 Confirm that the floppy disk drive can disconnect a USB floppy disk drive when your computer is in Sleep mode may cause the...
A message appears stating it is on or off , skip steps 1 to malfunction. The Safely Remove Hardware window appears. 3 Select the floppy disk drive you want to close the Safely Remove Hardware window. 9 Disconnect the floppy disk drive from the system. 6 Click OK. n 101 N Using Peripheral Devices... Disconnecting a USB floppy disk drive You can be safely removed from the computer. The Stop a Hardware device window appears. 5 Confirm that the floppy disk drive can disconnect a USB floppy disk drive when your computer is in Sleep mode may cause the...


