Operating Instructions
Page 4
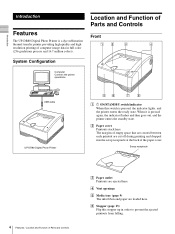
B Paper cover Printouts stack here. D Vent openings E Media tray (page 9) The ink ribbon and paper are cut off during printing and dropped into the scrap receptacle at the back of computer image data ...
B Paper cover Printouts stack here. D Vent openings E Media tray (page 9) The ink ribbon and paper are cut off during printing and dropped into the scrap receptacle at the back of computer image data ...
Operating Instructions
Page 9
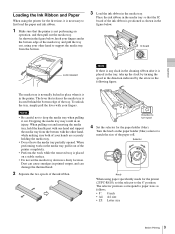
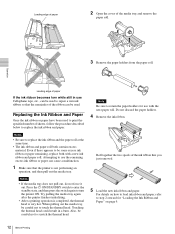
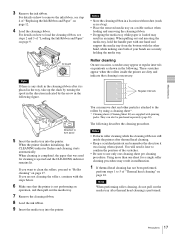
... (blue). Operation Loading the Ink Ribbon and Paper When using paper specifically made for the printer (2UPC-R810), set the media tray down in the media tray so that releases the media tray is located behind the bottom edge of the tray. To unlock the tray, simply pull the lever with your other... hand, while making sure both of the ink ribbon. Dust can cause smudges in the printer. As shown in the figure below . The media tray is normally locked in place when it is in printed output, and can damage the thermal head. 2 Separate the two spools of your hands...
... (blue). Operation Loading the Ink Ribbon and Paper When using paper specifically made for the printer (2UPC-R810), set the media tray down in the media tray so that releases the media tray is located behind the bottom edge of the tray. To unlock the tray, simply pull the lever with your other... hand, while making sure both of the ink ribbon. Dust can cause smudges in the printer. As shown in the figure below . The media tray is normally locked in place when it is in printed output, and can damage the thermal head. 2 Separate the two spools of your hands...
Operating Instructions
Page 10
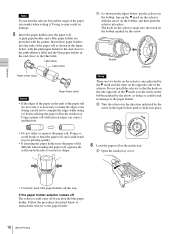
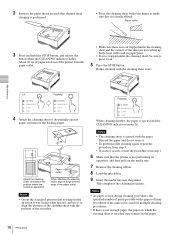
.... Do not install the selector so that the hook on the bobbin marked by the arrow in the figure below , put the selector in the media tray. Doing so could break or bend the paper roll, and could come off The selector could result in the figure below to reattach the... roll are provided with the pink paper holder in the end closer to the pink adhesive label and the blue paper holder in the media tray. 1 Open the media tray cover. • Correctly insert the paper holders all the way. Operation Note Do not turn the selector beyond the range of the...
.... Do not install the selector so that the hook on the bobbin marked by the arrow in the figure below , put the selector in the media tray. Doing so could break or bend the paper roll, and could come off The selector could result in the figure below to reattach the... roll are provided with the pink paper holder in the end closer to the pink adhesive label and the blue paper holder in the media tray. 1 Open the media tray cover. • Correctly insert the paper holders all the way. Operation Note Do not turn the selector beyond the range of the...
Operating Instructions
Page 11
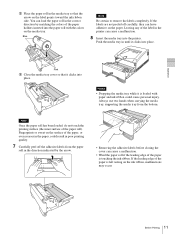
... (the inner surface of the paper is touching the ink ribbon. Leaving any of the paper holders inserted into place. Notes • Dropping the media tray while it is left resting on the surface of the paper, or even creases in the paper, could cause personal injury. Always use two... hands when carrying the media tray, supporting the media tray from the paper roll in the direction indicated by matching the colors of the label in the printer can cause a malfunction. 8 Insert...
... (the inner surface of the paper is touching the ink ribbon. Leaving any of the paper holders inserted into place. Notes • Dropping the media tray while it is left resting on the surface of the paper, or even creases in the paper, could cause personal injury. Always use two... hands when carrying the media tray, supporting the media tray from the paper roll in the direction indicated by matching the colors of the label in the printer can cause a malfunction. 8 Insert...
Operating Instructions
Page 12
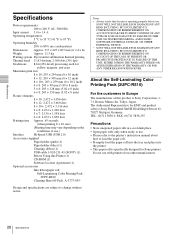
... hot. Press the 1 ON/STANDBY switch to enter the standby state, and then press the switch again to print the specified number of the media tray and remove the paper roll. Touching the thermal head could result in use with a new ink ribbon and paper roll. Do not discard.... For details on page 9. 12 Before Printing Leading edge of paper If the ink ribbon becomes torn while still in a burn. Try pulling the media tray again after the printer finishes initializing. • After a printing operation is completed, the thermal head is not performing an operation, and then pull...
... hot. Press the 1 ON/STANDBY switch to enter the standby state, and then press the switch again to print the specified number of the media tray and remove the paper roll. Touching the thermal head could result in use with a new ink ribbon and paper roll. Do not discard.... For details on page 9. 12 Before Printing Leading edge of paper If the ink ribbon becomes torn while still in a burn. Try pulling the media tray again after the printer finishes initializing. • After a printing operation is completed, the thermal head is not performing an operation, and then pull...
Operating Instructions
Page 13
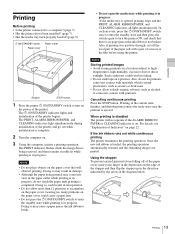
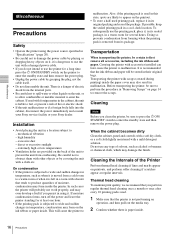
... on page 22. Notes Storing printed images • Avoid storing printouts in a location subject to break. • Do not open the media tray while printing is on the paper cover that there is no paper jam or the ink ribbon is in progress. Printing of the stopper...Printing Before printing • Is the printer connected to a computer? (page 7) • Has the printer driver been installed? (page 7) • Has the media tray been properly loaded? (page 9) 1 ON/STANDBY switch Paper cover Paper outlet Stopper STOP button 1 Press the printer 1 ON/STANDBY switch to turn the printer...
... on page 22. Notes Storing printed images • Avoid storing printouts in a location subject to break. • Do not open the media tray while printing is on the paper cover that there is no paper jam or the ink ribbon is in progress. Printing of the stopper...Printing Before printing • Is the printer connected to a computer? (page 7) • Has the printer driver been installed? (page 7) • Has the media tray been properly loaded? (page 9) 1 ON/STANDBY switch Paper cover Paper outlet Stopper STOP button 1 Press the printer 1 ON/STANDBY switch to turn the printer...
Operating Instructions
Page 14
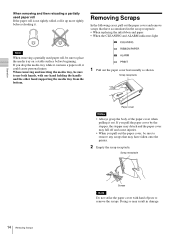
... it . Operation When removing and then reloading a partially used paper roll, be sure to use both hands, with hard objects to place the media tray on a stable surface before reloading it out. Scrap receptacle 14 Removing Scraps Scraps Note Do not strike the paper cover with one hand holding... the handle and the other hand supporting the media tray from the bottom. 1 Pull out the paper cover horizontally as shown. Doing so may have accumulated in damage. If you pull out...
... it . Operation When removing and then reloading a partially used paper roll, be sure to use both hands, with hard objects to place the media tray on a stable surface before reloading it out. Scrap receptacle 14 Removing Scraps Scraps Note Do not strike the paper cover with one hand holding... the handle and the other hand supporting the media tray from the bottom. 1 Pull out the paper cover horizontally as shown. Doing so may have accumulated in damage. If you pull out...
Operating Instructions
Page 16
... moved from a cold room to a warm room or when it is recommended that the printer is not performing an operation, and then pull out the media tray. 2 Confirm whether there is removed from forming when the printing pack is paper inside . Installation • Avoid placing the unit in using the power... of fire or electric shock. • If the unit malfunctions or if a foreign body falls into the cabinet, disconnect the power immediately and consult your Sony service facility or your Sony dealer. mechanical vibration -
... moved from a cold room to a warm room or when it is recommended that the printer is not performing an operation, and then pull out the media tray. 2 Confirm whether there is removed from forming when the printing pack is paper inside . Installation • Avoid placing the unit in using the power... of fire or electric shock. • If the unit malfunctions or if a foreign body falls into the cabinet, disconnect the power immediately and consult your Sony service facility or your Sony dealer. mechanical vibration -
Operating Instructions
Page 17
...load the cleaning ribbon, see step 4 of "Thermal head cleaning" on a stable surface when loading and removing the cleaning ribbon. • Dropping the media tray while paper is ejected and the CLEANING indicator remains lit. You will need it later to 5 of "Replacing the Ink Ribbon and Paper" on...For details on how to "Roller cleaning" on page 12. 4 Load the cleaning ribbon. Note When performing roller cleaning, do not pull out the media tray after thermal head cleaning. • Keep a scratched printout and remember the direction it is placed in the tray, take up the slack by...
...load the cleaning ribbon, see step 4 of "Thermal head cleaning" on a stable surface when loading and removing the cleaning ribbon. • Dropping the media tray while paper is ejected and the CLEANING indicator remains lit. You will need it later to 5 of "Replacing the Ink Ribbon and Paper" on...For details on how to "Roller cleaning" on page 12. 4 Load the cleaning ribbon. Note When performing roller cleaning, do not pull out the media tray after thermal head cleaning. • Keep a scratched printout and remember the direction it is placed in the tray, take up the slack by...
Operating Instructions
Page 18
... sheet with your finger to make sure that the printer is not performing an operation, and then pull out the media tray. 7 Remove the cleaning ribbon. 8 Load the ink ribbon. 9 Insert the media tray into the printer. Lit Flashing Flashing 4 Attach the cleaning sheet to align the position of the cleaning sheet...
... sheet with your finger to make sure that the printer is not performing an operation, and then pull out the media tray. 7 Remove the cleaning ribbon. 8 Load the ink ribbon. 9 Insert the media tray into the printer. Lit Flashing Flashing 4 Attach the cleaning sheet to align the position of the cleaning sheet...
Operating Instructions
Page 20
...Optional accessories Ink ribbon/paper roll Self-Laminating Color Printing Pack 2UPC-R810 Cleaning Sheet 80 Pack A-1737-055- The Authorized Representative for Sony printers. SONY WILL NOT BE LIABLE FOR DAMAGES OF ANY KIND INCLUDING, BUT NOT LIMITED TO, COMPENSATION OR REIMBURSEMENT ON ACCOUNT OF FAILURE TO ...PRINT CONTENT OF ANY TYPE OR LOSS OF DATA DUE TO FAILURE OF THIS UNIT OR ITS PRINTING MEDIA, ASSOCIATED SOFTWARE, EXTERNAL STORAGE, OR OTHER EXTERNAL DEVICE. • SONY WILL NOT BE LIABLE FOR DAMAGES OF ANY KIND INCLUDING, BUT NOT LIMITED TO, COMPENSATION OR REIMBURSEMENT ON...
...Optional accessories Ink ribbon/paper roll Self-Laminating Color Printing Pack 2UPC-R810 Cleaning Sheet 80 Pack A-1737-055- The Authorized Representative for Sony printers. SONY WILL NOT BE LIABLE FOR DAMAGES OF ANY KIND INCLUDING, BUT NOT LIMITED TO, COMPENSATION OR REIMBURSEMENT ON ACCOUNT OF FAILURE TO ...PRINT CONTENT OF ANY TYPE OR LOSS OF DATA DUE TO FAILURE OF THIS UNIT OR ITS PRINTING MEDIA, ASSOCIATED SOFTWARE, EXTERNAL STORAGE, OR OTHER EXTERNAL DEVICE. • SONY WILL NOT BE LIABLE FOR DAMAGES OF ANY KIND INCLUDING, BUT NOT LIMITED TO, COMPENSATION OR REIMBURSEMENT ON...
Operating Instructions
Page 21
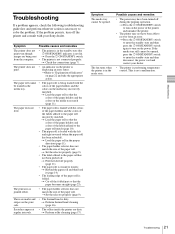
...to turn on the printer is folded. t Rewind the paper roll and then load it (page 14). • The leading edge of Indicators" on the media tray match (page 11). There are marks and • The thermal head is not a malfunction. 21 Troubleshooting regular intervals. The fan turns when the printer... holder selector does not match the size of the labels affixed to enter the standby state and then disconnect the power cord and contact your Sony dealer. tPress the 1 ON/STANDBY switch to enter the standby state and then press the 1 ON/STANDBY switch again to the paper roll match (...
...to turn on the printer is folded. t Rewind the paper roll and then load it (page 14). • The leading edge of Indicators" on the media tray match (page 11). There are marks and • The thermal head is not a malfunction. 21 Troubleshooting regular intervals. The fan turns when the printer... holder selector does not match the size of the labels affixed to enter the standby state and then disconnect the power cord and contact your Sony dealer. tPress the 1 ON/STANDBY switch to enter the standby state and then press the 1 ON/STANDBY switch again to the paper roll match (...
Operating Instructions
Page 22
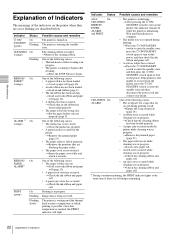
... of On CLEANING, RIBBON/ PAPER, ALARM, and PRINT • The printer is loaded. Wait until initialization is complete. • The media tray was in progress. • The printer is waiting until the thermal head reaches a temperature at the same time if there are still...lights at which printing is turned on the power, and then check the ink ribbon and paper roll. • A serious failure has occurred. tClose the media tray properly. • A paper jam has occurred in progress. Indicator 1 ON/ STANDBY (green) Status On Flashing CLEANING On (orange) Flashing RIBBON/...
... of On CLEANING, RIBBON/ PAPER, ALARM, and PRINT • The printer is loaded. Wait until initialization is complete. • The media tray was in progress. • The printer is waiting until the thermal head reaches a temperature at the same time if there are still...lights at which printing is turned on the power, and then check the ink ribbon and paper roll. • A serious failure has occurred. tClose the media tray properly. • A paper jam has occurred in progress. Indicator 1 ON/ STANDBY (green) Status On Flashing CLEANING On (orange) Flashing RIBBON/...
Operating Instructions
Page 23
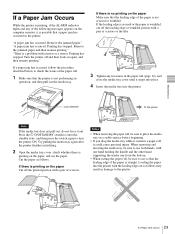
... then resume printing." If there is printing on the paper Make sure that the printer is not performing an operation, and then pull out the media tray. If there is no printing on the paper Cut off the leading edge or wrinkled portion with one hand holding the handle and the... other hand supporting the media tray from the bottom. • When cutting the paper roll, be sure to cut the paper. "There is a problem with the leading edge cut off...
... then resume printing." If there is printing on the paper Make sure that the printer is not performing an operation, and then pull out the media tray. If there is no printing on the paper Cut off the leading edge or wrinkled portion with one hand holding the handle and the... other hand supporting the media tray from the bottom. • When cutting the paper roll, be sure to cut the paper. "There is a problem with the leading edge cut off...
