Operating Instructions
Page 1
UP-CR20L © 2008 Sony Corporation 4-116-212-12 (1) Digital Photo Printer Operating Instructions Before operating the unit, please read this manual thoroughly and retain it for future reference.
UP-CR20L © 2008 Sony Corporation 4-116-212-12 (1) Digital Photo Printer Operating Instructions Before operating the unit, please read this manual thoroughly and retain it for future reference.
Operating Instructions
Page 2
... To reduce the risk of the following two conditions: (1) this device may not cause harmful interference, and (2) this product. This digital photo printer is encouraged to try to correct the interference by one or more of fire or electric shock, do not open the cabinet. If you have...comply with this apparatus to rain or moisture. If this product, you call ; All interface cables used in accordance with the limits for your Sony dealer regarding this device must be determined by turning the equipment off and on power connection Use a proper power cord for a digital device ...
... To reduce the risk of the following two conditions: (1) this device may not cause harmful interference, and (2) this product. This digital photo printer is encouraged to try to correct the interference by one or more of fire or electric shock, do not open the cabinet. If you have...comply with this apparatus to rain or moisture. If this product, you call ; All interface cables used in accordance with the limits for your Sony dealer regarding this device must be determined by turning the equipment off and on power connection Use a proper power cord for a digital device ...
Operating Instructions
Page 4
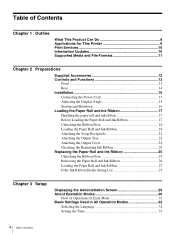
Table of Contents Chapter 1 Outline What This Product Can Do 8 Applications for This Printer 9 Print Services 10 Information Updates 10 Supported Media and File Formats 11 Chapter 2 Preparations Supplied Accessories 12 Controls and Functions 13 Front ...13 Rear ...14 ...
Table of Contents Chapter 1 Outline What This Product Can Do 8 Applications for This Printer 9 Print Services 10 Information Updates 10 Supported Media and File Formats 11 Chapter 2 Preparations Supplied Accessories 12 Controls and Functions 13 Front ...13 Rear ...14 ...

Operating Instructions
Page 6
... Quality 53 Adjusting the Gray Balance 53 Setting the Image Quality for an Expansion Printer 54 Displaying Logs 54 Displaying the Print Log 54 Displaying the Sales Log 55 Displaying the System Log 55 Adjusting the Touch ...from DPOF Settings 69 Printing with Expansion Printers 70 Connecting the Expansion Printer to the Unit 70 Confirming Information Related to the Expansion Printer 70 Printing from the Expansion Printer 70 Adjusting the Image Quality for the Expansion Printer 71 Printing From a Computer 71 Installing the Printer Driver 71 Computer Connection Setting 71 Connecting...
... Quality 53 Adjusting the Gray Balance 53 Setting the Image Quality for an Expansion Printer 54 Displaying Logs 54 Displaying the Print Log 54 Displaying the Sales Log 55 Displaying the System Log 55 Adjusting the Touch ...from DPOF Settings 69 Printing with Expansion Printers 70 Connecting the Expansion Printer to the Unit 70 Confirming Information Related to the Expansion Printer 70 Printing from the Expansion Printer 70 Adjusting the Image Quality for the Expansion Printer 71 Printing From a Computer 71 Installing the Printer Driver 71 Computer Connection Setting 71 Connecting...
Operating Instructions
Page 8
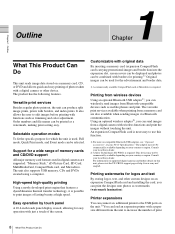
... devices Using an optional Bluetooth USB adaptor1), you can be commercially available depending on your local Sony dealer. This device may not be selected. Printer expansions You can connect an additional printer to the USB ports on the unit.1) You can produce split image prints, prints with a... from Bluetooth-compatible devices such as mobile phones and print. Versatile print services Besides regular photo printout, the unit can load an expansion printer with borders, and index prints. The unit also supports USB memory, CDs and DVDs created using a computer. High-speed high-quality ...
... devices Using an optional Bluetooth USB adaptor1), you can be commercially available depending on your local Sony dealer. This device may not be selected. Printer expansions You can connect an additional printer to the USB ports on the unit.1) You can produce split image prints, prints with a... from Bluetooth-compatible devices such as mobile phones and print. Versatile print services Besides regular photo printout, the unit can load an expansion printer with borders, and index prints. The unit also supports USB memory, CDs and DVDs created using a computer. High-speed high-quality ...
Operating Instructions
Page 9
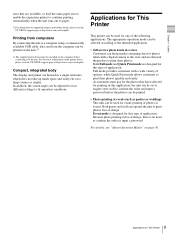
... easily fits on supported printers and further details, please visit the UP-CR20L support page at http://www.sony.net/snaplab. Compact, integrated body The display and printer are designed for This Printer For details, see "About Operation Modes" on the printer driver, please visit the... UP-CR20L support page at http://www.sony.net/snaplab. For the latest ...
... easily fits on supported printers and further details, please visit the UP-CR20L support page at http://www.sony.net/snaplab. Compact, integrated body The display and printer are designed for This Printer For details, see "About Operation Modes" on the printer driver, please visit the... UP-CR20L support page at http://www.sony.net/snaplab. For the latest ...

Operating Instructions
Page 12
... receptacle (1) Cleaning ribbon (1) Ribbon tray* (1) Paper core* (1) Paper adapter (blue)* (1) Paper adapter (pink)* (1) CD-ROM (1) Before Using This Printer (1) Warranty Card (1) Service and Customer Support Information (1) * The paper core is located inside the printer and must be removed when loading or removing paper. For details on removing the core, see "Loading the...
... receptacle (1) Cleaning ribbon (1) Ribbon tray* (1) Paper core* (1) Paper adapter (blue)* (1) Paper adapter (pink)* (1) CD-ROM (1) Before Using This Printer (1) Warranty Card (1) Service and Customer Support Information (1) * The paper core is located inside the printer and must be removed when loading or removing paper. For details on removing the core, see "Loading the...
Operating Instructions
Page 14
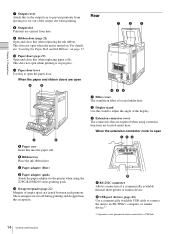
...D Paper adapter (pink) Attach the paper adapters to adjust the angle of the display. k Paper door lever Use this stand to the printer when using extension functions are cut off during printing and dropped into the paper roll. g Output cover Attach this receptacle. 14 Controls and... Functions A RS-232C connecter Allows connection of a commercially available thermal sheet printer or similar device. B Ribbon tray Place the ink ribbon here. These margins are located under here. c Extension connector cover The connectors...
...D Paper adapter (pink) Attach the paper adapters to adjust the angle of the display. k Paper door lever Use this stand to the printer when using extension functions are cut off during printing and dropped into the paper roll. g Output cover Attach this receptacle. 14 Controls and... Functions A RS-232C connecter Allows connection of a commercially available thermal sheet printer or similar device. B Ribbon tray Place the ink ribbon here. These margins are located under here. c Extension connector cover The connectors...
Operating Instructions
Page 15
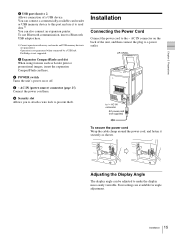
... device. e ~ AC IN (power source) connector (page 15) Connect the power cord here. Adjusting the Display Angle The display angle can also connect an expansion printer. Four settings are available for angle adjustment. 15 Installation You can connect a commercially available card reader or USB memory device to make the display more...
... device. e ~ AC IN (power source) connector (page 15) Connect the power cord here. Adjusting the Display Angle The display angle can also connect an expansion printer. Four settings are available for angle adjustment. 15 Installation You can connect a commercially available card reader or USB memory device to make the display more...
Operating Instructions
Page 18
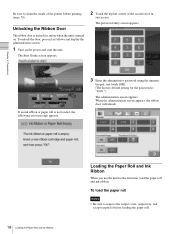
... • Be sure to clean the inside of the screen twice in succession. The Start Guide screen appears. 2 Touch the top left corner of the printer before loading the paper roll. The password entry screen appears. To unlock the door, proceed as follows and display the administration screen. 1 Turn on . When...
... • Be sure to clean the inside of the screen twice in succession. The Start Guide screen appears. 2 Touch the top left corner of the printer before loading the paper roll. The password entry screen appears. To unlock the door, proceed as follows and display the administration screen. 1 Turn on . When...
Operating Instructions
Page 20
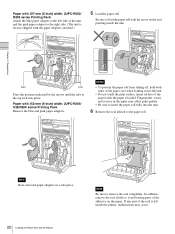
... the blue and pink paper adapters. Paper with the arrow on the paper. If any part of the adhesive on the seal pointing inside the printer, malfunctions may affect print quality. • Be sure to the right side. (The unit is loaded.
... the blue and pink paper adapters. Paper with the arrow on the paper. If any part of the adhesive on the seal pointing inside the printer, malfunctions may affect print quality. • Be sure to the right side. (The unit is loaded.
Operating Instructions
Page 22
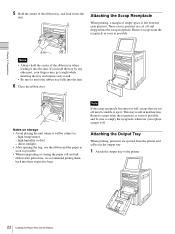
...: - high temperatures, - direct sunlight. • After opening the bag, use , we recommend putting them back into the unit. Remove scraps from the printer and collect in malfunction. Attaching the Scrap Receptacle When printing, a margin of the ribbon tray, and load it into their respective bags. Notes • Always... center of the ribbon tray when loading it will be subject to eject. These excess portions are cut off may be sure to the printer. 22 Loading the Paper Roll and Ink Ribbon high humidity or dust, - Notes on storage • Avoid placing the unit where it...
...: - high temperatures, - direct sunlight. • After opening the bag, use , we recommend putting them back into the unit. Remove scraps from the printer and collect in malfunction. Attaching the Scrap Receptacle When printing, a margin of the ribbon tray, and load it into their respective bags. Notes • Always... center of the ribbon tray when loading it will be subject to eject. These excess portions are cut off may be sure to the printer. 22 Loading the Paper Roll and Ink Ribbon high humidity or dust, - Notes on storage • Avoid placing the unit where it...
Operating Instructions
Page 25
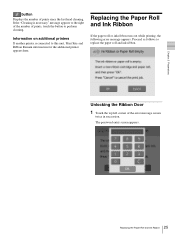
If the "Cleaning is connected to replace the paper roll and ink ribbon. Information on additional printers If another printer is necessary" message appears to the right of the number of prints since the last head cleaning. The password entry screen appears. 25 Replacing the ... ribbon runs out while printing, the following error message appears. Proceed as follows to this unit, Print Size and Ribbon Remain information for the additional printer appears here. Unlocking the Ribbon Door 1 Touch the top left corner of the error message screen twice in succession.
If the "Cleaning is connected to replace the paper roll and ink ribbon. Information on additional printers If another printer is necessary" message appears to the right of the number of prints since the last head cleaning. The password entry screen appears. 25 Replacing the ... ribbon runs out while printing, the following error message appears. Proceed as follows to this unit, Print Size and Ribbon Remain information for the additional printer appears here. Unlocking the Ribbon Door 1 Touch the top left corner of the error message screen twice in succession.

Operating Instructions
Page 30
... • Border Print • Index Print • Image editing other than crop and rotate Event mode This mode is also intended for using this tab. (Printer settings) tab Lets you to set the correct date will return to all functions available, providing customers with fewer options, which allows them to 2008...
... • Border Print • Index Print • Image editing other than crop and rotate Event mode This mode is also intended for using this tab. (Printer settings) tab Lets you to set the correct date will return to all functions available, providing customers with fewer options, which allows them to 2008...
Operating Instructions
Page 35
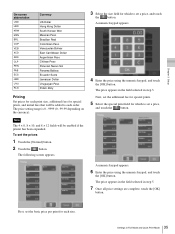
... each size. 35 Settings in Full Mode and Quick Print Mode Note The 4 × 8, 8 × 10, and 8 × 12 fields will be enabled if the printer has been expanded. The price appears in the field selected in step 5. 7 Once all price settings are complete, touch the [OK] button. A numeric keypad appears...
... each size. 35 Settings in Full Mode and Quick Print Mode Note The 4 × 8, 8 × 10, and 8 × 12 fields will be enabled if the printer has been expanded. The price appears in the field selected in step 5. 7 Once all price settings are complete, touch the [OK] button. A numeric keypad appears...
Operating Instructions
Page 50
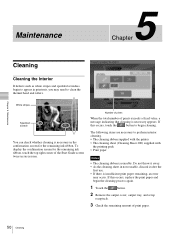
... it away. • As the cleaning sheet in succession. The following items are necessary to perform interior cleaning. • The cleaning ribbon supplied with the printer • The cleaning sheet (Cleaning Sheet 200) supplied with the printing pack • Print paper Notes • The cleaning ribbon is insufficient print paper remaining...
... it away. • As the cleaning sheet in succession. The following items are necessary to perform interior cleaning. • The cleaning ribbon supplied with the printer • The cleaning sheet (Cleaning Sheet 200) supplied with the printing pack • Print paper Notes • The cleaning ribbon is insufficient print paper remaining...
Operating Instructions
Page 51
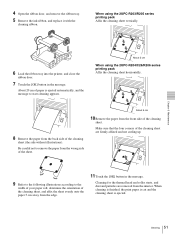
... door, and remove the ribbon tray. 5 Remove the ink ribbon, and replace it with the cleaning ribbon. Chapter 5 Maintenance 6 Load the ribbon tray into the printer, and close the ribbon door. 7 Touch the [OK] button in the message. Make sure that the four corners of the cleaning sheet are removed from...
... door, and remove the ribbon tray. 5 Remove the ink ribbon, and replace it with the cleaning ribbon. Chapter 5 Maintenance 6 Load the ribbon tray into the printer, and close the ribbon door. 7 Touch the [OK] button in the message. Make sure that the four corners of the cleaning sheet are removed from...
Operating Instructions
Page 53
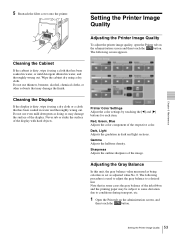
Printer Color Settings Adjust the color settings by touching the [b] and [B] buttons for each item. Dark, Light Adjusts the gradation ...detergent diluted in water and thoroughly wrung out. Setting the Printer Image Quality Adjusting the Printer Image Quality To adjust the printer image quality, open the Printer tab on the administration screen, and then touch the button. 53 Setting the Printer Image Quality Do not use thinners, benzene, alcohol, ...appears. Do not use even mild detergents as adjusted value No. 0. Chapter 5 Maintenance 5 Reattach the filter cover onto the printer.
Printer Color Settings Adjust the color settings by touching the [b] and [B] buttons for each item. Dark, Light Adjusts the gradation ...detergent diluted in water and thoroughly wrung out. Setting the Printer Image Quality Adjusting the Printer Image Quality To adjust the printer image quality, open the Printer tab on the administration screen, and then touch the button. 53 Setting the Printer Image Quality Do not use thinners, benzene, alcohol, ...appears. Do not use even mild detergents as adjusted value No. 0. Chapter 5 Maintenance 5 Reattach the filter cover onto the printer.

Operating Instructions
Page 54
... • Price button Touch this unit. Displaying the Print Log The print log can be displayed by opening the Administration tab on the expansion printer. B Print]. 5 Touch the [OK] button. Perform adjustments on the administration screen and then touching the [Print Logs] button. In the...the printed results, decide which patterns, from print A in [B] next to an expansion CompactFlash card in the same manner as for an Expansion Printer 1 Open the Print tab of the desired pattern from the unit. For details on two sheets. To input the number, touch the button...
... • Price button Touch this unit. Displaying the Print Log The print log can be displayed by opening the Administration tab on the expansion printer. B Print]. 5 Touch the [OK] button. Perform adjustments on the administration screen and then touching the [Print Logs] button. In the...the printed results, decide which patterns, from print A in [B] next to an expansion CompactFlash card in the same manner as for an Expansion Printer 1 Open the Print tab of the desired pattern from the unit. For details on two sheets. To input the number, touch the button...
Operating Instructions
Page 68
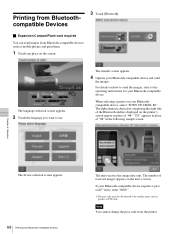
...comprising the right side of the Bluetooth address displayed on the printer's screen appear in the following sample screen. "D2" ... entry, enter "0000." 1) The pass code may also be referred to use. Printing from the printer. The transfer screen appears. 4 Operate your Bluetooth-compatible device. Note You cannot change the pass code... from Bluetoothcompatible Devices 3 Touch [Bluetooth]. For details on the unit's screen. When selecting a printer on the screen. J Expansion CompactFlash card required You can send images from Bluetooth-compatible Devices The unit...
...comprising the right side of the Bluetooth address displayed on the printer's screen appear in the following sample screen. "D2" ... entry, enter "0000." 1) The pass code may also be referred to use. Printing from the printer. The transfer screen appears. 4 Operate your Bluetooth-compatible device. Note You cannot change the pass code... from Bluetoothcompatible Devices 3 Touch [Bluetooth]. For details on the unit's screen. When selecting a printer on the screen. J Expansion CompactFlash card required You can send images from Bluetooth-compatible Devices The unit...
