
Operating Instructions / Mode d’emploi
Page 3
... 95 12 With the Macintosh OS 13 GB English Preparing to Print 14 Preparing a Print Pack 14 Loading the Ink Ribbon Cartridge and Printing Paper ......... 16 Removing the Ink Ribbon Cartridge and the Printing Paper 19 Making Printer Setting from your Computer 20 With Windows 20 With the Macintosh 25 Miscellaneous 31...
... 95 12 With the Macintosh OS 13 GB English Preparing to Print 14 Preparing a Print Pack 14 Loading the Ink Ribbon Cartridge and Printing Paper ......... 16 Removing the Ink Ribbon Cartridge and the Printing Paper 19 Making Printer Setting from your Computer 20 With Windows 20 With the Macintosh 25 Miscellaneous 31...

Operating Instructions / Mode d’emploi
Page 4
... paper that is thin and the size of the box against the packing list. Power cord (1) Tray case (1) Ink ribbon cartridge (sufficient for printing has perforations near both edges that allow you to tear off the blank strips of paper on each of ... horizontal position. Stands (2) Laminate Patterns Because laminate processing is necessary to transport or ship the printer. • When shipping the printer, remove the ink cartridge and the paper supply/eject tray from among the following laminate options: • Glossy: Produces a glossy print. • Texture: Produces a textured print...
... paper that is thin and the size of the box against the packing list. Power cord (1) Tray case (1) Ink ribbon cartridge (sufficient for printing has perforations near both edges that allow you to tear off the blank strips of paper on each of ... horizontal position. Stands (2) Laminate Patterns Because laminate processing is necessary to transport or ship the printer. • When shipping the printer, remove the ink cartridge and the paper supply/eject tray from among the following laminate options: • Glossy: Produces a glossy print. • Texture: Produces a textured print...
Operating Instructions / Mode d’emploi
Page 6
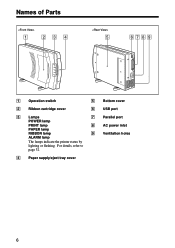
For details, refer to page 32. 4 Paper supply/eject tray cover 6 Names of Parts 1 234 5 6789 1 Operation switch 5 Bottom cover 2 Ribbon cartridge cover 6 USB port 3 Lamps 7 Parallel port POWER lamp PRINT lamp 8 AC power inlet PAPER lamp RIBBON lamp 9 Ventilation holes ALARM lamp The lamps indicate the printer status by lighting or flashing.
For details, refer to page 32. 4 Paper supply/eject tray cover 6 Names of Parts 1 234 5 6789 1 Operation switch 5 Bottom cover 2 Ribbon cartridge cover 6 USB port 3 Lamps 7 Parallel port POWER lamp PRINT lamp 8 AC power inlet PAPER lamp RIBBON lamp 9 Ventilation holes ALARM lamp The lamps indicate the printer status by lighting or flashing.

Operating Instructions / Mode d’emploi
Page 14
... allow you to print an image on the paper. 14 Notes on these sheets and the border is necessary to prepare a Sony Print Pack (printing paper and an ink ribbon cartridge, sold as a set). UPC10P34 Photocards 100 × 180 mm (100 × 134 mm after cutting along the left and right ...perforations, or a portion of the top and bottom of Sony Print Packs available. Preparing to Print Preparing a Print Pack In order to print, ...
... allow you to print an image on the paper. 14 Notes on these sheets and the border is necessary to prepare a Sony Print Pack (printing paper and an ink ribbon cartridge, sold as a set). UPC10P34 Photocards 100 × 180 mm (100 × 134 mm after cutting along the left and right ...perforations, or a portion of the top and bottom of Sony Print Packs available. Preparing to Print Preparing a Print Pack In order to print, ...

Operating Instructions / Mode d’emploi
Page 15
...the top and bottom of time, place them back in their original bags for an extended period of the paper. • Use the ink ribbon cartridge and paper that share the same product number together. Doing so could leave fingerprints, which will harm image quality. • If it back together ... has a 2:3 aspect ratio (V:H) are printed on the printing surfaces will harm image quality. • If you will not be using a partially used ink ribbon cartridge or unused, opened paper in dusty locations. Dust on the paper in a UPC-10P34 Print Pack, the printed image may extend beyond the left and...
...the top and bottom of time, place them back in their original bags for an extended period of the paper. • Use the ink ribbon cartridge and paper that share the same product number together. Doing so could leave fingerprints, which will harm image quality. • If it back together ... has a 2:3 aspect ratio (V:H) are printed on the printing surfaces will harm image quality. • If you will not be using a partially used ink ribbon cartridge or unused, opened paper in dusty locations. Dust on the paper in a UPC-10P34 Print Pack, the printed image may extend beyond the left and...
Operating Instructions / Mode d’emploi
Page 16
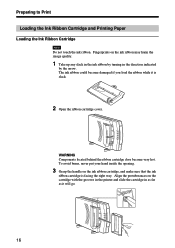
...by the arrow. WARNING Components located behind the ribbon cartridge door become damaged if you load the ribbon while it will go. 16 Preparing to Print Loading the Ink Ribbon Cartridge and Printing Paper Loading the Ink Ribbon Cartridge Note Do not touch the ink ribbon. Align the... protuberances on the ink ribbon cartridge, and make sure that the ink ribbon cartridge is slack. 2 Open the ribbon cartridge cover. To avoid burns, never put...
...by the arrow. WARNING Components located behind the ribbon cartridge door become damaged if you load the ribbon while it will go. 16 Preparing to Print Loading the Ink Ribbon Cartridge and Printing Paper Loading the Ink Ribbon Cartridge Note Do not touch the ink ribbon. Align the... protuberances on the ink ribbon cartridge, and make sure that the ink ribbon cartridge is slack. 2 Open the ribbon cartridge cover. To avoid burns, never put...

Operating Instructions / Mode d’emploi
Page 17
Stopper Printing surface Tabs 17 Doing so could leave fingerprints, which will harm image quality. 1 Fan the paper thoroughly. Loading the Printing Paper Note Never touch the printing side (the blank, glossy side) of the tray. 4 Close the ribbon cartridge cover, and then make sure that the paper is under the tabs at the end of the paper. If the paper is curled, uncurl it. 2 With the printing surface (glossy side) facing up, place the paper in the paper supply/eject tray, making sure that the RIBBON lamp has turned off.
Stopper Printing surface Tabs 17 Doing so could leave fingerprints, which will harm image quality. 1 Fan the paper thoroughly. Loading the Printing Paper Note Never touch the printing side (the blank, glossy side) of the tray. 4 Close the ribbon cartridge cover, and then make sure that the paper is under the tabs at the end of the paper. If the paper is curled, uncurl it. 2 With the printing surface (glossy side) facing up, place the paper in the paper supply/eject tray, making sure that the RIBBON lamp has turned off.

Operating Instructions / Mode d’emploi
Page 19
Removing the printing paper 1 Pull the paper supply/eject tray out of the printer. 2 Lift the metal plate at the bottom of the paper supply/eject tray, and then pull out the printing paper. 19 Removing the Ink Ribbon Cartridge and the Printing Paper Removing the ink ribbon cartridge 1 Open the ribbon cartridge cover. 2 Grasp the handle and pull the cartridge out.
Removing the printing paper 1 Pull the paper supply/eject tray out of the printer. 2 Lift the metal plate at the bottom of the paper supply/eject tray, and then pull out the printing paper. 19 Removing the Ink Ribbon Cartridge and the Printing Paper Removing the ink ribbon cartridge 1 Open the ribbon cartridge cover. 2 Grasp the handle and pull the cartridge out.
Operating Instructions / Mode d’emploi
Page 31
.... • Check that the ink ribbon cartridge and printing paper are still in the printer can result in damage to a warm one, or if it is moved from which you purchased the printer or you Sony service center. Cleaning the Printer • Before cleaning the printer, turn the power... off and allow the printer to do Before sending the printer for a while, then try printing again. t Properly connect the power cord as explained in "Loading the Ink Ribbon Cartridge and the ...
.... • Check that the ink ribbon cartridge and printing paper are still in the printer can result in damage to a warm one, or if it is moved from which you purchased the printer or you Sony service center. Cleaning the Printer • Before cleaning the printer, turn the power... off and allow the printer to do Before sending the printer for a while, then try printing again. t Properly connect the power cord as explained in "Loading the Ink Ribbon Cartridge and the ...
Operating Instructions / Mode d’emploi
Page 32
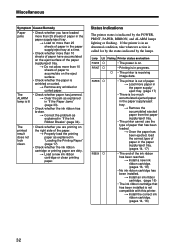
... Ribbon Breaks" (page 34). t Correct the problem as explained in "Loading the Printing Paper" (page 17) • Check whether the ink ribbon cartridge or printing paper are printing on the eject surface of the paper. t Properly load the printing paper as explained in the paper supply/eject tray...ALARM lamp is lit • Check whether you are dirty. PAPER a • The printer is indicated by the lamps. t Install the correct ink ribbon cartridge. (pages 14, 16) 32 t Load no more than 25 sheets of paper in the paper supply/eject tray at a time. • Check whether...
... Ribbon Breaks" (page 34). t Correct the problem as explained in "Loading the Printing Paper" (page 17) • Check whether the ink ribbon cartridge or printing paper are printing on the eject surface of the paper. t Properly load the printing paper as explained in the paper supply/eject tray...ALARM lamp is lit • Check whether you are dirty. PAPER a • The printer is indicated by the lamps. t Install the correct ink ribbon cartridge. (pages 14, 16) 32 t Load no more than 25 sheets of paper in the paper supply/eject tray at a time. • Check whether...
Operating Instructions / Mode d’emploi
Page 33
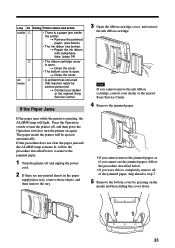
..., and remove the ink ribbon cartridge. t Close the cover. • The bottom cover is printing, the ALARM lamp will be ejected automatically. t Contact your dealer or the nearest Sony Service Center. 4 Remove the jammed paper. • If you cannot remove the jammed paper, or if you cannot see ... 33 If the Paper Jams If the paper jams while the printer is open . Note If you cannot remove the ink ribbon cartridge, contact your dealer or the nearest Sony Service Center. t Remove the jammed paper. (see the jammed paper, follow the procedure described below ) • The ink ...
..., and remove the ink ribbon cartridge. t Close the cover. • The bottom cover is printing, the ALARM lamp will be ejected automatically. t Contact your dealer or the nearest Sony Service Center. 4 Remove the jammed paper. • If you cannot remove the jammed paper, or if you cannot see ... 33 If the Paper Jams If the paper jams while the printer is open . Note If you cannot remove the ink ribbon cartridge, contact your dealer or the nearest Sony Service Center. t Remove the jammed paper. (see the jammed paper, follow the procedure described below ) • The ink ...
Operating Instructions / Mode d’emploi
Page 34
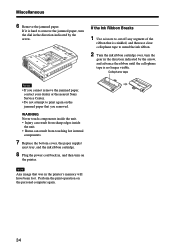
...inside the unit. • Burns can result from touching hot internal components. 7 Replace the bottom cover, the paper supply/ eject tray, and the ink ribbon cartridge. 8 Plug the power cord back in the direction indicated by the arrow. Perform the print operation on the printer. If the Ink Ribbon Breaks 1 Use... you removed. Miscellaneous 6 Remove the jammed paper. Cellophane tape Notes • If you cannot remove the jammed paper, contact your dealer or the nearest Sony Service Center. • Do not attempt to remove the jammed paper, turn on the personal computer again. 34
...inside the unit. • Burns can result from touching hot internal components. 7 Replace the bottom cover, the paper supply/ eject tray, and the ink ribbon cartridge. 8 Plug the power cord back in the direction indicated by the arrow. Perform the print operation on the printer. If the Ink Ribbon Breaks 1 Use... you removed. Miscellaneous 6 Remove the jammed paper. Cellophane tape Notes • If you cannot remove the jammed paper, contact your dealer or the nearest Sony Service Center. • Do not attempt to remove the jammed paper, turn on the personal computer again. 34

Operating Instructions / Mode d’emploi
Page 35
...Maximum capacity of paper supply tray 25 sheets Paper eject method Front ejection Sheets are ejected in order on top of paper supply tray Ribbon cartridge Can print 25 sheets Inputs AC IN (power inlet) Thermal head 11.6 dots/mm Accessories Paper supply/eject tray (1) Power cord (1)... Stands (2) Tray case (1) Ink ribbon cartridge (sufficient for printing 10 sheets) (1) Print paper (5 sheets each of printing pixels (maximum) Print Pack Effective Image transfer Type printing pixels pixels UPC...
...Maximum capacity of paper supply tray 25 sheets Paper eject method Front ejection Sheets are ejected in order on top of paper supply tray Ribbon cartridge Can print 25 sheets Inputs AC IN (power inlet) Thermal head 11.6 dots/mm Accessories Paper supply/eject tray (1) Power cord (1)... Stands (2) Tray case (1) Ink ribbon cartridge (sufficient for printing 10 sheets) (1) Print paper (5 sheets each of printing pixels (maximum) Print Pack Effective Image transfer Type printing pixels pixels UPC...


