
Operating Instructions
Page 1
Before using this player, please read this player may be updated in the future. Please visit the following website: http://www.sony.com/bluraysupport/ Getting Started Playback Settings and Adjustments Additional Information TM VIDEO/AUDIO UBP-X800 / UBP-UX80 4-687-309-11(1) Ultra HD Blu-ray™/ DVD Player Operating Instructions Thank you for your purchase. The software of this operating instructions carefully.
Before using this player, please read this player may be updated in the future. Please visit the following website: http://www.sony.com/bluraysupport/ Getting Started Playback Settings and Adjustments Additional Information TM VIDEO/AUDIO UBP-X800 / UBP-UX80 4-687-309-11(1) Ultra HD Blu-ray™/ DVD Player Operating Instructions Thank you for your purchase. The software of this operating instructions carefully.
Operating Instructions
Page 2
... servicing to qualified personnel only. 2 Record the serial number in this Ultra HD Blu-ray /DVD player is not working properly, please call upon your Sony dealer regarding this product is harmful to eyes, do not attempt to us at the rear of fire or electric shock, do not open the... cabinet. CAUTION The use of optical instruments with battery-installed to them whenever you call 1-800-222-SONY(7669). Refer to excessive heat, such as sunshine and fire. As the laser beam used in the space provided below.
... servicing to qualified personnel only. 2 Record the serial number in this Ultra HD Blu-ray /DVD player is not working properly, please call upon your Sony dealer regarding this product is harmful to eyes, do not attempt to us at the rear of fire or electric shock, do not open the... cabinet. CAUTION The use of optical instruments with battery-installed to them whenever you call 1-800-222-SONY(7669). Refer to excessive heat, such as sunshine and fire. As the laser beam used in the space provided below.
Operating Instructions
Page 3
This symbol is designed to be damaged. • Disconnect the AC power cord and all other than 3 metres. • Place the player in a location with adequate ventilation to prevent heat build-up the volume while listening to a section with a soft cloth. PRECAUTIONS • To reduce the risk of fire or electric shock, do not expose this appliance to dripping or splashing, and do not cover the ventilation opening of the front panel. It is intended to alert the user to the presence of electric shock to persons. Doing so may cause damage to the player or the object. • Take out ...
This symbol is designed to be damaged. • Disconnect the AC power cord and all other than 3 metres. • Place the player in a location with adequate ventilation to prevent heat build-up the volume while listening to a section with a soft cloth. PRECAUTIONS • To reduce the risk of fire or electric shock, do not expose this appliance to dripping or splashing, and do not cover the ventilation opening of the front panel. It is intended to alert the user to the presence of electric shock to persons. Doing so may cause damage to the player or the object. • Take out ...

Operating Instructions
Page 4
Carefully align the HDMI OUT jack on the rear of the player and the HDMI connector by MAC. Do not twist or force the HDMI connector into an outlet on only while one or more away from that to which is being transmitted. b This equipment has been tested and found to comply with the instructions, may damage the HDMI OUT jack and the connector. - If this equipment. Connect the equipment into the HDMI OUT jack. This equipment should be installed and operated keeping the radiator at the end of the following as improper handling may cause harmful interference to radio ...
Carefully align the HDMI OUT jack on the rear of the player and the HDMI connector by MAC. Do not twist or force the HDMI connector into an outlet on only while one or more away from that to which is being transmitted. b This equipment has been tested and found to comply with the instructions, may damage the HDMI OUT jack and the connector. - If this equipment. Connect the equipment into the HDMI OUT jack. This equipment should be installed and operated keeping the radiator at the end of the following as improper handling may cause harmful interference to radio ...

Operating Instructions
Page 5
... qualified service personnel. Servicing is used with, or Blu-ray Disc contents played with this product and (ii) our website (http://esupport.sony.com/) for replacement of the obsolete outlet. 10)Protect the power cord from being walked on or pinched particularly at least 20cm or more...plug does not fit into the apparatus, the apparatus has been exposed to rain or moisture, does not operate normally, or has been dropped. Sony recommends that produce heat. 9) Do not defeat the safety purpose of the IC radio frequency (RF) Exposure rules. If you experience any interference,...
... qualified service personnel. Servicing is used with, or Blu-ray Disc contents played with this product and (ii) our website (http://esupport.sony.com/) for replacement of the obsolete outlet. 10)Protect the power cord from being walked on or pinched particularly at least 20cm or more...plug does not fit into the apparatus, the apparatus has been exposed to rain or moisture, does not operate normally, or has been dropped. Sony recommends that produce heat. 9) Do not defeat the safety purpose of the IC radio frequency (RF) Exposure rules. If you experience any interference,...

Operating Instructions
Page 6
If you leave the still video image or on-screen display image displayed on your television screen. IMPORTANT NOTICE Caution: This player is capable of holding a still video image or on-screen display image on your TV for an extended period of time you risk permanent damage to this. Plasma display panel televisions and projection televisions are susceptible to your television screen indefinitely. If you have any questions or problems concerning your player, please consult your nearest Sony dealer. 6
If you leave the still video image or on-screen display image displayed on your television screen. IMPORTANT NOTICE Caution: This player is capable of holding a still video image or on-screen display image on your TV for an extended period of time you risk permanent damage to this. Plasma display panel televisions and projection televisions are susceptible to your television screen indefinitely. If you have any questions or problems concerning your player, please consult your nearest Sony dealer. 6
Operating Instructions
Page 7
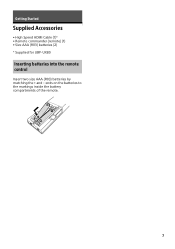
Getting Started Supplied Accessories • High Speed HDMI Cable (1)* • Remote commander (remote) (1) • Size AAA (R03) batteries (2) * Supplied for UBP-UX80 Inserting batteries into the remote control Insert two size AAA (R03) batteries by matching the + and - ends on the batteries to the markings inside the battery compartments of the remote. 7
Getting Started Supplied Accessories • High Speed HDMI Cable (1)* • Remote commander (remote) (1) • Size AAA (R03) batteries (2) * Supplied for UBP-UX80 Inserting batteries into the remote control Insert two size AAA (R03) batteries by matching the + and - ends on the batteries to the markings inside the battery compartments of the remote. 7

Operating Instructions
Page 8
Rear panel F E E Power indicator Lights up when the player is turned on the player, or sets to standby mode. D DIGITAL OUT (COAXIAL) jack 8 See page 15. F (USB) jack cover Lift the cover to connect a USB device to use the jack. C HDMI OUT 2 jack (AUDIO ONLY) Outputs digital audio signal only. Please remove the attached sticker to this jack. Getting Started Guide to Parts and Controls Front panel A BC D A Door tray B Remote sensor C Z (open/close) D 1 (on/standby) Turns on . A LAN (100) terminal B HDMI OUT 1 jack (VIDEO/AUDIO) Outputs digital video and audio signal.
Rear panel F E E Power indicator Lights up when the player is turned on the player, or sets to standby mode. D DIGITAL OUT (COAXIAL) jack 8 See page 15. F (USB) jack cover Lift the cover to connect a USB device to use the jack. C HDMI OUT 2 jack (AUDIO ONLY) Outputs digital audio signal only. Please remove the attached sticker to this jack. Getting Started Guide to Parts and Controls Front panel A BC D A Door tray B Remote sensor C Z (open/close) D 1 (on/standby) Turns on . A LAN (100) terminal B HDMI OUT 1 jack (VIDEO/AUDIO) Outputs digital video and audio signal.

Operating Instructions
Page 9
.... TV INPUT Switches between TV and other input sources. For further NETFLIX online service details, visit the following website and check the FAQ: http://www.sony.com/bluraysupport/ TOP MENU Opens or closes the Ultra HD Blu-ray/BD/ DVD's Top Menu. Use the tactile dot as favorite. If the connection...
.... TV INPUT Switches between TV and other input sources. For further NETFLIX online service details, visit the following website and check the FAQ: http://www.sony.com/bluraysupport/ TOP MENU Opens or closes the Ultra HD Blu-ray/BD/ DVD's Top Menu. Use the tactile dot as favorite. If the connection...

Operating Instructions
Page 10

Operating Instructions
Page 11
Getting Started Step 1: Connecting the Player Do not connect the AC power cord until you use BRAVIA TV that supports 4K60p, set the TV's "HDMI signal format" setting to "Enhanced format". 11 Connecting to your TV HDMI Cable*1*2 *1 See "Supplied Accessories" (page 7). *2 Premium High Speed HDMI Cable (not supplied) or High Speed HDMI Cable that supports 18 Gbps bandwidth. • 4K output requires a compatible 4K display which has HDCP2.2 capable HDMI input. • If you have made all the connections. b • To enjoy 4K Ultra HD 60p content, you need to connect the player to your...
Getting Started Step 1: Connecting the Player Do not connect the AC power cord until you use BRAVIA TV that supports 4K60p, set the TV's "HDMI signal format" setting to "Enhanced format". 11 Connecting to your TV HDMI Cable*1*2 *1 See "Supplied Accessories" (page 7). *2 Premium High Speed HDMI Cable (not supplied) or High Speed HDMI Cable that supports 18 Gbps bandwidth. • 4K output requires a compatible 4K display which has HDCP2.2 capable HDMI input. • If you have made all the connections. b • To enjoy 4K Ultra HD 60p content, you need to connect the player to your...

Operating Instructions
Page 12
Connecting to your AV amplifier (receiver) Select A, B or C connection methods according to the input jacks on your AV amplifier (receiver). B Non-4K AV amplifier (receiver) with HDMI IN HDMI Cable*1*2 High Speed HDMI Cable (not supplied) C Non-4K AV amplifier (receiver) without HDMI IN Coaxial digital cable (not supplied) HDMI Cable*1*2 *1 See "Supplied Accessories" (page 7). *2 Premium High Speed HDMI Cable (not supplied) or High Speed HDMI Cable that supports 18 Gbps bandwidth (not supplied). 12 A 4K AV amplifier (receiver) HDMI Cable*1*2 HDMI Cable*1*2 t To enjoy Bitstream (...
Connecting to your AV amplifier (receiver) Select A, B or C connection methods according to the input jacks on your AV amplifier (receiver). B Non-4K AV amplifier (receiver) with HDMI IN HDMI Cable*1*2 High Speed HDMI Cable (not supplied) C Non-4K AV amplifier (receiver) without HDMI IN Coaxial digital cable (not supplied) HDMI Cable*1*2 *1 See "Supplied Accessories" (page 7). *2 Premium High Speed HDMI Cable (not supplied) or High Speed HDMI Cable that supports 18 Gbps bandwidth (not supplied). 12 A 4K AV amplifier (receiver) HDMI Cable*1*2 HDMI Cable*1*2 t To enjoy Bitstream (...

Operating Instructions
Page 13
Wireless Setup Internet LAN cable (not supplied) Wireless LAN Router Modem z No cable assembly required between the player and the wireless LAN router. Internet 13 Wired Setup LAN cable (not supplied) LAN cable (not supplied) Router Modem z The use of a shielded and straight interface cable (LAN cable) is recommended. Getting Started Step 2: Network Connection If you are not going to connect the player to a network, proceed to "Step 3: Easy Setup" (page 14).
Wireless Setup Internet LAN cable (not supplied) Wireless LAN Router Modem z No cable assembly required between the player and the wireless LAN router. Internet 13 Wired Setup LAN cable (not supplied) LAN cable (not supplied) Router Modem z The use of a shielded and straight interface cable (LAN cable) is recommended. Getting Started Step 2: Network Connection If you are not going to connect the player to a network, proceed to "Step 3: Easy Setup" (page 14).

Operating Instructions
Page 14
Home screen display The home screen appears when you press HOME. Select an application using Step 3: Easy Setup When turned on for the first time Wait for a short while before the player turns on and starts [Easy Setup]. 1 Plug the player into the AC outlet.
Home screen display The home screen appears when you press HOME. Select an application using Step 3: Easy Setup When turned on for the first time Wait for a short while before the player turns on and starts [Easy Setup]. 1 Plug the player into the AC outlet.

Operating Instructions
Page 15
Press OPTIONS on the disc. b When playing a 4K Ultra HD Blu-ray disc with your TV. • If you use BRAVIA TV that the proper setting is selected in (Disc), and press ENTER. Playing side facing down 2 Press Z OPEN/CLOSE to the instruction manual supplied with the disc. z (Mixed disc) contains data contents. Enjoying 4K Ultra HD Blu-ray 1 Prepare for 3D] in [Screen Settings] (page 20). 2 Insert a Blu-ray 3D disc. z Refer also to the instruction manuals supplied with no disc key, it may require network connection depending on the network environment and official key server (...
Press OPTIONS on the disc. b When playing a 4K Ultra HD Blu-ray disc with your TV. • If you use BRAVIA TV that the proper setting is selected in (Disc), and press ENTER. Playing side facing down 2 Press Z OPEN/CLOSE to the instruction manual supplied with the disc. z (Mixed disc) contains data contents. Enjoying 4K Ultra HD Blu-ray 1 Prepare for 3D] in [Screen Settings] (page 20). 2 Insert a Blu-ray 3D disc. z Refer also to the instruction manuals supplied with no disc key, it may require network connection depending on the network environment and official key server (...
Operating Instructions
Page 16
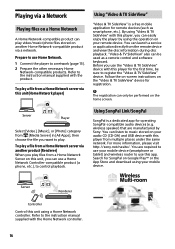
... on your mobile device. You can listen to use this unit using the operation on the home screen. For more information, please visit http://sony.net/nasite/. Server Renderer Controller Control this app. Prepare to music stored on the "Video & TV SideView" device for operating SongPal-compatible audio...To play a file from [Media Server] in [All Apps], then choose the file you can play . You can easily enjoy the player by Sony. b The registration can be performed on your mobile device (smartphone or tablet) and wireless router to use Home Network. 1 Connect the player to...
... on your mobile device. You can listen to use this unit using the operation on the home screen. For more information, please visit http://sony.net/nasite/. Server Renderer Controller Control this app. Prepare to music stored on the "Video & TV SideView" device for operating SongPal-compatible audio...To play a file from [Media Server] in [All Apps], then choose the file you can play . You can easily enjoy the player by Sony. b The registration can be performed on your mobile device (smartphone or tablet) and wireless router to use Home Network. 1 Connect the player to...
Operating Instructions
Page 17
...-Fi. 4 Launch and follow the instructions on your large TV screen. z • For further SongPal apps details, visit http://songpal.sony.net/ • For SongPal Link/SongPal Help, visit http://info.songpal.sony.net/help/ Using Screen mirroring "Screen mirroring" is not guaranteed. 1 Select [Screen mirroring] from other network. Connectivity with Miracast...
...-Fi. 4 Launch and follow the instructions on your large TV screen. z • For further SongPal apps details, visit http://songpal.sony.net/ • For SongPal Link/SongPal Help, visit http://info.songpal.sony.net/help/ Using Screen mirroring "Screen mirroring" is not guaranteed. 1 Select [Screen mirroring] from other network. Connectivity with Miracast...

Operating Instructions
Page 18
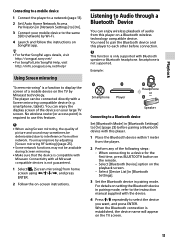
Turn off your Bluetooth device, turn down the volume level of the following steps: - Set [Bluetooth Output] in relation to the picture output (0 to 120 milliseconds). b - If the Bluetooth speaker is connected. The available items differ depending on the remote during any playback and select [Bluetooth Output], then select [Bluetooth + HDMI]. Same audio content is selected, but lowers overall brightness. x [Bluetooth Device]*2: Displays Bluetooth device list. x [Bluetooth Volume]*2: Displays the Bluetooth volume control view. x [Video Settings]: - [Picture Quality ...
Turn off your Bluetooth device, turn down the volume level of the following steps: - Set [Bluetooth Output] in relation to the picture output (0 to 120 milliseconds). b - If the Bluetooth speaker is connected. The available items differ depending on the remote during any playback and select [Bluetooth Output], then select [Bluetooth + HDMI]. Same audio content is selected, but lowers overall brightness. x [Bluetooth Device]*2: Displays Bluetooth device list. x [Bluetooth Volume]*2: Displays the Bluetooth volume control view. x [Video Settings]: - [Picture Quality ...

Operating Instructions
Page 19
x [Contrast] x [Brightness] x [Color] x [Hue] x [Pause]: Pauses the playback. x [Chapter Search]: Searches for related information using Searches for a chapter and starts playback from Gracenote when selecting [Track], [Artist] or [Related]. Video and Music only x [Top Menu]: Displays the Ultra HD Blu-ray/ BD/DVD's Top Menu. Selects the sound track on Ultra HD Blu-ray/BD/DVD VIDEO and starts playback from the beginning. x [Subtitle]: Switches the subtitle language when multilingual subtitles are recorded on Ultra HD Blu-ray/BD/DVD. x [Title Search]: Searches for the group ...
x [Contrast] x [Brightness] x [Color] x [Hue] x [Pause]: Pauses the playback. x [Chapter Search]: Searches for related information using Searches for a chapter and starts playback from Gracenote when selecting [Track], [Artist] or [Related]. Video and Music only x [Top Menu]: Displays the Ultra HD Blu-ray/ BD/DVD's Top Menu. Selects the sound track on Ultra HD Blu-ray/BD/DVD VIDEO and starts playback from the beginning. x [Subtitle]: Switches the subtitle language when multilingual subtitles are recorded on Ultra HD Blu-ray/BD/DVD. x [Title Search]: Searches for the group ...

Operating Instructions
Page 20
Settings and Adjustments Using the Settings Displays Select [Setup] on the home screen using The default settings are underlined. 1 Select [Setup] on the home screen when you need to change the settings of the player.
Settings and Adjustments Using the Settings Displays Select [Setup] on the home screen using The default settings are underlined. 1 Select [Setup] on the home screen when you need to change the settings of the player.
