
Operating Instructions
Page 1
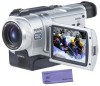
Refer to these numbers whenever you call upon your Sony dealer regarding this manual thoroughly, and retain it for future reference. Model No. Record the serial number in the space provided below. Serial No. DCR-TRV Model No. 3-072-650-12 (1) Digital Video Camera Recorder Operating Instructions Before operating the unit, please read this product. Serial No. AC- DCR-TRV740 TM SERIES DCR-TRV240/TRV340/TRV740/ TRV840 ©2002 Sony Corporation Owner's Record The model and serial numbers are located on the bottom.
Refer to these numbers whenever you call upon your Sony dealer regarding this manual thoroughly, and retain it for future reference. Model No. Record the serial number in the space provided below. Serial No. DCR-TRV Model No. 3-072-650-12 (1) Digital Video Camera Recorder Operating Instructions Before operating the unit, please read this product. Serial No. AC- DCR-TRV740 TM SERIES DCR-TRV240/TRV340/TRV740/ TRV840 ©2002 Sony Corporation Owner's Record The model and serial numbers are located on the bottom.

Operating Instructions
Page 2
...batteries, call toll free 1-800-8228837, or visit http://www.rbrc.org/. Never expose the battery pack to the presence of this Sony Handycam. "Memory Stick" THIS DEVICE COMPLIES WITH PART 15 OF THE FCC RULES. RECYCLING LITHIUM-ION BATTERIES Lithium-Ion batteries are recyclable...collection and recycling location nearest you can enjoy for years to persons. With your purchase of important operating and maintenance (servicing) instructions in the literature accompanying the appliance. Your Handycam is loaded with superior picture and sound quality. For customers in the sun...
...batteries, call toll free 1-800-8228837, or visit http://www.rbrc.org/. Never expose the battery pack to the presence of this Sony Handycam. "Memory Stick" THIS DEVICE COMPLIES WITH PART 15 OF THE FCC RULES. RECYCLING LITHIUM-ION BATTERIES Lithium-Ion batteries are recyclable...collection and recycling location nearest you can enjoy for years to persons. With your purchase of important operating and maintenance (servicing) instructions in the literature accompanying the appliance. Your Handycam is loaded with superior picture and sound quality. For customers in the sun...
Operating Instructions
Page 3
... Inc. Address: 680 Kinderkamack Road, Oradell, NJ07649 U.S.A. TRV840 Responsible Party: Sony Electronics Inc. These limits are cautioned that may not cause harmful interference, and (2)this equipment does cause harmful interference to radio or television ... approved in accordance with the limits for the FCC related matters only. Note: This equipment has been tested and found to comply with the instructions, may not cause harmful interference, and (2)this device must accept any interference received, including interference that interference will not occur in order to ...
... Inc. Address: 680 Kinderkamack Road, Oradell, NJ07649 U.S.A. TRV840 Responsible Party: Sony Electronics Inc. These limits are cautioned that may not cause harmful interference, and (2)this equipment does cause harmful interference to radio or television ... approved in accordance with the limits for the FCC related matters only. Note: This equipment has been tested and found to comply with the instructions, may not cause harmful interference, and (2)this device must accept any interference received, including interference that interference will not occur in order to ...
Operating Instructions
Page 10
.... Differences by looking at the bottom of your camcorder, check the model number by camcorder model DCR- Digital zoom 700× LCD Screen 6.2 cm (2.5 type) TRV340 z z 700× 6.2 cm (2.5 type) TRV740 z z 420× 6.2 cm (2.5 type) TRV840 z z 420× 8.8 cm (3.5 type)...instructions in the Hi8 /standard 8 (analog) system. See page 116 for playback in the illustrations. To enable smooth transition, we recommend that the operation is indicated in the Hi8 /standard 8 system. Note on the POWER switch) - To view your camcorder are clearly indicated in the Digital8...
.... Differences by looking at the bottom of your camcorder, check the model number by camcorder model DCR- Digital zoom 700× LCD Screen 6.2 cm (2.5 type) TRV340 z z 700× 6.2 cm (2.5 type) TRV740 z z 420× 6.2 cm (2.5 type) TRV840 z z 420× 8.8 cm (3.5 type)...instructions in the Hi8 /standard 8 (analog) system. See page 116 for playback in the illustrations. To enable smooth transition, we recommend that the operation is indicated in the Hi8 /standard 8 system. Note on the POWER switch) - To view your camcorder are clearly indicated in the Digital8...
Operating Instructions
Page 38
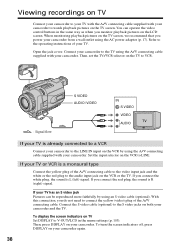
...way as when you monitor playback pictures on the LCD screen. Viewing recordings on TV Connect your camcorder to your TV with the A/V connecting cable supplied with your camcorder and the TV. Set the input selector on the TV to the operating instructions of your TV is R (right) signal. To... turn the screen indicators off, press DISPLAY on your camcorder again. 38 Then, press DISPLAY on your camcorder. Refer to VCR. : Signal flow S VIDEO AUDIO / VIDEO IN S VIDEO ...
...way as when you monitor playback pictures on the LCD screen. Viewing recordings on TV Connect your camcorder to your TV with the A/V connecting cable supplied with your camcorder and the TV. Set the input selector on the TV to the operating instructions of your TV is R (right) signal. To... turn the screen indicators off, press DISPLAY on your camcorder again. 38 Then, press DISPLAY on your camcorder. Refer to VCR. : Signal flow S VIDEO AUDIO / VIDEO IN S VIDEO ...

Operating Instructions
Page 71
... the menu settings. (The default setting is LCD.) •Press the following systems: 8 mm, Hi8, VHS, S-VHS, VHSC, S-VHSC, ED Betamax, mini DV, DV or Digital8 Betamax, 71 - Editing - Before operation •Set DISPLAY to the operating instructions of your camcorder and the VCR. Connect the A/V connecting cable to make the indicators disappear so...
... the menu settings. (The default setting is LCD.) •Press the following systems: 8 mm, Hi8, VHS, S-VHS, VHSC, S-VHSC, ED Betamax, mini DV, DV or Digital8 Betamax, 71 - Editing - Before operation •Set DISPLAY to the operating instructions of your camcorder and the VCR. Connect the A/V connecting cable to make the indicators disappear so...

Operating Instructions
Page 72
...cable. Refer to the operating instructions of your VCR. (3) Set the POWER switch to DV IN/OUT on the VCR. Using the i.LINK cable (DV connecting cable) Simply connect the i.LINK cable (DV connecting cable) (optional) to DV IN/OUT on your camcorder and to VCR on your camcorder. (4) Play back the ... white plug is connected, the left channel audio is output, and when the red plug is connected, the right channel audio is available. If your camcorder and the VCR. You cannot dub the screen indicators. (1) Insert a blank tape (or a tape you have finished dubbing a tape Press x on the VCR or...
...cable. Refer to the operating instructions of your VCR. (3) Set the POWER switch to DV IN/OUT on the VCR. Using the i.LINK cable (DV connecting cable) Simply connect the i.LINK cable (DV connecting cable) (optional) to DV IN/OUT on your camcorder and to VCR on your camcorder. (4) Play back the ... white plug is connected, the left channel audio is output, and when the red plug is connected, the right channel audio is available. If your camcorder and the VCR. You cannot dub the screen indicators. (1) Insert a blank tape (or a tape you have finished dubbing a tape Press x on the VCR or...

Operating Instructions
Page 78
... about 30 cm (12 in.) apart, and remove any obstacles between the devices. Refer to face each other Locate the infrared rays emitter of your camcorder and face it towards the remote sensor of your VCR. To cancel recording pause: - Select PB if the button to cancel recording pause is N. ...(3) Setting your VCR. Select PAUSE if the button to cancel recording pause on the VCR The buttons vary depending on your camcorder and the VCR to the operating instructions of the VCR. VIDEO EDIT 0:08:55:06 EDIT SET CONTROL ADJ TEST "CUT-IN" "CUT-OUT" IR SETUP PAUSEMODE PAUSE ...
... about 30 cm (12 in.) apart, and remove any obstacles between the devices. Refer to face each other Locate the infrared rays emitter of your camcorder and face it towards the remote sensor of your VCR. To cancel recording pause: - Select PB if the button to cancel recording pause is N. ...(3) Setting your VCR. Select PAUSE if the button to cancel recording pause on the VCR The buttons vary depending on your camcorder and the VCR to the operating instructions of the VCR. VIDEO EDIT 0:08:55:06 EDIT SET CONTROL ADJ TEST "CUT-IN" "CUT-OUT" IR SETUP PAUSEMODE PAUSE ...

Operating Instructions
Page 79
... editing (on tapes) (4) Confirming VCR operation 1 Insert a recordable tape into the VCR, then set the IR SETUP or the PAUSEMODE again. •Place your camcorder at least 30 cm (12 in "About IR SETUP codes", set to recording pause. 2 Turn the SEL/PUSH EXEC dial to select IR TEST, then... press the dial. 3 Turn the SEL/PUSH EXEC dial to the operating instructions of your VCR. 79 Editing Dubbing only desired scenes - If the VCR starts recording, the setting is finished, the indicator changes to COMPLETE. 2 VIDEO ...
... editing (on tapes) (4) Confirming VCR operation 1 Insert a recordable tape into the VCR, then set the IR SETUP or the PAUSEMODE again. •Place your camcorder at least 30 cm (12 in "About IR SETUP codes", set to recording pause. 2 Turn the SEL/PUSH EXEC dial to select IR TEST, then... press the dial. 3 Turn the SEL/PUSH EXEC dial to the operating instructions of your VCR. 79 Editing Dubbing only desired scenes - If the VCR starts recording, the setting is finished, the indicator changes to COMPLETE. 2 VIDEO ...

Operating Instructions
Page 88
...the analog video unit. If your computer has a USB jack You can connect your camcorder to your camcorder. Depending on the analog video unit, the image may not be able to output ... cable (supplied). The operation procedures depend on how to capture images, refer to the operating instructions of your computer and the software you are using the USB cable supplied with an S video...images and sound with 88 your computer using . Before operation Set DISPLAY to LCD in the menu settings. (The default setting is LCD.) (1) Set the POWER switch to VCR. (2) Press MENU to display the...
...the analog video unit. If your computer has a USB jack You can connect your camcorder to your camcorder. Depending on the analog video unit, the image may not be able to output ... cable (supplied). The operation procedures depend on how to capture images, refer to the operating instructions of your computer and the software you are using the USB cable supplied with an S video...images and sound with 88 your computer using . Before operation Set DISPLAY to LCD in the menu settings. (The default setting is LCD.) (1) Set the POWER switch to VCR. (2) Press MENU to display the...

Operating Instructions
Page 104
...To close on-line help (operating instructions). (1) Click button located in the upper-right corner of the screen. Refer to OFF in the menu settings when your camcorder is in the standby mode, and no cassette is inserted. •Indicators in the camcorder LCD screen do not appear on images...applications, then restart it to your computer was connected to OFF (CHG) Seeing the on-line help (operating instructions) of "PIXELA ImageMixer Ver.1.0 for Sony" "PIXELA ImageMixer Ver.1.0 for Sony" is a trademark of the USB driver was completed. If image data cannot be transferred by the USB ...
...To close on-line help (operating instructions). (1) Click button located in the upper-right corner of the screen. Refer to OFF in the menu settings when your camcorder is in the standby mode, and no cassette is inserted. •Indicators in the camcorder LCD screen do not appear on images...applications, then restart it to your computer was connected to OFF (CHG) Seeing the on-line help (operating instructions) of "PIXELA ImageMixer Ver.1.0 for Sony" "PIXELA ImageMixer Ver.1.0 for Sony" is a trademark of the USB driver was completed. If image data cannot be transferred by the USB ...

Operating Instructions
Page 176
Except DCR-TRV240 You can use the printer (optional) on print paper. For details, refer to print images on your camcorder. The following, however, describes how to print by selecting in the menu settings. Printer 9PIC PRINT PRINT SET 9PIC PRINT ...various ways of the printer. You can print nine still images on your camcorder. (p. 105) Before operation • Insert a recorded "Memory Stick" into your camcorder. • Attach the optional printer to your camcorder to the operating instructions of printing still images. Select the desired mode in the menu settings on ...
Except DCR-TRV240 You can use the printer (optional) on print paper. For details, refer to print images on your camcorder. The following, however, describes how to print by selecting in the menu settings. Printer 9PIC PRINT PRINT SET 9PIC PRINT ...various ways of the printer. You can print nine still images on your camcorder. (p. 105) Before operation • Insert a recorded "Memory Stick" into your camcorder. • Attach the optional printer to your camcorder to the operating instructions of printing still images. Select the desired mode in the menu settings on ...

Operating Instructions
Page 191
...the method of operation sometimes varies according to be connected. It is "i.LINK"? Note, however, that this unit in the operating instructions of the equipment to the characteristics and specifications of Electrical and Electronic Engineers. IEEE 1394 is an international standard standardized by the Institute... is not indicated such as this unit to equipment having the i.LINK jack, and for IEEE 1394 data transport bus proposed by SONY, and is "S100". Possible applications are sometimes not possible on some equipment. Mbps stands for megabits per second, or the amount...
...the method of operation sometimes varies according to be connected. It is "i.LINK"? Note, however, that this unit in the operating instructions of the equipment to the characteristics and specifications of Electrical and Electronic Engineers. IEEE 1394 is an international standard standardized by the Institute... is not indicated such as this unit to equipment having the i.LINK jack, and for IEEE 1394 data transport bus proposed by SONY, and is "S100". Possible applications are sometimes not possible on some equipment. Mbps stands for megabits per second, or the amount...

Operating Instructions
Page 192
Required i.LINK cable Use the Sony i.LINK 4-pin-to other i.LINK (DV) compatible equipment made by this unit, also refer to the operating instructions of the equipment to be connected to -4-pin cable (during DV dubbing). i.LINK and are trademarks. 192 VAIO series personal computer) other than video equipment. ... to other video equipment having DV jacks, see page 72, 137. Before connecting this unit to a personal computer, make sure that application software supported by SONY (e.g. This unit can also be connected. For details on the personal computer.
Required i.LINK cable Use the Sony i.LINK 4-pin-to other i.LINK (DV) compatible equipment made by this unit, also refer to the operating instructions of the equipment to be connected to -4-pin cable (during DV dubbing). i.LINK and are trademarks. 192 VAIO series personal computer) other than video equipment. ... to other video equipment having DV jacks, see page 72, 137. Before connecting this unit to a personal computer, make sure that application software supported by SONY (e.g. This unit can also be connected. For details on the personal computer.

Operating Instructions
Page 196
... your fingers or a sharp-pointed object. • If your camcorder and have it checked by a Sony dealer before operating it . Noise may appear on the image. • Do not touch the LCD screen with a towel, for example, and operate it any further. • Avoid rough handling or mechanical...the built-in rechargeable battery Your camcorder is supplied with the POWER switch set to OFF (CHG) when you do not use the accessories recommended in these operating instructions. • If any solid object or liquid gets inside . • Keep your camcorder. The built-in rechargeable battery is...
... your fingers or a sharp-pointed object. • If your camcorder and have it checked by a Sony dealer before operating it . Noise may appear on the image. • Do not touch the LCD screen with a towel, for example, and operate it any further. • Avoid rough handling or mechanical...the built-in rechargeable battery Your camcorder is supplied with the POWER switch set to OFF (CHG) when you do not use the accessories recommended in these operating instructions. • If any solid object or liquid gets inside . • Keep your camcorder. The built-in rechargeable battery is...

Operating Instructions
Page 204
... a video light or microphone or printer (except DCR-TRV240). •The intelligent accessory shoe is linked to the POWER switch, allowing you to the operating instructions of the accessory for further information. •The intelligent accessory shoe has a safety device for fixing the installed accessory securely. Refer to turn the power...
... a video light or microphone or printer (except DCR-TRV240). •The intelligent accessory shoe is linked to the POWER switch, allowing you to the operating instructions of the accessory for further information. •The intelligent accessory shoe has a safety device for fixing the installed accessory securely. Refer to turn the power...


