Operating Instructions
Page 4
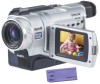
...TRV240) (p. 155) •Viewing images recorded on a tape using the USB cable (p. 94) •Viewing images live on your computer from your camcorder using the USB cable (p. 103) •Capturing images from an analog video unit on your computer (p. 88) Other uses Functions for adjusting exposure in...more impact •Digital zoom [MENU] (p. 24) The default setting is OFF. (To zoom greater than 25×, (DCR-TRV240/TRV340)/15× (DCR-TRV740/TRV840), select the digital zoom power in D ZOOM in the menu settings.) •Fader (p. 44) •Picture effects (p. 47) •Digital effects (p. ...
...TRV240) (p. 155) •Viewing images recorded on a tape using the USB cable (p. 94) •Viewing images live on your computer from your camcorder using the USB cable (p. 103) •Capturing images from an analog video unit on your computer (p. 88) Other uses Functions for adjusting exposure in...more impact •Digital zoom [MENU] (p. 24) The default setting is OFF. (To zoom greater than 25×, (DCR-TRV240/TRV340)/15× (DCR-TRV740/TRV840), select the digital zoom power in D ZOOM in the menu settings.) •Fader (p. 44) •Picture effects (p. 47) •Digital effects (p. ...
Operating Instructions
Page 5
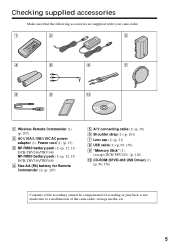
... Make sure that the following accessories are supplied with your camcorder. 1 2 3 4 5 6 7 8 9 0 1 Wireless Remote Commander (1) (p. 207) 2 AC-L10A/L10B/L10C AC power adaptor (1), Power cord (1) (p. 13) 3 NP-FM30 battery pack (1) (p. 12, 13) DCR-TRV240/TRV340 NP-FM50 battery pack (1) (p. 12, 13) DCR-TRV740/TRV840 4 Size AA (R6) battery for Remote Commander (2) (p. 207) 5 A/V connecting... (SPVD-008 USB Driver) (1) (p. 96, 156) Contents of the recording cannot be compensated if recording or playback is not made due to a malfunction of the camcorder, storage media, etc. 5
... Make sure that the following accessories are supplied with your camcorder. 1 2 3 4 5 6 7 8 9 0 1 Wireless Remote Commander (1) (p. 207) 2 AC-L10A/L10B/L10C AC power adaptor (1), Power cord (1) (p. 13) 3 NP-FM30 battery pack (1) (p. 12, 13) DCR-TRV240/TRV340 NP-FM50 battery pack (1) (p. 12, 13) DCR-TRV740/TRV840 4 Size AA (R6) battery for Remote Commander (2) (p. 207) 5 A/V connecting... (SPVD-008 USB Driver) (1) (p. 96, 156) Contents of the recording cannot be compensated if recording or playback is not made due to a malfunction of the camcorder, storage media, etc. 5

Operating Instructions
Page 6
... desired scenes - Display function 35 Viewing recordings on TV 38 Advanced Recording Operations Recording still images on your computer (Windows users only 94 Customizing Your Camcorder Changing the menu settings 105 6 Tape PB ZOOM 65 Quickly locating a scene - Basics Recording a picture 21 Shooting backlit subjects - BACK LIGHT 28 Shooting in the...
... desired scenes - Display function 35 Viewing recordings on TV 38 Advanced Recording Operations Recording still images on your computer (Windows users only 94 Customizing Your Camcorder Changing the menu settings 105 6 Tape PB ZOOM 65 Quickly locating a scene - Basics Recording a picture 21 Shooting backlit subjects - BACK LIGHT 28 Shooting in the...
Operating Instructions
Page 7
...Started Table of trouble and how to correct trouble 178 Self-diagnosis display 184 Warning indicators and messages .... 185 Additional Information Digital8 system, recording and playback 187 About the "InfoLITHIUM" battery pack 189 About i.LINK 191 Using your computer 155 Copying images...142 Recording edited pictures as a moving pictures - MPEG movie playback 153 Viewing images recorded on "Memory Stick"s on your camcorder abroad .......... 193 Maintenance information and precautions 194 Specifications 199 Quick Reference Identifying parts and controls 201 Index 209 7 PHOTO SAVE...
...Started Table of trouble and how to correct trouble 178 Self-diagnosis display 184 Warning indicators and messages .... 185 Additional Information Digital8 system, recording and playback 187 About the "InfoLITHIUM" battery pack 189 About i.LINK 191 Using your computer 155 Copying images...142 Recording edited pictures as a moving pictures - MPEG movie playback 153 Viewing images recorded on "Memory Stick"s on your camcorder abroad .......... 193 Maintenance information and precautions 194 Specifications 199 Quick Reference Identifying parts and controls 201 Index 209 7 PHOTO SAVE...

Operating Instructions
Page 8
... the DC IN jack cover. AC power adaptor (supplied) Inserting a cassette (p. 20) 1 Slide OPEN/EJECT in the direction of your camcorder outdoors (p. 12). See the page in straight as far as possible into the cassette compartment with its v mark facing up . Quick Start Guide This chapter ...
... the DC IN jack cover. AC power adaptor (supplied) Inserting a cassette (p. 20) 1 Slide OPEN/EJECT in the direction of your camcorder outdoors (p. 12). See the page in straight as far as possible into the cassette compartment with its v mark facing up . Quick Start Guide This chapter ...

Operating Instructions
Page 9
... the viewfinder is closed, use the viewfinder with your eye against the eyecup. Viewfinder When the LCD panel is black and white. V POWER CAM M Note Do not pick up your camcorder, the clock setting is set the clock setting before recording (p. 18). If you purchase your... camcorder by holding the viewfinder, the LCD panel, or the battery pack. 9 REW 3 Press N to CAMERA while pressing the small green...
... the viewfinder is closed, use the viewfinder with your eye against the eyecup. Viewfinder When the LCD panel is black and white. V POWER CAM M Note Do not pick up your camcorder, the clock setting is set the clock setting before recording (p. 18). If you purchase your... camcorder by holding the viewfinder, the LCD panel, or the battery pack. 9 REW 3 Press N to CAMERA while pressing the small green...
Operating Instructions
Page 10
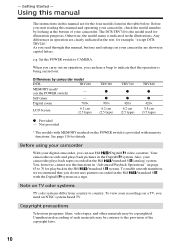
... out an operation, you start reading this manual are for details. TRV240 MEMORY mark* (on your camcorder plays back tapes recorded in the Digital8 system. Digital zoom 700× LCD Screen 6.2 cm (2.5 type) TRV340 z z 700× 6.2 cm (2.5 type) TRV740 z z 420× 6.2 cm (2.5 type) TRV840 z z 420× 8.8 cm (3.5 type) z Provided - Not provided * The models with...
... out an operation, you start reading this manual are for details. TRV240 MEMORY mark* (on your camcorder plays back tapes recorded in the Digital8 system. Digital zoom 700× LCD Screen 6.2 cm (2.5 type) TRV340 z z 700× 6.2 cm (2.5 type) TRV740 z z 420× 6.2 cm (2.5 type) TRV840 z z 420× 8.8 cm (3.5 type) z Provided - Not provided * The models with...
Operating Instructions
Page 11
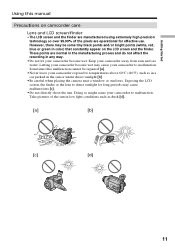
..., the finder or the lens to malfunction. Sometimes this manual Precautions on the LCD screen and the finder. Doing so might cause your camcorder away from rain and sea water. Keep your camcorder to direct sunlight for effective use. Getting Started Using this malfunction cannot be some tiny black ...points and/or bright points (white, red, blue or green in color) that constantly appear on camcorder care Lens and LCD screen/finder • The LCD screen and the finder are manufactured using extremely high-precision technology so over 99.99% of the sun in low light...
..., the finder or the lens to malfunction. Sometimes this manual Precautions on the LCD screen and the finder. Doing so might cause your camcorder away from rain and sea water. Keep your camcorder to direct sunlight for effective use. Getting Started Using this malfunction cannot be some tiny black ...points and/or bright points (white, red, blue or green in color) that constantly appear on camcorder care Lens and LCD screen/finder • The LCD screen and the finder are manufactured using extremely high-precision technology so over 99.99% of the sun in low light...

Operating Instructions
Page 12
Step 1 Preparing the power supply Installing the battery pack (1) Lift up the viewfinder. (2) Slide the battery pack down until it clicks. 1 2 To remove the battery pack (1) Lift up the viewfinder. (2) Slide the battery pack out in the direction of the arrow while pressing BATT (battery) release lever down. BATT (battery) release lever If you install the large-capacity battery pack If you install the NP-FM70/QM71/FM90/QM91/FM91 battery pack on your camcorder, extend its viewfinder. 12
Step 1 Preparing the power supply Installing the battery pack (1) Lift up the viewfinder. (2) Slide the battery pack down until it clicks. 1 2 To remove the battery pack (1) Lift up the viewfinder. (2) Slide the battery pack out in the direction of the arrow while pressing BATT (battery) release lever down. BATT (battery) release lever If you install the large-capacity battery pack If you install the NP-FM70/QM71/FM90/QM91/FM91 battery pack on your camcorder, extend its viewfinder. 12
Operating Instructions
Page 13
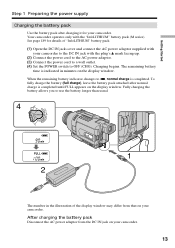
...indicated in the illustration of "InfoLITHIUM" battery pack. (1) Open the DC IN jack cover and connect the AC power adaptor supplied with your camcorder. 13 Charging begins. Getting Started OFCFR(CHG) E ERMAORY CAM M Step 1 Preparing the power supply Charging the battery pack Use the battery... pack after normal charge is completed until FULL appears on the display window. Your camcorder operates only with the plug's v mark facing up. (2) Connect the power cord to the AC power adaptor. (3) Connect the power cord ...
...indicated in the illustration of "InfoLITHIUM" battery pack. (1) Open the DC IN jack cover and connect the AC power adaptor supplied with your camcorder. 13 Charging begins. Getting Started OFCFR(CHG) E ERMAORY CAM M Step 1 Preparing the power supply Charging the battery pack Use the battery... pack after normal charge is completed until FULL appears on the display window. Your camcorder operates only with the plug's v mark facing up. (2) Connect the power cord to the AC power adaptor. (3) Connect the power cord ...

Operating Instructions
Page 14
...charging the battery pack in the display window. The "InfoLITHIUM" is a lithium ion battery pack that the indication on the DC plug of Sony Corporation. 14 Your camcorder operates only with the "InfoLITHIUM" battery pack (M series). Step 1 Preparing the power supply Note Prevent metallic objects from the wall outlet ... battery. When you use the AC power adaptor Place the AC power adaptor near a wall outlet. When the battery pack is charged fully The LCD backlight of between 10°C to 30°C (50°F to cut off the power. min" appears in an ambient temperature of the display...
...charging the battery pack in the display window. The "InfoLITHIUM" is a lithium ion battery pack that the indication on the DC plug of Sony Corporation. 14 Your camcorder operates only with the "InfoLITHIUM" battery pack (M series). Step 1 Preparing the power supply Note Prevent metallic objects from the wall outlet ... battery. When you use the AC power adaptor Place the AC power adaptor near a wall outlet. When the battery pack is charged fully The LCD backlight of between 10°C to 30°C (50°F to cut off the power. min" appears in an ambient temperature of the display...
Operating Instructions
Page 16
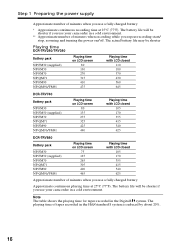
... tapes recorded in the Digital8 system. The battery life will be shorter if you use your camcorder in a cold environment. ** Approximate number of minutes when recording while you repeat recording start/ stop, zooming and turning the power on LCD screen 75 125 265 305 400 465 Playing time with LCD closed 105 170 355...-FM30 (supplied) NP-FM50 NP-FM70 NP-QM71 NP-FM90 NP-QM91/FM91 Playing time on LCD screen 80 130 270 315 410 475 Playing time with LCD closed 110 180 370 430 560 645 DCR-TRV740 Battery pack NP-FM30 NP-FM50 (supplied) NP-FM70 NP-QM71 NP-FM90 NP-QM91/FM91...
... tapes recorded in the Digital8 system. The battery life will be shorter if you use your camcorder in a cold environment. ** Approximate number of minutes when recording while you repeat recording start/ stop, zooming and turning the power on LCD screen 75 125 265 305 400 465 Playing time with LCD closed 105 170 355...-FM30 (supplied) NP-FM50 NP-FM70 NP-QM71 NP-FM90 NP-QM91/FM91 Playing time on LCD screen 80 130 270 315 410 475 Playing time with LCD closed 110 180 370 430 560 645 DCR-TRV740 Battery pack NP-FM30 NP-FM50 (supplied) NP-FM70 NP-QM71 NP-FM90 NP-QM91/FM91...

Operating Instructions
Page 17
Getting Started Step 1 Preparing the power supply Connecting to a wall outlet When you use your camcorder for a long time, we recommend that the battery pack cannot supply any power if the power cord is connected to the DC IN jack, even ...) as long as it is not plugged into a wall outlet. Using a car battery Use Sony Car Battery Adaptor (optional). 17 Notes •The AC power adaptor can supply power even if the battery pack is attached to your camcorder with the plug's v mark facing up. (2) Connect the power cord to the AC...
Getting Started Step 1 Preparing the power supply Connecting to a wall outlet When you use your camcorder for a long time, we recommend that the battery pack cannot supply any power if the power cord is connected to the DC IN jack, even ...) as long as it is not plugged into a wall outlet. Using a car battery Use Sony Car Battery Adaptor (optional). 17 Notes •The AC power adaptor can supply power even if the battery pack is attached to your camcorder with the plug's v mark facing up. (2) Connect the power cord to the AC...

Operating Instructions
Page 18
... pressing the dial by the time signal. If you set the POWER switch to CAMERA/MEMORY (except DCR-TRV240) unless you do not use your camcorder will be cleared from memory (bars may appear) because the built-in rechargeable battery installed in , then press the dial. (3) Turn the SEL/PUSH EXEC... MEMORY (except DCR-TRV240), and then press MENU to display the menu settings. (2) Turn the SEL/PUSH EXEC dial to select CLOCK SET in your camcorder for about half a year, the date and time settings may be displayed each time that you set the date and time settings. "CLOCK SET" will...
... pressing the dial by the time signal. If you set the POWER switch to CAMERA/MEMORY (except DCR-TRV240) unless you do not use your camcorder will be cleared from memory (bars may appear) because the built-in rechargeable battery installed in , then press the dial. (3) Turn the SEL/PUSH EXEC... MEMORY (except DCR-TRV240), and then press MENU to display the menu settings. (2) Turn the SEL/PUSH EXEC dial to select CLOCK SET in your camcorder for about half a year, the date and time settings may be displayed each time that you set the date and time settings. "CLOCK SET" will...
Operating Instructions
Page 19
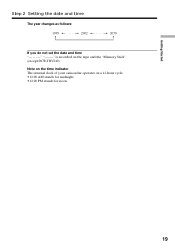
Getting Started Step 2 Setting the date and time The year changes as follows: 1995 T t 2002 T t 2079 If you do not set the date and time is recorded on the tape and the "Memory Stick". (except DCR-TRV240) Note on the time indicator The internal clock of your camcorder operates on a 12-hour cycle. •12:00 AM stands for midnight. •12:00 PM stands for noon. 19
Getting Started Step 2 Setting the date and time The year changes as follows: 1995 T t 2002 T t 2079 If you do not set the date and time is recorded on the tape and the "Memory Stick". (except DCR-TRV240) Note on the time indicator The internal clock of your camcorder operates on a 12-hour cycle. •12:00 AM stands for midnight. •12:00 PM stands for noon. 19
Operating Instructions
Page 20
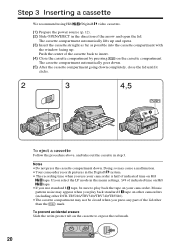
...erasure Slide the write-protect tab on the cassette to play back standard 8 tape on other camcorders (including other than the mark. Step 3 Inserting a cassette We recommend using Hi8 /Digital8 video cassettes. (1) Prepare the power source (p. 12). (2) Slide OPEN/EJECT in the direction... settings, 3/4 of the lid other DCR-TRV240/TRV340/TRV740/TRV840). •The cassette compartment may cause a malfunction. •Your camcorder records pictures in the Digital8 system. • The recording time when you use your camcorder. Push the center of the arrow and open the lid...
...erasure Slide the write-protect tab on the cassette to play back standard 8 tape on other camcorders (including other than the mark. Step 3 Inserting a cassette We recommend using Hi8 /Digital8 video cassettes. (1) Prepare the power source (p. 12). (2) Slide OPEN/EJECT in the direction... settings, 3/4 of the lid other DCR-TRV240/TRV340/TRV740/TRV840). •The cassette compartment may cause a malfunction. •Your camcorder records pictures in the Digital8 system. • The recording time when you use your camcorder. Push the center of the arrow and open the lid...

Operating Instructions
Page 21
Recording - The viewfinder automatically turns off. (5) Press START/STOP. The camera recording lamp located on the front of your camcorder to the standby mode. (4) Open the LCD panel while pressing OPEN. Recording a picture Your camcorder automatically focuses for more information (p. 12 to 20). (3) Set the POWER switch to the grip strap. (2) Install the power...
Recording - The viewfinder automatically turns off. (5) Press START/STOP. The camera recording lamp located on the front of your camcorder to the standby mode. (4) Open the LCD panel while pressing OPEN. Recording a picture Your camcorder automatically focuses for more information (p. 12 to 20). (3) Set the POWER switch to the grip strap. (2) Install the power...
Operating Instructions
Page 22
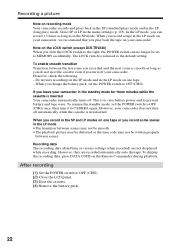
...tape. To display the recording data, press DATA CODE on one tape. - When you record a tape in the LP mode on your camcorder. To enable smooth transition Transition between scenes. However, they are not displayed while recording. However, check the following: - After recording (1) Set... the POWER switch to CAMERA again. This is not inserted. However, your camcorder does not turn off your camcorder, we recommend that you turn it to OFF (CHG). (2) Close the LCD panel. (3) Eject the cassette. (4) Remove the battery pack. 22 When you record in the ...
...tape. To display the recording data, press DATA CODE on one tape. - When you record a tape in the LP mode on your camcorder. To enable smooth transition Transition between scenes. However, they are not displayed while recording. However, check the following: - After recording (1) Set... the POWER switch to CAMERA again. This is not inserted. However, your camcorder does not turn off your camcorder, we recommend that you turn it to OFF (CHG). (2) Close the LCD panel. (3) Eject the cassette. (4) Remove the battery pack. 22 When you record in the ...

Operating Instructions
Page 23
... that you adjust the LCD B.L. When recording with the LCD panel opened up to the lens side. 180° 90° When closing the LCD panel, set it vertically until it clicks, and swing it into the camcorder body. Brightness of the LCD panel Make sure if the LCD panel is opened up ...to see. Select LCD B.L. or LCD BRIGHT, the recorded picture will not be opened Recording time...
... that you adjust the LCD B.L. When recording with the LCD panel opened up to the lens side. 180° 90° When closing the LCD panel, set it vertically until it clicks, and swing it into the camcorder body. Brightness of the LCD panel Make sure if the LCD panel is opened up ...to see. Select LCD B.L. or LCD BRIGHT, the recorded picture will not be opened Recording time...
Operating Instructions
Page 30
This may cause your camcorder to malfunction. •When you keep NIGHTSHOT set to ON in normal recording, the picture may slow down. While using the NightShot function, you cannot ...
This may cause your camcorder to malfunction. •When you keep NIGHTSHOT set to ON in normal recording, the picture may slow down. While using the NightShot function, you cannot ...


