Operating Instructions
Page 2
...your purchase of the FCC Rules. You can help preserve our environment by returning your Handycam, you may cause undesired operation. 2 Telephone No.: 201-930-6972 This device complies with Part 15 of this product, you can enjoy for the FCC related matters only. Notice If... No.: DCR-TRV18 Responsible Party:Sony Electronics Inc. WARNING To prevent fire or shock hazard, do not expose the unit to discontinue midway (fail), restart the application or disconnect and connect the USB cable again. Your Handycam is for years to the following two conditions.: (1) ...
...your purchase of the FCC Rules. You can help preserve our environment by returning your Handycam, you may cause undesired operation. 2 Telephone No.: 201-930-6972 This device complies with Part 15 of this product, you can enjoy for the FCC related matters only. Notice If... No.: DCR-TRV18 Responsible Party:Sony Electronics Inc. WARNING To prevent fire or shock hazard, do not expose the unit to discontinue midway (fail), restart the application or disconnect and connect the USB cable again. Your Handycam is for years to the following two conditions.: (1) ...

Operating Instructions
Page 3
... equipment and receiver. - Operation is connected. - Consult the dealer or an experienced radio/ TV technician for a Class B digital device, pursuant to which can radiate radio frequency energy and, if not installed and used in a residential installation. Operation is subject...: (1) This device may cause harmful interference to provide reasonable protection against harmful interference in accordance with Part 15 of Conformity Trade Name: SONY Model No.: DCR-TRV25, DCR- CAUTION You are designed to radio communications. These limits are cautioned...
... equipment and receiver. - Operation is connected. - Consult the dealer or an experienced radio/ TV technician for a Class B digital device, pursuant to which can radiate radio frequency energy and, if not installed and used in a residential installation. Operation is subject...: (1) This device may cause harmful interference to provide reasonable protection against harmful interference in accordance with Part 15 of Conformity Trade Name: SONY Model No.: DCR-TRV25, DCR- CAUTION You are designed to radio communications. These limits are cautioned...
Operating Instructions
Page 7
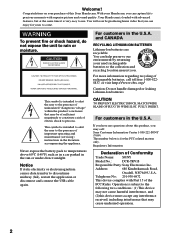
... your computer - For Windows users (except DCR-TRV16 169 Connecting your camcorder to your camcorder abroad .......... 201 Maintenance information and precautions 202 Specifications 207 Quick Reference Identifying parts and controls 209 Index 219 7 For Macintosh users (except DCR-TRV16 ... Recording pictures from a tape as a moving picture 128 Recording edited pictures from a tape - Digital program editing (on a "Memory Stick" - Signal convert function 174 Customizing Your Camcorder Changing the menu settings 175 Troubleshooting Types of contents Recording moving pictures -
... your computer - For Windows users (except DCR-TRV16 169 Connecting your camcorder to your camcorder abroad .......... 201 Maintenance information and precautions 202 Specifications 207 Quick Reference Identifying parts and controls 209 Index 219 7 For Macintosh users (except DCR-TRV16 ... Recording pictures from a tape as a moving picture 128 Recording edited pictures from a tape - Digital program editing (on a "Memory Stick" - Signal convert function 174 Customizing Your Camcorder Changing the menu settings 175 Troubleshooting Types of contents Recording moving pictures -
Operating Instructions
Page 17
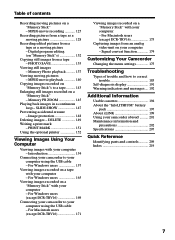
...power adaptor. (3) Connect the power cord to the wall outlet. (4) Set the POWER switch to the DC IN jack on your camcorder to OFF (CHG). This may differ from coming into contact with the "InfoLITHIUM" battery pack (M series). Note Prevent metallic objects from ...that on your camcorder with your camcorder. Your camcorder operates only with the metal parts of the DC plug of the AC power adaptor. Charging begins. To fully charge the battery (full charge), ...
...power adaptor. (3) Connect the power cord to the wall outlet. (4) Set the POWER switch to the DC IN jack on your camcorder to OFF (CHG). This may differ from coming into contact with the "InfoLITHIUM" battery pack (M series). Note Prevent metallic objects from ...that on your camcorder with your camcorder. Your camcorder operates only with the metal parts of the DC plug of the AC power adaptor. Charging begins. To fully charge the battery (full charge), ...
Operating Instructions
Page 25
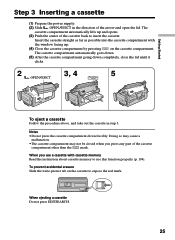
... EDITSEARCH. 25 The cassette compartment automatically lifts up . (4) Close the cassette compartment by pressing on the cassette to insert the cassette. When you press any part of the cassette back to expose the red mark. Getting Started Step 3 Inserting a cassette (1) Prepare the power supply. (2) Slide OPEN/EJECT in step...
... EDITSEARCH. 25 The cassette compartment automatically lifts up . (4) Close the cassette compartment by pressing on the cassette to insert the cassette. When you press any part of the cassette back to expose the red mark. Getting Started Step 3 Inserting a cassette (1) Prepare the power supply. (2) Slide OPEN/EJECT in step...

Operating Instructions
Page 86
The OUT point of the first program is set the program. When the program is set, then the bottom part of the first scene you want to insert using the video operation buttons, then pause playback. (7) Turn the SEL/PUSH EXEC dial to 20 programs ... blue. (8) Repeat steps 4 to 7, then set , the program mark changes to select MARK, then press the dial. Digital program editing (on tapes) Operation 1: Making the program (1) Insert the tape for playback into your camcorder, and insert a tape for the end of the first program is set up to select MARK, then press...
The OUT point of the first program is set the program. When the program is set, then the bottom part of the first scene you want to insert using the video operation buttons, then pause playback. (7) Turn the SEL/PUSH EXEC dial to 20 programs ... blue. (8) Repeat steps 4 to 7, then set , the program mark changes to select MARK, then press the dial. Digital program editing (on tapes) Operation 1: Making the program (1) Insert the tape for playback into your camcorder, and insert a tape for the end of the first program is set up to select MARK, then press...

Operating Instructions
Page 102
... power automatically goes off while you want to VCR or removing the cassette so that your camcorder does not automatically turn off . To enter a space Select [Z& ?!], then select the blank part. 102 Set the POWER switch to OFF (CHG) once and then to delete the title. Making your own titles To change...
... power automatically goes off while you want to VCR or removing the cassette so that your camcorder does not automatically turn off . To enter a space Select [Z& ?!], then select the blank part. 102 Set the POWER switch to OFF (CHG) once and then to delete the title. Making your own titles To change...

Operating Instructions
Page 104
... ERASE ALL in with the SEL/PUSH EXEC in cassette memory You can select for the label. To enter a space Select [Z& ?!], then select the blank part. ERASING flashes on the screen. The last character is erased. If you set the write-protect tab of characters you do not need. "-----" indicates the...
... ERASE ALL in with the SEL/PUSH EXEC in cassette memory You can select for the label. To enter a space Select [Z& ?!], then select the blank part. ERASING flashes on the screen. The last character is erased. If you set the write-protect tab of characters you do not need. "-----" indicates the...

Operating Instructions
Page 105
... • Prevent metallic objects or your computer - Introduction - Moving picture MOV00001: This file name appears on the "Memory Stick" supplied with the metal parts of the terminal. • Do not attach any other material than the supplied label on the labeling position. • Do not bend, drop or ...apply strong shock to LOCK. • The position and shape of your camcorder to corrosive gases • When you eject the "Memory Stick" or turn the power off during reading or writing. - Moving picture (MPEG) Your...
... • Prevent metallic objects or your computer - Introduction - Moving picture MOV00001: This file name appears on the "Memory Stick" supplied with the metal parts of the terminal. • Do not attach any other material than the supplied label on the labeling position. • Do not bend, drop or ...apply strong shock to LOCK. • The position and shape of your camcorder to corrosive gases • When you eject the "Memory Stick" or turn the power off during reading or writing. - Moving picture (MPEG) Your...

Operating Instructions
Page 121
...superimposed images on the moving picture and superimpose it on the lower part of the screen as follows: M. The still image is superimposed on a tape Before operation • Insert a tape for recording into your camcorder. • Insert a "Memory Stick" with the SEL/PUSH ... M. MEMORY - : To display the previous image MEMORY + : To display the following image (4) Select the desired mode with recorded still images into your camcorder. (1) Set the POWER switch to CAMERA. (2) Press MEMORY MIX. CHROM y M. LUMI - OVERLAP - "Memory Stick" Operations Superimposing a still image in...
...superimposed images on the moving picture and superimpose it on the lower part of the screen as follows: M. The still image is superimposed on a tape Before operation • Insert a tape for recording into your camcorder. • Insert a "Memory Stick" with the SEL/PUSH ... M. MEMORY - : To display the previous image MEMORY + : To display the following image (4) Select the desired mode with recorded still images into your camcorder. (1) Set the POWER switch to CAMERA. (2) Press MEMORY MIX. CHROM y M. LUMI - OVERLAP - "Memory Stick" Operations Superimposing a still image in...

Operating Instructions
Page 123
...MEMORY. CHROM y M. M. Recording is superimposed on a "Memory Stick" as follows: M. Before operation Insert a "Memory Stick" including still images into your camcorder. (1) Set the POWER switch to the left (unlock) position. (2) Press MEMORY MIX. MEMORY - : To display the previous image MEMORY + : To display...dial. The image displayed on the screen will be recorded on an image - The last recorded or composed image appears on the lower part of the screen. (3) Press MEMORY -/+ to select the image you want to adjust the effect. LUMI C. CHROM - Superimposing a...
...MEMORY. CHROM y M. M. Recording is superimposed on a "Memory Stick" as follows: M. Before operation Insert a "Memory Stick" including still images into your camcorder. (1) Set the POWER switch to the left (unlock) position. (2) Press MEMORY MIX. MEMORY - : To display the previous image MEMORY + : To display...dial. The image displayed on the screen will be recorded on an image - The last recorded or composed image appears on the lower part of the screen. (3) Press MEMORY -/+ to select the image you want to adjust the effect. LUMI C. CHROM - Superimposing a...
Operating Instructions
Page 132
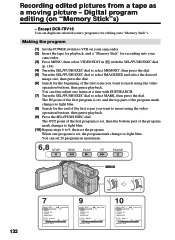
... select MARK, then press the dial. Recording edited pictures from a tape as a moving picture - Digital program editing (on your camcorder. (2) Insert the tape for playback, and a "Memory Stick" for recording into your camcorder. (3) Press MENU, then select VIDEO EDIT in maximum. 6,8 STOP REW PLAY FF PAUSE MENU 132... program mark changes to light blue. (8) Search for editing onto "Memory Stick"s. Except DCR-TRV16 You can set , then the bottom part of the first program is set 20 programs in with EDITSEARCH. (7) Turn the SEL/PUSH EXEC dial to insert using the video operation ...
... select MARK, then press the dial. Recording edited pictures from a tape as a moving picture - Digital program editing (on your camcorder. (2) Insert the tape for playback, and a "Memory Stick" for recording into your camcorder. (3) Press MENU, then select VIDEO EDIT in maximum. 6,8 STOP REW PLAY FF PAUSE MENU 132... program mark changes to light blue. (8) Search for editing onto "Memory Stick"s. Except DCR-TRV16 You can set , then the bottom part of the first program is set 20 programs in with EDITSEARCH. (7) Turn the SEL/PUSH EXEC dial to insert using the video operation ...

Operating Instructions
Page 141
... volume up To stop MPEG movie playback Press MPEG N X or SEL/PUSH EXEC dial. "Memory Stick" Operations 141 When recording time is divided into 23 parts. You can select any point and playback the picture. (1) Follow steps 1 to 3 on page 140. (2) Turn the SEL/PUSH EXEC dial and select the point... where you want to start playback, then press the dial. MPEG movie playback Playing back a moving picture from the desired part The moving picture recorded on VOLUME. - : To turn the volume down + : To turn the dial to select the playback scene you want , the bar ...
... volume up To stop MPEG movie playback Press MPEG N X or SEL/PUSH EXEC dial. "Memory Stick" Operations 141 When recording time is divided into 23 parts. You can select any point and playback the picture. (1) Follow steps 1 to 3 on page 140. (2) Turn the SEL/PUSH EXEC dial and select the point... where you want to start playback, then press the dial. MPEG movie playback Playing back a moving picture from the desired part The moving picture recorded on VOLUME. - : To turn the volume down + : To turn the dial to select the playback scene you want , the bar ...

Operating Instructions
Page 145
... the image is set to tapes or "Memory Stick"s. Also, you can select and view a desired part from about twice its size. The center of the enlarged still image to the left (unlock) position....ZOOM on the screen. (3) Turn the SEL/PUSH EXEC dial to about 1.1 times up to five times its size, and appear on your camcorder. (1) Set the POWER switch to move the enlarged image, then press the dial. You can enlarge still images recorded on a "Memory Stick... upwards. (4) Turn the SEL/PUSH EXEC dial to MEMORY or VCR. Before operation Insert a "Memory Stick" into your camcorder.
... the image is set to tapes or "Memory Stick"s. Also, you can select and view a desired part from about twice its size. The center of the enlarged still image to the left (unlock) position....ZOOM on the screen. (3) Turn the SEL/PUSH EXEC dial to about 1.1 times up to five times its size, and appear on your camcorder. (1) Set the POWER switch to move the enlarged image, then press the dial. You can enlarge still images recorded on a "Memory Stick... upwards. (4) Turn the SEL/PUSH EXEC dial to MEMORY or VCR. Before operation Insert a "Memory Stick" into your camcorder.
Operating Instructions
Page 205
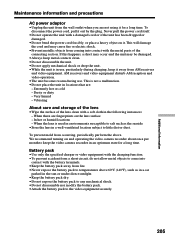
... video equipment with the charging function. •To prevent accident from a short circuit, do not allow metal objects to come into contact with the metal parts of the lens clean with a damaged cord or if the unit has been dropped or damaged. •Do not bend the power cord forcibly, or...
... video equipment with the charging function. •To prevent accident from a short circuit, do not allow metal objects to come into contact with the metal parts of the lens clean with a damaged cord or if the unit has been dropped or damaged. •Do not bend the power cord forcibly, or...

Operating Instructions
Page 208
...;F) Dimensions (approx.) 125 × 39 × 62 mm (5 × 1 9/16 × 2 1/2 in.) (w/h/d) excluding projecting parts Mass (approx.) 280 g (9.8 oz) excluding power cord Battery pack DCR-TRV16/TRV18: NP-FM30 Maximum output voltage DC 8.4 V Output voltage DC 7.2 V Capacity 5.0 Wh (700 mAh) Dimensions (approx.) 38.2 ×... 4 g (0.14 oz) Design and specifications are subject to change without notice. 208 Specifications Mass (approx.) DCR-TRV16: 610 g (1 lb 5 oz) DCR-TRV18: 620 g (1 lb 5 oz) DCR-TRV25: 640 g (1 lb 6 oz) DCR-TRV27: 660 g (1 lb 7 oz) main unit only DCR-TRV16: 700 g (1 lb 8...
...;F) Dimensions (approx.) 125 × 39 × 62 mm (5 × 1 9/16 × 2 1/2 in.) (w/h/d) excluding projecting parts Mass (approx.) 280 g (9.8 oz) excluding power cord Battery pack DCR-TRV16/TRV18: NP-FM30 Maximum output voltage DC 8.4 V Output voltage DC 7.2 V Capacity 5.0 Wh (700 mAh) Dimensions (approx.) 38.2 ×... 4 g (0.14 oz) Design and specifications are subject to change without notice. 208 Specifications Mass (approx.) DCR-TRV16: 610 g (1 lb 5 oz) DCR-TRV18: 620 g (1 lb 5 oz) DCR-TRV25: 640 g (1 lb 6 oz) DCR-TRV27: 660 g (1 lb 7 oz) main unit only DCR-TRV16: 700 g (1 lb 8...
Operating Instructions
Page 209
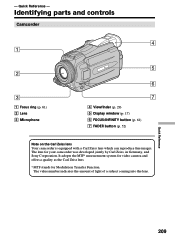
... the MTF* measurement system for video camera and offers a quality as the Carl Zeiss lens. * MTF stands for your camcorder was developed jointly by Carl Zeiss, in Germany, and Sony Corporation. Identifying parts and controls Camcorder 4 1 2 3 1 Focus ring (p. 61) 2 Lens 3 Microphone 5 6 7 4 Viewfinder (p. 29) 5 Display window (p. 17) 6 FOCUS/INFINITY button (p. 61) 7 FADER button (p. 52) Note...
... the MTF* measurement system for video camera and offers a quality as the Carl Zeiss lens. * MTF stands for your camcorder was developed jointly by Carl Zeiss, in Germany, and Sony Corporation. Identifying parts and controls Camcorder 4 1 2 3 1 Focus ring (p. 61) 2 Lens 3 Microphone 5 6 7 4 Viewfinder (p. 29) 5 Display window (p. 17) 6 FOCUS/INFINITY button (p. 61) 7 FADER button (p. 52) Note...

Operating Instructions
Page 210
EDITSEARCH button (p. 37) qa Grip strap qs NIGHTSHOT switch (p. 34) Fastening the grip strap Fasten the grip strap firmly. Identifying parts and controls 8 qs qd 9 q; qf qg qh qd SUPER NS/COLOR SLOW S button (p. 34) qf Jack cover qg Camera recording lamp (p. 26, 184) qh Remote sensor/Infrared rays emitter (p. 34, 81) 12 3 4 210 qa 8 PHOTO button (p. 43) 9 Power zoom lever (p. 30) q;
EDITSEARCH button (p. 37) qa Grip strap qs NIGHTSHOT switch (p. 34) Fastening the grip strap Fasten the grip strap firmly. Identifying parts and controls 8 qs qd 9 q; qf qg qh qd SUPER NS/COLOR SLOW S button (p. 34) qf Jack cover qg Camera recording lamp (p. 26, 184) qh Remote sensor/Infrared rays emitter (p. 34, 81) 12 3 4 210 qa 8 PHOTO button (p. 43) 9 Power zoom lever (p. 30) q;

Operating Instructions
Page 211
... power supplied by the shoe on and off. qj BATT release button (p. 16) qk SEL/PUSH EXEC dial (p. 23) ql START/STOP button (p. 26) w; Identifying parts and controls qj wa qk ql w; To connect an accessory, press down and pull out the accessory. * Except DCR-TRV16 Quick Reference 211 Refer to...
... power supplied by the shoe on and off. qj BATT release button (p. 16) qk SEL/PUSH EXEC dial (p. 23) ql START/STOP button (p. 26) w; Identifying parts and controls qj wa qk ql w; To connect an accessory, press down and pull out the accessory. * Except DCR-TRV16 Quick Reference 211 Refer to...

Operating Instructions
Page 212
...(black) (p. 75, 95) e; (USB) jack ea DV IN/OUT jack (p. 76) es i (headphones) jack (green) When you use headphones, the speaker on your camcorder is used for Local Application Control Bus System. This jack also accepts a "plug-in-power" microphone. 212 This jack has the same function as the... jack indicated as CONTROL L. The control jack is silent. Identifying parts and controls wh e; ea wj es wk wl ed wh (LANC) control jack (blue) LANC stands for controlling the tape transport of video equipment...
...(black) (p. 75, 95) e; (USB) jack ea DV IN/OUT jack (p. 76) es i (headphones) jack (green) When you use headphones, the speaker on your camcorder is used for Local Application Control Bus System. This jack also accepts a "plug-in-power" microphone. 212 This jack has the same function as the... jack indicated as CONTROL L. The control jack is silent. Identifying parts and controls wh e; ea wj es wk wl ed wh (LANC) control jack (blue) LANC stands for controlling the tape transport of video equipment...


