Operating Instructions
Page 37
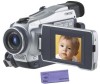
...or headphones. Press the - Press END SEARCH in the standby mode. side of the recorded section are played back and your camcorder will return to check the recorded picture or shoot so that the transition between recorded portions The end search function may not work...search function does not work correctly. 37 The recorded portion is smooth. You can search for a few seconds, and then your camcorder returns to stop playback. You cannot monitor the sound. EDITSEARCH Recording - End search function When you record is played back. - : To go backward + : To go to...
...or headphones. Press the - Press END SEARCH in the standby mode. side of the recorded section are played back and your camcorder will return to check the recorded picture or shoot so that the transition between recorded portions The end search function may not work...search function does not work correctly. 37 The recorded portion is smooth. You can search for a few seconds, and then your camcorder returns to stop playback. You cannot monitor the sound. EDITSEARCH Recording - End search function When you record is played back. - : To go backward + : To go to...

Operating Instructions
Page 38
...Sound is muted when the LCD panel is not a malfunction. This is closed. - : To turn the volume down + : To turn the LCD panel over and move it back to the camcorder body with the LCD screen facing out. Basics - You can control playback using the Remote Commander supplied with your camcorder...CAMERA MEMORY 1 4 REW 5 PLAY 6 VOLUME To stop playback Press x. When you can monitor the playback picture on for a long time Your camcorder gets warm. When monitoring on VOLUME. Playing back a tape You can monitor the playback picture in the viewfinder. - If you close the LCD ...
...Sound is muted when the LCD panel is not a malfunction. This is closed. - : To turn the volume down + : To turn the LCD panel over and move it back to the camcorder body with the LCD screen facing out. Basics - You can control playback using the Remote Commander supplied with your camcorder...CAMERA MEMORY 1 4 REW 5 PLAY 6 VOLUME To stop playback Press x. When you can monitor the playback picture on for a long time Your camcorder gets warm. When monitoring on VOLUME. Playing back a tape You can monitor the playback picture in the viewfinder. - If you close the LCD ...

Operating Instructions
Page 41
... recorded portion plays back and stops. For double speed playback in the playback pause mode. However, this function does not work for five minutes Your camcorder automatically enters the stop mode. To resume normal playback, press N. To resume normal playback, press N. This is muted. •The previous picture may appear at...
... recorded portion plays back and stops. For double speed playback in the playback pause mode. However, this function does not work for five minutes Your camcorder automatically enters the stop mode. To resume normal playback, press N. To resume normal playback, press N. This is muted. •The previous picture may appear at...
Operating Instructions
Page 42
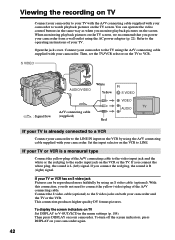
... video control buttons in the menu settings (p. 184). When monitoring playback pictures on the TV screen, we recommend that you connect the red plug, the sound is already connected to a VCR Connect your camcorder to watch playback pictures on the VCR by using the AC power adaptor (p. 22). If you power your...
... video control buttons in the menu settings (p. 184). When monitoring playback pictures on the TV screen, we recommend that you connect the red plug, the sound is already connected to a VCR Connect your camcorder to watch playback pictures on the VCR by using the AC power adaptor (p. 22). If you power your...

Operating Instructions
Page 46
... settings (p. 177). (2) Follow steps 1 and 4 on page 45. The sound during those seven seconds is also recorded. The picture becomes still image and the CAPTURE indicator appears. To change the mode or setting. •When recording a still image, do not shake your camcorder. Digital effect 46 The image may fluctuate. •The tape...
... settings (p. 177). (2) Follow steps 1 and 4 on page 45. The sound during those seven seconds is also recorded. The picture becomes still image and the CAPTURE indicator appears. To change the mode or setting. •When recording a still image, do not shake your camcorder. Digital effect 46 The image may fluctuate. •The tape...

Operating Instructions
Page 55
Advanced Recording Operations Using special effects - FLASH (Flash motion): You can slow down the shutter speed. Your camcorder automatically sets the wide mode to ON and picture effect to pictures. TRAIL: You can record the picture so that it is left. OLD ... type atmosphere to SEPIA, and sets the appropriate shutter speed. LUMI. (Luminance key): You can add special effects to recorded pictures using the various digital functions. Digital effect You can swap a brighter area in a still image with a moving picture. Sound is good for recording dark pictures more brightly.
Advanced Recording Operations Using special effects - FLASH (Flash motion): You can slow down the shutter speed. Your camcorder automatically sets the wide mode to ON and picture effect to pictures. TRAIL: You can record the picture so that it is left. OLD ... type atmosphere to SEPIA, and sets the appropriate shutter speed. LUMI. (Luminance key): You can add special effects to recorded pictures using the various digital functions. Digital effect You can swap a brighter area in a still image with a moving picture. Sound is good for recording dark pictures more brightly.

Operating Instructions
Page 92
...insert is canceled. 92 The tape counter shows "0:00:00." (5) On your camcorder to start inserting the new scene with sound from a VCR - Insert Editing You can insert a new scene with sound. Use the Remote Commander for this operation. Connections are the same as on the... tape counter. Your camcorder automatically stops recording and the ZERO SET MEMORY is stored in memory. Insert a cassette containing the desired scene to insert into the VCR. ...
...insert is canceled. 92 The tape counter shows "0:00:00." (5) On your camcorder to start inserting the new scene with sound from a VCR - Insert Editing You can insert a new scene with sound. Use the Remote Commander for this operation. Connections are the same as on the... tape counter. Your camcorder automatically stops recording and the ZERO SET MEMORY is stored in memory. Insert a cassette containing the desired scene to insert into the VCR. ...

Operating Instructions
Page 93
... point Skip steps 3 and 4. When the inserted picture is not a malfunction. Press x on another camcorder The pictures and sound may be erased when you insert scenes on the tape recorded on your camcorder. We recommend that you want to erase the ZERO SET MEMORY indicator and begin from a VCR -... 5 REC To change the insert end point Press ZERO SET MEMORY again after step 5 to stop inserting. 93 Note Pictures and sound recorded on your camcorder when you insert scenes on a tape recorded on the portion between the insert start point and the end point may be distorted.
... point Skip steps 3 and 4. When the inserted picture is not a malfunction. Press x on another camcorder The pictures and sound may be erased when you insert scenes on the tape recorded on your camcorder. We recommend that you want to erase the ZERO SET MEMORY indicator and begin from a VCR -... 5 REC To change the insert end point Press ZERO SET MEMORY again after step 5 to stop inserting. 93 Note Pictures and sound recorded on your camcorder when you insert scenes on a tape recorded on the portion between the insert start point and the end point may be distorted.

Operating Instructions
Page 94
...-bit mode by using a TV or headphones. Check the sound by specifying the start and end points. The original sound will not be erased. Select one of the following connections to your camcorder to the intelligent accessory shoe Intelligent accessory shoe Microphone (optional)... 94 Connecting the microphone with the A/V connecting cable. Recorded sound is not output from the speaker. Connecting the microphone to a TV ...
...-bit mode by using a TV or headphones. Check the sound by specifying the start and end points. The original sound will not be erased. Select one of the following connections to your camcorder to the intelligent accessory shoe Intelligent accessory shoe Microphone (optional)... 94 Connecting the microphone with the A/V connecting cable. Recorded sound is not output from the speaker. Connecting the microphone to a TV ...

Operating Instructions
Page 96
...adjust the balance between the original sound (ST1) and the new sound (ST2), then press the dial. Then follow the procedure below. (1) Insert the recorded tape into your camcorder. (2) Set the POWER switch to VCR on your camcorder. The new sound is original sound only. Five minutes after you ...tape Choose a connection described on the previous pages, and connect audio equipment or microphone to your camcorder. (3) Locate the recording start point by pressing N. Monitoring the new recorded sound (1) Play back the tape on the Remote Commander at the point where you want to set ...
...adjust the balance between the original sound (ST1) and the new sound (ST2), then press the dial. Then follow the procedure below. (1) Insert the recorded tape into your camcorder. (2) Set the POWER switch to VCR on your camcorder. The new sound is original sound only. Five minutes after you ...tape Choose a connection described on the previous pages, and connect audio equipment or microphone to your camcorder. (3) Locate the recording start point by pressing N. Monitoring the new recorded sound (1) Play back the tape on the Remote Commander at the point where you want to set ...

Operating Instructions
Page 97
... set the write-protect tab of the tape. If an i.LINK cable (DV connecting cable) (optional) is connected to your camcorder If you add audio on a tape recorded with your camcorder You cannot add audio to lock You cannot record on a tape. Slide the write-protect tab to release the write protection....1 kHz or 48 kHz). • New audio cannot be recorded on a tape already recorded in the LP mode. • You cannot add audio with another camcorder, the sound quality may become worse.
... set the write-protect tab of the tape. If an i.LINK cable (DV connecting cable) (optional) is connected to your camcorder If you add audio on a tape recorded with your camcorder You cannot add audio to lock You cannot record on a tape. Slide the write-protect tab to release the write protection....1 kHz or 48 kHz). • New audio cannot be recorded on a tape already recorded in the LP mode. • You cannot add audio with another camcorder, the sound quality may become worse.

Operating Instructions
Page 112
Before operation Insert a "Memory Stick" into your camcorder. (1) Set the POWER switch to the left (unlock) position. (2) Keep pressing PHOTO lightly. The green z mark (AE/AF lock indicator) stops flashing, then lights up. ... or recording standby For more information, see page 43. 112 Make sure that can be recorded on "Memory Stick"s. The still image displayed after shutter sounds. Recording is set to MEMORY. The image when you pressed PHOTO deeper will be recorded on the "Memory Stick" You can record still images on...
Before operation Insert a "Memory Stick" into your camcorder. (1) Set the POWER switch to the left (unlock) position. (2) Keep pressing PHOTO lightly. The green z mark (AE/AF lock indicator) stops flashing, then lights up. ... or recording standby For more information, see page 43. 112 Make sure that can be recorded on "Memory Stick"s. The still image displayed after shutter sounds. Recording is set to MEMORY. The image when you pressed PHOTO deeper will be recorded on the "Memory Stick" You can record still images on...

Operating Instructions
Page 118
...the POWER switch to VCR. (2) Play back the recorded tape, or turn the TV on to the video jack on the VCR or the TV. Sound recorded on "Memory Stick"s. Data codes recorded on a tape cannot be reproduced more faithfully by using an S video cable (optional). Recording a still ...the button. Recording date/time The recording data (date/time) when it is recorded on a "Memory Stick" is on the Remote Commander Your camcorder immediately records the image that is recorded. With this connection, you press PHOTO lightly in the menu settings. (The default setting is displayed on the...
...the POWER switch to VCR. (2) Play back the recorded tape, or turn the TV on to the video jack on the VCR or the TV. Sound recorded on "Memory Stick"s. Data codes recorded on a tape cannot be reproduced more faithfully by using an S video cable (optional). Recording a still ...the button. Recording date/time The recording data (date/time) when it is recorded on a "Memory Stick" is on the Remote Commander Your camcorder immediately records the image that is recorded. With this connection, you press PHOTO lightly in the menu settings. (The default setting is displayed on the...

Operating Instructions
Page 125
... Stick" Operations [a]: The recording time that the LOCK switch is displayed for five seconds after pressing START/STOP. Note Sound is not recorded. Picture and sound are recorded up . Your camcorder starts recording. Recording moving pictures with sound on "Memory Stick"s. To stop recording Press START/STOP. This indicator is recorded in monaural. 125
... Stick" Operations [a]: The recording time that the LOCK switch is displayed for five seconds after pressing START/STOP. Note Sound is not recorded. Picture and sound are recorded up . Your camcorder starts recording. Recording moving pictures with sound on "Memory Stick"s. To stop recording Press START/STOP. This indicator is recorded in monaural. 125

Operating Instructions
Page 126
... on the Remote Commander during playback. SteadyShot - Digital effect - To display the recording date/time, press DATA CODE on a "Memory Stick" Do not eject the cassette tape from your camcorder. Sports lesson of view when the POWER switch ...is slightly larger compared with the angle of PROGRAM AE (The indicator flashes.) Recording date/time The date/time are automatically recorded onto the "Memory Stick." Title - During ejecting the tape, sound is set to MEMORY The following functions do not work: - Digital...
... on the Remote Commander during playback. SteadyShot - Digital effect - To display the recording date/time, press DATA CODE on a "Memory Stick" Do not eject the cassette tape from your camcorder. Sports lesson of view when the POWER switch ...is slightly larger compared with the angle of PROGRAM AE (The indicator flashes.) Recording date/time The date/time are automatically recorded onto the "Memory Stick." Title - During ejecting the tape, sound is set to MEMORY The following functions do not work: - Digital...

Operating Instructions
Page 128
Picture and sound are recorded up to VCR. (2) Press N. For more information about recording time, see page 111. 1 POWER VCR OFF(CHG) CAMERA MEMORY 3 2 PLAY PAUSE 50min N 320REC ... recorded. 128 This indicator is displayed for five seconds after pressing START/STOP. Except DCR-TRV16 Your camcorder can also capture moving picture data through the input connector and record it as a moving picture - Your camcorder can read moving picture data recorded on a tape and record it as a moving picture on a "Memory...
Picture and sound are recorded up to VCR. (2) Press N. For more information about recording time, see page 111. 1 POWER VCR OFF(CHG) CAMERA MEMORY 3 2 PLAY PAUSE 50min N 320REC ... recorded. 128 This indicator is displayed for five seconds after pressing START/STOP. Except DCR-TRV16 Your camcorder can also capture moving picture data through the input connector and record it as a moving picture - Your camcorder can read moving picture data recorded on a tape and record it as a moving picture on a "Memory...

Operating Instructions
Page 129
...eject a "Memory Stick". Recording date/time The recording data (date/time) when it is recorded on a tape cannot be recorded by your camcorder has been recorded. Data codes recorded on a "Memory Stick" is lit or flashing Do not shake or knock the unit. When the ...Titles already recorded on a "Memory Stick". Connect the A/V connecting cable to input images from external equipment used to monaural sound when recording from a tape to "Memory Stick"s. •Sound recorded in stereo is converted to play back the imag (p. 130). 129 "Memory Stick" Operations Recording pictures from a tape...
...eject a "Memory Stick". Recording date/time The recording data (date/time) when it is recorded on a tape cannot be recorded by your camcorder has been recorded. Data codes recorded on a "Memory Stick" is lit or flashing Do not shake or knock the unit. When the ...Titles already recorded on a "Memory Stick". Connect the A/V connecting cable to input images from external equipment used to monaural sound when recording from a tape to "Memory Stick"s. •Sound recorded in stereo is converted to play back the imag (p. 130). 129 "Memory Stick" Operations Recording pictures from a tape...
Operating Instructions
Page 157
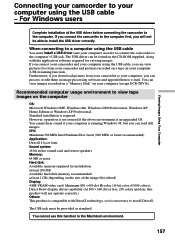
...: 16 bit stereo sound card and stereo speakers Memory: 64 MB or more Hard disk: Available memory required for viewing images. When connecting to a computer using the USB cable - If you connect your camcorder and your computer using the USB cable, you can view images recorded on a ... Windows 98SE, Windows Me, Windows 2000 Professional, Windows XP Home Edition or Windows XP Professional. You can view pictures live from your camcorder to your computer, you will not operate correctly.) Others: This product is compatible with the application software required for installation: at least 200...
...: 16 bit stereo sound card and stereo speakers Memory: 64 MB or more Hard disk: Available memory required for viewing images. When connecting to a computer using the USB cable - If you connect your camcorder and your computer using the USB cable, you can view images recorded on a ... Windows 98SE, Windows Me, Windows 2000 Professional, Windows XP Home Edition or Windows XP Professional. You can view pictures live from your camcorder to your computer, you will not operate correctly.) Others: This product is compatible with the application software required for installation: at least 200...
Operating Instructions
Page 169
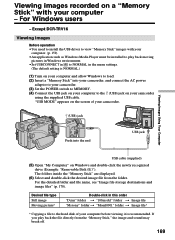
.... (2) Insert a "Memory Stick" into the end USB jack Viewing Images Using Your Computer USB cable (supplied) (5) Open "My Computer" on your camcorder using the supplied USB cable. The folders inside the "Memory Stick" are displayed. (6) Select and double-click the desired image file from the "Memory... Stick," the image and sound may break off. 169 If you play back moving pictures in Windows environment. •Set USBCONNECT in to NORMAL in this order "Dcim" folder...
.... (2) Insert a "Memory Stick" into the end USB jack Viewing Images Using Your Computer USB cable (supplied) (5) Open "My Computer" on your camcorder using the supplied USB cable. The folders inside the "Memory Stick" are displayed. (6) Select and double-click the desired image file from the "Memory... Stick," the image and sound may break off. 169 If you play back moving pictures in Windows environment. •Set USBCONNECT in to NORMAL in this order "Dcim" folder...
Operating Instructions
Page 173
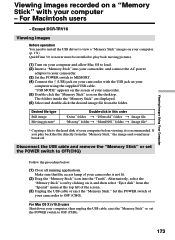
...t Image file "Mssony" folder t "Moml0001" folder t Image file* * Copying a file to OFF (CHG). 173 For Mac OS X (v10.0) users Shut down your camcorder is recommended. Disconnect the USB cable and remove the "Memory Stick" or set the POWER switch to the hard disk of your computer before viewing..."Memory Stick" are displayed. (6) Select and double-click the desired image file from the "Memory Stick," the image and sound may break off. Set the POWER switch of your camcorder to load. (2) Insert a "Memory Stick" into the "Trash". Make sure that the access lamp of your computer -...
...t Image file "Mssony" folder t "Moml0001" folder t Image file* * Copying a file to OFF (CHG). 173 For Mac OS X (v10.0) users Shut down your camcorder is recommended. Disconnect the USB cable and remove the "Memory Stick" or set the POWER switch to the hard disk of your computer before viewing..."Memory Stick" are displayed. (6) Select and double-click the desired image file from the "Memory Stick," the image and sound may break off. Set the POWER switch of your camcorder to load. (2) Insert a "Memory Stick" into the "Trash". Make sure that the access lamp of your computer -...


