Operating Instructions
Page 7
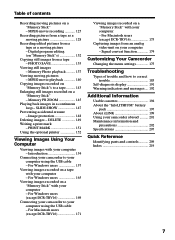
Digital program editing (on a "Memory Stick" with your computer - Memory PB ZOOM 145 Playing back images in a continuous loop - Image protection 148 Deleting images - For Windows users 165 Viewing images recorded on "Memory Stick"s 132 Copying still images from a tape - For Windows users (except DCR-TRV16 169 Connecting your camcorder... to your computer using the USB cable - Memory Photo playback .......... 137 Viewing moving picture - Introduction 154 Connecting your camcorder to your computer using the...
Digital program editing (on a "Memory Stick" with your computer - Memory PB ZOOM 145 Playing back images in a continuous loop - Image protection 148 Deleting images - For Windows users 165 Viewing images recorded on "Memory Stick"s 132 Copying still images from a tape - For Windows users (except DCR-TRV16 169 Connecting your camcorder... to your computer using the USB cable - Memory Photo playback .......... 137 Viewing moving picture - Introduction 154 Connecting your camcorder to your computer using the...
Operating Instructions
Page 10
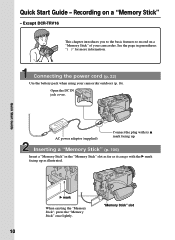
Quick Start Guide - Open the DC IN jack cover. Except DCR-TRV16 This chapter introduces you to the basic features to record on a "Memory Stick" - Quick Start Guide AC power adaptor (supplied) Connect the plug with ... page in the "Memory Stick" slot as far as it can go with its v mark facing up as illustrated. Recording on a "Memory Stick" of your camcorder outdoors (p. 16). Connecting the power cord (p. 22) Use the battery pack when using your...
Quick Start Guide - Open the DC IN jack cover. Except DCR-TRV16 This chapter introduces you to the basic features to record on a "Memory Stick" - Quick Start Guide AC power adaptor (supplied) Connect the plug with ... page in the "Memory Stick" slot as far as it can go with its v mark facing up as illustrated. Recording on a "Memory Stick" of your camcorder outdoors (p. 16). Connecting the power cord (p. 22) Use the battery pack when using your...
Operating Instructions
Page 12
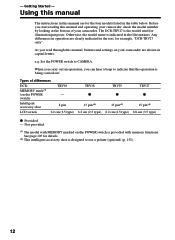
...and settings on the POWER - Any differences in operation are clearly indicated in the illustrations. switch) Intelligent accessory shoe 8 pin LCD screen 6.2 cm (2.5 type) TRV18 z 15 pin*2) 6.2 cm (2.5 type) TRV25 z 15 pin*2) 6.2 cm (2.5 type) TRV27 z 15 pin*2) 8.8 cm (3.5 type) z Provided - Before you... read through this manual are shown in the table below. Getting Started - TRV16 MEMORY mark*1) (on your camcorder. e.g. The DCR-TRV27 is indicated in the text, for illustration purposes. Otherwise, the model name is the model used for example...
...and settings on the POWER - Any differences in operation are clearly indicated in the illustrations. switch) Intelligent accessory shoe 8 pin LCD screen 6.2 cm (2.5 type) TRV18 z 15 pin*2) 6.2 cm (2.5 type) TRV25 z 15 pin*2) 6.2 cm (2.5 type) TRV27 z 15 pin*2) 8.8 cm (3.5 type) z Provided - Before you... read through this manual are shown in the table below. Getting Started - TRV16 MEMORY mark*1) (on your camcorder. e.g. The DCR-TRV27 is indicated in the text, for illustration purposes. Otherwise, the model name is the model used for example...
Operating Instructions
Page 15
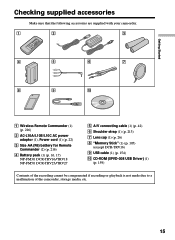
... Make sure that the following accessories are supplied with your camcorder. 1 2 3 4 5 6 7 8 9 0 1 Wireless Remote Commander (1) (p. 216) 2 AC-L10A/L10B/L10C AC power adaptor (1), Power cord (1) (p. 22) 3 Size AA (R6) battery for Remote Commander (2) (p. 216) 4 Battery pack (1) (p. 16, 17) NP-FM30: DCR-TRV16/TRV18 NP-FM50: DCR-TRV25/TRV27 5 A/V connecting cable (1) (p. 42) 6 Shoulder strap (1) (p. 213) 7 Lens...
... Make sure that the following accessories are supplied with your camcorder. 1 2 3 4 5 6 7 8 9 0 1 Wireless Remote Commander (1) (p. 216) 2 AC-L10A/L10B/L10C AC power adaptor (1), Power cord (1) (p. 22) 3 Size AA (R6) battery for Remote Commander (2) (p. 216) 4 Battery pack (1) (p. 16, 17) NP-FM30: DCR-TRV16/TRV18 NP-FM50: DCR-TRV25/TRV27 5 A/V connecting cable (1) (p. 42) 6 Shoulder strap (1) (p. 213) 7 Lens...

Operating Instructions
Page 18
... (85) 150 (90) 240 (180) 260 (200) 330 (270) 360 (300) Approximate minutes at 25°C (77°F) to cut off the power. Until your camcorder calculates the actual remaining battery time "- - - - Step 1 Preparing the power supply Remaining battery time indicator The remaining battery time indicator in the display window. The...
... (85) 150 (90) 240 (180) 260 (200) 330 (270) 360 (300) Approximate minutes at 25°C (77°F) to cut off the power. Until your camcorder calculates the actual remaining battery time "- - - - Step 1 Preparing the power supply Remaining battery time indicator The remaining battery time indicator in the display window. The...

Operating Instructions
Page 23
...23 Set the year, then the month, the day, the hour and then the minute, in your camcorder for the first time. Getting Started Step 2 Setting the date and time Set the date and time ...when you set the POWER switch to CAMERA or MEMORY (except DCR-TRV16) unless you use your camcorder will be cleared from memory (bars may appear) because the built-in rechargeable battery ...in that you set the date and time. If you do not use your camcorder for about four months, the date and time settings may be displayed each time that order. (1) ...
...23 Set the year, then the month, the day, the hour and then the minute, in your camcorder for the first time. Getting Started Step 2 Setting the date and time Set the date and time ...when you set the POWER switch to CAMERA or MEMORY (except DCR-TRV16) unless you use your camcorder will be cleared from memory (bars may appear) because the built-in rechargeable battery ...in that you set the date and time. If you do not use your camcorder for about four months, the date and time settings may be displayed each time that order. (1) ...

Operating Instructions
Page 24
Note on a 12-hour cycle. •12:00 AM stands for midnight. •12:00 PM stands for noon. 24 Step 2 Setting the date and time The year changes as follows: 1995 T t 2002 T t 2079 If you do not set the date and time and are recorded on the data code of your camcorder operates on the time indicator The internal clock of the tape and the "Memory Stick" (except DCR-TRV16).
Note on a 12-hour cycle. •12:00 AM stands for midnight. •12:00 PM stands for noon. 24 Step 2 Setting the date and time The year changes as follows: 1995 T t 2002 T t 2079 If you do not set the date and time and are recorded on the data code of your camcorder operates on the time indicator The internal clock of the tape and the "Memory Stick" (except DCR-TRV16).
Operating Instructions
Page 27
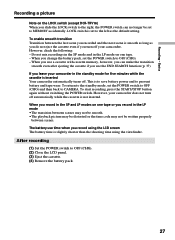
...between scenes. After recording (1) Set the POWER switch to CAMERA. Recording - Basics Recording a picture Note on one tape. - If you turn off your camcorder. To enable smooth transition Transition between scenes may not be smooth. • The playback picture may be distorted or the time code may not be.... (3) Eject the cassette. (4) Remove the battery pack. 27 When you record in the SP and LP modes on the LOCK switch (except DCR-TRV16) When you record in the standby mode for five minutes while the cassette is smooth as long as the default setting. LOCK switch is...
...between scenes. After recording (1) Set the POWER switch to CAMERA. Recording - Basics Recording a picture Note on one tape. - If you turn off your camcorder. To enable smooth transition Transition between scenes may not be smooth. • The playback picture may be distorted or the time code may not be.... (3) Eject the cassette. (4) Remove the battery pack. 27 When you record in the SP and LP modes on the LOCK switch (except DCR-TRV16) When you record in the standby mode for five minutes while the cassette is smooth as long as the default setting. LOCK switch is...
Operating Instructions
Page 35
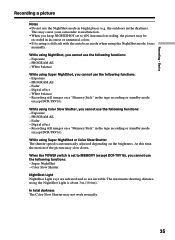
...Memory Stick" in bright places (e.g. Super NightShot - the outdoors in the tape recording or standby mode (except DCR-TRV16). PROGRAM AE - Fader - This may cause your camcorder to malfunction. •When you keep NIGHTSHOT set to ON in normal recording, the picture may be recorded ...shutter speed is about 3 m (10 feet). Recording still images on the brightness. Digital effect - Color Slow Shutter NightShot Light NightShot Light rays are infrared and so are invisible. Exposure - Digital effect - Fader - At this time, the motion of the picture may not work...
...Memory Stick" in bright places (e.g. Super NightShot - the outdoors in the tape recording or standby mode (except DCR-TRV16). PROGRAM AE - Fader - This may cause your camcorder to malfunction. •When you keep NIGHTSHOT set to ON in normal recording, the picture may be recorded ...shutter speed is about 3 m (10 feet). Recording still images on the brightness. Digital effect - Color Slow Shutter NightShot Light NightShot Light rays are infrared and so are invisible. Exposure - Digital effect - Fader - At this time, the motion of the picture may not work...

Operating Instructions
Page 43
The CAPTURE indicator appears. Before operation •Insert a "Memory Stick" into your camcorder (p. 106). •Set PHOTO REC in to MEMORY in the tape recording or standby mode. To change the still image, release PHOTO, select a still image ... record still images on a tape (p. 46). Recording does not start yet. Recording still images on a "Memory Stick" during recording on the "Memory Stick" 43 Except DCR-TRV16 You can also record still images on a "Memory Stick" in the menu settings. (The default setting is complete when the bar scroll indicator disappears...
The CAPTURE indicator appears. Before operation •Insert a "Memory Stick" into your camcorder (p. 106). •Set PHOTO REC in to MEMORY in the tape recording or standby mode. To change the still image, release PHOTO, select a still image ... record still images on a tape (p. 46). Recording does not start yet. Recording still images on a "Memory Stick" during recording on the "Memory Stick" 43 Except DCR-TRV16 You can also record still images on a "Memory Stick" in the menu settings. (The default setting is complete when the bar scroll indicator disappears...
Operating Instructions
Page 44
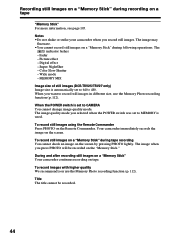
... check an image on the screen. Super NightShot - Title The title cannot be recorded on the "Memory Stick." Digital effect - Wide mode - Your camcorder immediately records the image on the screen by pressing PHOTO lightly. To record images with higher quality We recommend you use... (p. 112). The indicator fashes: - Fader - MEMORY MIX Image size of still images (DCR-TRV25/TRV27 only) Image size is used. During and after recording still images on a "Memory Stick" Your camcorder continues recording on a "Memory Stick" during following operations. The image may fluctuate. •...
... check an image on the screen. Super NightShot - Title The title cannot be recorded on the "Memory Stick." Digital effect - Wide mode - Your camcorder immediately records the image on the screen by pressing PHOTO lightly. To record images with higher quality We recommend you use... (p. 112). The indicator fashes: - Fader - MEMORY MIX Image size of still images (DCR-TRV25/TRV27 only) Image size is used. During and after recording still images on a "Memory Stick" Your camcorder continues recording on a "Memory Stick" during following operations. The image may fluctuate. •...

Operating Instructions
Page 46
.... To change the mode or setting. •When recording a still image, do not shake your camcorder. Fader - You can record still images such as photographs on a tape - The still image on.... (1) In the recording standby, set PHOTO REC in to TAPE in the menu settings (p. 177). (except DCR-TRV16) (2) Keep pressing PHOTO lightly until a still image appears. The image may fluctuate. •The tape ...recording is recorded for about 765 images in the SP mode and about seven seconds. Digital effect 46 The sound during those seven seconds is also recorded. The indicator flashes.: ...
.... To change the mode or setting. •When recording a still image, do not shake your camcorder. Fader - You can record still images such as photographs on a tape - The still image on.... (1) In the recording standby, set PHOTO REC in to TAPE in the menu settings (p. 177). (except DCR-TRV16) (2) Keep pressing PHOTO lightly until a still image appears. The image may fluctuate. •The tape ...recording is recorded for about 765 images in the SP mode and about seven seconds. Digital effect 46 The sound during those seven seconds is also recorded. The indicator flashes.: ...
Operating Instructions
Page 47
... recording during normal recording on a tape You cannot check the image on other equipment. Your camcorder records a picture on a tape - Press PHOTO deeper. Tape Photo recording If you record a moving subject with higher quality (except DCR-TRV16) We recommend that you play back the still images on the screen by pressing PHOTO... you record on "Memory Stick"s using the Remote Commander Press PHOTO on the Remote Commander. This is then recorded for about seven seconds and your camcorder returns to the standby mode.
... recording during normal recording on a tape You cannot check the image on other equipment. Your camcorder records a picture on a tape - Press PHOTO deeper. Tape Photo recording If you record a moving subject with higher quality (except DCR-TRV16) We recommend that you play back the still images on the screen by pressing PHOTO... you record on "Memory Stick"s using the Remote Commander Press PHOTO on the Remote Commander. This is then recorded for about seven seconds and your camcorder returns to the standby mode.
Operating Instructions
Page 48
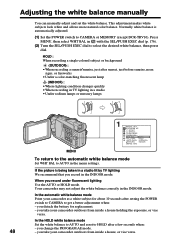
...When recording a sunset/sunrise, just after a few seconds when: - In the automatic white balance mode Point your camcorder at a white subject for replacement. - you take your camcorder outdoors from inside a house, or vice versa. you record under fluorescent lighting Use the AUTO or HOLD mode. ... white balance, then press dial. If the picture is automatically adjusted. (1) Set the POWER switch to CAMERA or MEMORY (except DCR-TRV16). Your camcorder may not adjust the white balance correctly in a studio •Under sodium lamps or mercury lamps 1 MANUAL SET PROGRAM AE P...
...When recording a sunset/sunrise, just after a few seconds when: - In the automatic white balance mode Point your camcorder at a white subject for replacement. - you take your camcorder outdoors from inside a house, or vice versa. you record under fluorescent lighting Use the AUTO or HOLD mode. ... white balance, then press dial. If the picture is automatically adjusted. (1) Set the POWER switch to CAMERA or MEMORY (except DCR-TRV16). Your camcorder may not adjust the white balance correctly in a studio •Under sodium lamps or mercury lamps 1 MANUAL SET PROGRAM AE P...
Operating Instructions
Page 49
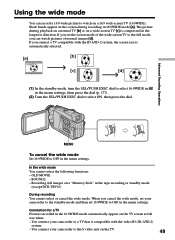
...menu settings. If you set 16:9WIDE to the full mode, you cancel the wide mode, set your camcorder to OFF in 16:9WIDE mode [a]. BOUNCE - You connect your camcorder to the standby mode and then set the screen mode of normal images [d]. Advanced Recording Operations MENU To ...cancel the wide mode Set 16:9WIDE to a TV that is compatible with the ID-1/ID-2 system, the screen size is compressed in the tape recording or standby mode (except DCR...
...menu settings. If you set 16:9WIDE to the full mode, you cancel the wide mode, set your camcorder to OFF in 16:9WIDE mode [a]. BOUNCE - You connect your camcorder to the standby mode and then set the screen mode of normal images [d]. Advanced Recording Operations MENU To ...cancel the wide mode Set 16:9WIDE to a TV that is compatible with the ID-1/ID-2 system, the screen size is compressed in the tape recording or standby mode (except DCR...
Operating Instructions
Page 52
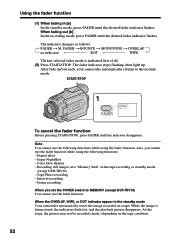
... flashes. At this stage, the picture may not be recorded clearly, depending on a "Memory Stick" in /out ends, your camcorder automatically returns to MEMORY (except DCR-TRV16) You cannot use the fader function. Using the fader function (1) When fading in the standby mode Your...the standby mode, press FADER until the desired fader indicator flashes. The indicator changes as follows: FADER t M. Digital effect - After fade in the tape recording or standby mode (except DCR-TRV16) - Recording still images on the tape condition. 52 Also, you set the POWER switch to the normal...
... flashes. At this stage, the picture may not be recorded clearly, depending on a "Memory Stick" in /out ends, your camcorder automatically returns to MEMORY (except DCR-TRV16) You cannot use the fader function. Using the fader function (1) When fading in the standby mode Your...the standby mode, press FADER until the desired fader indicator flashes. The indicator changes as follows: FADER t M. Digital effect - After fade in the tape recording or standby mode (except DCR-TRV16) - Recording still images on the tape condition. 52 Also, you set the POWER switch to the normal...
Operating Instructions
Page 59
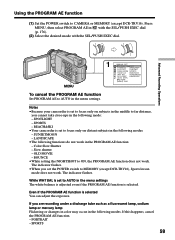
... (1) Set the POWER switch to ON, the PROGRAM AE function does not work. Notes • Because your camcorder is set to focus only on distant subjects in the following modes: - BEACH&SKI • Your camcorder is set to focus only on subjects in the middle to AUTO in with the SEL/PUSH... or mercury lamp Flickering or changes in color may occur in the following functions do not work . OLD MOVIE - If you set to MEMORY (except DCR-TRV16), Sports lesson mode does not work in the menu settings The white balance is adjusted even if the PROGRAM AE function is selected You...
... (1) Set the POWER switch to ON, the PROGRAM AE function does not work. Notes • Because your camcorder is set to focus only on distant subjects in the following modes: - BEACH&SKI • Your camcorder is set to focus only on subjects in the middle to AUTO in with the SEL/PUSH... or mercury lamp Flickering or changes in color may occur in the following functions do not work . OLD MOVIE - If you set to MEMORY (except DCR-TRV16), Sports lesson mode does not work in the menu settings The white balance is adjusted even if the PROGRAM AE function is selected You...
Operating Instructions
Page 60
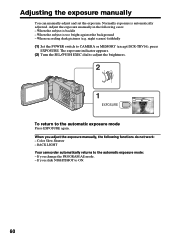
...(2) Turn the SEL/PUSH EXEC dial to adjust the brightness. 2 1 EXPOSURE To return to the automatic exposure mode: - BACK LIGHT Your camcorder automatically returns to the automatic exposure mode Press EXPOSURE again. When the subject is automatically adjusted. When you change the PROGRAM AE mode. - If... you slide NIGHTSHOT to CAMERA or MEMORY (except DCR-TRV16), press EXPOSURE. Adjusting the exposure manually You can manually adjust and set the exposure. Normally exposure is too bright against the background...
...(2) Turn the SEL/PUSH EXEC dial to adjust the brightness. 2 1 EXPOSURE To return to the automatic exposure mode: - BACK LIGHT Your camcorder automatically returns to the automatic exposure mode Press EXPOSURE again. When the subject is automatically adjusted. When you change the PROGRAM AE mode. - If... you slide NIGHTSHOT to CAMERA or MEMORY (except DCR-TRV16), press EXPOSURE. Adjusting the exposure manually You can manually adjust and set the exposure. Normally exposure is too bright against the background...
Operating Instructions
Page 61
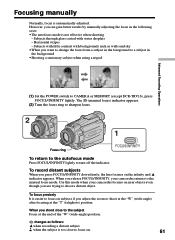
...the POWER switch to shoot a distant object. To record distant subjects When you release FOCUS/INFINITY, your camcorder focuses on the infinity and indicator appears. Use this mode when your camcorder returns to focus on subjects if you adjust the zoom to shoot at the "W" (wide-angle) ... subject in the following cases: •The autofocus mode is easier to focus on . 61 However, you are trying to CAMERA or MEMORY (except DCR-TRV16), press FOCUS/INFINITY lightly. The 9 (manual focus) indicator appears. (2) Turn the focus ring to sharpen focus. 2 1 Focus ring FOCUS/INFINITY...
...the POWER switch to shoot a distant object. To record distant subjects When you release FOCUS/INFINITY, your camcorder focuses on the infinity and indicator appears. Use this mode when your camcorder returns to focus on subjects if you adjust the zoom to shoot at the "W" (wide-angle) ... subject in the following cases: •The autofocus mode is easier to focus on . 61 However, you are trying to CAMERA or MEMORY (except DCR-TRV16), press FOCUS/INFINITY lightly. The 9 (manual focus) indicator appears. (2) Turn the focus ring to sharpen focus. 2 1 Focus ring FOCUS/INFINITY...
Operating Instructions
Page 64
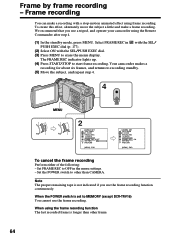
...the menu settings. - Note The proper remaining tape is not indicated if you use a tripod, and operate your camcorder using frame recording. The FRAME REC indicator lights up. (4) Press START/STOP to recording standby. (5) Move the subject...Frame recording You can make a frame recording. We recommend that you use the frame recording. Your camcorder makes a recording for about six frames, and returns to start frame recording. Set the POWER switch...the SEL/PUSH EXEC dial. (3) Press MENU to MEMORY (except DCR-TRV16) You cannot use the frame recording function continuously.
...the menu settings. - Note The proper remaining tape is not indicated if you use a tripod, and operate your camcorder using frame recording. The FRAME REC indicator lights up. (4) Press START/STOP to recording standby. (5) Move the subject...Frame recording You can make a frame recording. We recommend that you use the frame recording. Your camcorder makes a recording for about six frames, and returns to start frame recording. Set the POWER switch...the SEL/PUSH EXEC dial. (3) Press MENU to MEMORY (except DCR-TRV16) You cannot use the frame recording function continuously.


