
Operating Instructions
Page 2
...bookcase or built-in a residential installation. Install this system so that the power cord can be used in Canada This class B digital apparatus complies with the instructions, may cause harmful interference to radio or television reception, which the receiver is no guarantee that any changes... the equipment and receiver. - However, there is connected. - Consult the dealer or an experienced radio/TV technician for a Class B digital device, pursuant to correct the interference by turning the equipment off and on, the user is a trademark of their respective holders. WARNING ...
...bookcase or built-in a residential installation. Install this system so that the power cord can be used in Canada This class B digital apparatus complies with the instructions, may cause harmful interference to radio or television reception, which the receiver is no guarantee that any changes... the equipment and receiver. - However, there is connected. - Consult the dealer or an experienced radio/TV technician for a Class B digital device, pursuant to correct the interference by turning the equipment off and on, the user is a trademark of their respective holders. WARNING ...

Operating Instructions
Page 5
iPod and TDM-iP1 AV system (DAV series, etc.) Note DIGITAL MEDIA PORT is occasionally abbreviated as a battery charger (page 9). Overview You can enjoy iPod audio, video and photo contents by connecting this unit to an AV system with DIGITAL MEDIA PORT interface (Sony DAV series, etc.). • You can operate your iPod by its control buttons, the control buttons...
iPod and TDM-iP1 AV system (DAV series, etc.) Note DIGITAL MEDIA PORT is occasionally abbreviated as a battery charger (page 9). Overview You can enjoy iPod audio, video and photo contents by connecting this unit to an AV system with DIGITAL MEDIA PORT interface (Sony DAV series, etc.). • You can operate your iPod by its control buttons, the control buttons...
Operating Instructions
Page 6
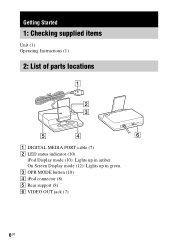
Getting Started 1: Checking supplied items Unit (1) Operating Instructions (1) 2: List of parts locations VIDEO OUT 1 DIGITAL MEDIA PORT cable (7) 2 LED status indicator (10) iPod Display mode (10): Lights up in amber. On Screen Display mode (12): Lights up in green. 3 OPR MODE button (10) 4 iPod connector (8) 5 Rear support (8) 6 VIDEO OUT jack (7) 6US
Getting Started 1: Checking supplied items Unit (1) Operating Instructions (1) 2: List of parts locations VIDEO OUT 1 DIGITAL MEDIA PORT cable (7) 2 LED status indicator (10) iPod Display mode (10): Lights up in amber. On Screen Display mode (12): Lights up in green. 3 OPR MODE button (10) 4 iPod connector (8) 5 Rear support (8) 6 VIDEO OUT jack (7) 6US
Operating Instructions
Page 7
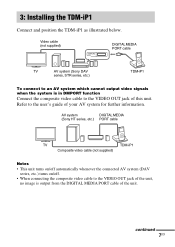
...the composite video cable to the VIDEO OUT jack of your AV system for further information. continued 7US AV system DIGITAL MEDIA (Sony HT series, etc.) PORT cable TV TDM-iP1 Composite video cable (not supplied) Notes • This unit turns on/off automatically whenever the connected AV system... the composite video cable to the user's guide of this unit. Video cable (not supplied) DMPORT DIGITAL MEDIA PORT cable TV AV system (Sony DAV series, STR series, etc.) TDM-iP1 To connect to an AV system which cannot output video signals when the system is output from the...
...the composite video cable to the VIDEO OUT jack of your AV system for further information. continued 7US AV system DIGITAL MEDIA (Sony HT series, etc.) PORT cable TV TDM-iP1 Composite video cable (not supplied) Notes • This unit turns on/off automatically whenever the connected AV system... the composite video cable to the user's guide of this unit. Video cable (not supplied) DMPORT DIGITAL MEDIA PORT cable TV AV system (Sony DAV series, STR series, etc.) TDM-iP1 To connect to an AV system which cannot output video signals when the system is output from the...

Operating Instructions
Page 8
... back of the connected iPod. 2 Put the iPod into the unit's connector 1 Adjust the rear support forward or backward so that the DIGITAL MEDIA PORT cable is turned off the AV system. To put the iPod into the unit's connector. Notes • Hold the rear support on the... sure the AV system is opposite to the f mark of a AV system (DAV series, etc.). Connecting 1 Connect the DIGITAL MEDIA PORT cable of this unit, and select the DIGITAL MEDIA PORT function. To connect/disconnect the unit DMPORT To DMPORT jack Connect so that it straight and parallel with the rear support. &#...
... back of the connected iPod. 2 Put the iPod into the unit's connector 1 Adjust the rear support forward or backward so that the DIGITAL MEDIA PORT cable is turned off the AV system. To put the iPod into the unit's connector. Notes • Hold the rear support on the... sure the AV system is opposite to the f mark of a AV system (DAV series, etc.). Connecting 1 Connect the DIGITAL MEDIA PORT cable of this unit, and select the DIGITAL MEDIA PORT function. To connect/disconnect the unit DMPORT To DMPORT jack Connect so that it straight and parallel with the rear support. &#...

Operating Instructions
Page 10
... MODE on the unit to switch the mode to the next (previous) song/video or chapter of your iPod by the AV system with DIGITAL MEDIA PORT interface (Sony DAV series, etc.). Works much like running your thumb around the Click Wheel on the iPod counterclockwise (clockwise). forward (fastrewind) play . ...iPod. Press and release to skip to iPod Display mode. Pause play . 10US Fast- Note The mode cannot be switched, except for the DIGITAL MEDIA PORT function. While the unit is in iPod Display mode, the unit's LED indicator lights up in amber. x On Screen Display mode You ...
... MODE on the unit to switch the mode to the next (previous) song/video or chapter of your iPod by the AV system with DIGITAL MEDIA PORT interface (Sony DAV series, etc.). Works much like running your thumb around the Click Wheel on the iPod counterclockwise (clockwise). forward (fastrewind) play . ...iPod. Press and release to skip to iPod Display mode. Pause play . 10US Fast- Note The mode cannot be switched, except for the DIGITAL MEDIA PORT function. While the unit is in iPod Display mode, the unit's LED indicator lights up in amber. x On Screen Display mode You ...
Operating Instructions
Page 12
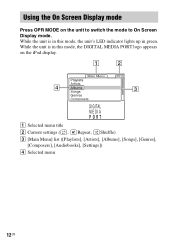
While the unit is in green. Using the On Screen Display mode Press OPR MODE on the iPod display. 1 2 Main Menu Playlists Artists 4 Albums 3 Songs Genres Composers DIGITAL MEDIA P O R T 1 Selected menu title 2 Current settings ( , Repeat, Shuffle) 3 [Main Menu] list ([Playlists], [Artists], [Albums], [Songs], [Genres], [Composers], [Audiobooks], [Settings]) 4 Selected menu 12US While the unit is in this mode, the unit's LED indicator lights up in this mode, the DIGITAL MEDIA PORT logo appears on the unit to switch the mode to On Screen Display mode.
While the unit is in green. Using the On Screen Display mode Press OPR MODE on the iPod display. 1 2 Main Menu Playlists Artists 4 Albums 3 Songs Genres Composers DIGITAL MEDIA P O R T 1 Selected menu title 2 Current settings ( , Repeat, Shuffle) 3 [Main Menu] list ([Playlists], [Artists], [Albums], [Songs], [Genres], [Composers], [Audiobooks], [Settings]) 4 Selected menu 12US While the unit is in this mode, the unit's LED indicator lights up in this mode, the DIGITAL MEDIA PORT logo appears on the unit to switch the mode to On Screen Display mode.

Operating Instructions
Page 15
Note that the iPod* is compatible with your unit, find your Sony dealer. This product is a system product, and the entire system is set to iPod Display mode (page 10). • Make the connection according to the ...'s guide of your AV system (page 7). • When browsing the on screen display through the DIGITAL MEDIA PORT cable: Disconnect the video cable from the VIDEO OUT jack. • When browsing the on screen display through the DIGITAL MEDIA PORT cable: Disconnect the video cable from the iPod does not appear on the TV screen. •...
Note that the iPod* is compatible with your unit, find your Sony dealer. This product is a system product, and the entire system is set to iPod Display mode (page 10). • Make the connection according to the ...'s guide of your AV system (page 7). • When browsing the on screen display through the DIGITAL MEDIA PORT cable: Disconnect the video cable from the VIDEO OUT jack. • When browsing the on screen display through the DIGITAL MEDIA PORT cable: Disconnect the video cable from the iPod does not appear on the TV screen. •...

Operating Instructions
Page 17
Do not use any type of abrasive pad, scouring powder or solvent such as thinner, benzine or alcohol. Specifications Output Video: 1 Vp-p 75 ohm (Composite Video out) General Power requirements: DC IN: 5 V, 700 mA (via DIGITAL MEDIA PORT) Dimensions (w/d/h): Approx. 90 × 78 × 65 mm (3 5/8 × 3 1/8 × 12 5/8 inch) Mass: Approx. 225 g (7.26 oz) (includes cable) Cable length: 2 m (6 ft) Design and specifications are subject to change without notice. 17US Cleaning the unit Clean the unit with a soft cloth slightly moistened with mild detergent solution.
Do not use any type of abrasive pad, scouring powder or solvent such as thinner, benzine or alcohol. Specifications Output Video: 1 Vp-p 75 ohm (Composite Video out) General Power requirements: DC IN: 5 V, 700 mA (via DIGITAL MEDIA PORT) Dimensions (w/d/h): Approx. 90 × 78 × 65 mm (3 5/8 × 3 1/8 × 12 5/8 inch) Mass: Approx. 225 g (7.26 oz) (includes cable) Cable length: 2 m (6 ft) Design and specifications are subject to change without notice. 17US Cleaning the unit Clean the unit with a soft cloth slightly moistened with mild detergent solution.