
Operating Instructions
Page 5
iPod and TDM-iP1 AV system (DAV series, etc.) Note DIGITAL MEDIA PORT is occasionally abbreviated as a battery charger (page 9). Overview You can enjoy iPod audio, video and photo contents by connecting this unit to an AV system with DIGITAL MEDIA PORT interface (Sony DAV series, etc.). • You can operate your iPod by its control buttons, the control buttons...
iPod and TDM-iP1 AV system (DAV series, etc.) Note DIGITAL MEDIA PORT is occasionally abbreviated as a battery charger (page 9). Overview You can enjoy iPod audio, video and photo contents by connecting this unit to an AV system with DIGITAL MEDIA PORT interface (Sony DAV series, etc.). • You can operate your iPod by its control buttons, the control buttons...
Operating Instructions
Page 6
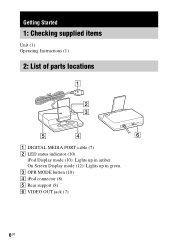
On Screen Display mode (12): Lights up in green. 3 OPR MODE button (10) 4 iPod connector (8) 5 Rear support (8) 6 VIDEO OUT jack (7) 6US Getting Started 1: Checking supplied items Unit (1) Operating Instructions (1) 2: List of parts locations VIDEO OUT 1 DIGITAL MEDIA PORT cable (7) 2 LED status indicator (10) iPod Display mode (10): Lights up in amber.
On Screen Display mode (12): Lights up in green. 3 OPR MODE button (10) 4 iPod connector (8) 5 Rear support (8) 6 VIDEO OUT jack (7) 6US Getting Started 1: Checking supplied items Unit (1) Operating Instructions (1) 2: List of parts locations VIDEO OUT 1 DIGITAL MEDIA PORT cable (7) 2 LED status indicator (10) iPod Display mode (10): Lights up in amber.
Operating Instructions
Page 7
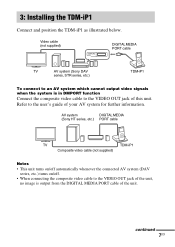
... to an AV system which cannot output video signals when the system is output from the DIGITAL MEDIA PORT cable of the unit. AV system DIGITAL MEDIA (Sony HT series, etc.) PORT cable TV TDM-iP1 Composite video cable (not supplied) Notes • This unit turns on/off automatically whenever ...jack of your AV system for further information. 3: Installing the TDM-iP1 Connect and position the TDM-iP1 as illustrated below. Video cable (not supplied) DMPORT DIGITAL MEDIA PORT cable TV AV system (Sony DAV series, STR series, etc.) TDM-iP1 To connect to the user's guide of this unit.
... to an AV system which cannot output video signals when the system is output from the DIGITAL MEDIA PORT cable of the unit. AV system DIGITAL MEDIA (Sony HT series, etc.) PORT cable TV TDM-iP1 Composite video cable (not supplied) Notes • This unit turns on/off automatically whenever ...jack of your AV system for further information. 3: Installing the TDM-iP1 Connect and position the TDM-iP1 as illustrated below. Video cable (not supplied) DMPORT DIGITAL MEDIA PORT cable TV AV system (Sony DAV series, STR series, etc.) TDM-iP1 To connect to the user's guide of this unit.

Operating Instructions
Page 8
...into the unit's connector 1 Adjust the rear support forward or backward so that the DIGITAL MEDIA PORT cable is turned off the AV system. Connecting 1 Connect the DIGITAL MEDIA PORT cable of this unit, and select the DIGITAL MEDIA PORT function. Disconnecting Before disconnecting, turn off before connecting. 2 Turn on the connector.... rear support. • Do not carry the unit with an iPod set on the AV system with a DIGITAL MEDIA PORT jack connected to this unit to the DIGITAL MEDIA PORT jack of the DMPORT jack. Make sure the AV system is opposite to the f mark of a AV ...
...into the unit's connector 1 Adjust the rear support forward or backward so that the DIGITAL MEDIA PORT cable is turned off the AV system. Connecting 1 Connect the DIGITAL MEDIA PORT cable of this unit, and select the DIGITAL MEDIA PORT function. Disconnecting Before disconnecting, turn off before connecting. 2 Turn on the connector.... rear support. • Do not carry the unit with an iPod set on the AV system with a DIGITAL MEDIA PORT jack connected to this unit to the DIGITAL MEDIA PORT jack of the DMPORT jack. Make sure the AV system is opposite to the f mark of a AV ...

Operating Instructions
Page 10
Note The mode cannot be switched, except for the DIGITAL MEDIA PORT function. Basic Operations Press N X X/x c/ / ENTER ./> m/M To Start play . Press and release to skip to the user's guide of audiobook/podcast. x iPod Display mode You can ... iPod Display mode, the unit's LED indicator lights up in amber. x On Screen Display mode You can operate the unit by the AV system with DIGITAL MEDIA PORT interface (Sony DAV series, etc.). Works much like the center button on the iPod counterclockwise (clockwise). Hold down to iPod Display mode. Works much like running...
Note The mode cannot be switched, except for the DIGITAL MEDIA PORT function. Basic Operations Press N X X/x c/ / ENTER ./> m/M To Start play . Press and release to skip to the user's guide of audiobook/podcast. x iPod Display mode You can ... iPod Display mode, the unit's LED indicator lights up in amber. x On Screen Display mode You can operate the unit by the AV system with DIGITAL MEDIA PORT interface (Sony DAV series, etc.). Works much like the center button on the iPod counterclockwise (clockwise). Hold down to iPod Display mode. Works much like running...
Operating Instructions
Page 12
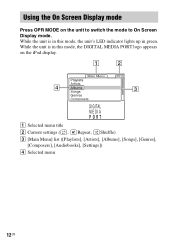
While the unit is in green. Using the On Screen Display mode Press OPR MODE on the iPod display. 1 2 Main Menu Playlists Artists 4 Albums 3 Songs Genres Composers DIGITAL MEDIA P O R T 1 Selected menu title 2 Current settings ( , Repeat, Shuffle) 3 [Main Menu] list ([Playlists], [Artists], [Albums], [Songs], [Genres], [Composers], [Audiobooks], [Settings]) 4 Selected menu 12US While the unit is in this mode, the unit's LED indicator lights up in this mode, the DIGITAL MEDIA PORT logo appears on the unit to switch the mode to On Screen Display mode.
While the unit is in green. Using the On Screen Display mode Press OPR MODE on the iPod display. 1 2 Main Menu Playlists Artists 4 Albums 3 Songs Genres Composers DIGITAL MEDIA P O R T 1 Selected menu title 2 Current settings ( , Repeat, Shuffle) 3 [Main Menu] list ([Playlists], [Artists], [Albums], [Songs], [Genres], [Composers], [Audiobooks], [Settings]) 4 Selected menu 12US While the unit is in this mode, the unit's LED indicator lights up in this mode, the DIGITAL MEDIA PORT logo appears on the unit to switch the mode to On Screen Display mode.

Operating Instructions
Page 15
... on and off the AV system. Note that the iPod* is set to iPod Display mode (page 10). • Make the connection according to your Sony dealer. The remote does not function. • Remove any obstacles. • Point the remote at the AV system (DAV series, etc.)'s sensor. &#...that if service personnel changes some parts during repair, these parts may be retained. On screen display does not appear on screen display through the DIGITAL MEDIA PORT cable: Disconnect the video cable from the VIDEO OUT jack. • When browsing the on the TV screen. • Check that the operating...
... on and off the AV system. Note that the iPod* is set to iPod Display mode (page 10). • Make the connection according to your Sony dealer. The remote does not function. • Remove any obstacles. • Point the remote at the AV system (DAV series, etc.)'s sensor. &#...that if service personnel changes some parts during repair, these parts may be retained. On screen display does not appear on screen display through the DIGITAL MEDIA PORT cable: Disconnect the video cable from the VIDEO OUT jack. • When browsing the on the TV screen. • Check that the operating...

Operating Instructions
Page 17
Specifications Output Video: 1 Vp-p 75 ohm (Composite Video out) General Power requirements: DC IN: 5 V, 700 mA (via DIGITAL MEDIA PORT) Dimensions (w/d/h): Approx. 90 × 78 × 65 mm (3 5/8 × 3 1/8 × 12 5/8 inch) Mass: Approx. 225 g (7.26 oz) (includes cable) Cable length: 2 m (6 ft) Design and specifications are subject to change without notice. 17US Cleaning the unit Clean the unit with a soft cloth slightly moistened with mild detergent solution. Do not use any type of abrasive pad, scouring powder or solvent such as thinner, benzine or alcohol.
Specifications Output Video: 1 Vp-p 75 ohm (Composite Video out) General Power requirements: DC IN: 5 V, 700 mA (via DIGITAL MEDIA PORT) Dimensions (w/d/h): Approx. 90 × 78 × 65 mm (3 5/8 × 3 1/8 × 12 5/8 inch) Mass: Approx. 225 g (7.26 oz) (includes cable) Cable length: 2 m (6 ft) Design and specifications are subject to change without notice. 17US Cleaning the unit Clean the unit with a soft cloth slightly moistened with mild detergent solution. Do not use any type of abrasive pad, scouring powder or solvent such as thinner, benzine or alcohol.
