Marketing Specifications
Page 1
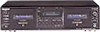
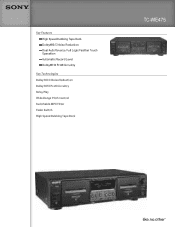
Key Features High Speed Dubbing Tape Deck Dolby® B/C Noise Reduction Dual Auto Reverse, Full Logic Feather Touch Operation Automatic Record Level Dolby® HX Pro® Circuitry Key Technologies Dolby® B/C Noise Reduction Dolby® HX Pro® Circuitry Relay Play Wide-Range Pitch Control Switchable MPX Filter Fader Switch High Speed Dubbing Tape Deck TC-WE475
Key Features High Speed Dubbing Tape Deck Dolby® B/C Noise Reduction Dual Auto Reverse, Full Logic Feather Touch Operation Automatic Record Level Dolby® HX Pro® Circuitry Key Technologies Dolby® B/C Noise Reduction Dolby® HX Pro® Circuitry Relay Play Wide-Range Pitch Control Switchable MPX Filter Fader Switch High Speed Dubbing Tape Deck TC-WE475

Operating Instructions (primary manual)
Page 2
...your tape deck. If this manual are cautioned that may cause harmful interference to them whenever you call upon your model number by one or more of the FCC Rules. Reorient or relocate the receiving antenna. - In this equipment. NOTICE FOR THE CUSTOMERS IN THE U.S.A. Owner's Record The.... These limits are located on , the user is the model used in cabinet. Check your Sony dealer regarding this manual The instructions in the text, for models TC-WE675 and WE475. Connect the equipment into an outlet on the apparatus. Consult the dealer or an experienced radio/...
...your tape deck. If this manual are cautioned that may cause harmful interference to them whenever you call upon your model number by one or more of the FCC Rules. Reorient or relocate the receiving antenna. - In this equipment. NOTICE FOR THE CUSTOMERS IN THE U.S.A. Owner's Record The.... These limits are located on , the user is the model used in cabinet. Check your Sony dealer regarding this manual The instructions in the text, for models TC-WE675 and WE475. Connect the equipment into an outlet on the apparatus. Consult the dealer or an experienced radio/...
Operating Instructions (primary manual)
Page 3
... space during recording - Relay Recording (TC-WE675 only 15 Recording the same source on both decks - Multi-AMS/Auto Play/ Memory Play 8 Creating your own program - Table of Contents Parts Identification Main unit 4 Getting Started Hooking up the system 6 Playing a Tape Playing a tape 7 Locating a track - RMS Play (TC-WE675 only) ..... 8 Recording on a Tape Recording on a tape 10 Adjusting bias and recording level calibration...
... space during recording - Relay Recording (TC-WE675 only 15 Recording the same source on both decks - Multi-AMS/Auto Play/ Memory Play 8 Creating your own program - Table of Contents Parts Identification Main unit 4 Getting Started Hooking up the system 6 Playing a Tape Playing a tape 7 Locating a track - RMS Play (TC-WE675 only) ..... 8 Recording on a Tape Recording on a tape 10 Adjusting bias and recording level calibration...
Operating Instructions (primary manual)
Page 7
...clockwise to raise the pitch or counterclockwise to lower it. Adjust the volume on deck A or normal-speed dubbing (but not during RMS play 2) or RMS dubbing 2)). 2) TC-WE675 only • To play a tape recorded with the Dolby 3) NR, set DOLBY NR to play facing you do so,...TC-WE675 only) and select the same position that the tape was recorded in-B or C. 3) "Dolby", "HX Pro", and the double-D symbol are trademarks of Dolby Laboratories. 3 Set DIRECTION MODE. Fast-forward or rewind M or m when the deck is operating. The deck starts playing. Press the button again to open the cassette...
...clockwise to raise the pitch or counterclockwise to lower it. Adjust the volume on deck A or normal-speed dubbing (but not during RMS play 2) or RMS dubbing 2)). 2) TC-WE675 only • To play a tape recorded with the Dolby 3) NR, set DOLBY NR to play facing you do so,...TC-WE675 only) and select the same position that the tape was recorded in-B or C. 3) "Dolby", "HX Pro", and the double-D symbol are trademarks of Dolby Laboratories. 3 Set DIRECTION MODE. Fast-forward or rewind M or m when the deck is operating. The deck starts playing. Press the button again to open the cassette...
Operating Instructions (primary manual)
Page 8
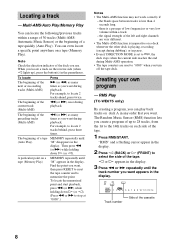
... 7 8 9 10 11 12 13 14 Track number Side of a tape (Auto Play) MEMORY repeatedly until "M" disappears in the display. h or H appears in the display. 3 Press m or M repeatedly until "M" appears in the display. The beginning of the cassette 8 the blank space between tracks is a passage of the preceding tracks ...-AMS: Automatic Music Sensor) or the beginning of a tape quickly (Auto Play). RMS Play (TC-WE675 only) By creating a program, you can play back tracks on a deck whenever the other deck is playing, recording (except during dubbing), or in the parentheses. You can...
... 7 8 9 10 11 12 13 14 Track number Side of a tape (Auto Play) MEMORY repeatedly until "M" disappears in the display. h or H appears in the display. 3 Press m or M repeatedly until "M" appears in the display. The beginning of the cassette 8 the blank space between tracks is a passage of the preceding tracks ...-AMS: Automatic Music Sensor) or the beginning of a tape quickly (Auto Play). RMS Play (TC-WE675 only) By creating a program, you can play back tracks on a deck whenever the other deck is playing, recording (except during dubbing), or in the parentheses. You can...
Operating Instructions (primary manual)
Page 10
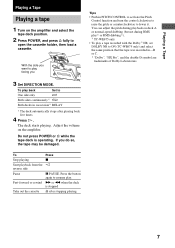
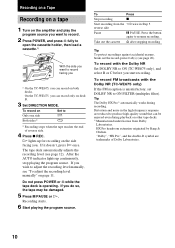
Recording on a Tape Recording on a tape 1 Turn on the amplifier and play the program source you want to record. 2 Press POWER, and press A fully to open the cassette holder, then load a cassette. 1) With the side you want to record facing you 1) On the TC-WE675, you can record on the side facing you. To record on deck B. 3 Set DIRECTION MODE. H lights up continuously...
Recording on a Tape Recording on a tape 1 Turn on the amplifier and play the program source you want to record. 2 Press POWER, and press A fully to open the cassette holder, then load a cassette. 1) With the side you want to record facing you 1) On the TC-WE675, you can record on the side facing you. To record on deck B. 3 Set DIRECTION MODE. H lights up continuously...
Operating Instructions (primary manual)
Page 11
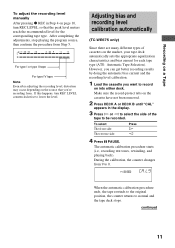
... H or h to select the side of cassettes on into either deck. If this happens, turn REC LEVEL so that you want to record on the market, your tape deck automatically sets the appropriate equalization characteristics and bias current for the corresponding tape type. Adjusting bias and recording level calibration automatically (TC-WE675 only) Since there are many different...
... H or h to select the side of cassettes on into either deck. If this happens, turn REC LEVEL so that you want to record on the market, your tape deck automatically sets the appropriate equalization characteristics and bias current for the corresponding tape type. Adjusting bias and recording level calibration automatically (TC-WE675 only) Since there are many different...
Operating Instructions (primary manual)
Page 12
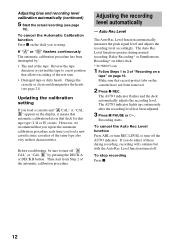
... recording level accordingly. Recording starts. If you load a new cassette since cassettes of the test tone. • Damaged tape or dirty heads. If "A" or "B" flashes continuously The automatic calibration procedure has been interrupted by pressing the DECK A or DECK B button. Adjusting the recording ...either deck. * TC-WE675 only 1 Follow Steps 1 to a new position that record-protect tabs on page 10. Adjusting bias and recording level calibration automatically (continued) 5 Start the actual recording (see page 21). The Auto Rec Level function operates during recording, recording ...
... recording level accordingly. Recording starts. If you load a new cassette since cassettes of the test tone. • Damaged tape or dirty heads. If "A" or "B" flashes continuously The automatic calibration procedure has been interrupted by pressing the DECK A or DECK B button. Adjusting the recording ...either deck. * TC-WE675 only 1 Follow Steps 1 to a new position that record-protect tabs on page 10. Adjusting bias and recording level calibration automatically (continued) 5 Start the actual recording (see page 21). The Auto Rec Level function operates during recording, recording ...

Operating Instructions (primary manual)
Page 13
...Recording on a tape" on and the recording level setting remains the same. The recording level cannot be recorded. The Auto Rec Level function may not increase for example, when the tape reaches to its end and you 're still recording, press FADER at the end of a recording (fade out). It is not working. Turn the deck...in the following : - Press ARL to start . Note Fade-in the display and the deck pauses. Recording on in the track, play the entire program source after recording starts, press z REC while playing the highest sound level portion of the program source to ...
...Recording on a tape" on and the recording level setting remains the same. The recording level cannot be recorded. The Auto Rec Level function may not increase for example, when the tape reaches to its end and you 're still recording, press FADER at the end of a recording (fade out). It is not working. Turn the deck...in the following : - Press ARL to start . Note Fade-in the display and the deck pauses. Recording on in the track, play the entire program source after recording starts, press z REC while playing the highest sound level portion of the program source to ...
Operating Instructions (primary manual)
Page 14
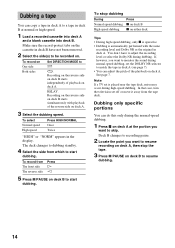
...-speed dubbing, only x is operative. • Dubbing is placed near the tape deck, noise may occur during the normal-speed dubbing. 1 Press x on deck A at normal or high speed. 1 Load a recorded cassette into deck A and a blank cassette into deck B. To record from which to start dubbing. The deck changes to dubbing standby. 4 Select the side from Press The front side...
...-speed dubbing, only x is operative. • Dubbing is placed near the tape deck, noise may occur during the normal-speed dubbing. 1 Press x on deck A at normal or high speed. 1 Load a recorded cassette into deck A and a blank cassette into deck B. To record from which to start dubbing. The deck changes to dubbing standby. 4 Select the side from Press The front side...
Operating Instructions (primary manual)
Page 15
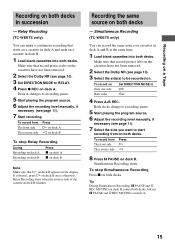
... side The reverse side Press H on deck A h on deck B To stop Simultaneous Recording Press x on deck B appears in deck B. 1 Load blank cassettes into both decks. Both decks change to be recorded on deck A. 15 Simultaneous Recording starts. Recording the same source on both decks. Recording on a Tape Recording on deck B. To record from on both decks in deck B finishes. Relay Recording (TC-WE675 only) You can record the same source on Only one...
... side The reverse side Press H on deck A h on deck B To stop Simultaneous Recording Press x on deck B appears in deck B. 1 Load blank cassettes into both decks. Both decks change to be recorded on deck A. 15 Simultaneous Recording starts. Recording the same source on both decks. Recording on a Tape Recording on deck B. To record from on both decks in deck B finishes. Relay Recording (TC-WE675 only) You can record the same source on Only one...
Operating Instructions (primary manual)
Page 16
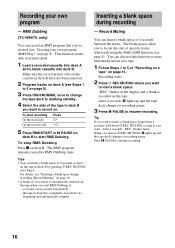
... unwanted portions on a tape. 1 Follow Steps 1 to 5 of the tape in deck B you want to recording pause. After 4 seconds, X lights up and the tape deck changes to load a blank space. Make sure the record-protect tabs on the cassette in the display and a blank is recorded on deck B. The RMS program remains even after Step 4. RMS Dubbing (TC-WE675 only) You...
... unwanted portions on a tape. 1 Follow Steps 1 to 5 of the tape in deck B you want to recording pause. After 4 seconds, X lights up and the tape deck changes to load a blank space. Make sure the record-protect tabs on the cassette in the display and a blank is recorded on deck B. The RMS program remains even after Step 4. RMS Dubbing (TC-WE675 only) You...
Operating Instructions (primary manual)
Page 17
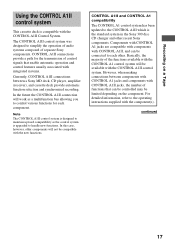
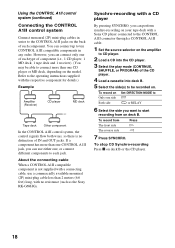
...In the future the CONTROL A1II connection will not be limited depending on a Tape Using the CONTROL A1II control system This cassette deck is the standard system in the Sony 300 disc CD changer and other . CONTROL A1II connections provide a path for ... with components with CONTROL A1II jacks, the number of separate Sony components. However, when making connections between a Sony MD deck, CD player, amplifier (receiver), and cassette deck provide automatic function selection and synchronized recording. Recording on the component. continued 17 In this case, however, ...
...In the future the CONTROL A1II connection will not be limited depending on a Tape Using the CONTROL A1II control system This cassette deck is the standard system in the Sony 300 disc CD changer and other . CONTROL A1II connections provide a path for ... with components with CONTROL A1II jacks, the number of separate Sony components. However, when making connections between a Sony MD deck, CD player, amplifier (receiver), and cassette deck provide automatic function selection and synchronized recording. Recording on the component. continued 17 In this case, however, ...
Operating Instructions (primary manual)
Page 18
...connect different components to each jack. To stop CD Synchro-recording Press x on the amplifier to CD player. 2 Load a CD into the CD player. 3 Select the play mode (CONTINUE, SHUFFLE, or PROGRAM) of the CD player. 4 Load a cassette into deck B. 5 Select the side(s) to be able to connect... cable. 1 Set the source selector on deck B or the CD player. 18 However, you can perform synchro-recording on your tape deck with a CD player By pressing SYNCHRO, you can connect only one of IN and OUT jacks. Synchro-recording with a Sony CD player connected to ten CONTROL A1II compatible...
...connect different components to each jack. To stop CD Synchro-recording Press x on the amplifier to CD player. 2 Load a CD into the CD player. 3 Select the play mode (CONTINUE, SHUFFLE, or PROGRAM) of the CD player. 4 Load a cassette into deck B. 5 Select the side(s) to be able to connect... cable. 1 Set the source selector on deck B or the CD player. 18 However, you can perform synchro-recording on your tape deck with a CD player By pressing SYNCHRO, you can connect only one of IN and OUT jacks. Synchro-recording with a Sony CD player connected to ten CONTROL A1II compatible...
Operating Instructions (primary manual)
Page 19
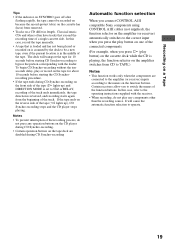
... single cassette side. It will transport the tape for about 10 seconds before starting the CD Synchrorecording procedure. • If the tape ends during CD Synchro-recording Automatic function selection When you connect CONTROL A1II compatible Sony components ...recorded on is assumed by the deck to the operating instructions supplied with the leader. The deck will cause the automatic function selection to the correct input when you press the play button) on the cassette deck while the CD is playing, the function selector on the amplifier switches from the beginning of the tape...
... single cassette side. It will transport the tape for about 10 seconds before starting the CD Synchrorecording procedure. • If the tape ends during CD Synchro-recording Automatic function selection When you connect CONTROL A1II compatible Sony components ...recorded on is assumed by the deck to the operating instructions supplied with the leader. The deck will cause the automatic function selection to the correct input when you press the play button) on the cassette deck while the CD is playing, the function selector on the amplifier switches from the beginning of the tape...
Operating Instructions (primary manual)
Page 20
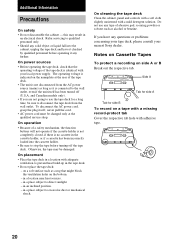
...object or liquid fall into the cassette holder. • Be sure to stop the tape before operating it is no cassette in a location with your nearest Sony dealer. in a place subject to prevent heat build-up in the tape deck. • Do not place the tape deck: - Side A Tab for ...direct sunlight. - On placement • Place the tape deck in the cassette holder, or if a cassette has been incorrectly loaded into the cabinet, unplug the tape deck and have any type of the tape deck is indicated on a tape with a missing record-protect tab Cover the respective tab hole with a mild...
...object or liquid fall into the cassette holder. • Be sure to stop the tape before operating it is no cassette in a location with your nearest Sony dealer. in a place subject to prevent heat build-up in the tape deck. • Do not place the tape deck: - Side A Tab for ...direct sunlight. - On placement • Place the tape deck in the cassette holder, or if a cassette has been incorrectly loaded into the cabinet, unplug the tape deck and have any type of the tape deck is indicated on a tape with a missing record-protect tab Cover the respective tab hole with a mild...
Operating Instructions (primary manual)
Page 21
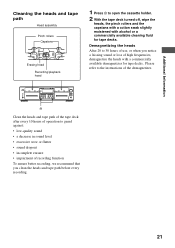
...; sound dropout • incomplete erasure • impairment of the demagnetizer. Additional Information Cleaning the heads and tape path Head assembly Pinch rollers Capstans Erasing head Recording/playback head 1 Press A to open the cassette holder. 2 With the tape deck turned off, wipe the heads, the pinch rollers and the capstans with a cotton swab slightly moistened with...
...; sound dropout • incomplete erasure • impairment of the demagnetizer. Additional Information Cleaning the heads and tape path Head assembly Pinch rollers Capstans Erasing head Recording/playback head 1 Press A to open the cassette holder. 2 With the tape deck turned off, wipe the heads, the pinch rollers and the capstans with a cotton swab slightly moistened with...
Operating Instructions (primary manual)
Page 22
... not play or record. • There is no cassette in the display, press MEMORY repeatedly until X stops flashing. • Check that the tape deck connections are secure. • The heads and tape path are dirty. The tape stops before a track is less than 4 seconds long. Should the problem persist, consult your nearest Sony dealer. There is hum...
... not play or record. • There is no cassette in the display, press MEMORY repeatedly until X stops flashing. • Check that the tape deck connections are secure. • The heads and tape path are dirty. The tape stops before a track is less than 4 seconds long. Should the problem persist, consult your nearest Sony dealer. There is hum...

