Dimensions Diagram
Page 1
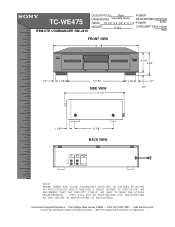
TC-WE475 REMOTE COMMANDER RM-J910 DESCRIPTION: Dual POWER DIMENSIONS Cassette Deck REQUIREMENTS1: 20VAC (WHD): 16 7/8" X 4 3/4" X 11 1/4" POWER 60Hz WEIGHT: 11 lbs CONSUMPTION:11 Watts (max) FRONT VIEW 16 7/8" R 4 1/4" 4 3/4" 1/2" 1 7/8 " 12 1/8" SIDE VIEW 11 1/4" 1 7/8 1/2" 1/2" 1 1/8" 6 7/8" BACK VIEW... TO MAKE THE ACTUAL MEASUREMENTS. Consumer Integrated Systems • Park Ridge, New Jersey 07656 • FAX (201) 930 7891 • b2b.sel.sony.com Features and specifications subject to change without notice. • Non-metric weights and measurements are approximate...
TC-WE475 REMOTE COMMANDER RM-J910 DESCRIPTION: Dual POWER DIMENSIONS Cassette Deck REQUIREMENTS1: 20VAC (WHD): 16 7/8" X 4 3/4" X 11 1/4" POWER 60Hz WEIGHT: 11 lbs CONSUMPTION:11 Watts (max) FRONT VIEW 16 7/8" R 4 1/4" 4 3/4" 1/2" 1 7/8 " 12 1/8" SIDE VIEW 11 1/4" 1 7/8 1/2" 1/2" 1 1/8" 6 7/8" BACK VIEW... TO MAKE THE ACTUAL MEASUREMENTS. Consumer Integrated Systems • Park Ridge, New Jersey 07656 • FAX (201) 930 7891 • b2b.sel.sony.com Features and specifications subject to change without notice. • Non-metric weights and measurements are approximate...

Operating Instructions (primary manual)
Page 1
4-232-596-12 (1) Stereo Cassette Deck Operating Instructions TC-WE675 TC-WE475 © 2001 Sony Corporation
4-232-596-12 (1) Stereo Cassette Deck Operating Instructions TC-WE675 TC-WE475 © 2001 Sony Corporation
Operating Instructions (primary manual)
Page 7
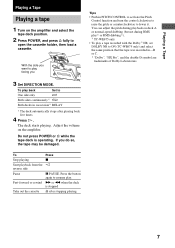
... resume play a tape recorded with the Dolby 3) NR, set DOLBY NR to open the cassette holder, then load a cassette. The deck starts playing. Do not press POWER or A while the tape deck is stopped Take out the cassette A after playing back five times. 4 Press H. You can adjust the pitch during RMS... play 2) or RMS dubbing 2)). 2) TC-WE675 only • To play . If you want to play ...
... resume play a tape recorded with the Dolby 3) NR, set DOLBY NR to open the cassette holder, then load a cassette. The deck starts playing. Do not press POWER or A while the tape deck is stopped Take out the cassette A after playing back five times. 4 Press H. You can adjust the pitch during RMS... play 2) or RMS dubbing 2)). 2) TC-WE675 only • To play . If you want to play ...
Operating Instructions (primary manual)
Page 8
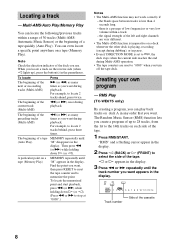
... a flashing cursor appear in the display. 2 Press h (BACK) or H (FRONT) to "0000" when you want . A particular point on a deck whenever the other deck is a passage of low frequencies or very low volume within a range of 30 tracks (Multi-AMS: Automatic Music Sensor) or the beginning of the... cassette 8 For example, to locate 2 tracks behind, press three times. For example, to locate 2 tracks ahead, press twice. RMS Play (TC-WE675...
... a flashing cursor appear in the display. 2 Press h (BACK) or H (FRONT) to "0000" when you want . A particular point on a deck whenever the other deck is a passage of low frequencies or very low volume within a range of 30 tracks (Multi-AMS: Automatic Music Sensor) or the beginning of the... cassette 8 For example, to locate 2 tracks behind, press three times. For example, to locate 2 tracks ahead, press twice. RMS Play (TC-WE675...
Operating Instructions (primary manual)
Page 10
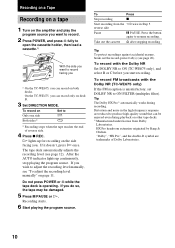
... only) If the FM reception is operating. HX Pro headroom extension originated by Bang & Olufsen. On the TC-WE475, you can record on both decks. To record on other tape decks. 3) Manufactured under license from the h twice in the high-frequency response are trademarks of reverse side. 4 Press ... 2 Press POWER, and press A fully to open the cassette holder, then load a cassette. 1) With the side you want to record facing you 1) On the TC-WE675, you can record only on deck B. 3 Set DIRECTION MODE. The tape deck automatically adjusts the recording level (see page 20). After the...
... only) If the FM reception is operating. HX Pro headroom extension originated by Bang & Olufsen. On the TC-WE475, you can record on both decks. To record on other tape decks. 3) Manufactured under license from the h twice in the high-frequency response are trademarks of reverse side. 4 Press ... 2 Press POWER, and press A fully to open the cassette holder, then load a cassette. 1) With the side you want to record facing you 1) On the TC-WE675, you can record only on deck B. 3 Set DIRECTION MODE. The tape deck automatically adjusts the recording level (see page 20). After the...
Operating Instructions (primary manual)
Page 11
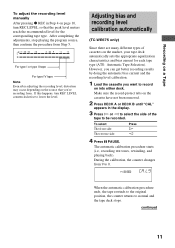
...the record-protect tabs on the cassette have not been removed. 2 Press DECK A or DECK B until "CAL" appears in Step 4 on page 10, turn REC LEVEL counterclockwise to lower the level. Adjusting bias and recording level calibration automatically (TC-WE675 only) Since there are many...the recording level manually After pressing z REC in the display. 3 Press H or h to select the side of cassettes on the market, your tape deck automatically sets the appropriate equalization characteristics and bias current for the corresponding tape type. After completing the adjustments, stop playing ...
...the record-protect tabs on the cassette have not been removed. 2 Press DECK A or DECK B until "CAL" appears in Step 4 on page 10, turn REC LEVEL counterclockwise to lower the level. Adjusting bias and recording level calibration automatically (TC-WE675 only) Since there are many...the recording level manually After pressing z REC in the display. 3 Press H or h to select the side of cassettes on the market, your tape deck automatically sets the appropriate equalization characteristics and bias current for the corresponding tape type. After completing the adjustments, stop playing ...
Operating Instructions (primary manual)
Page 12
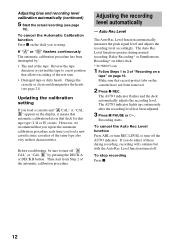
... "Recording on a tape" on either deck. * TC-WE675 only 1 Follow Steps 1 to turn off "A CAL" or "CAL B" by : • The end of the automatic calibration procedure. Then start from Step 2 of the tape. To cancel the Automatic Calibration function Press x on the cassette have not been removed. 2 Press ...* on page 10. However, we recommend that allows recording of the same type also vary in that deck for that record-protect tabs on the deck you load a new cassette since cassettes of the test tone. • Damaged tape or dirty heads. To stop recording Press x. 12 Make...
... "Recording on a tape" on either deck. * TC-WE675 only 1 Follow Steps 1 to turn off "A CAL" or "CAL B" by : • The end of the automatic calibration procedure. Then start from Step 2 of the tape. To cancel the Automatic Calibration function Press x on the cassette have not been removed. 2 Press ...* on page 10. However, we recommend that allows recording of the same type also vary in that deck for that record-protect tabs on the deck you load a new cassette since cassettes of the test tone. • Damaged tape or dirty heads. To stop recording Press x. 12 Make...
Operating Instructions (primary manual)
Page 14
Recording on the reverse side on deck B starts independently of the reverse side on deck A at normal or high speed. 1 Load a recorded cassette into deck A and a blank cassette into deck B. To select Press HIGH/NORMAL Normal speed Once High speed Twice "HIGH" or "NORM" appears in deck A. You don't have not been... do this only during normal-speed dubbing, set is automatically performed with playback of playback on the cassette in deck B have to skip. Make sure the record-protect tabs on deck A. RELAY. Note If a TV set the DOLBY NR selector to monitor the sound during the ...
Recording on the reverse side on deck B starts independently of the reverse side on deck A at normal or high speed. 1 Load a recorded cassette into deck A and a blank cassette into deck B. To select Press HIGH/NORMAL Normal speed Once High speed Twice "HIGH" or "NORM" appears in deck A. You don't have not been... do this only during normal-speed dubbing, set is automatically performed with playback of playback on the cassette in deck B have to skip. Make sure the record-protect tabs on deck A. RELAY. Note If a TV set the DOLBY NR selector to monitor the sound during the ...
Operating Instructions (primary manual)
Page 15
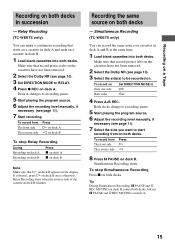
... The reverse side Press H on deck A h on deck B To stop Simultaneous Recording Press x on . Relay Recording (TC-WE675 only) You can record the same source on cassettes in deck B finishes. If it doesn't, press H on deck A. 15 Tip During Simultaneous Recording, X PAUSE and W REC MUTING on deck B control both decks. Simultaneous Recording (TC-WE675 only) You can make a continuous...
... The reverse side Press H on deck A h on deck B To stop Simultaneous Recording Press x on . Relay Recording (TC-WE675 only) You can record the same source on cassettes in deck B finishes. If it doesn't, press H on deck A. 15 Tip During Simultaneous Recording, X PAUSE and W REC MUTING on deck B control both decks. Simultaneous Recording (TC-WE675 only) You can make a continuous...
Operating Instructions (primary manual)
Page 16
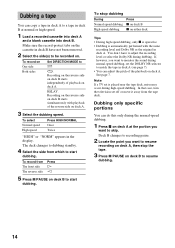
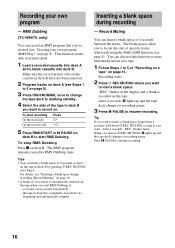
...Select the side of "Recording on a tape" on a tape. 1 Follow Steps 1 to resume recording. 16 Make sure the record-protect tabs on the cassette in deck B is completely rewound to locate the start RMS Dubbing if: - To stop RMS Dubbing Press x on the tape. Tip If you release W REC ...You can insert a blank space of 4 seconds or more on the tape when you want . After 4 seconds, "REC" flashes faster. RMS Dubbing (TC-WE675 only) You can insert a blank space of specific tracks afterwards using the Multi-AMS function (see "Creating your own program - Recording your own ...
...Select the side of "Recording on a tape" on a tape. 1 Follow Steps 1 to resume recording. 16 Make sure the record-protect tabs on the cassette in deck B is completely rewound to locate the start RMS Dubbing if: - To stop RMS Dubbing Press x on the tape. Tip If you release W REC ...You can insert a blank space of 4 seconds or more on the tape when you want . After 4 seconds, "REC" flashes faster. RMS Dubbing (TC-WE675 only) You can insert a blank space of specific tracks afterwards using the Multi-AMS function (see "Creating your own program - Recording your own ...
Operating Instructions (primary manual)
Page 17
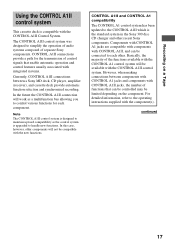
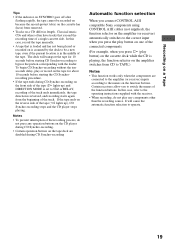
... A1II control system. Components with CONTROL A1 jacks are compatible with components with integrated systems. Currently, CONTROL A1II connections between a Sony MD deck, CD player, amplifier (receiver), and cassette deck provide automatic function selection and synchronized recording. Recording on the component. CONTROL A1II connections provide a path for each other recent... available with the CONTROL A1 control system will not be limited depending on a Tape Using the CONTROL A1II control system This cassette deck is the standard system in the Sony 300 disc CD changer and other .
... A1II control system. Components with CONTROL A1 jacks are compatible with components with integrated systems. Currently, CONTROL A1II connections between a Sony MD deck, CD player, amplifier (receiver), and cassette deck provide automatic function selection and synchronized recording. Recording on the component. CONTROL A1II connections provide a path for each other recent... available with the CONTROL A1 control system will not be limited depending on a Tape Using the CONTROL A1II control system This cassette deck is the standard system in the Sony 300 disc CD changer and other .
Operating Instructions (primary manual)
Page 18
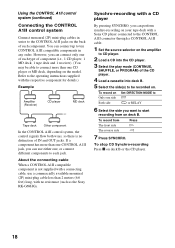
...Sony RK-G69HG). To record from on the back of each jack. To record on the model. To stop CD Synchro-recording Press x on . However, you can use a commercially available monaural (2P) mini-plug cable less than 2 meters (6.6 feet) long, with no distinction of the CD player. 4 Load a cassette into deck... B. 5 Select the side(s) to be able to connect more than one CD player or MD deck, depending on Set DIRECTION MODE to Only one , or connect different components to the CONTROL A1II ...
...Sony RK-G69HG). To record from on the back of each jack. To record on the model. To stop CD Synchro-recording Press x on . However, you can use a commercially available monaural (2P) mini-plug cable less than 2 meters (6.6 feet) long, with no distinction of the CD player. 4 Load a cassette into deck... B. 5 Select the side(s) to be able to connect more than one CD player or MD deck, depending on Set DIRECTION MODE to Only one , or connect different components to the CONTROL A1II ...
Operating Instructions (primary manual)
Page 19
.... • A tape that is loaded and has not been played or recorded on is assumed by the deck to be recorded on because the record-protect tab(s) on the cassette has (have tracks that exceed the recording time of the tape (H lights up ), CD Synchro-recording stops ...starting the CD Synchrorecording procedure. • If the tape ends during CD Synchro-recording Automatic function selection When you connect CONTROL A1II compatible Sony components using CONTROL A1II cables (not supplied), the function selector on the amplifier (or receiver) automatically switches to switch the names of the...
.... • A tape that is loaded and has not been played or recorded on is assumed by the deck to be recorded on because the record-protect tab(s) on the cassette has (have tracks that exceed the recording time of the tape (H lights up ), CD Synchro-recording stops ...starting the CD Synchrorecording procedure. • If the tape ends during CD Synchro-recording Automatic function selection When you connect CONTROL A1II compatible Sony components using CONTROL A1II cables (not supplied), the function selector on the amplifier (or receiver) automatically switches to switch the names of the...
Operating Instructions (primary manual)
Page 20
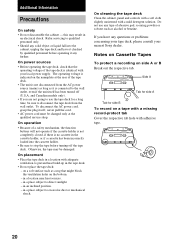
...subject to excessive dust or mechanical shock. in the tape deck. • Do not place the tape deck: - On cleaning the tape deck Clean the cabinet, panel and controls with a soft cloth slightly moistened with your nearest Sony dealer. If you are not going to the wall outlet... heat sources. - and Canadian models only). • If you have it any questions or problems concerning your tape deck, please consult your local power supply. Notes on Cassette Tapes To protect a recording on a soft surface such as alcohol or benzine. On operation • Because of abrasive...
...subject to excessive dust or mechanical shock. in the tape deck. • Do not place the tape deck: - On cleaning the tape deck Clean the cabinet, panel and controls with a soft cloth slightly moistened with your nearest Sony dealer. If you are not going to the wall outlet... heat sources. - and Canadian models only). • If you have it any questions or problems concerning your tape deck, please consult your local power supply. Notes on Cassette Tapes To protect a recording on a soft surface such as alcohol or benzine. On operation • Because of abrasive...
Operating Instructions (primary manual)
Page 21
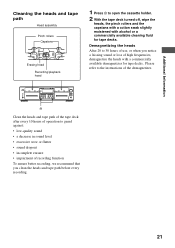
... of use, or when you clean the heads and tape path before every recording. 21 A Clean the heads and tape path of the tape deck after every 10 hours of operation to guard against: • low-quality sound • a decrease in sound level • excessive wow or... Information Cleaning the heads and tape path Head assembly Pinch rollers Capstans Erasing head Recording/playback head 1 Press A to open the cassette holder. 2 With the tape deck turned off, wipe the heads, the pinch rollers and the capstans with a cotton swab slightly moistened with a commercially available demagnetizer for...
... of use, or when you clean the heads and tape path before every recording. 21 A Clean the heads and tape path of the tape deck after every 10 hours of operation to guard against: • low-quality sound • a decrease in sound level • excessive wow or... Information Cleaning the heads and tape path Head assembly Pinch rollers Capstans Erasing head Recording/playback head 1 Press A to open the cassette holder. 2 With the tape deck turned off, wipe the heads, the pinch rollers and the capstans with a cotton swab slightly moistened with a commercially available demagnetizer for...
Operating Instructions (primary manual)
Page 22
... page 21). • The recording/playback head is magnetized. There is hum or noise. • The tape deck is no cassette in the display, press MEMORY repeatedly until X stops flashing. • Check that the tape deck connections are secure. • The heads and tape path are dirty. Use another...and tape path are dirty. Load a blank space of the sound is shown in the cassette holder. • The tape has come to turn off the function. Should the problem persist, consult your nearest Sony dealer. Clean them (see page 20). • Make sure the amplifier setting is correct....
... page 21). • The recording/playback head is magnetized. There is hum or noise. • The tape deck is no cassette in the display, press MEMORY repeatedly until X stops flashing. • Check that the tape deck connections are secure. • The heads and tape path are dirty. Use another...and tape path are dirty. Load a blank space of the sound is shown in the cassette holder. • The tape has come to turn off the function. Should the problem persist, consult your nearest Sony dealer. Clean them (see page 20). • Make sure the amplifier setting is correct....
Operating Instructions (primary manual)
Page 23
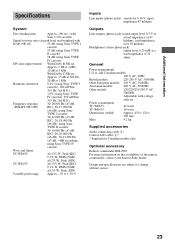
.... 23 RMS (NAB) ±0.2% W. Peak (DIN) TC-WE475: ±0.15% W. RMS (NAB) ±0.2% W. Peak (IEC) 0.1% W. Additional Information Specifications System Fast-winding time Approx. 100 sec. (with Sony C-60 cassette) Signal-to-noise ratio (at peak level and weighted with... voltage selector Power consumption TC-WE675: 22 watts TC-WE475: 18 watts Dimensions (w/h/d) Approx. 430 × 120 × 300 mm ...
.... 23 RMS (NAB) ±0.2% W. Peak (DIN) TC-WE475: ±0.15% W. RMS (NAB) ±0.2% W. Peak (IEC) 0.1% W. Additional Information Specifications System Fast-winding time Approx. 100 sec. (with Sony C-60 cassette) Signal-to-noise ratio (at peak level and weighted with... voltage selector Power consumption TC-WE675: 22 watts TC-WE475: 18 watts Dimensions (w/h/d) Approx. 430 × 120 × 300 mm ...


