

Handycam® Handbook
Page 2
...Techniques Using the Handycam Handbook You will be found in the Operating Guide and the PMB Guide that is the Help of the supplied "PMB (Picture Motion Browser)" software. Refer to the Help of Adobe Reader for illustration purposes are captured using your camcorder and accessories ... PRO Duo" media and "Memory Stick PRO-HG Duo" media are subject to its fullest in this Handycam Handbook. Searching for information quickly Click an item on your camcorder. In this Handycam Handbook, the internal memory of each page, and you will jump to the Operating Guide (a separate volume...
...Techniques Using the Handycam Handbook You will be found in the Operating Guide and the PMB Guide that is the Help of the supplied "PMB (Picture Motion Browser)" software. Refer to the Help of Adobe Reader for illustration purposes are captured using your camcorder and accessories ... PRO Duo" media and "Memory Stick PRO-HG Duo" media are subject to its fullest in this Handycam Handbook. Searching for information quickly Click an item on your camcorder. In this Handycam Handbook, the internal memory of each page, and you will jump to the Operating Guide (a separate volume...

Handycam® Handbook
Page 3
Table of Contents Useful Recording Techniques Table of advice for successful recording 19 Recording and playing movies and photos easily ( Easy Handycam Operation) ...20 Recording movies 20 Shooting photos 22 Playing movies 23 Viewing photos 25 Recording 26 Recording movies 26 Shooting photos 28 Useful ... 9 Using the OPTION MENU 9 Menu lists 11 List of the HOME MENU 11 List of the OPTION MENU 12 Read this before operating your camcorder 13 Getting started Step 1: Charging the battery pack 15 Step 2: Turning the power on, and setting the date and time 17 Changing the language...
Table of Contents Useful Recording Techniques Table of advice for successful recording 19 Recording and playing movies and photos easily ( Easy Handycam Operation) ...20 Recording movies 20 Shooting photos 22 Playing movies 23 Viewing photos 25 Recording 26 Recording movies 26 Shooting photos 28 Useful ... 9 Using the OPTION MENU 9 Menu lists 11 List of the HOME MENU 11 List of the OPTION MENU 12 Read this before operating your camcorder 13 Getting started Step 1: Charging the battery pack 15 Step 2: Turning the power on, and setting the date and time 17 Changing the language...
Handycam® Handbook
Page 4
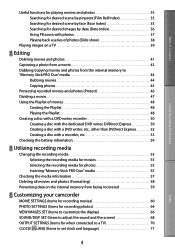
... 55 Checking the media information 57 Deleting all movies and photos (Formatting 58 Preventing data on the internal memory from being recovered 59 Customizing your camcorder MOVIE SETTINGS (Items for recording movies 60 PHOTO SETTINGS (Items for recording photos 64 VIEW IMAGES SET (Items to customize the display 66 SOUND/DISP...
... 55 Checking the media information 57 Deleting all movies and photos (Formatting 58 Preventing data on the internal memory from being recovered 59 Customizing your camcorder MOVIE SETTINGS (Items for recording movies 60 PHOTO SETTINGS (Items for recording photos 64 VIEW IMAGES SET (Items to customize the display 66 SOUND/DISP...
Handycam® Handbook
Page 5
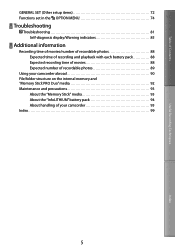
... Expected time of recording and playback with each battery pack 88 Expected recording time of movies 88 Expected number of recordable photos 89 Using your camcorder abroad 90 File/folder structure on the internal memory and "Memory Stick PRO Duo" media 92 Maintenance and precautions 93 About the "Memory Stick" media...
... Expected time of recording and playback with each battery pack 88 Expected recording time of movies 88 Expected number of recordable photos 89 Using your camcorder abroad 90 File/folder structure on the internal memory and "Memory Stick PRO Duo" media 92 Maintenance and precautions 93 About the "Memory Stick" media...

Handycam® Handbook
Page 8
...; "Memory Stick Duo" media slot (56) Access lamp (Internal memory, "Memory Stick PRO Duo" media) (56) While the lamp is lit or flashing, the camcorder is reading or writing data. (USB) jack (52) Screen indicators Upper left Center Upper right Indicator 0:00:00 [00min] 9999 9999 100/112...
...; "Memory Stick Duo" media slot (56) Access lamp (Internal memory, "Memory Stick PRO Duo" media) (56) While the lamp is lit or flashing, the camcorder is reading or writing data. (USB) jack (52) Screen indicators Upper left Center Upper right Indicator 0:00:00 [00min] 9999 9999 100/112...
Handycam® Handbook
Page 9
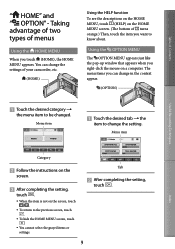
Table of turns orange.) Then, touch the item you want to know about. The menu items you can change the settings of your camcorder, etc. (HOME) Using the HELP function To see the descriptions on the HOME MENU, touch (HELP) on the HOME MENU screen. (The bottom of Contents " ...
Table of turns orange.) Then, touch the item you want to know about. The menu items you can change the settings of your camcorder, etc. (HOME) Using the HELP function To see the descriptions on the HOME MENU, touch (HELP) on the HOME MENU screen. (The bottom of Contents " ...

Handycam® Handbook
Page 10
Table of Contents Useful Recording Techniques Notes When the item you want is not on the screen, touch another tab. (There may be no tab.) You cannot use the OPTION MENU during Easy Handycam operation. The tabs and items that appear on the screen depend on the recording/playback status of your camcorder at the time. 10 Index
Table of Contents Useful Recording Techniques Notes When the item you want is not on the screen, touch another tab. (There may be no tab.) You cannot use the OPTION MENU during Easy Handycam operation. The tabs and items that appear on the screen depend on the recording/playback status of your camcorder at the time. 10 Index
Handycam® Handbook
Page 13
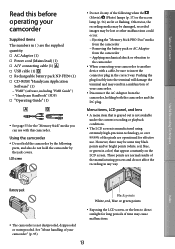
..." (software, including "PMB Guide" ) "Handycam Handbook" (PDF) "Operating Guide" (1) See page 55 for the "Memory Stick" media you can use . Menu items, LCD panel, and lens A menu item that appear constantly on the LCD screen. Table of Contents Read this camcorder. Using the camcorder Do not hold the...
..." (software, including "PMB Guide" ) "Handycam Handbook" (PDF) "Operating Guide" (1) See page 55 for the "Memory Stick" media you can use . Menu items, LCD panel, and lens A menu item that appear constantly on the LCD screen. Table of Contents Read this camcorder. Using the camcorder Do not hold the...
Handycam® Handbook
Page 14
...by Carl Zeiss, in low light conditions, such as a DVD-R using your camcorder to a malfunction of the sun only in Germany, and Sony Corporation, and produces superior images. Also, when you dispose of the camcorder. In such a case, save the image data on some data might cause... your camcorder if necessary (p. 18). Carl Zeiss lens Your camcorder is recommended that you save your computer...
...by Carl Zeiss, in low light conditions, such as a DVD-R using your camcorder to a malfunction of the sun only in Germany, and Sony Corporation, and produces superior images. Also, when you dispose of the camcorder. In such a case, save the image data on some data might cause... your camcorder if necessary (p. 18). Carl Zeiss lens Your camcorder is recommended that you save your computer...
Handycam® Handbook
Page 15
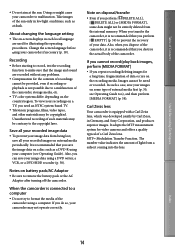
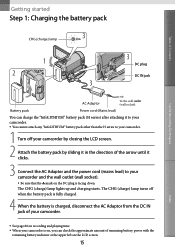
... pack by sliding it in the direction of the arrow until it clicks. 3 Connect the AC Adaptor and the power cord (mains lead) to your camcorder. 1 Turn off when the battery pack is fully charged. 4 When the battery is charged, disconnect the AC Adaptor from the DC IN jack of remaining... indicator at the upper left on the DC plug is on, you can check the approximate amount of your camcorder. See page 88 on recording and playing time. When your camcorder and the wall outlet (wall socket). Be sure that the mark on the LCD screen. 15 Index...
... pack by sliding it in the direction of the arrow until it clicks. 3 Connect the AC Adaptor and the power cord (mains lead) to your camcorder. 1 Turn off when the battery pack is fully charged. 4 When the battery is charged, disconnect the AC Adaptor from the DC IN jack of remaining... indicator at the upper left on the DC plug is on, you can check the approximate amount of your camcorder. See page 88 on recording and playing time. When your camcorder and the wall outlet (wall socket). Be sure that the mark on the LCD screen. 15 Index...
Handycam® Handbook
Page 16
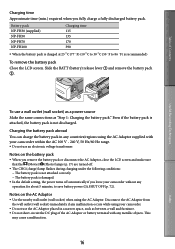
... you fully charge a fully discharged battery pack. This may cause a malfunction. 16 Index Table of the AC Adaptor or battery terminal with your camcorder without any operation for about 5 minutes, to 86 ˚F) is not discharged. Disconnect the AC Adaptor from the wall outlet (wall socket)... immediately if any malfunction occurs while using your camcorder. Do not use the AC Adaptor placed in any metallic objects. Charging the battery pack abroad You can charge the battery pack in...
... you fully charge a fully discharged battery pack. This may cause a malfunction. 16 Index Table of the AC Adaptor or battery terminal with your camcorder without any operation for about 5 minutes, to 86 ˚F) is not discharged. Disconnect the AC Adaptor from the wall outlet (wall socket)... immediately if any malfunction occurs while using your camcorder. Do not use the AC Adaptor placed in any metallic objects. Charging the battery pack abroad You can charge the battery pack in...
Handycam® Handbook
Page 17
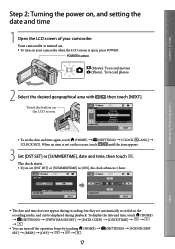
...] or [SUMMERTIME] to [ON], the clock advances 1 hour. The date and time does not appear during playback. When an item is not on your camcorder. Your camcorder is turned on. To turn off the operation beeps by touching (HOME) (SETTINGS) [SOUND/DISP SET] [BEEP] [OFF 17... Index Table of Contents Useful Recording Techniques Step 2: Turning the power on, and setting the date and time 1 Open the LCD screen of your camcorder when the LCD screen is open, press POWER.
...] or [SUMMERTIME] to [ON], the clock advances 1 hour. The date and time does not appear during playback. When an item is not on your camcorder. Your camcorder is turned on. To turn off the operation beeps by touching (HOME) (SETTINGS) [SOUND/DISP SET] [BEEP] [OFF 17... Index Table of Contents Useful Recording Techniques Step 2: Turning the power on, and setting the date and time 1 Open the LCD screen of your camcorder when the LCD screen is open, press POWER.

Handycam® Handbook
Page 18
... seconds and the power is turned POWER button You can change the on-screen displays to [OFF], turn off your camcorder also by pressing POWER. To turn off your camcorder by pressing POWER. When [POWER ON BY LCD] (p. 73) is set to show messages in a specified language. Table of Contents...
... seconds and the power is turned POWER button You can change the on-screen displays to [OFF], turn off your camcorder also by pressing POWER. To turn off your camcorder by pressing POWER. When [POWER ON BY LCD] (p. 73) is set to show messages in a specified language. Table of Contents...

Handycam® Handbook
Page 19
...for a balanced volume of voices, since the recording person is essential that may make the scene look stable. And, use of camcorder accessories. Evoking a feeling of panning for a while to make the viewer feel tired when viewing them. Accentuating movies with narration ...out slowly and smoothly. Table of Contents Useful Recording Techniques Recording/Playback Five pieces of advice for successful recording Stabilizing your camcorder When you hold the camcorder, keep your upper body upright, and hold your arms close to your movies. Using accessories Make good use zooming sparingly....
...for a balanced volume of voices, since the recording person is essential that may make the scene look stable. And, use of camcorder accessories. Evoking a feeling of panning for a while to make the viewer feel tired when viewing them. Accentuating movies with narration ...out slowly and smoothly. Table of Contents Useful Recording Techniques Recording/Playback Five pieces of advice for successful recording Stabilizing your camcorder When you hold the camcorder, keep your upper body upright, and hold your arms close to your movies. Using accessories Make good use zooming sparingly....

Handycam® Handbook
Page 20
...Recording Techniques Recording and playing movies and photos easily ( Easy Handycam Operation) Simply press EASY. During Easy Handycam operation, you can record or play movies and photos easily (Easy Handycam operation). Table of your camcorder when the LCD screen is started, nearly all menu settings ...are reset to the default settings automatically. (Some menu items retain the settings that were made before Easy Handycam operation.) Recording movies In the...
...Recording Techniques Recording and playing movies and photos easily ( Easy Handycam Operation) Simply press EASY. During Easy Handycam operation, you can record or play movies and photos easily (Easy Handycam operation). Table of your camcorder when the LCD screen is started, nearly all menu settings ...are reset to the default settings automatically. (Some menu items retain the settings that were made before Easy Handycam operation.) Recording movies In the...
Handycam® Handbook
Page 22
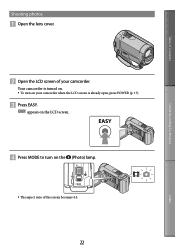
appears on the LCD screen. Press MODE to turn on the (Photo) lamp. The aspect ratio of your camcorder when the LCD screen is turned on. To turn on your camcorder. Table of Contents Useful Recording Techniques Shooting photos Open the lens cover. Open the LCD screen of the screen becomes 4:3. 22 Index Your camcorder is already open, press POWER (p. 17). Press EASY.
appears on the LCD screen. Press MODE to turn on the (Photo) lamp. The aspect ratio of your camcorder when the LCD screen is turned on. To turn on your camcorder. Table of Contents Useful Recording Techniques Shooting photos Open the lens cover. Open the LCD screen of the screen becomes 4:3. 22 Index Your camcorder is already open, press POWER (p. 17). Press EASY.
Handycam® Handbook
Page 23
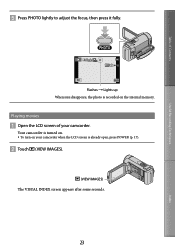
Playing movies Open the LCD screen of Contents Useful Recording Techniques When Flashes Lights up disappears, the photo is recorded on your camcorder. Press PHOTO lightly to adjust the focus, then press it fully. Your camcorder is already open, press POWER (p. 17). Touch (VIEW IMAGES). (VIEW IMAGES) The VISUAL INDEX screen appears after some seconds. 23 Index Table of your camcorder when the LCD screen is turned on. To turn on the internal memory.
Playing movies Open the LCD screen of Contents Useful Recording Techniques When Flashes Lights up disappears, the photo is recorded on your camcorder. Press PHOTO lightly to adjust the focus, then press it fully. Your camcorder is already open, press POWER (p. 17). Touch (VIEW IMAGES). (VIEW IMAGES) The VISUAL INDEX screen appears after some seconds. 23 Index Table of your camcorder when the LCD screen is turned on. To turn on the internal memory.
Handycam® Handbook
Page 24
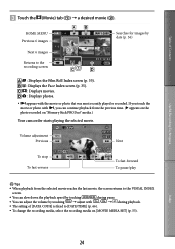
... [DATA CODE] is fixed to [DATE/TIME] (p. 66). To change the recording media, select the recording media on "Memory Stick PRO Duo" media.) Your camcorder starts playing the selected movie. Volume adjustment Previous Next To stop To fast-reverse To fast-forward To pause/play Tips When playback...
... [DATA CODE] is fixed to [DATE/TIME] (p. 66). To change the recording media, select the recording media on "Memory Stick PRO Duo" media.) Your camcorder starts playing the selected movie. Volume adjustment Previous Next To stop To fast-reverse To fast-forward To pause/play Tips When playback...

Handycam® Handbook
Page 25
...; You cannot use some buttons/functions during Easy Handycam operation since they are automatically set an invalid operation, [Invalid during Easy Handycam operation You cannot use the OPTION MENU. Cancel Easy Handycam operation if you want to add effects to display... the menu items available for setup changes. See "Menu lists" (p. 11) on [PHOTO MEDIA SET] (p. 55). Previous To the VISUAL INDEX screen Slide show/pause Next Tips The setting of Contents Useful Recording Techniques Your camcorder...
...; You cannot use some buttons/functions during Easy Handycam operation since they are automatically set an invalid operation, [Invalid during Easy Handycam operation You cannot use the OPTION MENU. Cancel Easy Handycam operation if you want to add effects to display... the menu items available for setup changes. See "Menu lists" (p. 11) on [PHOTO MEDIA SET] (p. 55). Previous To the VISUAL INDEX screen Slide show/pause Next Tips The setting of Contents Useful Recording Techniques Your camcorder...
Handycam® Handbook
Page 26
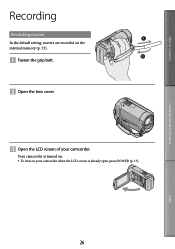
Table of Contents Useful Recording Techniques Recording Recording movies In the default setting, movies are recorded on your camcorder when the LCD screen is turned on. To turn on the internal memory (p. 55). Fasten the grip belt. Open the lens cover. Open the LCD screen of your camcorder. Your camcorder is already open, press POWER (p. 17). 26 Index
Table of Contents Useful Recording Techniques Recording Recording movies In the default setting, movies are recorded on your camcorder when the LCD screen is turned on. To turn on the internal memory (p. 55). Fasten the grip belt. Open the lens cover. Open the LCD screen of your camcorder. Your camcorder is already open, press POWER (p. 17). 26 Index


