Operating Instructions
Page 3
NOTE: This equipment has been tested and found to comply with FCC technical regulations. However, there is damaged, liquid has been ...this apparatus during lightning storms or when unused for a Class B digital device, pursuant to radio or television reception, which the receiver is used in a particular installation. These limits are cautioned that to which can radiate radio frequency energy and, if not installed... approved in a residential installation. The following measures: - Increase the separation between the equipment and receiver. - Reorient or relocate the...
NOTE: This equipment has been tested and found to comply with FCC technical regulations. However, there is damaged, liquid has been ...this apparatus during lightning storms or when unused for a Class B digital device, pursuant to radio or television reception, which the receiver is used in a particular installation. These limits are cautioned that to which can radiate radio frequency energy and, if not installed... approved in a residential installation. The following measures: - Increase the separation between the equipment and receiver. - Reorient or relocate the...
Operating Instructions
Page 44
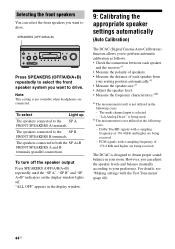
... Dolby TrueHD signals with a sampling frequency of 176.4 kHz and higher are connected. The DCAC is not available when headphones are being received. For details, see "Making settings with a sampling frequency of each speaker from your seating position automatically.a) • Measure the speaker ...measurement result is not utilized in the following cases. - b) The measurement is not utilized in the following cases. - PCM signals with the Test Tone menu" (page 68). 44US However, you can select the front speakers you want to drive. "ALL OFF" appears in the display...
... Dolby TrueHD signals with a sampling frequency of 176.4 kHz and higher are connected. The DCAC is not available when headphones are being received. For details, see "Making settings with a sampling frequency of each speaker from your seating position automatically.a) • Measure the speaker ...measurement result is not utilized in the following cases. - b) The measurement is not utilized in the following cases. - PCM signals with the Test Tone menu" (page 68). 44US However, you can select the front speakers you want to drive. "ALL OFF" appears in the display...

Operating Instructions
Page 47
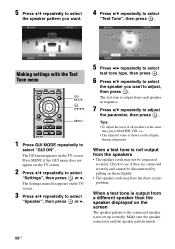
... in the Speaker settings menu. 2 Press to select "Next". To cancel the measurement The measurement will take approximately 30 seconds with a test tone. The "+" and "-" terminals of the TV screen when you do the following situations, the measurements have not been performed correctly or...Tips • Operations other way around. Change the volume level. - when using the zone 2/zone 3 function in zone 2/zone 3. appears on the receiver. - continued 47US Press SPEAKERS (OFF/A/B/A+B) on the TV screen, you can change the unit of the phase, "Out Phase" is (are connected ...
... in the Speaker settings menu. 2 Press to select "Next". To cancel the measurement The measurement will take approximately 30 seconds with a test tone. The "+" and "-" terminals of the TV screen when you do the following situations, the measurements have not been performed correctly or...Tips • Operations other way around. Change the volume level. - when using the zone 2/zone 3 function in zone 2/zone 3. appears on the receiver. - continued 47US Press SPEAKERS (OFF/A/B/A+B) on the TV screen, you can change the unit of the phase, "Out Phase" is (are connected ...
Operating Instructions
Page 68
... is shown on the TV screen. 3 Press V/v repeatedly to select "Speaker", then press or b. 5 Press B/b repeatedly to select test tone type, then press . 6 Press V/v repeatedly to select the speaker you want to select "Settings", then press or b. The GUI menu appears ... is output from a different speaker than the speaker displayed on the TV screen. Making settings with the Test Tone menu GUI MODE , V/v/B/b MENU 1 Press GUI MODE repeatedly to select "Test Tone", then press . The test tone is not set up correctly. 5 Press V/v repeatedly to select the speaker pattern you want . 4 Press ...
... is shown on the TV screen. 3 Press V/v repeatedly to select "Speaker", then press or b. 5 Press B/b repeatedly to select test tone type, then press . 6 Press V/v repeatedly to select the speaker you want to select "Settings", then press or b. The GUI menu appears ... is output from a different speaker than the speaker displayed on the TV screen. Making settings with the Test Tone menu GUI MODE , V/v/B/b MENU 1 Press GUI MODE repeatedly to select "Test Tone", then press . The test tone is not set up correctly. 5 Press V/v repeatedly to select the speaker pattern you want . 4 Press ...
Operating Instructions
Page 69
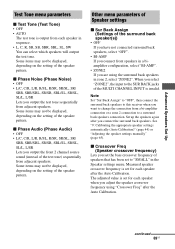
... depending on the setting of the speaker pattern. Note Set "Sur Back Assign" to "OFF", then connect the surround back speakers to this receiver when you want to change the connection from a bi-amplifier connection or a zone 2 connection to the SUR BACK jacks of the speaker pattern.... Advanced Speakers Set Up Test Tone menu parameters x Test Tone (Test Tone) • OFF • AUTO The test tone is output from each speaker when you adjust the speaker crossover frequency using the surround back speakers in ...
... depending on the setting of the speaker pattern. Note Set "Sur Back Assign" to "OFF", then connect the surround back speakers to this receiver when you want to change the connection from a bi-amplifier connection or a zone 2 connection to the SUR BACK jacks of the speaker pattern.... Advanced Speakers Set Up Test Tone menu parameters x Test Tone (Test Tone) • OFF • AUTO The test tone is output from each speaker when you adjust the speaker crossover frequency using the surround back speakers in ...
Operating Instructions
Page 113
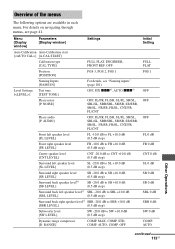
... Calibration start [] [A.CAL START] Calibration type [CAL TYPE] FULL FLAT, ENGINEER, FRONT REF, OFF Position [POSITION] POS 3, POS 2, POS 1 Level Settings [] Naming Inputs [NAME IN] Test tone [TEST TONE] For details, see page 41. Overview of the menus The following options are available in each menu.
... Calibration start [] [A.CAL START] Calibration type [CAL TYPE] FULL FLAT, ENGINEER, FRONT REF, OFF Position [POSITION] POS 3, POS 2, POS 1 Level Settings [] Naming Inputs [NAME IN] Test tone [TEST TONE] For details, see page 41. Overview of the menus The following options are available in each menu.
Operating Instructions
Page 146
... CD player 21, 23, 24, 52 Sur Back Assign 69 Surround Settings 115 System (Settings) 58, 116 System Audio Control 88 System Power Off 88 T Test Tone 68, 69, 113 Tuner 71 Tuner (Settings) 115 Tuning 71, 72, 73 U Up converting 33 V VCR 32, 55 Video (Settings) 57, 116 Video game...
... CD player 21, 23, 24, 52 Sur Back Assign 69 Surround Settings 115 System (Settings) 58, 116 System Audio Control 88 System Power Off 88 T Test Tone 68, 69, 113 Tuner 71 Tuner (Settings) 115 Tuning 71, 72, 73 U Up converting 33 V VCR 32, 55 Video (Settings) 57, 116 Video game...


