Operating Instructions
Page 1
4-144-907-11(1) Multi Channel AV Receiver Operating Instructions STR-DA3500ES ©2009 Sony Corporation
4-144-907-11(1) Multi Channel AV Receiver Operating Instructions STR-DA3500ES ©2009 Sony Corporation
Operating Instructions
Page 3
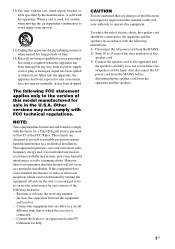
... any changes or modifications not expressly approved in a residential installation. If this model manufactured for help. Reorient or relocate the receiving antenna. - CAUTION You are designed to provide reasonable protection against harmful interference in this manual could void your authority to operate... harmful interference to rain or moisture, does not operate normally, or has been dropped. Increase the separation between the equipment and receiver. - NOTE: This equipment has been tested and found to qualified service personnel. Consult the dealer or an experienced radio/TV ...
... any changes or modifications not expressly approved in a residential installation. If this model manufactured for help. Reorient or relocate the receiving antenna. - CAUTION You are designed to provide reasonable protection against harmful interference in this manual could void your authority to operate... harmful interference to rain or moisture, does not operate normally, or has been dropped. Increase the separation between the equipment and receiver. - NOTE: This equipment has been tested and found to qualified service personnel. Consult the dealer or an experienced radio/TV ...
Operating Instructions
Page 4
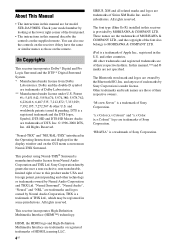
...7,272,567 & other countries. and worldwide patents issued & pending. The font type (Shin Go R) installed in this receiver is provided by Neural Audio Corporation, THX is a trademark of Sony Corporation. iPod is a trademark of THX Ltd., which may be registered in some jurisdictions. "M-crew Server" is a... MORISAWA & COMPANY LTD. "Neural Surround", "Neural Audio", "Neural" and "NRL" are trademarks of Sony Corporation. The Bluetooth word mark and logos are those on the receiver if they have the same or similar names as those of use to MORISAWA & COMPANY LTD. Other ...
...7,272,567 & other countries. and worldwide patents issued & pending. The font type (Shin Go R) installed in this receiver is provided by Neural Audio Corporation, THX is a trademark of Sony Corporation. iPod is a trademark of THX Ltd., which may be registered in some jurisdictions. "M-crew Server" is a... MORISAWA & COMPANY LTD. "Neural Surround", "Neural Audio", "Neural" and "NRL" are trademarks of Sony Corporation. The Bluetooth word mark and logos are those on the receiver if they have the same or similar names as those of use to MORISAWA & COMPANY LTD. Other ...
Operating Instructions
Page 5
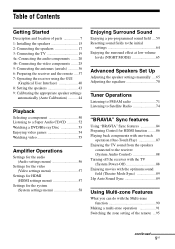
... audio components ....... 20 4b: Connecting the video components ....... 25 5: Connecting the antennas (aerials 36 6: Preparing the receiver and the remote .... 37 7: Operating the receiver using the GUI (Graphical User Interface 40 8: Setting the speakers 43 9: Calibrating the appropriate speaker settings automatically (Auto Calibration... Enjoying the TV sound from the speakers connected to the receiver (System Audio Control 88 Turning off the receiver with the TV (System Power-Off 88 Enjoying movies with the optimum sound field (Theater Mode Sync 89 24p Auto Sound Sync 89 Using Multi-...
... audio components ....... 20 4b: Connecting the video components ....... 25 5: Connecting the antennas (aerials 36 6: Preparing the receiver and the remote .... 37 7: Operating the receiver using the GUI (Graphical User Interface 40 8: Setting the speakers 43 9: Calibrating the appropriate speaker settings automatically (Auto Calibration... Enjoying the TV sound from the speakers connected to the receiver (System Audio Control 88 Turning off the receiver with the TV (System Power-Off 88 Enjoying movies with the optimum sound field (Theater Mode Sync 89 24p Auto Sound Sync 89 Using Multi-...
Operating Instructions
Page 6
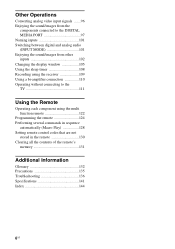
... audio (INPUT MODE 101 Enjoying the sound/images from other inputs 102 Changing the display window 105 Using the sleep timer 108 Recording using the receiver 109 Using a bi-amplifier connection 110 Operating without connecting to the TV 111 Using the Remote Operating each component using the multi function remote 122...
... audio (INPUT MODE 101 Enjoying the sound/images from other inputs 102 Changing the display window 105 Using the sleep timer 108 Recording using the receiver 109 Using a bi-amplifier connection 110 Operating without connecting to the TV 111 Using the Remote Operating each component using the multi function remote 122...
Operating Instructions
Page 7
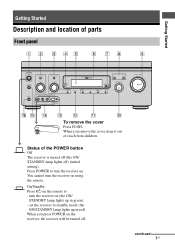
... turned off (the ON/ STANDBY lamp lights off . continued 7US You cannot turn the receiver on (the ON/ STANDBY lamp lights up in green). - On/Standby Press ?/1 on the receiver, the receiver will be turned off ) (initial setting). When you press POWER on the remote to standby mode (the ON/STANDBY lamp lights...
... turned off (the ON/ STANDBY lamp lights off . continued 7US You cannot turn the receiver on (the ON/ STANDBY lamp lights up in green). - On/Standby Press ?/1 on the receiver, the receiver will be turned off ) (initial setting). When you press POWER on the remote to standby mode (the ON/STANDBY lamp lights...

Operating Instructions
Page 8
...P PHONES jack Connects to select a sound field (page 59). A.F.D. E Display window The current status of the selected component or a list of the receiver. MOVIE (HD-D.C.S.) Press to headphones. Press TONE MODE repeatedly to select the item you press ZONE POWER, the output signals for zone 2 or zone... 3, press ZONE SELECT (H) to select zone 2 or zone 3 first, then turn the receiver on the display window. Name Function A POWER Press to turn INPUT SELECTOR to select the input source. Shows the status of selectable items ...
...P PHONES jack Connects to select a sound field (page 59). A.F.D. E Display window The current status of the selected component or a list of the receiver. MOVIE (HD-D.C.S.) Press to headphones. Press TONE MODE repeatedly to select the item you press ZONE POWER, the output signals for zone 2 or zone... 3, press ZONE SELECT (H) to select zone 2 or zone 3 first, then turn the receiver on the display window. Name Function A POWER Press to turn INPUT SELECTOR to select the input source. Shows the status of selectable items ...
Operating Instructions
Page 9
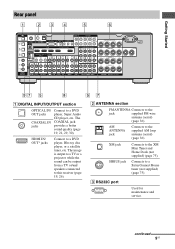
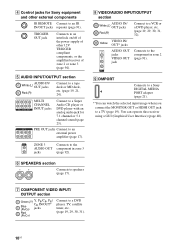
...maintenance and service. The COAXIAL jack provides a better sound quality (page 19, 21, 29, 30). B ANTENNA section FM ANTENNA Connects to this receiver (page 19, 26). The image is output to a TV or a projector while the sound can be output from a TV or/and speakers connected to...Started A DIGITAL INPUT/OUTPUT section OPTICAL IN/ OUT jacks COAXIAL IN jacks Connect to a SiriusConnect Home tuner (not supplied) (page 75). continued 9US AM ANTENNA jack Connects to the XM Mini Tuner and Home Dock (not supplied) (page 75). XM jack Connects to the supplied AM loop antenna (aerial...
...maintenance and service. The COAXIAL jack provides a better sound quality (page 19, 21, 29, 30). B ANTENNA section FM ANTENNA Connects to this receiver (page 19, 26). The image is output to a TV or a projector while the sound can be output from a TV or/and speakers connected to...Started A DIGITAL INPUT/OUTPUT section OPTICAL IN/ OUT jacks COAXIAL IN jacks Connect to a SiriusConnect Home tuner (not supplied) (page 75). continued 9US AM ANTENNA jack Connects to the XM Mini Tuner and Home Dock (not supplied) (page 75). XM jack Connects to the supplied AM loop antenna (aerial...
Operating Instructions
Page 10
... CD player or DVD player with an analog audio jack for Sony equipment and other 12V TRIGGER compliant components, or the amplifier/receiver of other external components IR REMOTE Connect to a Sony DIGITAL MEDIA PORT adapter (page 21). * You can operate this receiver using a GUI (Graphical User Interface) (page 40). PRE OUT jacks Connect...
... CD player or DVD player with an analog audio jack for Sony equipment and other 12V TRIGGER compliant components, or the amplifier/receiver of other external components IR REMOTE Connect to a Sony DIGITAL MEDIA PORT adapter (page 21). * You can operate this receiver using a GUI (Graphical User Interface) (page 40). PRE OUT jacks Connect...
Operating Instructions
Page 11
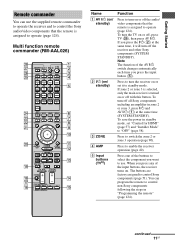
...on. When you press any of the buttons to select the component you want to use the supplied remote commander to operate the receiver and to control the Sony audio/video components that the remote is assigned to "OFF" (page 58). Note The function of the AV ?/1 switch changes ...automatically each time you press the ?/1 (B) at the same time (SYSTEM STANDBY). Press to control Sony components (page 51). The buttons are factory assigned to enable the receiver operation (page 40). If you press the input button (E). To turn on or set "Control for HDMI" (page 57...
...on. When you press any of the buttons to select the component you want to use the supplied remote commander to operate the receiver and to control the Sony audio/video components that the remote is assigned to "OFF" (page 58). Note The function of the AV ?/1 switch changes ...automatically each time you press the ?/1 (B) at the same time (SYSTEM STANDBY). Press to control Sony components (page 51). The buttons are factory assigned to enable the receiver operation (page 40). If you press the input button (E). To turn on or set "Control for HDMI" (page 57...
Operating Instructions
Page 12
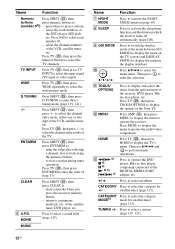
...screen) and DISPLAY MODE (to switch the display mode of the DVD player, MD deck, etc. select the channel numbers of the Sony TV. Press SHIFT (Y), then press -/-- CLEAR Press SHIFT (Y), then press CLEAR to select track number 10. - Press TV (Z), then...tuner, etc. satellite tuner (page 121). Press 0/10 to - F A.F.D. L MENU HOME M m/M a) x a) X a) N a) b) ./> a) Press AMP (4), then press MENU to display the menu to perform menu operations. Then use V/v/B/b and to operate the receiver. Press to operate the DVD player, Blu-ray disc player, component connected to (number...
...screen) and DISPLAY MODE (to switch the display mode of the DVD player, MD deck, etc. select the channel numbers of the Sony TV. Press SHIFT (Y), then press -/-- CLEAR Press SHIFT (Y), then press CLEAR to select track number 10. - Press TV (Z), then...tuner, etc. satellite tuner (page 121). Press 0/10 to - F A.F.D. L MENU HOME M m/M a) x a) X a) N a) b) ./> a) Press AMP (4), then press MENU to display the menu to perform menu operations. Then use V/v/B/b and to operate the receiver. Press to operate the DVD player, Blu-ray disc player, component connected to (number...
Operating Instructions
Page 13
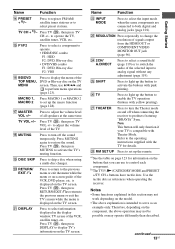
...HDMI OUT or COMPONENT VIDEO MONITOR OUT jack (page 96). T RETURN/ EXIT O Press to return to serve as references when operating the receiver. is intended to the previous menu or exit the menu while the menu or on the model. • The above operation may not be...the sound temporarily. Refer to select information displayed in this section may operate differently than described. U DISPLAY Press to the operating instructions supplied with Theater Mode. X 2CH/ A.DIRECT Press to select a sound field (page 119) or to switch the audio of the selected input to both ...
...HDMI OUT or COMPONENT VIDEO MONITOR OUT jack (page 96). T RETURN/ EXIT O Press to return to serve as references when operating the receiver. is intended to the previous menu or exit the menu while the menu or on the model. • The above operation may not be...the sound temporarily. Refer to select information displayed in this section may operate differently than described. U DISPLAY Press to the operating instructions supplied with Theater Mode. X 2CH/ A.DIRECT Press to select a sound field (page 119) or to switch the audio of the selected input to both ...

Operating Instructions
Page 14
... sound temporarily. K RETURN/ EXIT O Press to return to display and select items from option menus. You can only be used to operate the receiver. After pressing GUI MODE (3), press V/v/B/b to adjust the volume level. U/u H MASTER VOLUME +/- Press to select the menu item. J DMPORT ... simple operations using this remote. Press to activate the sleep timer function and the duration which the receiver turns off automatically (page 108). Press to display the menu to operate the receiver. 14US Name Function G INPUT Press to select the input source SELECTOR to play . ./> Skips ...
... sound temporarily. K RETURN/ EXIT O Press to return to display and select items from option menus. You can only be used to operate the receiver. After pressing GUI MODE (3), press V/v/B/b to adjust the volume level. U/u H MASTER VOLUME +/- Press to select the menu item. J DMPORT ... simple operations using this remote. Press to activate the sleep timer function and the duration which the receiver turns off automatically (page 108). Press to display the menu to operate the receiver. 14US Name Function G INPUT Press to select the input source SELECTOR to play . ./> Skips ...
Operating Instructions
Page 15
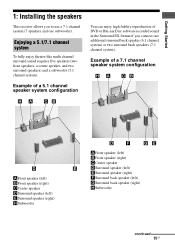
Getting Started 1: Installing the speakers This receiver allows you connect one subwoofer). Example of a 5.1 channel speaker system configuration You can enjoy high fidelity reproduction of a 7.1 channel speaker system ...DSurround speaker (left) ESurround speaker (right) FSurround back speaker (left) GSurround back speaker (right) HSubwoofer continued 15US Enjoying a 5.1/7.1 channel system To fully enjoy theater-like multi channel surround sound requires five speakers (two front speakers, a center speaker, and two surround speakers) and a subwoofer (5.1 channel system). Example of ...
Getting Started 1: Installing the speakers This receiver allows you connect one subwoofer). Example of a 5.1 channel speaker system configuration You can enjoy high fidelity reproduction of a 7.1 channel speaker system ...DSurround speaker (left) ESurround speaker (right) FSurround back speaker (left) GSurround back speaker (right) HSubwoofer continued 15US Enjoying a 5.1/7.1 channel system To fully enjoy theater-like multi channel surround sound requires five speakers (two front speakers, a center speaker, and two surround speakers) and a subwoofer (5.1 channel system). Example of ...
Operating Instructions
Page 19
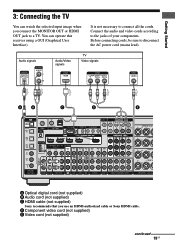
... to a TV. You can watch the selected input image when you use an HDMI-authorized cable or Sony HDMI cable. Getting Started 3: Connecting the TV You can operate this receiver using a GUI (Graphical User Interface). Audio signals Audio/Video signals TV Video signals AB C D E... A Optical digital cord (not supplied) B Audio cord (not supplied) C HDMI cable (not supplied) Sony recommends that you connect the MONITOR OUT or...
... to a TV. You can watch the selected input image when you use an HDMI-authorized cable or Sony HDMI cable. Getting Started 3: Connecting the TV You can operate this receiver using a GUI (Graphical User Interface). Audio signals Audio/Video signals TV Video signals AB C D E... A Optical digital cord (not supplied) B Audio cord (not supplied) C HDMI cable (not supplied) Sony recommends that you connect the MONITOR OUT or...

Operating Instructions
Page 20
...connecting optical digital cords, insert the plugs straight in until they click into place. Unless the power is displayed on the status of the receiver. In this configuration, set the audio output jack of a playback component are being output to connect each component. Component to be connected"... 4a: Connecting the audio components How to hook up your components This section describes how to hook up all your components to this receiver. For details, see "Component to be connected Super Audio CD player, CD player With digital audio output With multi channel audio output...
...connecting optical digital cords, insert the plugs straight in until they click into place. Unless the power is displayed on the status of the receiver. In this configuration, set the audio output jack of a playback component are being output to connect each component. Component to be connected"... 4a: Connecting the audio components How to hook up your components This section describes how to hook up all your components to this receiver. For details, see "Component to be connected Super Audio CD player, CD player With digital audio output With multi channel audio output...
Operating Instructions
Page 22
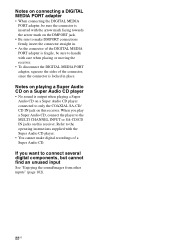
...is fragile, be sure the connector is inserted with the arrow mark facing towards the arrow mark on this receiver. Notes on playing a Super Audio CD on a Super Audio CD player • No sound is ... jack on the DMPORT jack. • Be sure to handle with care when placing or moving the receiver. • To disconnect the DIGITAL MEDIA PORT adapter, squeeze the sides of a Super Audio CD. ...When you want to the MULTI CHANNEL INPUT or SA-CD/CD IN jacks on this receiver. If you play a Super Audio CD, connect the player to connect several digital components, but cannot ...
...is fragile, be sure the connector is inserted with the arrow mark facing towards the arrow mark on this receiver. Notes on playing a Super Audio CD on a Super Audio CD player • No sound is ... jack on the DMPORT jack. • Be sure to handle with care when placing or moving the receiver. • To disconnect the DIGITAL MEDIA PORT adapter, squeeze the sides of a Super Audio CD. ...When you want to the MULTI CHANNEL INPUT or SA-CD/CD IN jacks on this receiver. If you play a Super Audio CD, connect the player to connect several digital components, but cannot ...

Operating Instructions
Page 23
...-ray disc player, Super Audio CD player, etc. Alternatively, the multi channel input jacks can connect them to the MULTI CHANNEL INPUT jacks of this receiver to other audio output jacks.
...-ray disc player, Super Audio CD player, etc. Alternatively, the multi channel input jacks can connect them to the MULTI CHANNEL INPUT jacks of this receiver to other audio output jacks.
Operating Instructions
Page 25
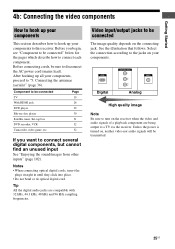
...below for the pages which describe how to connect each component. See the illustration that follows. Select the connection according to the jacks on the receiver when the video and audio signals of a playback component are compatible with 32 kHz, 44.1 kHz, 48 kHz and 96 kHz sampling frequencies.... Digital Analog High quality image Note Be sure to turn on your components to this receiver. Getting Started 4b: Connecting the video components How to hook up your components This section describes how to hook up all your components, proceed...
...below for the pages which describe how to connect each component. See the illustration that follows. Select the connection according to the jacks on the receiver when the video and audio signals of a playback component are compatible with 32 kHz, 44.1 kHz, 48 kHz and 96 kHz sampling frequencies.... Digital Analog High quality image Note Be sure to turn on your components to this receiver. Getting Started 4b: Connecting the video components How to hook up your components This section describes how to hook up all your components, proceed...
Operating Instructions
Page 26
... Audio, Dolby TrueHD), Deep Color and x.v.Color (x.v.Colour) transmission, extended by HDMI can be output from the speakers and the PRE OUT jacks on this receiver using the HDMI IN jack. • Analog video signals input to the VIDEO jack or COMPONENT VIDEO jacks can be... is the abbreviated name for HighDefinition Multimedia Interface. HDMI features • A digital audio signals transmitted by HDMI ver1.3. • This receiver supports the Control for AUDIO) jack and select HDMI 3 as HDMI signals. When you need a higher sound quality, connect your component to 8 channels can be ...
... Audio, Dolby TrueHD), Deep Color and x.v.Color (x.v.Colour) transmission, extended by HDMI can be output from the speakers and the PRE OUT jacks on this receiver using the HDMI IN jack. • Analog video signals input to the VIDEO jack or COMPONENT VIDEO jacks can be... is the abbreviated name for HighDefinition Multimedia Interface. HDMI features • A digital audio signals transmitted by HDMI ver1.3. • This receiver supports the Control for AUDIO) jack and select HDMI 3 as HDMI signals. When you need a higher sound quality, connect your component to 8 channels can be ...


