Operating Instructions
Page 2
...No Serial No WARNING To reduce the risk of the FCC Rules. If this product. Reorient or relocate the receiving antenna. - Increase the separation between the equipment and receiver. - To prevent fire or shock hazard, do not cover the ventilation of the following measures: - Batteries... on a circuit different from the wall socket immediately in this manual could void your Sony dealer regarding this equipment does cause harmful interference to radio or television reception, which the receiver is encouraged to try to rain or moisture. Do not install the appliance in a...
...No Serial No WARNING To reduce the risk of the FCC Rules. If this product. Reorient or relocate the receiving antenna. - Increase the separation between the equipment and receiver. - To prevent fire or shock hazard, do not cover the ventilation of the following measures: - Batteries... on a circuit different from the wall socket immediately in this manual could void your Sony dealer regarding this equipment does cause harmful interference to radio or television reception, which the receiver is encouraged to try to rain or moisture. Do not install the appliance in a...
Operating Instructions
Page 3
.... DTS and DTS Digital Surround are registered trademarks and the DTS logos and Symbol are for example, "Models of : • Receiver STR-KG700 • Speaker system - All Rights Reserved. 3US Center speaker SS-CNP710 - You can also use the controls on the... on the supplied remote. and other U.S. Patent #'s: 5,451,942; 5,956,674; 5,974,380; 5,978,762; 6,487,535 & other countries. This receiver incorporates Dolby* Digital and Pro Logic Surround and the DTS** Digital Surround System. * Manufactured under U.S. About This Manual • The instructions in this manual...
.... DTS and DTS Digital Surround are registered trademarks and the DTS logos and Symbol are for example, "Models of : • Receiver STR-KG700 • Speaker system - All Rights Reserved. 3US Center speaker SS-CNP710 - You can also use the controls on the... on the supplied remote. and other U.S. Patent #'s: 5,451,942; 5,956,674; 5,974,380; 5,978,762; 6,487,535 & other countries. This receiver incorporates Dolby* Digital and Pro Logic Surround and the DTS** Digital Surround System. * Manufactured under U.S. About This Manual • The instructions in this manual...
Operating Instructions
Page 4
...12 2: Connecting the speakers 14 3: Connecting the audio/video components 15 4: Connecting the antennas 20 5: Preparing the receiver and the remote .....21 6: Adjusting the speaker levels and balance (TEST TONE 22 Playback Selecting a component 24 ... audio (AUDIO menu).........32 Settings for the system (SYSTEM menu) ...33 Tuner Operations Listening to FM/AM radio 39 Presetting radio stations 41 Other Operations Switching between digital and analog audio (INPUT MODE...Using only the front speakers and sub woofer (2CH STEREO 38 Resetting sound fields to the initial settings 39 4US
...12 2: Connecting the speakers 14 3: Connecting the audio/video components 15 4: Connecting the antennas 20 5: Preparing the receiver and the remote .....21 6: Adjusting the speaker levels and balance (TEST TONE 22 Playback Selecting a component 24 ... audio (AUDIO menu).........32 Settings for the system (SYSTEM menu) ...33 Tuner Operations Listening to FM/AM radio 39 Presetting radio stations 41 Other Operations Switching between digital and analog audio (INPUT MODE...Using only the front speakers and sub woofer (2CH STEREO 38 Resetting sound fields to the initial settings 39 4US
Operating Instructions
Page 5
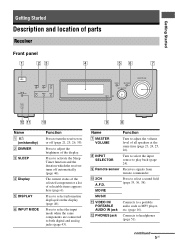
...list of all speakers at the same time (page 23, 24, 25, 26). Turn to activate the Sleep Timer function and the duration which the receiver turns off (page 21, 25, 26, 39). Turn to select the input source to a portable audio such as MP3 player, etc. (page...MASTER VOLUME qs qa q; . Name A ?/1 (on/standby) B DIMMER C SLEEP D Display E DISPLAY F INPUT MODE Function Press to adjust the brightness of parts Receiver Front panel 1 23 4 56 7 ?/1 VIDEO IN/ PORTABLE AUDIO IN DIMMER SLEEP 2CH A.F.D. Getting Started Getting Started Description and location of the display. Press to ...
...list of all speakers at the same time (page 23, 24, 25, 26). Turn to activate the Sleep Timer function and the duration which the receiver turns off (page 21, 25, 26, 39). Turn to select the input source to a portable audio such as MP3 player, etc. (page...MASTER VOLUME qs qa q; . Name A ?/1 (on/standby) B DIMMER C SLEEP D Display E DISPLAY F INPUT MODE Function Press to adjust the brightness of parts Receiver Front panel 1 23 4 56 7 ?/1 VIDEO IN/ PORTABLE AUDIO IN DIMMER SLEEP 2CH A.F.D. Getting Started Getting Started Description and location of the display. Press to ...
Operating Instructions
Page 6
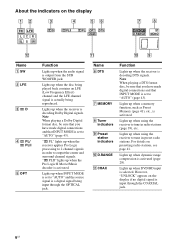
...through the COAXIAL jack. 6US Name F DTS G MEMORY H Tuner indicators I Preset station indicators J D.RANGE K COAX Function Lights up when using the receiver to "AUTO" and the source signal is activated. Note When playing a DTS format disc, be sure that you have made digital connections and that ...input is actually being played back contains an LFE (Low Frequency Effect) channel and the LFE channel signal is selected. Lights up when the receiver applies Pro Logic processing to output the center and surround channel signals. For details on the display 12 3 4 56 SW LFE LCR ...
...through the COAXIAL jack. 6US Name F DTS G MEMORY H Tuner indicators I Preset station indicators J D.RANGE K COAX Function Lights up when using the receiver to "AUTO" and the source signal is activated. Note When playing a DTS format disc, be sure that you have made digital connections and that ...input is actually being played back contains an LFE (Low Frequency Effect) channel and the LFE channel signal is selected. Lights up when the receiver applies Pro Logic processing to output the center and surround channel signals. For details on the display 12 3 4 56 SW LFE LCR ...
Operating Instructions
Page 7
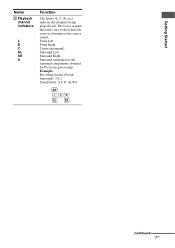
The boxes around the letters vary to show how the receiver downmixes the source sound. AUTO SW LCR SL SR continued 7US Getting Started Name L Playback channel indicators L R C SL SR S Function The letters (L, C, R, etc.) indicate the channels being played back. Front Left Front Right Center (monaural) Surround Left Surround Right Surround (monaural or the surround components obtained by Pro Logic processing) Example: Recording format (Front/ Surround): 3/2.1 Sound Field: A.F.D.
The boxes around the letters vary to show how the receiver downmixes the source sound. AUTO SW LCR SL SR continued 7US Getting Started Name L Playback channel indicators L R C SL SR S Function The letters (L, C, R, etc.) indicate the channels being played back. Front Left Front Right Center (monaural) Surround Left Surround Right Surround (monaural or the surround components obtained by Pro Logic processing) Example: Recording format (Front/ Surround): 3/2.1 Sound Field: A.F.D.
Operating Instructions
Page 8
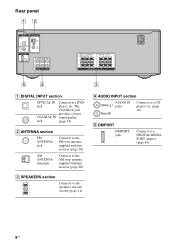
B ANTENNA section FM ANTENNA jack AM ANTENNA terminals Connects to the AM loop antenna supplied with this receiver (page 20). D AUDIO INPUT section AUDIO IN White (L) jacks Red (R) Connects to a DVD jack player, etc. Rear panel 12 DIGITAL OPTICAL SAT IN COAXIAL DVD/... DMPORT jack Connects to the speakers and sub woofer (page 14). C SPEAKERS section Connects to a DIGITAL MEDIA PORT adapter (page 44). 8US Connects to the FM wire antenna supplied with this receiver (page 20).
B ANTENNA section FM ANTENNA jack AM ANTENNA terminals Connects to the AM loop antenna supplied with this receiver (page 20). D AUDIO INPUT section AUDIO IN White (L) jacks Red (R) Connects to a DVD jack player, etc. Rear panel 12 DIGITAL OPTICAL SAT IN COAXIAL DVD/... DMPORT jack Connects to the speakers and sub woofer (page 14). C SPEAKERS section Connects to a DIGITAL MEDIA PORT adapter (page 44). 8US Connects to the FM wire antenna supplied with this receiver (page 20).
Operating Instructions
Page 9
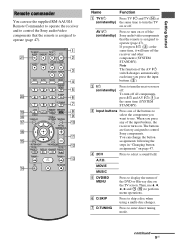
...O RETURN/EXIT MENU/HOME TV CH - m TUNING + qd H M TV qf FM MODE X x Name Function A TV ?/1 Press TV ?/1 and TV (N) at the same time, it will turn off the receiver and other components (SYSTEM STANDBY). The buttons are factory assigned to display the menu of...AV ?/1 (A) at the same time (SYSTEM STANDBY). Then, use V, v, B, b and (P) to use the supplied RM-AAU024 Remote Commander to operate the receiver and to control the Sony audio/video components that the remote is assigned to select a sound field. MOVIE MUSIC 4 DVD/BD MENU 123 5 w; D.SKIP 456 6 7 8 D....
...O RETURN/EXIT MENU/HOME TV CH - m TUNING + qd H M TV qf FM MODE X x Name Function A TV ?/1 Press TV ?/1 and TV (N) at the same time, it will turn off the receiver and other components (SYSTEM STANDBY). The buttons are factory assigned to display the menu of...AV ?/1 (A) at the same time (SYSTEM STANDBY). Then, use V, v, B, b and (P) to use the supplied RM-AAU024 Remote Commander to operate the receiver and to control the Sony audio/video components that the remote is assigned to select a sound field. MOVIE MUSIC 4 DVD/BD MENU 123 5 w; D.SKIP 456 6 7 8 D....
Operating Instructions
Page 10
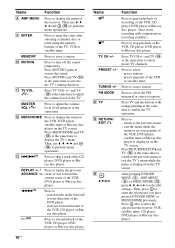
... the VCR, DVD player or Blu-ray disc player. start playback of the receiver, VCR, satellite tuner, CD player, DVD player or Blu-ray disc player. 10US Press to - Press to select the FM monaural or stereo reception. J MUTING Press to enter the selection of the VCR, CD player,.../ ADVANCE m/Mb) Ha)b) < Press to stop playback of all speakers at the same time to scan a station. FM MODE N TV O RETURN/ EXIT O P V/v/B/b Function Press to pause playback or recording of the receiver. Name Function H AMP MENU Press to select - Press to display the menu of the VCR, CD player, DVD...
... the VCR, DVD player or Blu-ray disc player. start playback of the receiver, VCR, satellite tuner, CD player, DVD player or Blu-ray disc player. 10US Press to - Press to select the FM monaural or stereo reception. J MUTING Press to enter the selection of the VCR, CD player,.../ ADVANCE m/Mb) Ha)b) < Press to stop playback of all speakers at the same time to scan a station. FM MODE N TV O RETURN/ EXIT O P V/v/B/b Function Press to pause playback or recording of the receiver. Name Function H AMP MENU Press to select - Press to display the menu of the VCR, CD player, DVD...
Operating Instructions
Page 11
... TV. >10 Press to select track numbers over 10 of the CD player. Press to activate the Sleep Timer function and the duration which the receiver turns off automatically. Press the numeric buttons and TV (N) at the same time to display TV's information on the model. • The above ...or video input). Press to clear a mistake when you press the incorrect numeric button. Press TOOLS/OPTIONS and TV (N) at the same time to the Sony TV. CLEAR T Numeric buttons (number 5a)) U TV INPUT Press to display and select the options of the Digital CATV terminal. preset/tune to ...
... TV. >10 Press to select track numbers over 10 of the CD player. Press to activate the Sleep Timer function and the duration which the receiver turns off automatically. Press the numeric buttons and TV (N) at the same time to display TV's information on the model. • The above ...or video input). Press to clear a mistake when you press the incorrect numeric button. Press TOOLS/OPTIONS and TV (N) at the same time to the Sony TV. CLEAR T Numeric buttons (number 5a)) U TV INPUT Press to display and select the options of the Digital CATV terminal. preset/tune to ...
Operating Instructions
Page 15
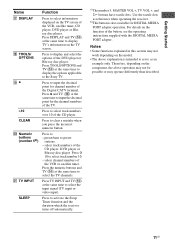
... the system's performance. 3: Connecting the audio/ video components How to connect your components This section describes how to hook up your components, proceed to this receiver. Character on speaker label L R C SL SR Speaker type Front left Front right Center Surround left Surround right * The sub woofer do not have any character...
... the system's performance. 3: Connecting the audio/ video components How to connect your components This section describes how to hook up your components, proceed to this receiver. Character on speaker label L R C SL SR Speaker type Front left Front right Center Surround left Surround right * The sub woofer do not have any character...
Operating Instructions
Page 19
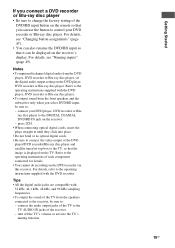
... 32 kHz, 44.1 kHz, 48 kHz, and 96 kHz sampling frequencies. • To output the sound of the TV from the speakers connected to the receiver, be sure to the operating instructions supplied with the DVD player, DVD recorder or Blu-ray disc player. • To output sound from the DVD... or Bluray disc player to the operating instructions of each component connected for details. • You cannot do recording on the DVD recorder via this receiver. Notes • To input multi channel digital audio from the front speakers and the subwoofer only when you can be sure to the TV, so...
... 32 kHz, 44.1 kHz, 48 kHz, and 96 kHz sampling frequencies. • To output the sound of the TV from the speakers connected to the receiver, be sure to the operating instructions supplied with the DVD player, DVD recorder or Blu-ray disc player. • To output sound from the DVD... or Bluray disc player to the operating instructions of each component connected for details. • You cannot do recording on the DVD recorder via this receiver. Notes • To input multi channel digital audio from the front speakers and the subwoofer only when you can be sure to the TV, so...
Operating Instructions
Page 20
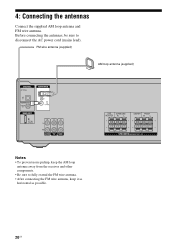
... antenna, keep it as horizontal as possible. 20US 4: Connecting the antennas Connect the supplied AM loop antenna and FM wire antenna. FM wire antenna (supplied) AM loop antenna (supplied) DIGITAL OPTICAL SAT IN COAXIAL DVD/BD IN ANTENNA AM DMPORT DC5V 0.7A MAX IN IN IN L R SA-...CD/CD TV SAT SUB SURROUND WOOFER R L CENTER FRONT RL SPEAKERS Notes • To prevent noise pickup, keep the AM loop antenna away from the receiver...
... antenna, keep it as horizontal as possible. 20US 4: Connecting the antennas Connect the supplied AM loop antenna and FM wire antenna. FM wire antenna (supplied) AM loop antenna (supplied) DIGITAL OPTICAL SAT IN COAXIAL DVD/BD IN ANTENNA AM DMPORT DC5V 0.7A MAX IN IN IN L R SA-...CD/CD TV SAT SUB SURROUND WOOFER R L CENTER FRONT RL SPEAKERS Notes • To prevent noise pickup, keep the AM loop antenna away from the receiver...
Operating Instructions
Page 21
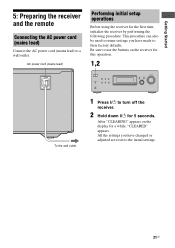
After "CLEARING" appears on the receiver for 5 seconds. Getting Started 5: Preparing the receiver and the remote Connecting the AC power cord (mains lead) Connect the AC power cord (mains lead) to the initial settings. 21US All the settings ... MASTER VOLUME To the wall outlet 1 Press ?/1 to use the buttons on the display for the first time, initialize the receiver by performing the following procedure. Be sure to turn off the receiver. 2 Hold down ?/1 for this operation. 1,2 ?/1 VIDEO IN/ PORTABLE AUDIO IN DIMMER SLEEP 2CH A.F.D. This procedure can also be used...
After "CLEARING" appears on the receiver for 5 seconds. Getting Started 5: Preparing the receiver and the remote Connecting the AC power cord (mains lead) Connect the AC power cord (mains lead) to the initial settings. 21US All the settings ... MASTER VOLUME To the wall outlet 1 Press ?/1 to use the buttons on the display for the first time, initialize the receiver by performing the following procedure. Be sure to turn off the receiver. 2 Hold down ?/1 for this operation. 1,2 ?/1 VIDEO IN/ PORTABLE AUDIO IN DIMMER SLEEP 2CH A.F.D. This procedure can also be used...
Operating Instructions
Page 22
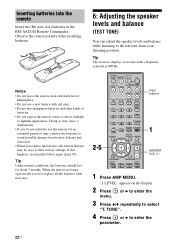
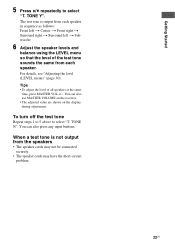
Tip The receiver employs a test tone with old ones. • Do not mix manganese batteries and other kinds of time, remove the batteries to direct sunlight or lighting .... 2 Press menu. TV CH + PRESET - Notes • Do not leave the remote in the RM-AAU024 Remote Commander. When the remote no longer operates the receiver, replace all the batteries with new ones. 6: Adjusting the speaker levels and balance (TEST TONE) You can adjust the speaker levels and balance while listening...
Tip The receiver employs a test tone with old ones. • Do not mix manganese batteries and other kinds of time, remove the batteries to direct sunlight or lighting .... 2 Press menu. TV CH + PRESET - Notes • Do not leave the remote in the RM-AAU024 Remote Commander. When the remote no longer operates the receiver, replace all the batteries with new ones. 6: Adjusting the speaker levels and balance (TEST TONE) You can adjust the speaker levels and balance while listening...
Operating Instructions
Page 23
... the LEVEL menu so that the level of all speakers at the same time, press MASTER VOL +/-. You can also use MASTER VOLUME on the receiver. • The adjusted value are shown on the display during adjustment.
... the LEVEL menu so that the level of all speakers at the same time, press MASTER VOL +/-. You can also use MASTER VOLUME on the receiver. • The adjusted value are shown on the display during adjustment.
Operating Instructions
Page 24
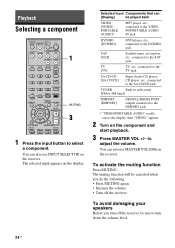
...sure to the DMPORT jack * "VIDEO/PORTABLE AUDIO" scrolls across the display, then "VIDEO" appears. 2 Turn on the receiver. REPLAY ADVANCE PRESET + .< > 1 MUTING 3 < 1 Press the input button to adjust the volume. You can ...TV CH + PRESET - You can also use INPUT SELECTOR on the display. The selected input appears on the receiver. Playback Selecting a component TV INPUT TV ?/1 SLEEP DMPORT AV ?/1 ?/1 SYSTEM STANDBY VIDEO DVD/BD SAT TV...CD jack TUNER Built-in radio tuner [FM or AM band] DMPORT [DMPORT] DIGITAL MEDIA PORT adapter connected to turn off the...
...sure to the DMPORT jack * "VIDEO/PORTABLE AUDIO" scrolls across the display, then "VIDEO" appears. 2 Turn on the receiver. REPLAY ADVANCE PRESET + .< > 1 MUTING 3 < 1 Press the input button to adjust the volume. You can ...TV CH + PRESET - You can also use INPUT SELECTOR on the display. The selected input appears on the receiver. Playback Selecting a component TV INPUT TV ?/1 SLEEP DMPORT AV ?/1 ?/1 SYSTEM STANDBY VIDEO DVD/BD SAT TV...CD jack TUNER Built-in radio tuner [FM or AM band] DMPORT [DMPORT] DIGITAL MEDIA PORT adapter connected to turn off the...

Operating Instructions
Page 25
m TUNING + H M TV FM MODE X x 2 3 5 ?/1 VIDEO IN/ PORTABLE AUDIO IN DIMMER SLEEP 2CH A.F.D. You can also use INPUT SELECTOR on the receiver. 3 Press SA-CD/CD. MOVIE MUSIC 1 4 7 >10 CLEAR DISPLAY DVD/BD MENU 23 D.SKIP 56 D.TUNING 89 MEMORY AMP MENU 0/10 ENTER TOOLS/... PRESET - Playback Listening/Watching a component Listening to the operating instructions supplied with the Super Audio CD player or CD player. Refer to page 36 for a Sony Super Audio CD player. • Refer to a Super Audio CD/CD TV INPUT TV ?/1 SLEEP DMPORT AV ?/1 ?/1 SYSTEM STANDBY VIDEO DVD/BD SAT...
m TUNING + H M TV FM MODE X x 2 3 5 ?/1 VIDEO IN/ PORTABLE AUDIO IN DIMMER SLEEP 2CH A.F.D. You can also use INPUT SELECTOR on the receiver. 3 Press SA-CD/CD. MOVIE MUSIC 1 4 7 >10 CLEAR DISPLAY DVD/BD MENU 23 D.SKIP 56 D.TUNING 89 MEMORY AMP MENU 0/10 ENTER TOOLS/... PRESET - Playback Listening/Watching a component Listening to the operating instructions supplied with the Super Audio CD player or CD player. Refer to page 36 for a Sony Super Audio CD player. • Refer to a Super Audio CD/CD TV INPUT TV ?/1 SLEEP DMPORT AV ?/1 ?/1 SYSTEM STANDBY VIDEO DVD/BD SAT...
Operating Instructions
Page 26
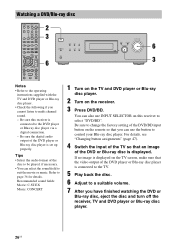
...TUNING 789 >10 CLEAR DISPLAY MEMORY AMP MENU 0/10 ENTER TOOLS/ OPTIONS MUTING TV VOL MASTER VOL O RETURN/EXIT MENU/HOME TV CH - TUNING + m H M TV FM MODE X x 2 3 6 ?/1 VIDEO IN/ PORTABLE AUDIO IN DIMMER SLEEP 2CH A.F.D. Refer to control your Blu-ray disc player. Be sure to change the factory setting of... the DVD/BD input button on the remote so that you can use INPUT SELECTOR on this receiver is connected to the TV. 5 Play back the disc. 6 Adjust to the DVD player or Blu-ray disc player via a digital connection. - If no ...
...TUNING 789 >10 CLEAR DISPLAY MEMORY AMP MENU 0/10 ENTER TOOLS/ OPTIONS MUTING TV VOL MASTER VOL O RETURN/EXIT MENU/HOME TV CH - TUNING + m H M TV FM MODE X x 2 3 6 ?/1 VIDEO IN/ PORTABLE AUDIO IN DIMMER SLEEP 2CH A.F.D. Refer to control your Blu-ray disc player. Be sure to change the factory setting of... the DVD/BD input button on the remote so that you can use INPUT SELECTOR on this receiver is connected to the TV. 5 Play back the disc. 6 Adjust to the DVD player or Blu-ray disc player via a digital connection. - If no ...
Operating Instructions
Page 27
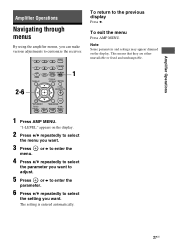
The setting is entered automatically. To return to customize the receiver. 2-6 D.SKIP 456 D.TUNING 789 >10 MEMORY AMP MENU 0/10 ENTER 1 CLEAR DISPLAY TOOLS/ OPTIONS MUTING TV VOL MASTER VOL O RETURN/EXIT MENU/HOME TV CH - ...
The setting is entered automatically. To return to customize the receiver. 2-6 D.SKIP 456 D.TUNING 789 >10 MEMORY AMP MENU 0/10 ENTER 1 CLEAR DISPLAY TOOLS/ OPTIONS MUTING TV VOL MASTER VOL O RETURN/EXIT MENU/HOME TV CH - ...


