Operating Instructions
Page 3
... © 1996-2007 DTS, Inc. Sub woofer SS-WP700 • The instructions in this manual describe the controls on the remote. CENTER FRONT RL Area code Any differences in operation, according to the area code, are clearly indicated in the text, for ...,674; 5,974,380; 5,978,762; 6,487,535 & other countries. This receiver incorporates Dolby* Digital and Pro Logic Surround and the DTS** Digital Surround System. * Manufactured under U.S. In this manual, ™ and ® marks are trademarks of : • Receiver STR-KG700 • Speaker system - All Rights Reserved. 3US
... © 1996-2007 DTS, Inc. Sub woofer SS-WP700 • The instructions in this manual describe the controls on the remote. CENTER FRONT RL Area code Any differences in operation, according to the area code, are clearly indicated in the text, for ...,674; 5,974,380; 5,978,762; 6,487,535 & other countries. This receiver incorporates Dolby* Digital and Pro Logic Surround and the DTS** Digital Surround System. * Manufactured under U.S. In this manual, ™ and ® marks are trademarks of : • Receiver STR-KG700 • Speaker system - All Rights Reserved. 3US
Operating Instructions
Page 4
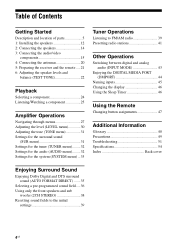
... Connecting the speakers 14 3: Connecting the audio/video components 15 4: Connecting the antennas 20 5: Preparing the receiver and the remote .....21 6: Adjusting the speaker levels and balance (TEST TONE 22 Playback Selecting a component 24 Listening/Watching ...audio (AUDIO menu).........32 Settings for the system (SYSTEM menu) ...33 Tuner Operations Listening to FM/AM radio 39 Presetting radio stations 41 Other Operations Switching between digital and analog audio (INPUT MODE... only the front speakers and sub woofer (2CH STEREO 38 Resetting sound fields to the initial settings 39 4US
... Connecting the speakers 14 3: Connecting the audio/video components 15 4: Connecting the antennas 20 5: Preparing the receiver and the remote .....21 6: Adjusting the speaker levels and balance (TEST TONE 22 Playback Selecting a component 24 Listening/Watching ...audio (AUDIO menu).........32 Settings for the system (SYSTEM menu) ...33 Tuner Operations Listening to FM/AM radio 39 Presetting radio stations 41 Other Operations Switching between digital and analog audio (INPUT MODE... only the front speakers and sub woofer (2CH STEREO 38 Resetting sound fields to the initial settings 39 4US
Operating Instructions
Page 5
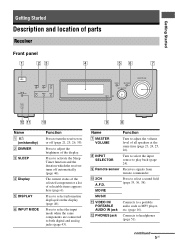
... off (page 21, 25, 26, 39). Turn to select the input source to headphones (page 51). Receives signals from remote commander. L PHONES jack Connects to play back (page 24). Press to adjust the brightness of all speakers at the same time (page 23, 24,... connected to select a sound field (page 35, 36, 38). Turn to turn the receiver on the display (page 46). Press to both digital and analog jacks (page 43). 9 8 Name Function G MASTER VOLUME H INPUT SELECTOR I Remote sensor J 2CH A.F.D. continued 5US Getting Started Getting Started Description and location of selectable items ...
... off (page 21, 25, 26, 39). Turn to select the input source to headphones (page 51). Receives signals from remote commander. L PHONES jack Connects to play back (page 24). Press to adjust the brightness of all speakers at the same time (page 23, 24,... connected to select a sound field (page 35, 36, 38). Turn to turn the receiver on the display (page 46). Press to both digital and analog jacks (page 43). 9 8 Name Function G MASTER VOLUME H INPUT SELECTOR I Remote sensor J 2CH A.F.D. continued 5US Getting Started Getting Started Description and location of selectable items ...
Operating Instructions
Page 9
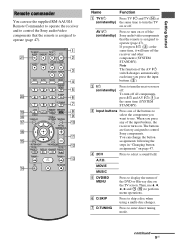
... direct tuning mode. MOVIE MUSIC E DVD/BD MENU Press to use. Getting Started Remote commander You can change the button assignments following the steps in "Changing button assignments" on page 47. m TUNING + qd H M TV qf FM MODE X x Name Function A TV ?/1 Press TV ?/1 and TV (N) at ...To turn the TV on the TV screen. Then, use the supplied RM-AAU024 Remote Commander to operate the receiver and to control the Sony audio/video components that the remote is assigned to turn the receiver on /standby) Press to operate (page 47). TV VOL MASTER VOL qh qa ...
... direct tuning mode. MOVIE MUSIC E DVD/BD MENU Press to use. Getting Started Remote commander You can change the button assignments following the steps in "Changing button assignments" on page 47. m TUNING + qd H M TV qf FM MODE X x Name Function A TV ?/1 Press TV ?/1 and TV (N) at ...To turn the TV on the TV screen. Then, use the supplied RM-AAU024 Remote Commander to operate the receiver and to control the Sony audio/video components that the remote is assigned to turn the receiver on /standby) Press to operate (page 47). TV VOL MASTER VOL qh qa ...
Operating Instructions
Page 19
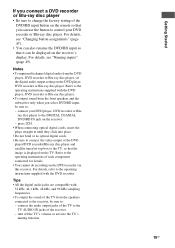
... Blu-ray disc player. • To output sound from the front speakers and the subwoofer only when you can be sure to the receiver, be displayed on the receiver's display. Notes • To input multi channel digital audio from the speakers connected to : - press 2CH. • When connecting optical digital cords, insert... Blu-ray disc player, set -top box to the TV, so that the image is displayed on the remote so that it can use the button to the TV AUDIO IN jacks of the receiver. - turn off the TV's volume or activate the TV's muting function. 19US Tips • All the digital...
... Blu-ray disc player. • To output sound from the front speakers and the subwoofer only when you can be sure to the receiver, be displayed on the receiver's display. Notes • To input multi channel digital audio from the speakers connected to : - press 2CH. • When connecting optical digital cords, insert... Blu-ray disc player, set -top box to the TV, so that the image is displayed on the remote so that it can use the button to the TV AUDIO IN jacks of the receiver. - turn off the TV's volume or activate the TV's muting function. 19US Tips • All the digital...
Operating Instructions
Page 21
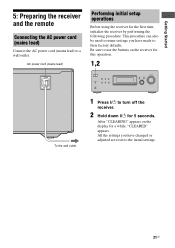
...have made to their factory defaults. After "CLEARING" appears on the receiver for a while, "CLEARED" appears. Be sure to turn off the receiver. 2 Hold down ?/1 for the first time, initialize the receiver by performing the following procedure. MOVIE MUSIC PHONES DISPLAY INPUT MODE INPUT... buttons on the display for this operation. 1,2 ?/1 VIDEO IN/ PORTABLE AUDIO IN DIMMER SLEEP 2CH A.F.D. Getting Started 5: Preparing the receiver and the remote Connecting the AC power cord (mains lead) Connect the AC power cord (mains lead) to the initial settings. 21US All the settings...
...have made to their factory defaults. After "CLEARING" appears on the receiver for a while, "CLEARED" appears. Be sure to turn off the receiver. 2 Hold down ?/1 for the first time, initialize the receiver by performing the following procedure. MOVIE MUSIC PHONES DISPLAY INPUT MODE INPUT... buttons on the display for this operation. 1,2 ?/1 VIDEO IN/ PORTABLE AUDIO IN DIMMER SLEEP 2CH A.F.D. Getting Started 5: Preparing the receiver and the remote Connecting the AC power cord (mains lead) Connect the AC power cord (mains lead) to the initial settings. 21US All the settings...
Operating Instructions
Page 22
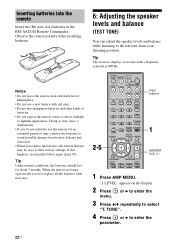
...or b to enter the 3 Press V/v repeatedly to enter the parameter. 22US Doing so may be reset to their factory settings. Tip The receiver employs a test tone with new ones. 6: Adjusting the speaker levels and balance (TEST TONE) You can adjust the speaker levels and balance ...MENU/HOME TV CH - "1-LEVEL" appears on the display. 2 Press menu. Notes • Do not leave the remote in the RM-AAU024 Remote Commander. When the remote no longer operates the receiver, replace all the batteries with a frequency centered at 800 Hz. 2-5 TV INPUT TV ?/1 SLEEP DMPORT AV ?/1 ...
...or b to enter the 3 Press V/v repeatedly to enter the parameter. 22US Doing so may be reset to their factory settings. Tip The receiver employs a test tone with new ones. 6: Adjusting the speaker levels and balance (TEST TONE) You can adjust the speaker levels and balance ...MENU/HOME TV CH - "1-LEVEL" appears on the display. 2 Press menu. Notes • Do not leave the remote in the RM-AAU024 Remote Commander. When the remote no longer operates the receiver, replace all the batteries with a frequency centered at 800 Hz. 2-5 TV INPUT TV ?/1 SLEEP DMPORT AV ?/1 ...
Operating Instructions
Page 26
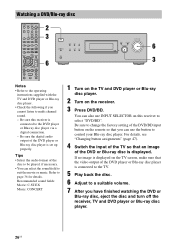
...3 Notes • Refer to change the factory setting of the DVD/BD input button on this receiver is set up properly. Be sure to the operating instructions supplied with the TV and DVD player...- Be sure the digital audio output of the TV so that you can use INPUT SELECTOR on the remote so that an image of the DVD or Blu-ray disc is connected to the TV. 5 Play back... also use the button to suit the movie or music. If no image is displayed on the receiver. 3 Press DVD/BD. TUNING + m H M TV FM MODE X x 2 3 6 ?/1 VIDEO IN/ PORTABLE AUDIO IN DIMMER SLEEP 2CH A.F.D. You ...
...3 Notes • Refer to change the factory setting of the DVD/BD input button on this receiver is set up properly. Be sure to the operating instructions supplied with the TV and DVD player...- Be sure the digital audio output of the TV so that you can use INPUT SELECTOR on the remote so that an image of the DVD or Blu-ray disc is connected to the TV. 5 Play back... also use the button to suit the movie or music. If no image is displayed on the receiver. 3 Press DVD/BD. TUNING + m H M TV FM MODE X x 2 3 6 ?/1 VIDEO IN/ PORTABLE AUDIO IN DIMMER SLEEP 2CH A.F.D. You ...
Operating Instructions
Page 43
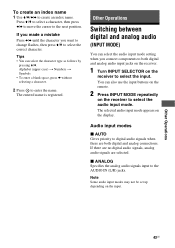
...remote. 2 Press INPUT MODE repeatedly on the display. x ANALOG Specifies the analog audio signals input to enter the name. Tips • You can select the audio input mode setting when you want to change flashes, then press V/v to select the input. The selected audio input mode appears on the receiver...without selecting a character. 2 Press to the AUDIO IN (L/R) jacks. Note Some audio input modes may not be set up depending on the receiver to select the correct character. Other Operations 43US Press V/v to select a character, then press B/b to move the cursor to create an ...
...remote. 2 Press INPUT MODE repeatedly on the display. x ANALOG Specifies the analog audio signals input to enter the name. Tips • You can select the audio input mode setting when you want to change flashes, then press V/v to select the input. The selected audio input mode appears on the receiver...without selecting a character. 2 Press to the AUDIO IN (L/R) jacks. Note Some audio input modes may not be set up depending on the receiver to select the correct character. Other Operations 43US Press V/v to select a character, then press B/b to move the cursor to create an ...
Operating Instructions
Page 45
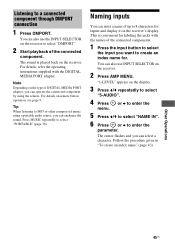
... select the input you want to MP3 or other compressed music using the remote. This is played back on remote button operation, see page 9. Tip When listening to create an index name for inputs and display it on the receiver to select "PORTABLE" (page 36). The cursor flashes and you can operate the...
... select the input you want to MP3 or other compressed music using the remote. This is played back on remote button operation, see page 9. Tip When listening to create an index name for inputs and display it on the receiver to select "PORTABLE" (page 36). The cursor flashes and you can operate the...
Operating Instructions
Page 46
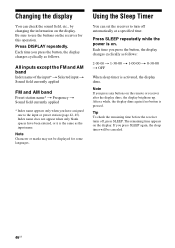
Each time you press any buttons on the remote or receiver after the display dims, the display brightens up. Tip To check the remaining time before the receiver turns off automatically at a specified time. Press DISPLAY repeatedly. Using the Sleep Timer You can check the sound field, etc., ... preset station (page 42, 45). Changing the display You can set the receiver to turn off , press SLEEP. All inputs except the FM and AM band Index name of the input* t Selected input t Sound field currently applied FM and AM band Preset station name* t Frequency t Sound field currently applied ...
Each time you press any buttons on the remote or receiver after the display dims, the display brightens up. Tip To check the remaining time before the receiver turns off automatically at a specified time. Press DISPLAY repeatedly. Using the Sleep Timer You can check the sound field, etc., ... preset station (page 42, 45). Changing the display You can set the receiver to turn off , press SLEEP. All inputs except the FM and AM band Index name of the input* t Selected input t Sound field currently applied FM and AM band Preset station name* t Frequency t Sound field currently applied ...
Operating Instructions
Page 47
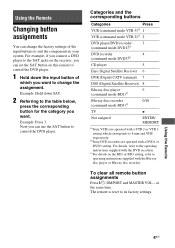
Example: Press 3. Now you can set the SAT button on this remote to control the DVD player. 1 Hold down SAT. 2 Referring to its factory settings. b)Sony DVD recorders are operated with the Blu-ray disc player or Blu-ray disc recorder. For details, refer to ...player 5 Euro Digital Satellite Receiver 6 DVR (Digital CATV terminal) 7 DSS (Digital Satellite Receiver) 8 Blu-ray disc player 9 (command mode BD1)c) Blu-ray disc recorder 0/10 (command mode BD3)c) TV Not assigned ENTER/ MEMORY a)Sony VCRs are operated with the DVD recorders. The remote is reset to the table...
Example: Press 3. Now you can set the SAT button on this remote to control the DVD player. 1 Hold down SAT. 2 Referring to its factory settings. b)Sony DVD recorders are operated with the Blu-ray disc player or Blu-ray disc recorder. For details, refer to ...player 5 Euro Digital Satellite Receiver 6 DVR (Digital CATV terminal) 7 DSS (Digital Satellite Receiver) 8 Blu-ray disc player 9 (command mode BD1)c) Blu-ray disc recorder 0/10 (command mode BD3)c) TV Not assigned ENTER/ MEMORY a)Sony VCRs are operated with the DVD recorders. The remote is reset to the table...
Operating Instructions
Page 53
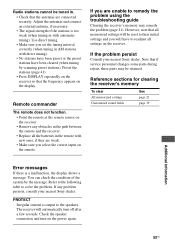
... may remedy the problem (page 21). Refer to the following table to solve the problem. The receiver will automatically turn on the receiver. • Remove any problem persists, consult your nearest Sony dealer. Use direct tuning. • Make sure you will have been cleared (when tuning by...output to the speakers. If the problem persist Consult your nearest Sony dealer. If you are weak. • Make sure you select the correct input on the remote. However, note that the frequency appears on the receiver. Radio stations cannot be tuned in AM stations with direct tuning...
... may remedy the problem (page 21). Refer to the following table to solve the problem. The receiver will automatically turn on the receiver. • Remove any problem persists, consult your nearest Sony dealer. Use direct tuning. • Make sure you will have been cleared (when tuning by...output to the speakers. If the problem persist Consult your nearest Sony dealer. If you are weak. • Make sure you select the correct input on the remote. However, note that the frequency appears on the receiver. Radio stations cannot be tuned in AM stations with direct tuning...
Operating Instructions
Page 55
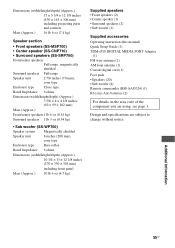
...; Sub woofer (1) Supplied accessories Operating instruction (this manual) Quick Setup Guide (1) TDM-iP10 DIGITAL MEDIA PORT Adapter (1) FM wire antenna (1) AM loop antenna (1) Coaxial digital cord (1) Foot pads • Speakers (20) • Sub woofer (4) Remote commander (RM-AAU024) (1) R6 (size-AA) batteries (2) For details on the area code of the component you...
...; Sub woofer (1) Supplied accessories Operating instruction (this manual) Quick Setup Guide (1) TDM-iP10 DIGITAL MEDIA PORT Adapter (1) FM wire antenna (1) AM loop antenna (1) Coaxial digital cord (1) Foot pads • Speakers (20) • Sub woofer (4) Remote commander (RM-AAU024) (1) R6 (size-AA) batteries (2) For details on the area code of the component you...
Operating Instructions
Page 56
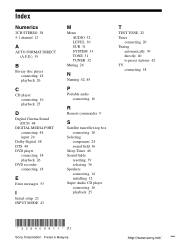
Index Numerics 2CH STEREO 38 5.1 channel 12 A AUTO FORMAT DIRECT (A.F.D.) 35 B Bu-ray disc player connecting 18 playback 26 C CD player connecting 16 playback 25 D...Menu AUDIO 32 LEVEL 30 SUR 31 SYSTEM 33 TONE 31 TUNER 32 Muting 24 N Naming 42, 45 P Portable audio connecting 16 R Remote commander 9 S Satellite tuner/Set-top box connecting 18 Selecting component 24 sound field 36 Sleep Timer 46 Sound fields resetting 39 selecting 36 Speakers... 25 T TEST TONE 22 Tuner connecting 20 Tuning automatically 39 directly 40 to preset stations 42 TV connecting 18 (1) Sony Corporation Printed in Malaysia
Index Numerics 2CH STEREO 38 5.1 channel 12 A AUTO FORMAT DIRECT (A.F.D.) 35 B Bu-ray disc player connecting 18 playback 26 C CD player connecting 16 playback 25 D...Menu AUDIO 32 LEVEL 30 SUR 31 SYSTEM 33 TONE 31 TUNER 32 Muting 24 N Naming 42, 45 P Portable audio connecting 16 R Remote commander 9 S Satellite tuner/Set-top box connecting 18 Selecting component 24 sound field 36 Sleep Timer 46 Sound fields resetting 39 selecting 36 Speakers... 25 T TEST TONE 22 Tuner connecting 20 Tuning automatically 39 directly 40 to preset stations 42 TV connecting 18 (1) Sony Corporation Printed in Malaysia


