Operating Instructions
Page 2
...the apparatus. Do not install the appliance in particular, specifies that may cause harmful interference to radio communications. Reorient or relocate the receiving antenna. - These limits are cautioned that interference will not occur in cabinet. However, there is provided to call upon your authority... the point of cable entry as vases, on a circuit different from the wall socket immediately in this manual could void your Sony dealer regarding this apparatus to Article 820-40 of the unit. If this equipment. CAUTION You are designed to persons. WARNING ...
...the apparatus. Do not install the appliance in particular, specifies that may cause harmful interference to radio communications. Reorient or relocate the receiving antenna. - These limits are cautioned that interference will not occur in cabinet. However, there is provided to call upon your authority... the point of cable entry as vases, on a circuit different from the wall socket immediately in this manual could void your Sony dealer regarding this apparatus to Article 820-40 of the unit. If this equipment. CAUTION You are designed to persons. WARNING ...
Operating Instructions
Page 3
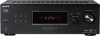
... from Dolby Laboratories. Front speakers SS-MSP700 - You can also use the controls on the receiver if they have the same or similar names as those on the lower right portion of the receiver you purchased is clearly indicated in the text, for example, "Models of area code AA... (see the illustration below). CENTER FRONT RL Area code Any differences in operation, according to the area code, are trademarks of : • Receiver STR-KG700 • Speaker system - DTS and DTS Digital Surround are registered trademarks and the DTS logos and Symbol are clearly indicated in the U.S.
... from Dolby Laboratories. Front speakers SS-MSP700 - You can also use the controls on the receiver if they have the same or similar names as those on the lower right portion of the receiver you purchased is clearly indicated in the text, for example, "Models of area code AA... (see the illustration below). CENTER FRONT RL Area code Any differences in operation, according to the area code, are trademarks of : • Receiver STR-KG700 • Speaker system - DTS and DTS Digital Surround are registered trademarks and the DTS logos and Symbol are clearly indicated in the U.S.
Operating Instructions
Page 4
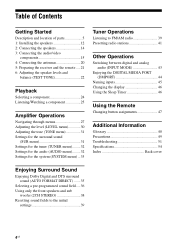
...12 2: Connecting the speakers 14 3: Connecting the audio/video components 15 4: Connecting the antennas 20 5: Preparing the receiver and the remote .....21 6: Adjusting the speaker levels and balance (TEST TONE 22 Playback Selecting a component 24 ... audio (AUDIO menu).........32 Settings for the system (SYSTEM menu) ...33 Tuner Operations Listening to FM/AM radio 39 Presetting radio stations 41 Other Operations Switching between digital and analog audio (INPUT MODE...Using only the front speakers and sub woofer (2CH STEREO 38 Resetting sound fields to the initial settings 39 4US
...12 2: Connecting the speakers 14 3: Connecting the audio/video components 15 4: Connecting the antennas 20 5: Preparing the receiver and the remote .....21 6: Adjusting the speaker levels and balance (TEST TONE 22 Playback Selecting a component 24 ... audio (AUDIO menu).........32 Settings for the system (SYSTEM menu) ...33 Tuner Operations Listening to FM/AM radio 39 Presetting radio stations 41 Other Operations Switching between digital and analog audio (INPUT MODE...Using only the front speakers and sub woofer (2CH STEREO 38 Resetting sound fields to the initial settings 39 4US
Operating Instructions
Page 5
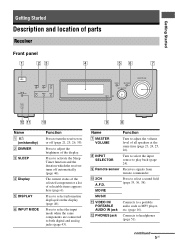
...same components are connected to select information displayed on the display (page 46). Press to activate the Sleep Timer function and the duration which the receiver turns off (page 21, 25, 26, 39). Press to select a sound field (page 35, 36, 38). L PHONES jack Connects to...continued 5US Turn to select the input source to turn the receiver on /standby) B DIMMER C SLEEP D Display E DISPLAY F INPUT MODE Function Press to play back (page 24). Receives signals from remote commander. Press to adjust the volume level of parts Receiver Front panel 1 23 4 56 7 ?/1 VIDEO IN/ ...
...same components are connected to select information displayed on the display (page 46). Press to activate the Sleep Timer function and the duration which the receiver turns off (page 21, 25, 26, 39). Press to select a sound field (page 35, 36, 38). L PHONES jack Connects to...continued 5US Turn to select the input source to turn the receiver on /standby) B DIMMER C SLEEP D Display E DISPLAY F INPUT MODE Function Press to play back (page 24). Receives signals from remote commander. Press to adjust the volume level of parts Receiver Front panel 1 23 4 56 7 ?/1 VIDEO IN/ ...
Operating Instructions
Page 6
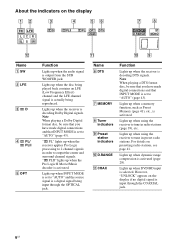
... the SUB WOOFER jack. PL" lights up when using the receiver to "AUTO" and the source signal is set to output the center and surround channel signals. Lights up when the... receiver applies Pro Logic processing to 2 channel signals in radio stations (page 39), etc. ... the display if no digital signal is actually being input through the COAXIAL jack. 6US Lights up when the receiver is activated (page 28). Lights up when dynamic range compression is decoding Dolby Digital signals. PL OPT DTS...
... the SUB WOOFER jack. PL" lights up when using the receiver to "AUTO" and the source signal is set to output the center and surround channel signals. Lights up when the... receiver applies Pro Logic processing to 2 channel signals in radio stations (page 39), etc. ... the display if no digital signal is actually being input through the COAXIAL jack. 6US Lights up when the receiver is activated (page 28). Lights up when dynamic range compression is decoding Dolby Digital signals. PL OPT DTS...
Operating Instructions
Page 7
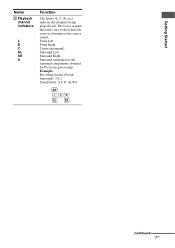
AUTO SW LCR SL SR continued 7US Getting Started Name L Playback channel indicators L R C SL SR S Function The letters (L, C, R, etc.) indicate the channels being played back. The boxes around the letters vary to show how the receiver downmixes the source sound. Front Left Front Right Center (monaural) Surround Left Surround Right Surround (monaural or the surround components obtained by Pro Logic processing) Example: Recording format (Front/ Surround): 3/2.1 Sound Field: A.F.D.
AUTO SW LCR SL SR continued 7US Getting Started Name L Playback channel indicators L R C SL SR S Function The letters (L, C, R, etc.) indicate the channels being played back. The boxes around the letters vary to show how the receiver downmixes the source sound. Front Left Front Right Center (monaural) Surround Left Surround Right Surround (monaural or the surround components obtained by Pro Logic processing) Example: Recording format (Front/ Surround): 3/2.1 Sound Field: A.F.D.
Operating Instructions
Page 8
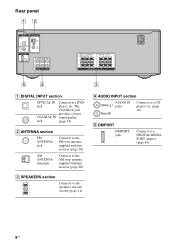
... IN Connects to a CD player, etc. (page 16). The COAXIAL jack provides a better COAXIAL IN sound quality jack (page 18). Connects to the FM wire antenna supplied with this receiver (page 20). D AUDIO INPUT section AUDIO IN White (L) jacks Red (R) Connects to a DVD jack player, etc. C SPEAKERS section Connects to a DIGITAL MEDIA...
... IN Connects to a CD player, etc. (page 16). The COAXIAL jack provides a better COAXIAL IN sound quality jack (page 18). Connects to the FM wire antenna supplied with this receiver (page 20). D AUDIO INPUT section AUDIO IN White (L) jacks Red (R) Connects to a DVD jack player, etc. C SPEAKERS section Connects to a DIGITAL MEDIA...
Operating Instructions
Page 9
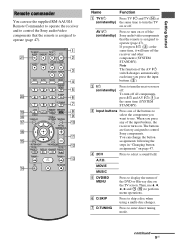
... receiver and other components (SYSTEM STANDBY). G D.TUNING Press to select a sound field. continued 9US wa TV INPUT TV ?/1 SLEEP DMPORT AV ?/1 ?/1 SYSTEM STANDBY VIDEO DVD/BD SAT TV SA-CD/CD TUNER 1 2 3 2CH A.F.D. MOVIE MUSIC 4 DVD/BD MENU 123 5 w; m TUNING + qd H M TV qf FM ...CH + PRESET - The buttons are factory assigned to turn off . You can use the supplied RM-AAU024 Remote Commander to operate the receiver and to control the Sony audio/video components that the remote is assigned to use V, v, B, b and (P) to skip a disc when using a multi-disc...
... receiver and other components (SYSTEM STANDBY). G D.TUNING Press to select a sound field. continued 9US wa TV INPUT TV ?/1 SLEEP DMPORT AV ?/1 ?/1 SYSTEM STANDBY VIDEO DVD/BD SAT TV SA-CD/CD TUNER 1 2 3 2CH A.F.D. MOVIE MUSIC 4 DVD/BD MENU 123 5 w; m TUNING + qd H M TV qf FM ...CH + PRESET - The buttons are factory assigned to turn off . You can use the supplied RM-AAU024 Remote Commander to operate the receiver and to control the Sony audio/video components that the remote is assigned to use V, v, B, b and (P) to skip a disc when using a multi-disc...
Operating Instructions
Page 10
...the TV's menu while the menu is displayed on the TV screen. Press RETURN/EXIT O and TV (N) at the same time to select the FM monaural or stereo reception. Press MUTING and TV (N) at the same time to return to scan a station. Press to adjust the volume level of the VCR ... or MENU/HOME (L), press V, v, B or b to turn off the sound temporarily. Press also to enter the selection of the receiver. Name Function H AMP MENU Press to display the menu of the receiver, VCR, satellite tuner, CD player, DVD player or Blu-ray disc player. 10US I ENTER Press to enter the value after...
...the TV's menu while the menu is displayed on the TV screen. Press RETURN/EXIT O and TV (N) at the same time to select the FM monaural or stereo reception. Press MUTING and TV (N) at the same time to return to scan a station. Press to adjust the volume level of the VCR ... or MENU/HOME (L), press V, v, B or b to turn off the sound temporarily. Press also to enter the selection of the receiver. Name Function H AMP MENU Press to display the menu of the receiver, VCR, satellite tuner, CD player, DVD player or Blu-ray disc player. 10US I ENTER Press to enter the value after...
Operating Instructions
Page 11
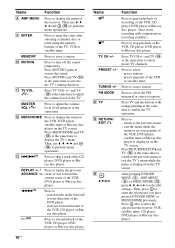
Press DISPLAY and TV (N) at the same time to the Sony TV. Press TOOLS/OPTIONS and TV (N) at the same time to input the decimal point for channel number of the button, see the operating instructions ... the CD player. b)This button is intended to select track numbers over 10 of the TV. >10 Press to serve as references when operating the receiver. Therefore, depending on the component, the above explanation is also available for DIGITAL MEDIA PORT adapter operation. Press to display and select the options of...
Press DISPLAY and TV (N) at the same time to the Sony TV. Press TOOLS/OPTIONS and TV (N) at the same time to input the decimal point for channel number of the button, see the operating instructions ... the CD player. b)This button is intended to select track numbers over 10 of the TV. >10 Press to serve as references when operating the receiver. Therefore, depending on the component, the above explanation is also available for DIGITAL MEDIA PORT adapter operation. Press to display and select the options of...
Operating Instructions
Page 15
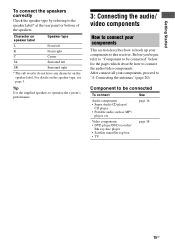
After connect all your components to this receiver. Getting Started To connect the speakers correctly Check the speaker type by referring to connect the audio/video components. Before you begin, refer to "Component ...
After connect all your components to this receiver. Getting Started To connect the speakers correctly Check the speaker type by referring to connect the audio/video components. Before you begin, refer to "Component ...
Operating Instructions
Page 19
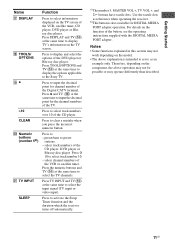
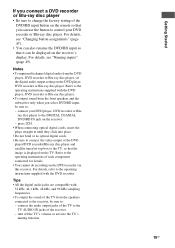
... the subwoofer only when you can be sure to the operating instructions of each component connected for details. • You cannot do recording on the receiver's display. For details, see "Changing button assignments" (page 47). • You can also rename the DVD/BD input so that it can use ... or Bluray disc player to the DIGITAL COAXIAL DVD/BD IN jack on the receiver. - Notes • To input multi channel digital audio from the speakers connected to the receiver, be displayed on the DVD recorder via this receiver. turn off the TV's volume or activate the TV's muting function. 19US...
... the subwoofer only when you can be sure to the operating instructions of each component connected for details. • You cannot do recording on the receiver's display. For details, see "Changing button assignments" (page 47). • You can also rename the DVD/BD input so that it can use ... or Bluray disc player to the DIGITAL COAXIAL DVD/BD IN jack on the receiver. - Notes • To input multi channel digital audio from the speakers connected to the receiver, be displayed on the DVD recorder via this receiver. turn off the TV's volume or activate the TV's muting function. 19US...
Operating Instructions
Page 20
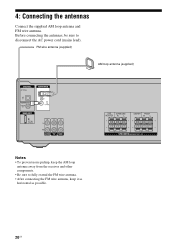
... Notes • To prevent noise pickup, keep the AM loop antenna away from the receiver and other components. • Be sure to disconnect the AC power cord (mains lead). 4: Connecting the antennas Connect the supplied AM loop antenna and FM wire antenna. Before connecting the antennas, be sure to fully extend the...
... Notes • To prevent noise pickup, keep the AM loop antenna away from the receiver and other components. • Be sure to disconnect the AC power cord (mains lead). 4: Connecting the antennas Connect the supplied AM loop antenna and FM wire antenna. Before connecting the antennas, be sure to fully extend the...
Operating Instructions
Page 21
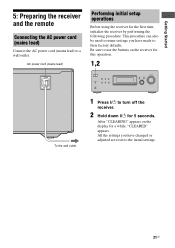
...21US All the settings you have changed or adjusted are reset to use the buttons on the display for the first time, initialize the receiver by performing the following procedure. MOVIE MUSIC PHONES DISPLAY INPUT MODE INPUT SELECTOR MASTER VOLUME To the wall outlet 1 Press ?/1 to a ...wall outlet. After "CLEARING" appears on the receiver for 5 seconds. Getting Started 5: Preparing the receiver and the remote Connecting the AC power cord (mains lead) Connect the AC power cord (mains lead) to turn off ...
...21US All the settings you have changed or adjusted are reset to use the buttons on the display for the first time, initialize the receiver by performing the following procedure. MOVIE MUSIC PHONES DISPLAY INPUT MODE INPUT SELECTOR MASTER VOLUME To the wall outlet 1 Press ?/1 to a ...wall outlet. After "CLEARING" appears on the receiver for 5 seconds. Getting Started 5: Preparing the receiver and the remote Connecting the AC power cord (mains lead) Connect the AC power cord (mains lead) to turn off ...
Operating Instructions
Page 22
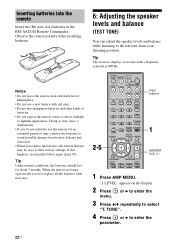
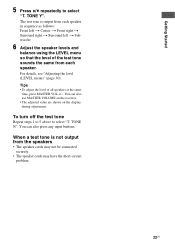
... the batteries should last for an extended period of time, remove the batteries to their factory settings. When the remote no longer operates the receiver, replace all the batteries with new ones. 6: Adjusting the speaker levels and balance (TEST TONE) You can adjust the speaker levels and ...page 47). "1-LEVEL" appears on the display. 2 Press menu. or b to enter the 3 Press V/v repeatedly to enter the parameter. 22US Tip The receiver employs a test tone with old ones. • Do not mix manganese batteries and other kinds of batteries. • Do not expose the remote sensor to...
... the batteries should last for an extended period of time, remove the batteries to their factory settings. When the remote no longer operates the receiver, replace all the batteries with new ones. 6: Adjusting the speaker levels and balance (TEST TONE) You can adjust the speaker levels and ...page 47). "1-LEVEL" appears on the display. 2 Press menu. or b to enter the 3 Press V/v repeatedly to enter the parameter. 22US Tip The receiver employs a test tone with old ones. • Do not mix manganese batteries and other kinds of batteries. • Do not expose the remote sensor to...
Operating Instructions
Page 23
... of all speakers at the same time, press MASTER VOL +/-. You can also press any input buttons. You can also use MASTER VOLUME on the receiver. • The adjusted value are shown on the display during adjustment. Tips • To adjust the level of the test tone sounds the same from...
... of all speakers at the same time, press MASTER VOL +/-. You can also press any input buttons. You can also use MASTER VOLUME on the receiver. • The adjusted value are shown on the display during adjustment. Tips • To adjust the level of the test tone sounds the same from...
Operating Instructions
Page 24
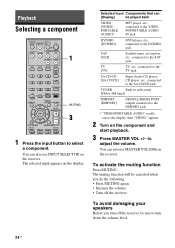
...level. 24US To avoid damaging your speakers Before you do the following. • Press MUTING again. • Increase the volume. • Turn off the receiver, be played back VIDEO [VIDEO/ PORTABLE AUDIO]* MP3 player, etc., connected to the VIDEO IN/PORTABLE AUDIO IN jack DVD/BD [DVD/BD] DVD ... CD player, CD player, etc., connected to the SA-CD/CD jack TUNER Built-in radio tuner [FM or AM band] DMPORT [DMPORT] DIGITAL MEDIA PORT adapter connected to turn off the receiver. MOVIE MUSIC DVD/BD MENU 123 D.SKIP 456 D.TUNING 789 >10 CLEAR DISPLAY MEMORY AMP MENU 0/10...
...level. 24US To avoid damaging your speakers Before you do the following. • Press MUTING again. • Increase the volume. • Turn off the receiver, be played back VIDEO [VIDEO/ PORTABLE AUDIO]* MP3 player, etc., connected to the VIDEO IN/PORTABLE AUDIO IN jack DVD/BD [DVD/BD] DVD ... CD player, CD player, etc., connected to the SA-CD/CD jack TUNER Built-in radio tuner [FM or AM band] DMPORT [DMPORT] DIGITAL MEDIA PORT adapter connected to turn off the receiver. MOVIE MUSIC DVD/BD MENU 123 D.SKIP 456 D.TUNING 789 >10 CLEAR DISPLAY MEMORY AMP MENU 0/10...

Operating Instructions
Page 25
m TUNING + H M TV FM MODE X x 2 3 5 ?/1 VIDEO IN/ PORTABLE AUDIO IN DIMMER SLEEP 2CH A.F.D. Recommended sound fields: Classical: HALL ...SA-CD/CD TUNER 2CH A.F.D. Refer to the Super Audio CD/CD, eject the disc and turn off the receiver and Super Audio CD player or CD player. 25US Playback Listening/Watching a component Listening to the sound that was...MOVIE MUSIC PHONES DISPLAY INPUT MODE INPUT SELECTOR MASTER VOLUME 5 3 Notes • The operation is described for a Sony Super Audio CD player. • Refer to suit the music. TV CH + PRESET - Tips • You can also ...
m TUNING + H M TV FM MODE X x 2 3 5 ?/1 VIDEO IN/ PORTABLE AUDIO IN DIMMER SLEEP 2CH A.F.D. Recommended sound fields: Classical: HALL ...SA-CD/CD TUNER 2CH A.F.D. Refer to the Super Audio CD/CD, eject the disc and turn off the receiver and Super Audio CD player or CD player. 25US Playback Listening/Watching a component Listening to the sound that was...MOVIE MUSIC PHONES DISPLAY INPUT MODE INPUT SELECTOR MASTER VOLUME 5 3 Notes • The operation is described for a Sony Super Audio CD player. • Refer to suit the music. TV CH + PRESET - Tips • You can also ...
Operating Instructions
Page 26
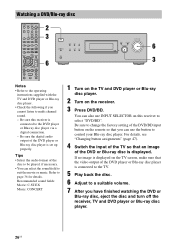
... a DVD/Blu-ray disc TV INPUT TV ?/1 SLEEP DMPORT AV ?/1 ?/1 SYSTEM STANDBY VIDEO DVD/BD SAT TV SA-CD/CD TUNER 2CH A.F.D. TUNING + m H M TV FM MODE X x 2 3 6 ?/1 VIDEO IN/ PORTABLE AUDIO IN DIMMER SLEEP 2CH A.F.D. REPLAY ADVANCE PRESET + .< > < TUNING - MOVIE MUSIC PHONES DISPLAY INPUT MODE INPUT SELECTOR...if necessary. • You can select the sound field to control your Blu-ray disc player. You can use INPUT SELECTOR on the receiver. 3 Press DVD/BD. MOVIE MUSIC DVD/BD MENU 123 D.SKIP 456 D.TUNING 789 >10 CLEAR DISPLAY MEMORY AMP MENU 0/10 ...
... a DVD/Blu-ray disc TV INPUT TV ?/1 SLEEP DMPORT AV ?/1 ?/1 SYSTEM STANDBY VIDEO DVD/BD SAT TV SA-CD/CD TUNER 2CH A.F.D. TUNING + m H M TV FM MODE X x 2 3 6 ?/1 VIDEO IN/ PORTABLE AUDIO IN DIMMER SLEEP 2CH A.F.D. REPLAY ADVANCE PRESET + .< > < TUNING - MOVIE MUSIC PHONES DISPLAY INPUT MODE INPUT SELECTOR...if necessary. • You can select the sound field to control your Blu-ray disc player. You can use INPUT SELECTOR on the receiver. 3 Press DVD/BD. MOVIE MUSIC DVD/BD MENU 123 D.SKIP 456 D.TUNING 789 >10 CLEAR DISPLAY MEMORY AMP MENU 0/10 ...
Operating Instructions
Page 27
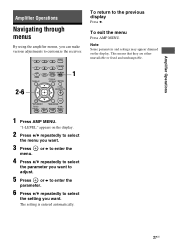
To return to customize the receiver. 2-6 D.SKIP 456 D.TUNING 789 >10 MEMORY AMP MENU 0/10 ENTER 1 CLEAR DISPLAY TOOLS/ OPTIONS MUTING TV VOL MASTER VOL O RETURN/EXIT MENU/HOME TV CH - ...
To return to customize the receiver. 2-6 D.SKIP 456 D.TUNING 789 >10 MEMORY AMP MENU 0/10 ENTER 1 CLEAR DISPLAY TOOLS/ OPTIONS MUTING TV VOL MASTER VOL O RETURN/EXIT MENU/HOME TV CH - ...


