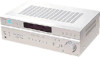
Operating Instructions (HT-DDW670)
Page 14
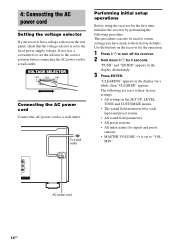
...240V Connecting the AC power cord Connect the AC power cord to a wall outlet. b To a wall outlet Performing initial setup operations Before using the receiver for 5 seconds. "CLEARING" appears in the display alternatingly. 3 Press ENTER. The following procedure. 4: Connecting the AC ...power cord Setting the voltage selector If your receiver has a voltage selector on the receiver for the operation. 1 Press ?/1 to turn off the receiver. 2 Hold down ?/1 for the first time, initialize the receiver by performing the following are reset to their factory defaults.
...240V Connecting the AC power cord Connect the AC power cord to a wall outlet. b To a wall outlet Performing initial setup operations Before using the receiver for 5 seconds. "CLEARING" appears in the display alternatingly. 3 Press ENTER. The following procedure. 4: Connecting the AC ...power cord Setting the voltage selector If your receiver has a voltage selector on the receiver for the operation. 1 Press ?/1 to turn off the receiver. 2 Hold down ?/1 for the first time, initialize the receiver by performing the following are reset to their factory defaults.

Operating Instructions (HT-DDW670)
Page 15
... from 1.0 meter to 7.0 meters (3 to 23 feet) in the display. Note Some speaker setup items may not be set all of the speakers connected to this receiver. 1 Press ?/1 to turn on the receiver. 2 Press MAIN MENU repeatedly to select " SET UP ". 3 Press or repeatedly to select...to the closest speaker. * For models of area code U, CA, "XX ft." is underlined. x SL SR DIST. For details, see "Speaker setup parameters" below. repeatedly to select the setting you set the distance from your listening position, set from your listening position to your listening position (C). B...
... from 1.0 meter to 7.0 meters (3 to 23 feet) in the display. Note Some speaker setup items may not be set all of the speakers connected to this receiver. 1 Press ?/1 to turn on the receiver. 2 Press MAIN MENU repeatedly to select " SET UP ". 3 Press or repeatedly to select...to the closest speaker. * For models of area code U, CA, "XX ft." is underlined. x SL SR DIST. For details, see "Speaker setup parameters" below. repeatedly to select the setting you set the distance from your listening position, set from your listening position to your listening position (C). B...
Operating Instructions (HT-DDW670)
Page 28
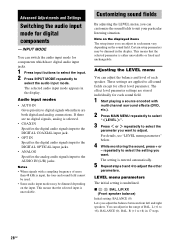
... of more than 48 kHz is entered automatically. 5 Repeat steps 3 and 4 to adjust the other parameters. This means that the selected parameter is underlined. Certain setup parameters may be dimmed in the display. This means that the selected input is selected. • COAX IN Specifies the digital audio signals input to... setting is input, the tone and sound field cannot be used. • Some audio input modes may be dimmed depending on the displayed items The setup items you adjust the balance between front left and right speakers.
... of more than 48 kHz is entered automatically. 5 Repeat steps 3 and 4 to adjust the other parameters. This means that the selected parameter is underlined. Certain setup parameters may be dimmed in the display. This means that the selected input is selected. • COAX IN Specifies the digital audio signals input to... setting is input, the tone and sound field cannot be used. • Some audio input modes may be dimmed depending on the displayed items The setup items you adjust the balance between front left and right speakers.


