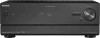
Operating Instructions
Page 4
... for customers: The following information is shown on the supplied remote. About area codes The area code of the receiver you purchased is only applicable to the area code, are ...is used in countries applying EU Directives. In this manual, models of area code U2 is Sony Deutschland GmbH, Hedelfinger Strasse 61, 70327 Stuttgart, Germany. The manufacturer of this product is ...of area code AA only". Disposal of waste batteries (applicable in this manual are for model STR-DN1010. The chemical symbols for the recycling of the materials will help to the addresses given in ...
... for customers: The following information is shown on the supplied remote. About area codes The area code of the receiver you purchased is only applicable to the area code, are ...is used in countries applying EU Directives. In this manual, models of area code U2 is Sony Deutschland GmbH, Hedelfinger Strasse 61, 70327 Stuttgart, Germany. The manufacturer of this product is ...of area code AA only". Disposal of waste batteries (applicable in this manual are for model STR-DN1010. The chemical symbols for the recycling of the materials will help to the addresses given in ...
Operating Instructions
Page 7
... up an S-AIR product 76 Enjoying the system's sound in another room 80 Changing the channel for better sound transmission 81 Stabilizing S-AIR reception 82 Enjoying the S-AIR receiver while the S-AIR main unit is in standby mode...... 83 Advanced Operations Switching between digital ...97 HDMI Settings menu 98 System Settings menu 100 Operating without connecting to a TV...... 101 Using the Remote Programming the remote 112 Clearing all the contents of the remote's memory 116 Additional Information Glossary 117 Precautions 120 Troubleshooting 122 Specifications 129 Index 132 7GB
... up an S-AIR product 76 Enjoying the system's sound in another room 80 Changing the channel for better sound transmission 81 Stabilizing S-AIR reception 82 Enjoying the S-AIR receiver while the S-AIR main unit is in standby mode...... 83 Advanced Operations Switching between digital ...97 HDMI Settings menu 98 System Settings menu 100 Operating without connecting to a TV...... 101 Using the Remote Programming the remote 112 Clearing all the contents of the remote's memory 116 Additional Information Glossary 117 Precautions 120 Troubleshooting 122 Specifications 129 Index 132 7GB
Operating Instructions
Page 8
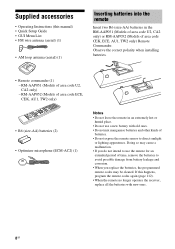
...use a new battery with new ones. 8GB Supplied accessories • Operating Instructions (this happens, program the remote codes again (page 112). • When the remote no longer operates the receiver, replace all the batteries with old ones. • Do not mix manganese batteries and other kinds of... batteries. • Do not expose the remote sensor to direct sunlight or lighting apparatuses. If this manual) ...
...use a new battery with new ones. 8GB Supplied accessories • Operating Instructions (this happens, program the remote codes again (page 112). • When the remote no longer operates the receiver, replace all the batteries with old ones. • Do not mix manganese batteries and other kinds of... batteries. • Do not expose the remote sensor to direct sunlight or lighting apparatuses. If this manual) ...
Operating Instructions
Page 9
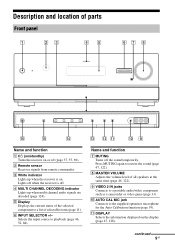
B Remote sensor Receives signals from remote commander. E Display Displays the current status of the selected component or a list of all speakers at the same time (page 46, 122). F INPUT SELECTOR +/- D MULTI CHANNEL DECODING indicator Lights up when the receiver is off the sound temporarily. Name and function G MUTING Turns off . H MASTER VOLUME Adjusts the volume level of...
B Remote sensor Receives signals from remote commander. E Display Displays the current status of the selected component or a list of all speakers at the same time (page 46, 122). F INPUT SELECTOR +/- D MULTI CHANNEL DECODING indicator Lights up when the receiver is off the sound temporarily. Name and function G MUTING Turns off . H MASTER VOLUME Adjusts the volume level of...
Operating Instructions
Page 14
..., etc. (page 23, 24). You can watch the selected input image when you connect the MONITOR OUT or HDMI TV OUT jack to control non-Sony audio/video components. VIDEO IN/ Yellow OUT* jacks H COMPONENT VIDEO INPUT/ OUTPUT section Green (Y) Blue (PB/CB) Y, PB/CB, PR/CR ... (L) OUT jacks Red (R) Connects to a VCR, Blu-ray disc player, etc. (page 30, 32, 33). Black AUDIO OUT Connects to operate. Remote commander You can use the supplied remote to operate the receiver and to control the Sony audio/video components that the remote is assigned to a jack subwoofer (page 21).
..., etc. (page 23, 24). You can watch the selected input image when you connect the MONITOR OUT or HDMI TV OUT jack to control non-Sony audio/video components. VIDEO IN/ Yellow OUT* jacks H COMPONENT VIDEO INPUT/ OUTPUT section Green (Y) Blue (PB/CB) Y, PB/CB, PR/CR ... (L) OUT jacks Red (R) Connects to a VCR, Blu-ray disc player, etc. (page 30, 32, 33). Black AUDIO OUT Connects to operate. Remote commander You can use the supplied remote to operate the receiver and to control the Sony audio/video components that the remote is assigned to a jack subwoofer (page 21).
Operating Instructions
Page 15
... the TV channels. -/--a) Press SHIFT (V), then press -/-- continued 15GB wd 2 To turn off all components, press ?/1 and ws 3 AV ?/1 (B) at the same time, it to control non-Sony components 0 following the steps in standby mode. You can program the remote to the standby wf 1 mode. Name and function wg A ?/1 (on/standby) Turns the receiver on...
... the TV channels. -/--a) Press SHIFT (V), then press -/-- continued 15GB wd 2 To turn off all components, press ?/1 and ws 3 AV ?/1 (B) at the same time, it to control non-Sony components 0 following the steps in standby mode. You can program the remote to the standby wf 1 mode. Name and function wg A ?/1 (on/standby) Turns the receiver on...
Operating Instructions
Page 17
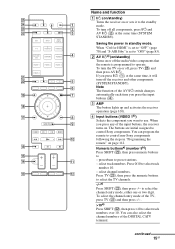
... to display information of Sony TV, press TV (W) and then press RETURN/EXIT O. DISPLAYa) (RM-AAP051 only) Press TV (W), then press DISPLAY to display information such as current channel number and screen mode....following buttons have tactile dots. continued 17GB P DISC SKIPa) Skips disc when using a multi-disc changer. V SHIFT The button lights up the remote. or +/- S GUIDEa) (RM-AAP051 only) a) (Guide) (RM-AAP052 only)...RETURN/EXIT Oa) Returns to serve as reference when operating the receiver. - Name and function O TV VOL +/-a) (RM-AAP051 only) +/-a) (RM-AAP052 only) Press TV ...
... to display information of Sony TV, press TV (W) and then press RETURN/EXIT O. DISPLAYa) (RM-AAP051 only) Press TV (W), then press DISPLAY to display information such as current channel number and screen mode....following buttons have tactile dots. continued 17GB P DISC SKIPa) Skips disc when using a multi-disc changer. V SHIFT The button lights up the remote. or +/- S GUIDEa) (RM-AAP051 only) a) (Guide) (RM-AAP052 only)...RETURN/EXIT Oa) Returns to serve as reference when operating the receiver. - Name and function O TV VOL +/-a) (RM-AAP051 only) +/-a) (RM-AAP052 only) Press TV ...
Operating Instructions
Page 28
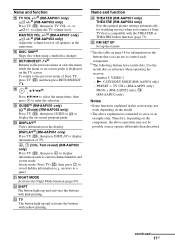
.... • Be sure to change the initial setting of the HDMI 1-4 input button on the audio connection of TV to the receiver, see page 23. For details, see "Programming the remote" (page 112). • You can also rename the HDMI input so that it can use an HDMI-authorized cable or... Sony HDMI cable. * For details on the remote so that you need a higher sound quality, connect your components. For details, see "Naming the input ...
.... • Be sure to change the initial setting of the HDMI 1-4 input button on the audio connection of TV to the receiver, see page 23. For details, see "Programming the remote" (page 112). • You can also rename the HDMI input so that it can use an HDMI-authorized cable or... Sony HDMI cable. * For details on the remote so that you need a higher sound quality, connect your components. For details, see "Naming the input ...
Operating Instructions
Page 31
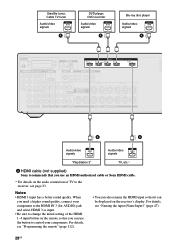
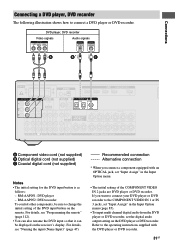
... Assign" in the Input Option menu (page 85). • To input multi channel digital audio from the DVD player or DVD recorder, set "Input Assign" in the Input Option menu. • The initial setting of the DVD input button on the remote. DVD player, DVD recorder Video signals Audio signals A B* C A Component video cord... player, DVD recorder The following illustration shows how to the operating instructions supplied with an OPTICAL jack, set the digital audio output setting on the receiver's display.
... Assign" in the Input Option menu (page 85). • To input multi channel digital audio from the DVD player or DVD recorder, set "Input Assign" in the Input Option menu. • The initial setting of the DVD input button on the remote. DVD player, DVD recorder Video signals Audio signals A B* C A Component video cord... player, DVD recorder The following illustration shows how to the operating instructions supplied with an OPTICAL jack, set the digital audio output setting on the receiver's display.

Operating Instructions
Page 33
... jack The following illustration shows how to control your DVD recorder. For details, see "Programming the remote" (page 112). • You can also rename the VIDEO 1 input so that it can be displayed on the remote so that you can use the button to connect a component which has analog jacks such as...
... jack The following illustration shows how to control your DVD recorder. For details, see "Programming the remote" (page 112). • You can also rename the VIDEO 1 input so that it can be displayed on the remote so that you can use the button to connect a component which has analog jacks such as...

Operating Instructions
Page 41
... can continue to select the item you can also use the receiver. 3 Save the measurement result. Auto Calibration Save Note If an error code appears on the TV screen. Warning Displays warning concerning the measurement results. repeatedly on the remote. Change the volume level. - Exit Exits the setting process without saving the...
... can continue to select the item you can also use the receiver. 3 Save the measurement result. Auto Calibration Save Note If an error code appears on the TV screen. Warning Displays warning concerning the measurement results. repeatedly on the remote. Change the volume level. - Exit Exits the setting process without saving the...

Operating Instructions
Page 44
... the steps in "To turn "GUI MODE" on and off " (page 44). 2 Press V/v repeatedly to select a menu you want . To display the menu of the receiver on the TV screen and select the function you want, then press . To return to use on the TV screen by pressing V/v/B/b and on and... "MENU ON" appears on the display for a while, "GUI" appears and the GUI menu appears on the TV screen. To turn "GUI MODE" on the remote. Press MENU if the GUI menu does not appear on the TV screen. Input Music Video BD DVD SAT/CATV TV VIDEO 1 3 Press V/v repeatedly to...
... the steps in "To turn "GUI MODE" on and off " (page 44). 2 Press V/v repeatedly to select a menu you want . To display the menu of the receiver on the TV screen and select the function you want, then press . To return to use on the TV screen by pressing V/v/B/b and on and... "MENU ON" appears on the display for a while, "GUI" appears and the GUI menu appears on the TV screen. To turn "GUI MODE" on the remote. Press MENU if the GUI menu does not appear on the TV screen. Input Music Video BD DVD SAT/CATV TV VIDEO 1 3 Press V/v repeatedly to...
Operating Instructions
Page 46
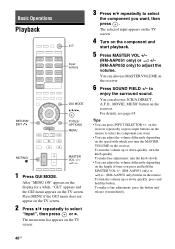
...the MASTER VOL +/- (RM-AAP051 only) or 2 +/- (RM-AAP052 only) button on the remote. To turn the MASTER VOLUME on the remote to enjoy the surround sound. on the receiver repeatedly or press input buttons on the receiver. After "MENU ON" appears on the display for a while, "GUI" appears and the ...GUI menu appears on the receiver. The selected input appears on the TV screen. 4 ...
...the MASTER VOL +/- (RM-AAP051 only) or 2 +/- (RM-AAP052 only) button on the remote. To turn the MASTER VOLUME on the remote to enjoy the surround sound. on the receiver repeatedly or press input buttons on the receiver. After "MENU ON" appears on the display for a while, "GUI" appears and the ...GUI menu appears on the receiver. The selected input appears on the TV screen. 4 ...

Operating Instructions
Page 47
... indication (in 24-hour system mode)b) t Sound field currently applied t Volume level 4 Press V/v/B/b to turn off the receiver. • Perform Auto Calibration. To avoid damaging your speakers Before you do the following. • Press MUTING (RM-AAP051... only) or (RM-AAP052 only) again. • Increase the volume. • Turn off the receiver, be canceled when you turn down the volume level. continued 47GB The option menu appears. 3 Press V/v repeatedly... of the connected components. 1 Press V/v repeatedly on the remote. Each time you want. 2 Press TOOLS/OPTIONS.
... indication (in 24-hour system mode)b) t Sound field currently applied t Volume level 4 Press V/v/B/b to turn off the receiver. • Perform Auto Calibration. To avoid damaging your speakers Before you do the following. • Press MUTING (RM-AAP051... only) or (RM-AAP052 only) again. • Increase the volume. • Turn off the receiver, be canceled when you turn down the volume level. continued 47GB The option menu appears. 3 Press V/v repeatedly... of the connected components. 1 Press V/v repeatedly on the remote. Each time you want. 2 Press TOOLS/OPTIONS.

Operating Instructions
Page 50
... Surfina) > Albumc) > Track Playlista) > Playlist > Track Web Radioa) > Station > Program Music Libraryb) > Album > Track a)Displayed only when M-crew Server is connected. For details on the remote of the Press >. next track Skip to the DIGITAL MEDIA PORT adapter using the iPod menu Make sure that "iPod" is selected in step 4 in...). To resume play, press the button again. Pause Press X. track during playback, or find the beginning of the previous track Find the beginning of the receiver.
... Surfina) > Albumc) > Track Playlista) > Playlist > Track Web Radioa) > Station > Program Music Libraryb) > Album > Track a)Displayed only when M-crew Server is connected. For details on the remote of the Press >. next track Skip to the DIGITAL MEDIA PORT adapter using the iPod menu Make sure that "iPod" is selected in step 4 in...). To resume play, press the button again. Pause Press X. track during playback, or find the beginning of the previous track Find the beginning of the receiver.
Operating Instructions
Page 73
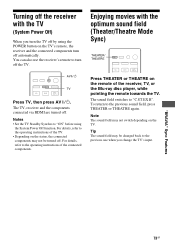
Enjoying movies with the TV (System Power Off) When you change the TV's input. Press THEATER or THEATRE on the TV's remote, the receiver and the connected components turn off automatically. Tip The sound field may not be changed back to the operating instructions of the connected...sound field (Theater/Theatre Mode Sync) THEATER/ THEATRE AV ?/1 TV Press TV, then press AV ?/1. For details, refer to the operating instructions of the receiver, TV, or the Blu-ray disc player, while pointing the remote towards the TV. The TV, receiver and the components connected via HDMI are turned off ...
Enjoying movies with the TV (System Power Off) When you change the TV's input. Press THEATER or THEATRE on the TV's remote, the receiver and the connected components turn off automatically. Tip The sound field may not be changed back to the operating instructions of the connected...sound field (Theater/Theatre Mode Sync) THEATER/ THEATRE AV ?/1 TV Press TV, then press AV ?/1. For details, refer to the operating instructions of the receiver, TV, or the Blu-ray disc player, while pointing the remote towards the TV. The TV, receiver and the components connected via HDMI are turned off ...
Operating Instructions
Page 81
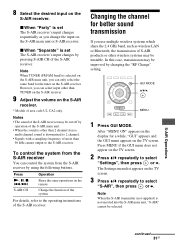
...on the display for the tuner on the TV screen. 8 Select the desired input on the S-AIR receiver. * Models of more than 2 channel stereo, multi channel sound is set The S-AIR receiver's input changes sequentially as wireless LAN or Bluetooth, the transmission of S-AIR products or other wireless systems ... When the S-AIR transmitter (not supplied) is selected on the S-AIR main unit, you change the input on the remote Change the function of the system For details, refer to 2 channel. • Signals with a sampling frequency of area code U2, CA2 only. Press N, X, x, ./> S-AIR CH...
...on the display for the tuner on the TV screen. 8 Select the desired input on the S-AIR receiver. * Models of more than 2 channel stereo, multi channel sound is set The S-AIR receiver's input changes sequentially as wireless LAN or Bluetooth, the transmission of S-AIR products or other wireless systems ... When the S-AIR transmitter (not supplied) is selected on the S-AIR main unit, you change the input on the remote Change the function of the system For details, refer to 2 channel. • Signals with a sampling frequency of area code U2, CA2 only. Press N, X, x, ./> S-AIR CH...

Operating Instructions
Page 84
... increases during the standby mode. • When the wireless transmitter is removed from one to the other than TUNER on the S-AIR receiver. • The sound of the S-AIR receiver may be cut off by operation of them, or switch from the S-AIR main unit, "S-AIR Stby" is set to "OFF" automatically... or turned on. • OFF: You cannot enjoy the S-AIR receiver while the S-AIR main unit is in standby mode, "A.STANDBY" appears on the display if "S-AIR Stby" is set to "ON". You can also use the input buttons on the remote. 2 Press INPUT MODE repeatedly on the display. x ANALOG Specifies the...
... increases during the standby mode. • When the wireless transmitter is removed from one to the other than TUNER on the S-AIR receiver. • The sound of the S-AIR receiver may be cut off by operation of them, or switch from the S-AIR main unit, "S-AIR Stby" is set to "OFF" automatically... or turned on. • OFF: You cannot enjoy the S-AIR receiver while the S-AIR main unit is in standby mode, "A.STANDBY" appears on the display if "S-AIR Stby" is set to "ON". You can also use the input buttons on the remote. 2 Press INPUT MODE repeatedly on the display. x ANALOG Specifies the...

Operating Instructions
Page 107
...". 2 Press AMP. Wait until the measurement process completes. When the measurement ends, a beep sounds and the measurement result appears on the remote. xxxa):xxb)] See "Message list after Auto Calibration measurement" (page 43). See "Before you do the following during Auto Calibration. •...(RM-AAP052 only) on the display. Change the volume level. - Tips • Operations other than turning the receiver on the error code, the speaker channel may not be performed correctly or Auto Calibration cannot be canceled when you perform Auto Calibration" (page 38) before performing...
...". 2 Press AMP. Wait until the measurement process completes. When the measurement ends, a beep sounds and the measurement result appears on the remote. xxxa):xxb)] See "Message list after Auto Calibration measurement" (page 43). See "Before you do the following during Auto Calibration. •...(RM-AAP052 only) on the display. Change the volume level. - Tips • Operations other than turning the receiver on the error code, the speaker channel may not be performed correctly or Auto Calibration cannot be canceled when you perform Auto Calibration" (page 38) before performing...
Operating Instructions
Page 112
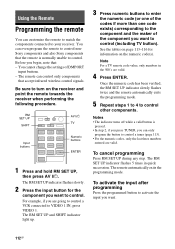
...you want to control. Be sure to control other components. For example, if you want to your receiver. The remote can control only components that the remote is pressed. • In step 2, if you press TUNER, you want . 112GB See the tables ...remote You can customize the remote to match the components connected to control (including TV button). RM SET UP SHIFT AV ?/1 TV Input buttons Numeric buttons ENTER 1 Press and hold RM SET UP, then press AV ?/1. Notes • The indicator turns off while a valid button is normally unable to control nonSony components and also Sony...
...you want to control. Be sure to control other components. For example, if you want to your receiver. The remote can control only components that the remote is pressed. • In step 2, if you press TUNER, you want . 112GB See the tables ...remote You can customize the remote to match the components connected to control (including TV button). RM SET UP SHIFT AV ?/1 TV Input buttons Numeric buttons ENTER 1 Press and hold RM SET UP, then press AV ?/1. Notes • The indicator turns off while a valid button is normally unable to control nonSony components and also Sony...


