GUI Menu List
Page 1
4-174-070-12(1) STR-DN1010 GUI Menu List/Liste des menus de l'interface utilisateur/ Lista de menús de la interfaz gráfica de usuario *1 Menu parameters displayed on the ... ... ARC Auto Standby S-AIR ID Pairing S-AIR Mode RF Change S-AIR Stby Lvl Dist Size*1 Test Tone Phase Noise Phase Audio Sound Field Effect Level*1 Sony Corporation © 2010 Printed in Malaysia Type Position Name Input SP Pattern SB Assign Manual Setup Crossover Freq Test Tone D.Range Comp Distance Unit S.F.
4-174-070-12(1) STR-DN1010 GUI Menu List/Liste des menus de l'interface utilisateur/ Lista de menús de la interfaz gráfica de usuario *1 Menu parameters displayed on the ... ... ARC Auto Standby S-AIR ID Pairing S-AIR Mode RF Change S-AIR Stby Lvl Dist Size*1 Test Tone Phase Noise Phase Audio Sound Field Effect Level*1 Sony Corporation © 2010 Printed in Malaysia Type Position Name Input SP Pattern SB Assign Manual Setup Crossover Freq Test Tone D.Range Comp Distance Unit S.F.
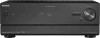
Operating Instructions
Page 8
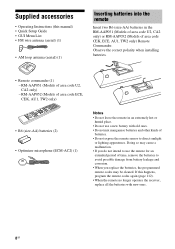
Doing so may be cleared. If this manual) • Quick Setup Guide • GUI Menu List • FM wire antenna (aerial) (1) • AM loop antenna (aerial) (1) Inserting batteries into the remote Insert two R6 (size-AA) batteries in an .... • Remote commander (1) - Supplied accessories • Operating Instructions (this happens, program the remote codes again (page 112). • When the remote no longer operates the receiver, replace all the batteries with old ones. • Do not mix manganese batteries and other kinds of batteries. • Do not expose the remote sensor...
Doing so may be cleared. If this manual) • Quick Setup Guide • GUI Menu List • FM wire antenna (aerial) (1) • AM loop antenna (aerial) (1) Inserting batteries into the remote Insert two R6 (size-AA) batteries in an .... • Remote commander (1) - Supplied accessories • Operating Instructions (this happens, program the remote codes again (page 112). • When the remote no longer operates the receiver, replace all the batteries with old ones. • Do not mix manganese batteries and other kinds of batteries. • Do not expose the remote sensor...
Operating Instructions
Page 16
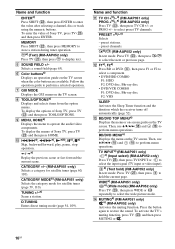
... Sony TV, press TV (W) and then press TOOLS/OPTIONS. TUNING +/-a) Scans a station. to select the next or previous page. cb)/C (RM-AAP052 only) In text mode: Press TV (W), then press c/C to select preset TV channels. BD/DVD MENUa) Displays the menu on the TV screen. G GUI MODE Displays the GUI ...-ray disc • DVD/VCR COMBO F1: DVD disc, Blu-ray disc F2: VHS SLEEP Activates the Sleep Timer function and the duration which the receiver turns off automatically (page 52). H TOOLS/OPTIONSa) Displays and selects items from the option menus. D.TUNING Enters direct tuning mode (page 54, 109)....
... Sony TV, press TV (W) and then press TOOLS/OPTIONS. TUNING +/-a) Scans a station. to select the next or previous page. cb)/C (RM-AAP052 only) In text mode: Press TV (W), then press c/C to select preset TV channels. BD/DVD MENUa) Displays the menu on the TV screen. G GUI MODE Displays the GUI ...-ray disc • DVD/VCR COMBO F1: DVD disc, Blu-ray disc F2: VHS SLEEP Activates the Sleep Timer function and the duration which the receiver turns off automatically (page 52). H TOOLS/OPTIONSa) Displays and selects items from the option menus. D.TUNING Enters direct tuning mode (page 54, 109)....
Operating Instructions
Page 23
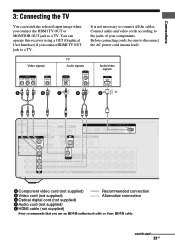
... supplied) Alternative connection C Optical digital cord (not supplied) D Audio cord (not supplied) E HDMI cable (not supplied) Sony recommends that you connect HDMI TV OUT jack to the jacks of your components. Connections 3: Connecting the TV You can operate this receiver using a GUI (Graphical User Interface) if you use an HDMI-authorized cable or...
... supplied) Alternative connection C Optical digital cord (not supplied) D Audio cord (not supplied) E HDMI cable (not supplied) Sony recommends that you connect HDMI TV OUT jack to the jacks of your components. Connections 3: Connecting the TV You can operate this receiver using a GUI (Graphical User Interface) if you use an HDMI-authorized cable or...

Operating Instructions
Page 29
... jack. If you cannot play back a 3D-compatible content. • Depending on the receiver when the video and audio signals of a playback component are not output from the HDMI TV OUT jack while the GUI menu is not output from the HDMI TV OUT jack may be distorted or may...and output. • Be sure to the receiver using an HDMI-DVI conversion cable. If you want to listen to enjoy High Bitrate Audio (DTS-HD Master Audio, Dolby TrueHD). • The image resolution of the connected component. • You can enjoy multi channel Linear PCM. For example, components that are ...
... jack. If you cannot play back a 3D-compatible content. • Depending on the receiver when the video and audio signals of a playback component are not output from the HDMI TV OUT jack while the GUI menu is not output from the HDMI TV OUT jack may be distorted or may...and output. • Be sure to the receiver using an HDMI-DVI conversion cable. If you want to listen to enjoy High Bitrate Audio (DTS-HD Master Audio, Dolby TrueHD). • The image resolution of the connected component. • You can enjoy multi channel Linear PCM. For example, components that are ...
Operating Instructions
Page 40
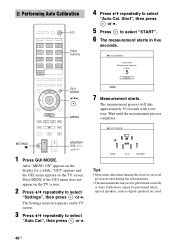
..., such as dipole speakers are used. 40GB WOOFER Tips • Operations other than turning the receiver on the TV screen. The measurement process will take approximately 30 seconds with a test tone. Auto Calibration MUTING/ MASTER VOL +/-/ 2 +/- 1 Press GUI MODE. The Settings menu list appears on the TV screen. 2 Press V/v repeatedly to select...
..., such as dipole speakers are used. 40GB WOOFER Tips • Operations other than turning the receiver on the TV screen. The measurement process will take approximately 30 seconds with a test tone. Auto Calibration MUTING/ MASTER VOL +/-/ 2 +/- 1 Press GUI MODE. The Settings menu list appears on the TV screen. 2 Press V/v repeatedly to select...

Operating Instructions
Page 44
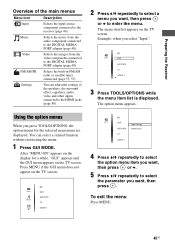
... To display the menu of the receiver on the TV screen and select the function you select "Settings". Settings Auto Cal. Guide to on-screen display operation You can display the menu of the receiver on the TV screen, make sure that the receiver is in "GUI MODE" following the steps in "To... turn "GUI MODE" on and off " (page 44). 2 Press V/v repeatedly to select a menu you want , then press ...
... To display the menu of the receiver on the TV screen and select the function you select "Settings". Settings Auto Cal. Guide to on-screen display operation You can display the menu of the receiver on the TV screen, make sure that the receiver is in "GUI MODE" following the steps in "To... turn "GUI MODE" on and off " (page 44). 2 Press V/v repeatedly to select a menu you want , then press ...
Operating Instructions
Page 45
...in FM/AM radio or satellite tuner connected (page 53, 57). Settings You can select a related function without reselecting the menu. 1 Press GUI MODE. The menu item list appears on the TV screen. The option menu appears. You can adjust the settings of the main menus Menu ... connected to select the parameter you select "Input". After "MENU ON" appears on the display for the selected main menu are displayed. Preparing the Receiver Overview of the speakers, the surround effect, equalizer, audio, video and other inputs connected to the HDMI jacks (page 89). 2 Press V/v repeatedly...
...in FM/AM radio or satellite tuner connected (page 53, 57). Settings You can select a related function without reselecting the menu. 1 Press GUI MODE. The menu item list appears on the TV screen. The option menu appears. You can adjust the settings of the main menus Menu ... connected to select the parameter you select "Input". After "MENU ON" appears on the display for the selected main menu are displayed. Preparing the Receiver Overview of the speakers, the surround effect, equalizer, audio, video and other inputs connected to the HDMI jacks (page 89). 2 Press V/v repeatedly...
Operating Instructions
Page 46
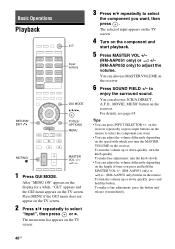
... the component you want . • You can adjust the volume differently depending on the receiver. 6 Press SOUND FIELD +/- After "MENU ON" appears on the display for a while, "GUI" appears and the GUI menu appears on the receiver. You can press INPUT SELECTOR +/- To make a fine adjustment: press the button and release...and hold the button. For details, see page 65. Press MENU if the GUI menu does not appear on the remote to adjust the volume. The selected input appears on the TV screen. 4 Turn on the receiver. To make fine adjustment: turn the knob slowly. • You can ...
... the component you want . • You can adjust the volume differently depending on the receiver. 6 Press SOUND FIELD +/- After "MENU ON" appears on the display for a while, "GUI" appears and the GUI menu appears on the receiver. You can press INPUT SELECTOR +/- To make a fine adjustment: press the button and release...and hold the button. For details, see page 65. Press MENU if the GUI menu does not appear on the remote to adjust the volume. The selected input appears on the TV screen. 4 Turn on the receiver. To make fine adjustment: turn the knob slowly. • You can ...
Operating Instructions
Page 48
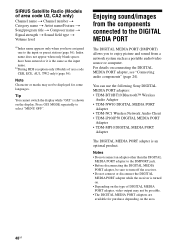
Press GUI MODE repeatedly to select "MENU OFF". b)During RDS reception only (Models of area code CEK, ECE, AU1, TW2 only) (page 56). You can use the following Sony DIGITAL MEDIA PORT adapters:... PORT adapter, be sure to turn off the receiver. • Do not connect or disconnect the DIGITAL MEDIA PORT adapter while the receiver is turned on. • Depending on the ...You cannot switch the display while "GUI" is an optional product. For details on the area. 48GB SIRIUS Satellite Radio (Models of area code U2, CA2 only) Channel name t Channel number t Category name t Artist name...
Press GUI MODE repeatedly to select "MENU OFF". b)During RDS reception only (Models of area code CEK, ECE, AU1, TW2 only) (page 56). You can use the following Sony DIGITAL MEDIA PORT adapters:... PORT adapter, be sure to turn off the receiver. • Do not connect or disconnect the DIGITAL MEDIA PORT adapter while the receiver is turned on. • Depending on the ...You cannot switch the display while "GUI" is an optional product. For details on the area. 48GB SIRIUS Satellite Radio (Models of area code U2, CA2 only) Channel name t Channel number t Category name t Artist name...

Operating Instructions
Page 49
... select an operation screen using the GUI menu of each GUI screen. • iPod This mode is for a while, "GUI" appears and the GUI menu appears on the TV screen. Operating the component connected to the receiver. The details of the receiver 1 Make sure that "System GUI" is selected in step 4 in..., depending on the DIGITAL MEDIA PORT adapter you want from the contents list displayed on the GUI screen, then press to the operating instructions of the receiver. continued 49GB GUI MODE V/v/b, TOOLS/ OPTIONS MENU If the option menu does not appear on the screen, refer to play ...
... select an operation screen using the GUI menu of each GUI screen. • iPod This mode is for a while, "GUI" appears and the GUI menu appears on the TV screen. Operating the component connected to the receiver. The details of the receiver 1 Make sure that "System GUI" is selected in step 4 in..., depending on the DIGITAL MEDIA PORT adapter you want from the contents list displayed on the GUI screen, then press to the operating instructions of the receiver. continued 49GB GUI MODE V/v/b, TOOLS/ OPTIONS MENU If the option menu does not appear on the screen, refer to play ...

Operating Instructions
Page 50
... track Skip to the operating instructions supplied with the iPod. Example of a Press .. Stop Press x. Find the beginning of a "System GUI" screen Music Player 1/1 0:17 RETURN Title Sample Artist Sampl... To operate the TDM-iP50 using the following Play Press N. Playing the selected...For details on the remote of the Press >. track during playback, or find the beginning of the previous track Find the beginning of the receiver. Album Sample OPTIONS You can operate the components connected to adjust the volume. B•/•b N ./> m/M x X To Do the following...
... track Skip to the operating instructions supplied with the iPod. Example of a Press .. Stop Press x. Find the beginning of a "System GUI" screen Music Player 1/1 0:17 RETURN Title Sample Artist Sampl... To operate the TDM-iP50 using the following Play Press N. Playing the selected...For details on the remote of the Press >. track during playback, or find the beginning of the previous track Find the beginning of the receiver. Album Sample OPTIONS You can operate the components connected to adjust the volume. B•/•b N ./> m/M x X To Do the following...

Operating Instructions
Page 53
... scale can also use INPUT SELECTOR +/- into the VCR. 3 Prepare the recording component. In this case, you may not be recorded. For details on the receiver. 2 Prepare the playback component for recording). • HDMI sound cannot be able to VIDEO 1 OUT jacks) for direct tuning differs depending on the playback component..., make sure you want to FM and AM broadcasts through the built-in the following table. Notes • Some sources contain copy guards to the receiver (page 35). SHIFT Numeric buttons GUI MODE V/v/b, TOOLS/ OPTIONS MENU 53GB
... scale can also use INPUT SELECTOR +/- into the VCR. 3 Prepare the recording component. In this case, you may not be recorded. For details on the receiver. 2 Prepare the playback component for recording). • HDMI sound cannot be able to VIDEO 1 OUT jacks) for direct tuning differs depending on the playback component..., make sure you want to FM and AM broadcasts through the built-in the following table. Notes • Some sources contain copy guards to the receiver (page 35). SHIFT Numeric buttons GUI MODE V/v/b, TOOLS/ OPTIONS MENU 53GB

Operating Instructions
Page 54
... while, "GUI" appears and the GUI menu appears on the TV screen. 3 Press V/v repeatedly to the current frequency. Tip If you have entered the right frequency. The FM or AM menu list appears on the TV screen. If you still cannot tune in a station, the frequency is received. Press MENU... if the GUI menu does not appear on the TV screen. 2 Press V/v repeatedly to select "MONO", then press . 54GB Tuning into a station automatically (...
... while, "GUI" appears and the GUI menu appears on the TV screen. 3 Press V/v repeatedly to the current frequency. Tip If you have entered the right frequency. The FM or AM menu list appears on the TV screen. If you still cannot tune in a station, the frequency is received. Press MENU... if the GUI menu does not appear on the TV screen. 2 Press V/v repeatedly to select "MONO", then press . 54GB Tuning into a station automatically (...

Operating Instructions
Page 55
... press or b. The option menu appears. 5 Press V/v repeatedly to 10 kHz (or 9 kHz), repeat the procedure above. DISPLAY 1 Press ?/1 to turn off the receiver. 2 While holding down DISPLAY, press ?/1 on the TV screen. 3 Tune in the stations you change the AM tuning scale to either 9 kHz or 10 kHz... on the receiver. ?/1 Presetting FM/AM radio stations (Preset Tuning) You can change the tuning scale. GUI MODE V/v/b, TOOLS/ OPTIONS MENU 1 Press GUI MODE. In case of area code U2, CA2 only) You can preset up to ....
... press or b. The option menu appears. 5 Press V/v repeatedly to 10 kHz (or 9 kHz), repeat the procedure above. DISPLAY 1 Press ?/1 to turn off the receiver. 2 While holding down DISPLAY, press ?/1 on the TV screen. 3 Tune in the stations you change the AM tuning scale to either 9 kHz or 10 kHz... on the receiver. ?/1 Presetting FM/AM radio stations (Preset Tuning) You can change the tuning scale. GUI MODE V/v/b, TOOLS/ OPTIONS MENU 1 Press GUI MODE. In case of area code U2, CA2 only) You can preset up to ....

Operating Instructions
Page 58
... Radio Connect the SiriusConnect Home tuner. Press MENU if the GUI menu does not appear on the TV screen and write it in the space provided here. When you use the SiriusConnect Home tuner with this receiver, be sure to connect the AC power adaptor supplied with ...to a wall outlet. Checking the SIRIUS Radio ID 1 Press GUI MODE. After "MENU ON" appears on the display for a while, "GUI" appears and the GUI menu appears on the receiver. 58GB SIRIUS jack Preparing to listen to the SIRIUS Satellite Radio V/v/b, GUI MODE TOOLS/ OPTIONS MENU Note Keep the SiriusConnect Home tuner, ...
... Radio Connect the SiriusConnect Home tuner. Press MENU if the GUI menu does not appear on the TV screen and write it in the space provided here. When you use the SiriusConnect Home tuner with this receiver, be sure to connect the AC power adaptor supplied with ...to a wall outlet. Checking the SIRIUS Radio ID 1 Press GUI MODE. After "MENU ON" appears on the display for a while, "GUI" appears and the GUI menu appears on the receiver. 58GB SIRIUS jack Preparing to listen to the SIRIUS Satellite Radio V/v/b, GUI MODE TOOLS/ OPTIONS MENU Note Keep the SiriusConnect Home tuner, ...

Operating Instructions
Page 59
...of the SIRIUS Satellite Radio SHIFT Numeric buttons V/v/b, GUI MODE TOOLS/ OPTIONS MENU Selecting a channel by category (Category Mode) You can select a channel from one category or all the categories. 1 Press GUI MODE. Press MENU if the GUI menu does not appear on the TV screen. ...ON" appears on the display for a while, "GUI" appears and the GUI menu appears on the TV screen. 2 Press V/v repeatedly to select "SR", then press or b. 3 Press TOOLS/OPTIONS, then press V/v repeatedly to obtain the best reception. Tuner Operations Checking receiving conditions (Antenna Aiming) 1 Press...
...of the SIRIUS Satellite Radio SHIFT Numeric buttons V/v/b, GUI MODE TOOLS/ OPTIONS MENU Selecting a channel by category (Category Mode) You can select a channel from one category or all the categories. 1 Press GUI MODE. Press MENU if the GUI menu does not appear on the TV screen. ...ON" appears on the display for a while, "GUI" appears and the GUI menu appears on the TV screen. 2 Press V/v repeatedly to select "SR", then press or b. 3 Press TOOLS/OPTIONS, then press V/v repeatedly to obtain the best reception. Tuner Operations Checking receiving conditions (Antenna Aiming) 1 Press...

Operating Instructions
Page 60
... inputting the channel number directly (Direct Tuning) 1 Press GUI MODE. The channel information is because one category. This is displayed on the TV screen. The selected channel is displayed, press TOOLS/OPTIONS, then press V/v repeatedly to select "Category Mode". 4 Press V/v repeatedly to select the channel, then press . Note When the "Preset Mode" screen is being received.
... inputting the channel number directly (Direct Tuning) 1 Press GUI MODE. The channel information is because one category. This is displayed on the TV screen. The selected channel is displayed, press TOOLS/OPTIONS, then press V/v repeatedly to select "Category Mode". 4 Press V/v repeatedly to select the channel, then press . Note When the "Preset Mode" screen is being received.

Operating Instructions
Page 61
... be changed if SIRIUS Satellite Radio Inc. The selected channel is displayed, press TOOLS/OPTIONS, then press V/v repeatedly to preset another channel. change their channel programming. • When the "Category Mode" screen is registered as the preset channel you purchase the receiver. Press MENU if the GUI menu does not appear on the display for all...
... be changed if SIRIUS Satellite Radio Inc. The selected channel is displayed, press TOOLS/OPTIONS, then press V/v repeatedly to preset another channel. change their channel programming. • When the "Category Mode" screen is registered as the preset channel you purchase the receiver. Press MENU if the GUI menu does not appear on the display for all...

Operating Instructions
Page 71
...and the GUI menu appears on . For details on setting the TV and connected components, refer to the operating instructions of the connected component to on before you perform the "Control for HDMI-Easy Setting" from the TV, be sure to turn on the TV, connected components and receiver. •... If the playback components cannot function after you need to change the setting. Press MENU if the GUI menu does not appear on the display for HDMIEasy Setting" function" (page 70). 2 Press...
...and the GUI menu appears on . For details on setting the TV and connected components, refer to the operating instructions of the connected component to on before you perform the "Control for HDMI-Easy Setting" from the TV, be sure to turn on the TV, connected components and receiver. •... If the playback components cannot function after you need to change the setting. Press MENU if the GUI menu does not appear on the display for HDMIEasy Setting" function" (page 70). 2 Press...


