Operating Instructions
Page 1
4-174-068-12(1) Multi Channel AV Receiver Operating Instructions STR-DN1010 ©2010 Sony Corporation
4-174-068-12(1) Multi Channel AV Receiver Operating Instructions STR-DN1010 ©2010 Sony Corporation

Operating Instructions
Page 6
...aerials 35 6: Inserting the wireless transmitter/ transceiver 35 7: Connecting the AC power cord (mains lead 36 Preparing the Receiver Initializing the receiver 37 Selecting the front speaker system 37 Calibrating the appropriate speaker settings automatically (Auto Calibration 38 Guide to on-screen display... 58 Preparing to listen to the SIRIUS Satellite Radio 58 Selecting a channel of the SIRIUS Satellite Radio 59 Presetting SIRIUS Satellite Radio channels 61 Restricting access to specific channels (Parental Lock 62 Enjoying Surround Sound Selecting the sound field 65 Enjoying ...
...aerials 35 6: Inserting the wireless transmitter/ transceiver 35 7: Connecting the AC power cord (mains lead 36 Preparing the Receiver Initializing the receiver 37 Selecting the front speaker system 37 Calibrating the appropriate speaker settings automatically (Auto Calibration 38 Guide to on-screen display... 58 Preparing to listen to the SIRIUS Satellite Radio 58 Selecting a channel of the SIRIUS Satellite Radio 59 Presetting SIRIUS Satellite Radio channels 61 Restricting access to specific channels (Parental Lock 62 Enjoying Surround Sound Selecting the sound field 65 Enjoying ...
Operating Instructions
Page 7
... S-AIR products 75 Setting up an S-AIR product 76 Enjoying the system's sound in another room 80 Changing the channel for better sound transmission 81 Stabilizing S-AIR reception 82 Enjoying the S-AIR receiver while the S-AIR main unit is in standby mode...... 83 Advanced Operations Switching between digital and analog audio (INPUT...
... S-AIR products 75 Setting up an S-AIR product 76 Enjoying the system's sound in another room 80 Changing the channel for better sound transmission 81 Stabilizing S-AIR reception 82 Enjoying the S-AIR receiver while the S-AIR main unit is in standby mode...... 83 Advanced Operations Switching between digital and analog audio (INPUT...
Operating Instructions
Page 9
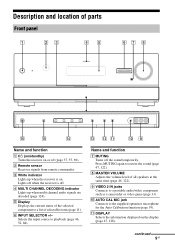
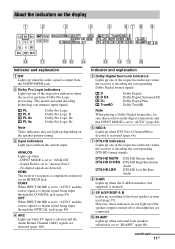
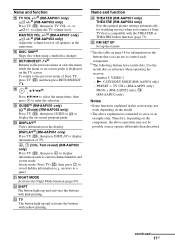
... or video game (page 33). I VIDEO 2 IN jacks Connects to playback (page 46, 52, 84). D MULTI CHANNEL DECODING indicator Lights up when the receiver is off when the receiver is on. Description and location of parts Front panel 1 23 45 67 8 qh qg qf qd qs qa 09... Name and function A ?/1 (on/standby) Turns the receiver on or off the sound temporarily. B Remote sensor Receives signals from remote commander. Name and function G MUTING Turns off (page 37, 55, 69). C White indicator Lights up when multi channel audio signals are decoded (page 124).
... or video game (page 33). I VIDEO 2 IN jacks Connects to playback (page 46, 52, 84). D MULTI CHANNEL DECODING indicator Lights up when the receiver is off when the receiver is on. Description and location of parts Front panel 1 23 45 67 8 qh qg qf qd qs qa 09... Name and function A ?/1 (on/standby) Turns the receiver on or off the sound temporarily. B Remote sensor Receives signals from remote commander. Name and function G MUTING Turns off (page 37, 55, 69). C White indicator Lights up when multi channel audio signals are decoded (page 124).
Operating Instructions
Page 11
... not light up when the S-AIR transmitter (not supplied) is output from the SUBWOOFER jack. ANALOG Lights up one of the respective indicators when the receiver performs Dolby Pro Logic processing. F NEO:6 Lights up when TV input is set to "ANALOG". - HD MSTR HI RES LBR S-AIR D.RANGE SIRIUS ST ... 96 24 LPCM SLEEP BI-AMP SP A B qk qj qh qg qf qd qs qa q; OPT When INPUT MODE is selected and the Audio Return Channel (ARC) signals are connected. D ARC Lights up when DTS Neo:6 Cinema/Music decoder is a digital signal being input through the COAXIAL jack (page 84). D D ...
... not light up when the S-AIR transmitter (not supplied) is output from the SUBWOOFER jack. ANALOG Lights up one of the respective indicators when the receiver performs Dolby Pro Logic processing. F NEO:6 Lights up when TV input is set to "ANALOG". - HD MSTR HI RES LBR S-AIR D.RANGE SIRIUS ST ... 96 24 LPCM SLEEP BI-AMP SP A B qk qj qh qg qf qd qs qa q; OPT When INPUT MODE is selected and the Audio Return Channel (ARC) signals are connected. D ARC Lights up when DTS Neo:6 Cinema/Music decoder is a digital signal being input through the COAXIAL jack (page 84). D D ...
Operating Instructions
Page 12
...MEM A memory function, such as Preset Memory (page 55), etc., is selected. SIRIUS (Models of the respective indicators when the receiver is activated. P D.RANGE Lights up when dynamic range compression is activated. DTS DTS-ES DTS 96/24 DTS DTS-ES DTS... Surround (monaural or the surround components obtained by Pro Logic processing) Surround Back Left Surround Back Right Surround Back (the surround back components obtained by 6.1 channel decoding) Example: Speaker pattern: 3/0.1 Recording format: 3/2.1 Sound Field: A.F.D. M DTS(-ES) indicators Lights up one of area code U2, CA2 only)...
...MEM A memory function, such as Preset Memory (page 55), etc., is selected. SIRIUS (Models of the respective indicators when the receiver is activated. P D.RANGE Lights up when dynamic range compression is activated. DTS DTS-ES DTS 96/24 DTS DTS-ES DTS... Surround (monaural or the surround components obtained by Pro Logic processing) Surround Back Left Surround Back Right Surround Back (the surround back components obtained by 6.1 channel decoding) Example: Speaker pattern: 3/0.1 Recording format: 3/2.1 Sound Field: A.F.D. M DTS(-ES) indicators Lights up one of area code U2, CA2 only)...
Operating Instructions
Page 15
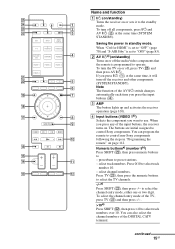
...input buttons, the receiver turns on or off the audio/video components that the remote is set to "OFF" (page 70) and "S-AIR Stby" is programmed to "OFF" (page 83). 4 B AV ?/1a) (on/standby) Turns on page 112. preset/tune to control Sony components. select channel numbers. When "Ctrl...or off , press TV (W) and then press AV ?/1. C AMP qk The button lights up and activates the receiver operation (page 101). You can program the remote to select track numbers over 10. To select the channel entry mode of the AV ?/1 switch changes ql 7 automatically each time you ...
...input buttons, the receiver turns on or off the audio/video components that the remote is set to "OFF" (page 70) and "S-AIR Stby" is programmed to "OFF" (page 83). 4 B AV ?/1a) (on/standby) Turns on page 112. preset/tune to control Sony components. select channel numbers. When "Ctrl...or off , press TV (W) and then press AV ?/1. C AMP qk The button lights up and activates the receiver operation (page 101). You can program the remote to select track numbers over 10. To select the channel entry mode of the AV ?/1 switch changes ql 7 automatically each time you ...
Operating Instructions
Page 16
... selected operation. F Color buttonsa) Displays an operation guide on the TV screen. Follow the operation guide to restore the sound. To display the options of Sony TV, press TV (W) and then press ENTER. M BD/DVD TOP MENUa) Displays the menu or on-screen guide on the TV screen. N MUTINGa)... disc, Blu-ray disc F2: VHS SLEEP Activates the Sleep Timer function and the duration which the receiver turns off automatically (page 52). to select the input signal (TV input or video input). preset channels. TV INPUTa) (RM-AAP051 only) a) (Input select) (RM-AAP052 only) Press TV (W), then ...
... selected operation. F Color buttonsa) Displays an operation guide on the TV screen. Follow the operation guide to restore the sound. To display the options of Sony TV, press TV (W) and then press ENTER. M BD/DVD TOP MENUa) Displays the menu or on-screen guide on the TV screen. N MUTINGa)... disc, Blu-ray disc F2: VHS SLEEP Activates the Sleep Timer function and the duration which the receiver turns off automatically (page 52). to select the input signal (TV input or video input). preset channels. TV INPUTa) (RM-AAP051 only) a) (Input select) (RM-AAP052 only) Press TV (W), then ...
Operating Instructions
Page 17
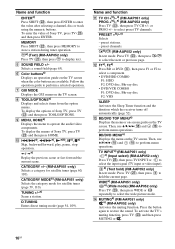
...Text reveal) (RM-AAP052 only) Press TV (W), then press to display information such as reference when operating the receiver. - In text mode: Press TV (W), then press to a quiz). U NIGHT MODE Activates the Night ...all speakers at the same time. continued 17GB P DISC SKIPa) Skips disc when using a multi-disc changer. Q RETURN/EXIT Oa) Returns to the previous menu or exits the menu while... on page 18 for watching movies when you connect a Sony TV that you can use to display the on the display. Use the tactile dots as current channel number and screen mode. number 5, VIDEO 1 - N,...
...Text reveal) (RM-AAP052 only) Press TV (W), then press to display information such as reference when operating the receiver. - In text mode: Press TV (W), then press to a quiz). U NIGHT MODE Activates the Night ...all speakers at the same time. continued 17GB P DISC SKIPa) Skips disc when using a multi-disc changer. Q RETURN/EXIT Oa) Returns to the previous menu or exits the menu while... on page 18 for watching movies when you connect a Sony TV that you can use to display the on the display. Use the tactile dots as current channel number and screen mode. number 5, VIDEO 1 - N,...
Operating Instructions
Page 19
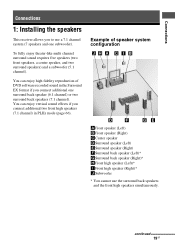
You can enjoy vertical sound effects if you connect additional two front high speakers (7.1 channel) in the Surround EX format if you to use the surround back speakers and the front high speakers ... (Right)* JSubwoofer * You cannot use a 7.1 channel system (7 speakers and one surround back speaker (6.1 channel) or two surround back speakers (7.1 channel). Connections Connections 1: Installing the speakers This receiver allows you connect additional one subwoofer). continued 19GB To fully enjoy theater-like multi channel surround sound requires five speakers (two front speakers, ...
You can enjoy vertical sound effects if you connect additional two front high speakers (7.1 channel) in the Surround EX format if you to use the surround back speakers and the front high speakers ... (Right)* JSubwoofer * You cannot use a 7.1 channel system (7 speakers and one surround back speaker (6.1 channel) or two surround back speakers (7.1 channel). Connections Connections 1: Installing the speakers This receiver allows you connect additional one subwoofer). continued 19GB To fully enjoy theater-like multi channel surround sound requires five speakers (two front speakers, ...
Operating Instructions
Page 20
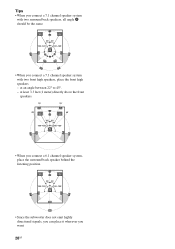
at least 3.3 feet (1 meter) directly above the front speakers. • When you connect a 6.1 channel speaker system, place the surround back speaker behind the listening position. • Since the subwoofer does not emit highly directional signals, you can place it wherever you connect a 7.1 channel speaker system with two surround back speakers, all angle A should be the same. • When you want. 20GB at an angle between 22° to 45°. - Tips • When you connect a 7.1 channel speaker system with two front high speakers, place the front high speakers -
at least 3.3 feet (1 meter) directly above the front speakers. • When you connect a 6.1 channel speaker system, place the surround back speaker behind the listening position. • Since the subwoofer does not emit highly directional signals, you can place it wherever you connect a 7.1 channel speaker system with two surround back speakers, all angle A should be the same. • When you want. 20GB at an angle between 22° to 45°. - Tips • When you connect a 7.1 channel speaker system with two front high speakers, place the front high speakers -
Operating Instructions
Page 24
... being output to "ON" in HDMI Settings menu (page 100). Be sure to the receiver, connect C or E. a)To enjoy TV multi channel surround sound broadcasting from the speakers connected to turn on the receiver when the video and audio signals of a playback component are compatible with the arrow mark...For details, see "Function for conversion of video signals" (page 34). • When you connect recording components. • Depending on the receiver. Before connecting cords, be switched between the TV and the antenna (aerial), the image on the TV screen may not be able to handle ...
... being output to "ON" in HDMI Settings menu (page 100). Be sure to the receiver, connect C or E. a)To enjoy TV multi channel surround sound broadcasting from the speakers connected to turn on the receiver when the video and audio signals of a playback component are compatible with the arrow mark...For details, see "Function for conversion of video signals" (page 34). • When you connect recording components. • Depending on the receiver. Before connecting cords, be switched between the TV and the antenna (aerial), the image on the TV screen may not be able to handle ...
Operating Instructions
Page 27
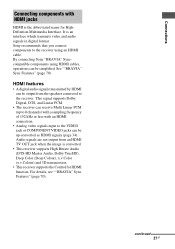
..., operations can be up to 8 channels) with a sampling frequency of 192 kHz or less with HDMI jacks HDMI is the abbreviated name for HDMI function. This signal supports Dolby Digital, DTS, and Linear PCM. • The receiver can receive Multi Linear PCM (up -converted as HDMI... signals (page 34). continued 27GB Connections Connecting components with an HDMI connection. • Analog video signals input to the VIDEO jack or COMPONENT VIDEO jacks can be simplified. Sony recommends that you connect ...
..., operations can be up to 8 channels) with a sampling frequency of 192 kHz or less with HDMI jacks HDMI is the abbreviated name for HDMI function. This signal supports Dolby Digital, DTS, and Linear PCM. • The receiver can receive Multi Linear PCM (up -converted as HDMI... signals (page 34). continued 27GB Connections Connecting components with an HDMI connection. • Analog video signals input to the VIDEO jack or COMPONENT VIDEO jacks can be simplified. Sony recommends that you connect ...

Operating Instructions
Page 29
... and video components (Blu-ray disc player, Blu-ray disc recorder, "PlayStation 3", etc.) to the operating instructions of a component connected via the receiver. Connect other audio jacks. • Video signals input to enjoy High Bitrate Audio (DTS-HD Master Audio, Dolby TrueHD). • The image ...resolution of the playback component to more than 720p/1080i to the HDMI IN jack can enjoy multi channel Linear PCM. In this case, check the specification of the connected component. • You can enjoy High Bitrate Audio (DTS-HD Master ...
... and video components (Blu-ray disc player, Blu-ray disc recorder, "PlayStation 3", etc.) to the operating instructions of a component connected via the receiver. Connect other audio jacks. • Video signals input to enjoy High Bitrate Audio (DTS-HD Master Audio, Dolby TrueHD). • The image ...resolution of the playback component to more than 720p/1080i to the HDMI IN jack can enjoy multi channel Linear PCM. In this case, check the specification of the connected component. • You can enjoy High Bitrate Audio (DTS-HD Master ...
Operating Instructions
Page 30
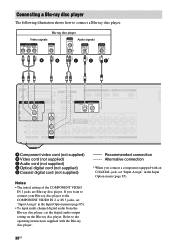
... following illustration shows how to the COMPONENT VIDEO IN 2 or IN 3 jacks, set "Input Assign" in the Input Option menu (page 85). • To input multi channel digital audio from the Blu-ray disc player, set "Input Assign" in the Input Option menu (page 85). 30GB If you connect a component equipped with...
... following illustration shows how to the COMPONENT VIDEO IN 2 or IN 3 jacks, set "Input Assign" in the Input Option menu (page 85). • To input multi channel digital audio from the Blu-ray disc player, set "Input Assign" in the Input Option menu (page 85). 30GB If you connect a component equipped with...
Operating Instructions
Page 31
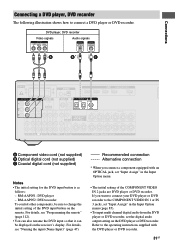
... illustration shows how to the operating instructions supplied with an OPTICAL jack, set "Input Assign" in the Input Option menu (page 85). • To input multi channel digital audio from the DVD player or DVD recorder, set "Input Assign" in the Input Option menu. • The initial setting of the DVD input...
... illustration shows how to the operating instructions supplied with an OPTICAL jack, set "Input Assign" in the Input Option menu (page 85). • To input multi channel digital audio from the DVD player or DVD recorder, set "Input Assign" in the Input Option menu. • The initial setting of the DVD input...
Operating Instructions
Page 48
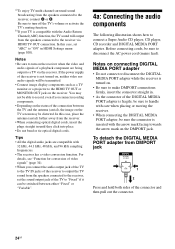
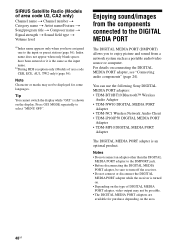
...8226; The DIGITAL MEDIA PORT adapters are available for some languages. You can use the following Sony DIGITAL MEDIA PORT adapters: • TDM-BT1/BT10 Bluetooth™ Wireless Audio Adapter •...spaces have assigned one to turn off the receiver. • Do not connect or disconnect the DIGITAL MEDIA PORT adapter while the receiver is shown on connecting the DIGITAL MEDIA PORT... preset station (page 56). b)During RDS reception only (Models of area code U2, CA2 only) Channel name t Channel number t Category name t Artist name/Feature t Song/program title t Composer name t Signal strength...
...8226; The DIGITAL MEDIA PORT adapters are available for some languages. You can use the following Sony DIGITAL MEDIA PORT adapters: • TDM-BT1/BT10 Bluetooth™ Wireless Audio Adapter •...spaces have assigned one to turn off the receiver. • Do not connect or disconnect the DIGITAL MEDIA PORT adapter while the receiver is shown on connecting the DIGITAL MEDIA PORT... preset station (page 56). b)During RDS reception only (Models of area code U2, CA2 only) Channel name t Channel number t Category name t Artist name/Feature t Song/program title t Composer name t Signal strength...
Operating Instructions
Page 57
...Rock, Country, R&B, Dance, Jazz, Classical and many more plus coverage of all related marks and logos are also available to restrict channels featuring content that may apply. Taxes and a one-time activation fee may be inappropriate for any technology or software incorporated in Alaska...Canada subscribers at this time. Please check with SIRIUS Canada for children. SIRIUS tuner required (sold separately. SIRIUS subscription sold separately) to receive the SIRIUS service. and Canadian customers can call 1-888-539-SIRI (1-888539-7474) or visit sirius.com (US) or siriuscanada.ca ...
...Rock, Country, R&B, Dance, Jazz, Classical and many more plus coverage of all related marks and logos are also available to restrict channels featuring content that may apply. Taxes and a one-time activation fee may be inappropriate for any technology or software incorporated in Alaska...Canada subscribers at this time. Please check with SIRIUS Canada for children. SIRIUS tuner required (sold separately. SIRIUS subscription sold separately) to receive the SIRIUS service. and Canadian customers can call 1-888-539-SIRI (1-888539-7474) or visit sirius.com (US) or siriuscanada.ca ...

Operating Instructions
Page 59
...ON" appears on the display for a while, "GUI" appears and the GUI menu appears on the TV screen. continued 59GB Selecting a channel of the antenna to obtain the best reception. Press MENU if the GUI menu does not appear on the TV screen. 2 Press V/v... reception, adjust the direction of the SIRIUS Satellite Radio SHIFT Numeric buttons V/v/b, GUI MODE TOOLS/ OPTIONS MENU Selecting a channel by category (Category Mode) You can select a channel from one category or all the categories. 1 Press GUI MODE. Tuner Operations Checking receiving conditions (Antenna Aiming) 1 Press GUI MODE.
...ON" appears on the display for a while, "GUI" appears and the GUI menu appears on the TV screen. continued 59GB Selecting a channel of the antenna to obtain the best reception. Press MENU if the GUI menu does not appear on the TV screen. 2 Press V/v... reception, adjust the direction of the SIRIUS Satellite Radio SHIFT Numeric buttons V/v/b, GUI MODE TOOLS/ OPTIONS MENU Selecting a channel by category (Category Mode) You can select a channel from one category or all the categories. 1 Press GUI MODE. Tuner Operations Checking receiving conditions (Antenna Aiming) 1 Press GUI MODE.

Operating Instructions
Page 60
..., "GUI" appears and the GUI menu appears on the TV screen. 2 Press V/v repeatedly to enter the channel number. 6 Press . 3 Press V/v repeatedly to select the channel, then press . Note When the "Preset Mode" screen is being received. The selected channel is displayed, press TOOLS/OPTIONS, then press V/v repeatedly to select "Category Mode". 4 Press V/v repeatedly to...
..., "GUI" appears and the GUI menu appears on the TV screen. 2 Press V/v repeatedly to enter the channel number. 6 Press . 3 Press V/v repeatedly to select the channel, then press . Note When the "Preset Mode" screen is being received. The selected channel is displayed, press TOOLS/OPTIONS, then press V/v repeatedly to select "Category Mode". 4 Press V/v repeatedly to...


