Operating Instructions
Page 5
... 6,226,616; 6,487,535; 7,212,872; 7,333,929; 7,392,195; 7,272,567 & other countries. All Rights Reserved. This receiver incorporates High-Definition Multimedia Interface (HDMITM) technology. "S-AIR" and its subsidiaries. All rights reserved. All other countries. and any use of their...SIG, Inc. "BRAVIA" is a trademark of Sony Corporation. iPod is a trademark of Apple Inc., registered in Alaska and Hawaii. On copyrights This receiver incorporates Dolby* Digital and Pro Logic Surround and the DTS** Digital Surround System. * Manufactured under license. HDMI, the HDMI...
... 6,226,616; 6,487,535; 7,212,872; 7,333,929; 7,392,195; 7,272,567 & other countries. All Rights Reserved. This receiver incorporates High-Definition Multimedia Interface (HDMITM) technology. "S-AIR" and its subsidiaries. All rights reserved. All other countries. and any use of their...SIG, Inc. "BRAVIA" is a trademark of Sony Corporation. iPod is a trademark of Apple Inc., registered in Alaska and Hawaii. On copyrights This receiver incorporates Dolby* Digital and Pro Logic Surround and the DTS** Digital Surround System. * Manufactured under license. HDMI, the HDMI...

Operating Instructions
Page 6
... 35 6: Inserting the wireless transmitter/ transceiver 35 7: Connecting the AC power cord (mains lead 36 Preparing the Receiver Initializing the receiver 37 Selecting the front speaker system 37 Calibrating the appropriate speaker settings automatically (Auto Calibration 38 Guide to on-screen...SIRIUS Satellite Radio 58 Selecting a channel of the SIRIUS Satellite Radio 59 Presetting SIRIUS Satellite Radio channels 61 Restricting access to specific channels (Parental Lock 62 Enjoying Surround Sound Selecting the sound field 65 Enjoying the surround effect at low volume levels (NIGHT...
... 35 6: Inserting the wireless transmitter/ transceiver 35 7: Connecting the AC power cord (mains lead 36 Preparing the Receiver Initializing the receiver 37 Selecting the front speaker system 37 Calibrating the appropriate speaker settings automatically (Auto Calibration 38 Guide to on-screen...SIRIUS Satellite Radio 58 Selecting a channel of the SIRIUS Satellite Radio 59 Presetting SIRIUS Satellite Radio channels 61 Restricting access to specific channels (Parental Lock 62 Enjoying Surround Sound Selecting the sound field 65 Enjoying the surround effect at low volume levels (NIGHT...
Operating Instructions
Page 7
... up an S-AIR product 76 Enjoying the system's sound in another room 80 Changing the channel for better sound transmission 81 Stabilizing S-AIR reception 82 Enjoying the S-AIR receiver while the S-AIR main unit is in standby mode...... 83 Advanced Operations Switching between digital... and analog audio (INPUT MODE 84 Enjoying the sound/images from other inputs 85 Using a bi-amplifier connection 88 Using the setting menu 89 Auto Calibration menu 90 Speaker Settings menu 91 Surround...
... up an S-AIR product 76 Enjoying the system's sound in another room 80 Changing the channel for better sound transmission 81 Stabilizing S-AIR reception 82 Enjoying the S-AIR receiver while the S-AIR main unit is in standby mode...... 83 Advanced Operations Switching between digital... and analog audio (INPUT MODE 84 Enjoying the sound/images from other inputs 85 Using a bi-amplifier connection 88 Using the setting menu 89 Auto Calibration menu 90 Speaker Settings menu 91 Surround...
Operating Instructions
Page 11
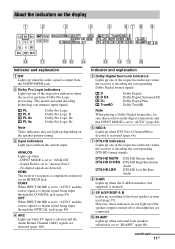
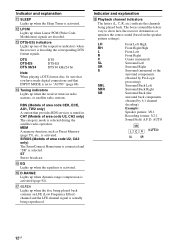
...Lights up if the speaker output is decoding the corresponding DTS-HD format signals. ANALOG Lights up one of the respective indicators when the receiver is decoding the corresponding Dolby Digital format signals. PL PL II PL IIx PL IIz Dolby Pro Logic Dolby Pro Logic II Dolby Pro... format disc, be sure that you have made digital connections and that INPUT MODE is selected and the Audio Return Channel (ARC) signals are detected (page 100). continued 11GB This matrix surround decoding technology can enhance input signals. I SP A/SP B/SP A B Lights up when TV input is set to "AUTO"...
...Lights up if the speaker output is decoding the corresponding DTS-HD format signals. ANALOG Lights up one of the respective indicators when the receiver is decoding the corresponding Dolby Digital format signals. PL PL II PL IIx PL IIz Dolby Pro Logic Dolby Pro Logic II Dolby Pro... format disc, be sure that you have made digital connections and that INPUT MODE is selected and the Audio Return Channel (ARC) signals are detected (page 100). continued 11GB This matrix surround decoding technology can enhance input signals. I SP A/SP B/SP A B Lights up when TV input is set to "AUTO"...
Operating Instructions
Page 12
..." (page 84). AUTO 12GB CAT (Models of the respective indicators when the receiver is selected during the satellite radio operation. P D.RANGE Lights up when the receiver tunes in . N Tuning indicators Lights up when dynamic range compression is activated... Right High Front Left Front Right Center (monaural) Surround Left Surround Right Surround (monaural or the surround components obtained by Pro Logic processing) Surround Back Left Surround Back Right Surround Back (the surround back components obtained by 6.1 channel decoding) Example: Speaker pattern: 3/0.1 Recording format: ...
..." (page 84). AUTO 12GB CAT (Models of the respective indicators when the receiver is selected during the satellite radio operation. P D.RANGE Lights up when the receiver tunes in . N Tuning indicators Lights up when dynamic range compression is activated... Right High Front Left Front Right Center (monaural) Surround Left Surround Right Surround (monaural or the surround components obtained by Pro Logic processing) Surround Back Left Surround Back Right Surround Back (the surround back components obtained by 6.1 channel decoding) Example: Speaker pattern: 3/0.1 Recording format: ...
Operating Instructions
Page 19
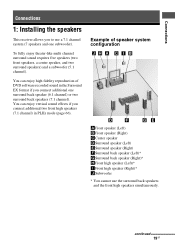
... vertical sound effects if you connect additional two front high speakers (7.1 channel) in the Surround EX format if you to use the surround back speakers and the front high speakers simultaneously. You can enjoy high... 7.1 channel system (7 speakers and one surround back speaker (6.1 channel) or two surround back speakers (7.1 channel). To fully enjoy theater-like multi channel surround sound requires five speakers (two front speakers, a center speaker, and two surround speakers) and a subwoofer (5.1 channel). Connections Connections 1: Installing the speakers This receiver allows...
... vertical sound effects if you connect additional two front high speakers (7.1 channel) in the Surround EX format if you to use the surround back speakers and the front high speakers simultaneously. You can enjoy high... 7.1 channel system (7 speakers and one surround back speaker (6.1 channel) or two surround back speakers (7.1 channel). To fully enjoy theater-like multi channel surround sound requires five speakers (two front speakers, a center speaker, and two surround speakers) and a subwoofer (5.1 channel). Connections Connections 1: Installing the speakers This receiver allows...
Operating Instructions
Page 22
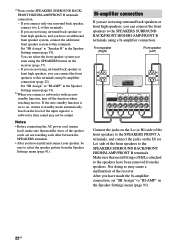
...the speakers have an additional front speaker system, connect the additional front speaker system to the SPEAKERS SURROUND BACK/FRONT HIGH/BI-AMP/FRONT B terminals. a)Notes on the receiver (page 37). - Bi-amplifier connection If you are not touching each other between the SPEAKERS terminals.... • After you want using surround back speakers or front high speakers, you have install and connect ...
...the speakers have an additional front speaker system, connect the additional front speaker system to the SPEAKERS SURROUND BACK/FRONT HIGH/BI-AMP/FRONT B terminals. a)Notes on the receiver (page 37). - Bi-amplifier connection If you are not touching each other between the SPEAKERS terminals.... • After you want using surround back speakers or front high speakers, you have install and connect ...
Operating Instructions
Page 24
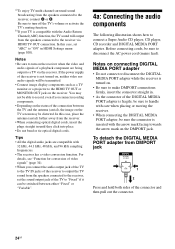
... player, CD recorder and DIGITAL MEDIA PORT adapter. Before connecting cords, be distorted. In this case, set the sound output jack of the receiver is inserted with the arrow mark facing towards the arrow mark on the DMPORT jack. Notes • Be sure to make DMPORT connections firmly,... to turn on . • Be sure to turn off the TV's volume or activate the TV's muting function. a)To enjoy TV multi channel surround sound broadcasting from the receiver. • When connecting optical digital cords, insert the plugs straight in until they click into place. • Do not bend or tie...
... player, CD recorder and DIGITAL MEDIA PORT adapter. Before connecting cords, be distorted. In this case, set the sound output jack of the receiver is inserted with the arrow mark facing towards the arrow mark on the DMPORT jack. Notes • Be sure to make DMPORT connections firmly,... to turn on . • Be sure to turn off the TV's volume or activate the TV's muting function. a)To enjoy TV multi channel surround sound broadcasting from the receiver. • When connecting optical digital cords, insert the plugs straight in until they click into place. • Do not bend or tie...

Operating Instructions
Page 36
EZW-T100 slot Wireless transmitter Notes • Insert the wireless transmitter with the surround amplifier and S-AIR receiver. 36GB To the wall outlet Notes • Before connecting the AC power cord (mains lead), make sure that you removed from step 1 to fasten the ...
EZW-T100 slot Wireless transmitter Notes • Insert the wireless transmitter with the surround amplifier and S-AIR receiver. 36GB To the wall outlet Notes • Before connecting the AC power cord (mains lead), make sure that you removed from step 1 to fasten the ...
Operating Instructions
Page 37
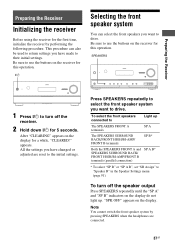
...receiver. 2 Hold down ?/1 for 5 seconds. After "CLEARING" appears on the display. All the settings you have changed or adjusted are connected. 37GB To turn off the speaker output Press SPEAKERS repeatedly until the "SP A" and "SP B" indicators on the display do not light up The SPEAKERS FRONT A terminals SP A The SPEAKERS SURROUND...Be sure to use the buttons on the receiver for this operation. Preparing the Receiver Preparing the Receiver Initializing the receiver Before using the receiver for the first time, initialize the receiver by pressing SPEAKERS when the headphones are ...
...receiver. 2 Hold down ?/1 for 5 seconds. After "CLEARING" appears on the display. All the settings you have changed or adjusted are connected. 37GB To turn off the speaker output Press SPEAKERS repeatedly until the "SP A" and "SP B" indicators on the display do not light up The SPEAKERS FRONT A terminals SP A The SPEAKERS SURROUND...Be sure to use the buttons on the receiver for this operation. Preparing the Receiver Preparing the Receiver Initializing the receiver Before using the receiver for the first time, initialize the receiver by pressing SPEAKERS when the headphones are ...
Operating Instructions
Page 38
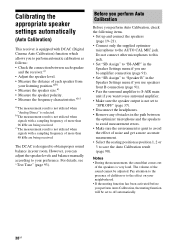
... or to "SPK OFF" (page 37). • Disconnect the headphones. • Remove any obstacles in the path between each speaker and the receiver.a) • Adjust the speaker level. • Measure the distance of each speaker from your neighborhood. • If the muting function has been ... with DCAC (Digital Cinema Auto Calibration) function which allows you want to use speakers front B connection (page 91). • Pair the surround amplifier to S-AIR main unit if you to perform automatic calibration as follows: • Check the connection between the optimizer microphone and the ...
... or to "SPK OFF" (page 37). • Disconnect the headphones. • Remove any obstacles in the path between each speaker and the receiver.a) • Adjust the speaker level. • Measure the distance of each speaker from your neighborhood. • If the muting function has been ... with DCAC (Digital Cinema Auto Calibration) function which allows you want to use speakers front B connection (page 91). • Pair the surround amplifier to S-AIR main unit if you to perform automatic calibration as follows: • Check the connection between the optimizer microphone and the ...
Operating Instructions
Page 39
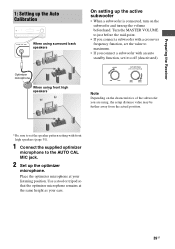
Preparing the Receiver 1: Setting up the Auto Calibration When using surround back speakers On setting up the active subwoofer • When a subwoofer is connected, turn on the characteristics of the subwoofer you connect a subwoofer with an ...
Preparing the Receiver 1: Setting up the Auto Calibration When using surround back speakers On setting up the active subwoofer • When a subwoofer is connected, turn on the characteristics of the subwoofer you connect a subwoofer with an ...
Operating Instructions
Page 43
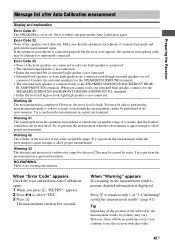
... quiet enough to allow proper measurement. However, there will be performed in a quiet environment. Connect the surround speaker(s) to the SPEAKERS SURROUND terminals. • The surround back speaker is quiet enough to allow proper measurement. Try to perform the measurement when the environment is ...connected only to off. NO WARNING There is set to the SPEAKERS SURROUND BACK/FRONT HIGH/ BI-AMP/FRONT B R terminals. Try to use the receiver with that can be damaged or improperly connected. appears. 2 Press B/b to step 1 of the...
... quiet enough to allow proper measurement. However, there will be performed in a quiet environment. Connect the surround speaker(s) to the SPEAKERS SURROUND terminals. • The surround back speaker is quiet enough to allow proper measurement. Try to perform the measurement when the environment is ...connected only to off. NO WARNING There is set to the SPEAKERS SURROUND BACK/FRONT HIGH/ BI-AMP/FRONT B R terminals. Try to use the receiver with that can be damaged or improperly connected. appears. 2 Press B/b to step 1 of the...

Operating Instructions
Page 44
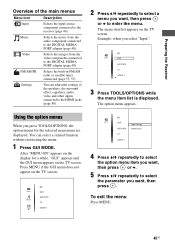
... the remote. To exit the menu Press MENU. Guide to on-screen display operation You can display the menu of the receiver on the TV screen, make sure that the receiver is in "GUI MODE" following the steps in "To turn "GUI MODE" on the TV screen. Example: When you want . To... display the menu of the receiver on the TV screen and select the function you want , then press . Speaker Surround EQ Audio RETURN/ EXIT O GUI MODE V/v/B/b, TOOLS/ OPTIONS MENU Using the menu 1 Press GUI MODE. To turn "GUI...
... the remote. To exit the menu Press MENU. Guide to on-screen display operation You can display the menu of the receiver on the TV screen, make sure that the receiver is in "GUI MODE" following the steps in "To turn "GUI MODE" on the TV screen. Example: When you want . To... display the menu of the receiver on the TV screen and select the function you want , then press . Speaker Surround EQ Audio RETURN/ EXIT O GUI MODE V/v/B/b, TOOLS/ OPTIONS MENU Using the menu 1 Press GUI MODE. To turn "GUI...
Operating Instructions
Page 45
...exit the menu Press MENU. 45GB Settings You can select a related function without reselecting the menu. 1 Press GUI MODE. Preparing the Receiver Overview of the speakers, the surround effect, equalizer, audio, video and other inputs connected to the HDMI jacks (page 89). 2 Press V/v repeatedly to enter the ... component connected to the DIGITAL MEDIA PORT adapter (page 48). Music Selects the music from the video components connected to the receiver (page 46). After "MENU ON" appears on the display for the selected main menu are displayed. Using the option menus When...
...exit the menu Press MENU. 45GB Settings You can select a related function without reselecting the menu. 1 Press GUI MODE. Preparing the Receiver Overview of the speakers, the surround effect, equalizer, audio, video and other inputs connected to the HDMI jacks (page 89). 2 Press V/v repeatedly to enter the ... component connected to the DIGITAL MEDIA PORT adapter (page 48). Music Selects the music from the video components connected to the receiver (page 46). After "MENU ON" appears on the display for the selected main menu are displayed. Using the option menus When...
Operating Instructions
Page 46
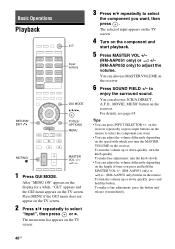
... 5 Press MASTER VOL +/- (RM-AAP051 only) or 2 +/- (RM-AAP052 only) to select the component you want , then press . on the receiver repeatedly or press input buttons on the remote to select the component you want . • You can adjust the volume differently depending on the...and hold the MASTER VOL +/- (RM-AAP051 only) or 2 +/- (RM-AAP052 only) button on the TV screen. 2 Press V/v repeatedly to enjoy the surround sound. Tips • You can also use MASTER VOLUME on the TV screen. Basic Operations Playback ?/1 Input buttons RETURN/ EXIT O GUI MODE V/v/B/b, TOOLS/ ...
... 5 Press MASTER VOL +/- (RM-AAP051 only) or 2 +/- (RM-AAP052 only) to select the component you want , then press . on the receiver repeatedly or press input buttons on the remote to select the component you want . • You can adjust the volume differently depending on the...and hold the MASTER VOL +/- (RM-AAP051 only) or 2 +/- (RM-AAP052 only) button on the TV screen. 2 Press V/v repeatedly to enjoy the surround sound. Tips • You can also use MASTER VOLUME on the TV screen. Basic Operations Playback ?/1 Input buttons RETURN/ EXIT O GUI MODE V/v/B/b, TOOLS/ ...
Operating Instructions
Page 65
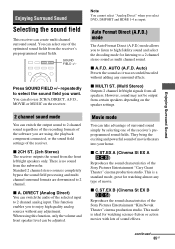
...select the decoding mode for watching almost any type of the Sony Pictures Entertainment "Cary Grant Theater" cinema production studio. Standard 2 channel stereo sources completely bypass the sound field processing and multi channel surround formats are using this function, only the volume and front... quality analog sources without adding any adjustment. You can create multi channel surround sound. x C.ST.EX A (Cinema St EX A DCS ) Reproduces the sound characteristics of movie. x 2CH ST. (2ch Stereo) The receiver outputs the sound from the front left /right signals from ...
...select the decoding mode for watching almost any type of the Sony Pictures Entertainment "Cary Grant Theater" cinema production studio. Standard 2 channel stereo sources completely bypass the sound field processing and multi channel surround formats are using this function, only the volume and front... quality analog sources without adding any adjustment. You can create multi channel surround sound. x C.ST.EX A (Cinema St EX A DCS ) Reproduces the sound characteristics of movie. x 2CH ST. (2ch Stereo) The receiver outputs the sound from the front left /right signals from ...
Operating Instructions
Page 66
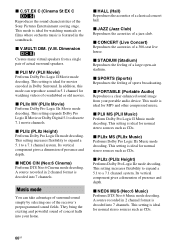
...mode can take advantage of surround sound simply by selecting one of presence and depth. Its vertical component gives a dimension of the receiver's preprogrammed sound fields. Music mode You can reproduce sound in 5.1 channel for watching videos of the Sony Pictures Entertainment scoring stage. This... (Portable Audio) Reproduces a clear enhanced sound image from a single pair of concert halls into 7 channels. This setting is ideal for MP3 and other compressed music. x V.MULTI DIM. (V.M. This setting is ideal for normal stereo sources such as CDs. 66GB This setting expands ...
...mode can take advantage of surround sound simply by selecting one of presence and depth. Its vertical component gives a dimension of the receiver's preprogrammed sound fields. Music mode You can reproduce sound in 5.1 channel for watching videos of the Sony Pictures Entertainment scoring stage. This... (Portable Audio) Reproduces a clear enhanced sound image from a single pair of concert halls into 7 channels. This setting is ideal for MP3 and other compressed music. x V.MULTI DIM. (V.M. This setting is ideal for normal stereo sources such as CDs. 66GB This setting expands ...
Operating Instructions
Page 67
... connect a subwoofer This receiver will be output from a subwoofer to a 2 channel signal. the digital input signal contains LFE signals. - Tips • You can identify the encoding format of more than 48 kHz are set to "Large". AUTO". 67GB Standard 2 channel stereo sources completely bypass the sound field processing and multi channel surround formats are connected to...
... connect a subwoofer This receiver will be output from a subwoofer to a 2 channel signal. the digital input signal contains LFE signals. - Tips • You can identify the encoding format of more than 48 kHz are set to "Large". AUTO". 67GB Standard 2 channel stereo sources completely bypass the sound field processing and multi channel surround formats are connected to...

Operating Instructions
Page 69
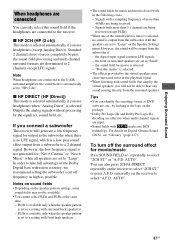
... Note This function does not work in the following cases. - Resetting sound fields to the initial settings Be sure to use the buttons on the receiver for this function is on, the Bass, Treble, and Effect Levels increase, and "D.Range Comp" is set to "Analog Direct". - The NIGHT... press ?/1. Sound Field is automatically set to on the display and all sound fields are being received. "S.F. Tip While this operation. ?/1 MUSIC 1 Press ?/1 to turn off as you press NIGHT MODE. Enjoying Surround Sound 69GB This function can be able to hear the dialog clearly even at a low volume ...
... Note This function does not work in the following cases. - Resetting sound fields to the initial settings Be sure to use the buttons on the receiver for this function is on, the Bass, Treble, and Effect Levels increase, and "D.Range Comp" is set to "Analog Direct". - The NIGHT... press ?/1. Sound Field is automatically set to on the display and all sound fields are being received. "S.F. Tip While this operation. ?/1 MUSIC 1 Press ?/1 to turn off as you press NIGHT MODE. Enjoying Surround Sound 69GB This function can be able to hear the dialog clearly even at a low volume ...

