Operating Instructions
Page 4
...Connecting speakers 16 3a: Connecting the audio components.........17 3b: Connecting the video components ........23 4: Connecting the antennas 32 5: Preparing the receiver and the remote .....33 6: Selecting the speaker system 35 7: Calibrating the appropriate settings automatically (AUTO CALIBRATION 35 8: Adjusting the speaker levels...80 Watching HDMI images from other inputs (HDMI VIDEO ASSIGN 81 Naming inputs 82 Changing the display 83 Using the Sleep Timer 83 Recording using the receiver 84 Listening to the sound in another zone ....... 85 Using the Remote Programming the remote ...
...Connecting speakers 16 3a: Connecting the audio components.........17 3b: Connecting the video components ........23 4: Connecting the antennas 32 5: Preparing the receiver and the remote .....33 6: Selecting the speaker system 35 7: Calibrating the appropriate settings automatically (AUTO CALIBRATION 35 8: Adjusting the speaker levels...80 Watching HDMI images from other inputs (HDMI VIDEO ASSIGN 81 Naming inputs 82 Changing the display 83 Using the Sleep Timer 83 Recording using the receiver 84 Listening to the sound in another zone ....... 85 Using the Remote Programming the remote ...
Operating Instructions
Page 5
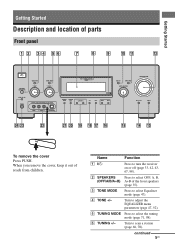
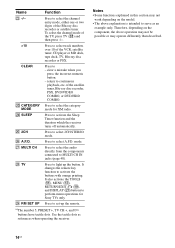
... of reach from children. qa qs ?/1 SPEAKERS (OFF/A/B/A+B) TONE MODE - TUNING + AUTO CAL MIC PHONES VIDEO 3 IN/PORTABLE AV IN VIDEO L AUDIO R DIGITAL(OPT) MULTI CHANNEL DECODING DISPLAY INPUT MODE INPUT SELECTOR MASTER VOLUME MEMORY/ CATEGORY ENTER MODE - C TONE MODE Press to select the tuning mode (page 71, ... continued 5US When you remove the cover, keep it out of parts Front panel 1 2 34 56 7 8 9 q; B SPEAKERS Press to turn the receiver on or off (page 33, 42, 43, 67, 98). Turn to scan a station (page 68, 70). Turn to adjust the EQUALIZER menu parameters ...
... of reach from children. qa qs ?/1 SPEAKERS (OFF/A/B/A+B) TONE MODE - TUNING + AUTO CAL MIC PHONES VIDEO 3 IN/PORTABLE AV IN VIDEO L AUDIO R DIGITAL(OPT) MULTI CHANNEL DECODING DISPLAY INPUT MODE INPUT SELECTOR MASTER VOLUME MEMORY/ CATEGORY ENTER MODE - C TONE MODE Press to select the tuning mode (page 71, ... continued 5US When you remove the cover, keep it out of parts Front panel 1 2 34 56 7 8 9 q; B SPEAKERS Press to turn the receiver on or off (page 33, 42, 43, 67, 98). Turn to scan a station (page 68, 70). Turn to adjust the EQUALIZER menu parameters ...
Operating Instructions
Page 6
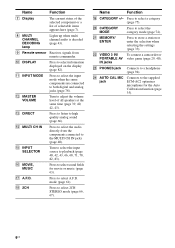
I Remote sensor Receives signals from the components connected to the MULTI CH IN jacks (page 40). Q A.F.D. V VIDEO 3 IN/ To connect a camcorder or PORTABLE AV video game (page 29, 40). L MASTER VOLUME Turn to select sound fields for the Auto Calibration function (page ... 42, 43, 66, 68, 71, 78, 82, 83). H MULTI CHANNEL DECODING lamp Lights up when multi channel audio is decoded (page 43). M DIRECT Press to listen to select information displayed on the display (page 82). N MULTI CH IN Press to the supplied jack ECM-AC2 optimizer microphone for movie ...
I Remote sensor Receives signals from the components connected to the MULTI CH IN jacks (page 40). Q A.F.D. V VIDEO 3 IN/ To connect a camcorder or PORTABLE AV video game (page 29, 40). L MASTER VOLUME Turn to select sound fields for the Auto Calibration function (page ... 42, 43, 66, 68, 71, 78, 82, 83). H MULTI CHANNEL DECODING lamp Lights up when multi channel audio is decoded (page 43). M DIRECT Press to listen to select information displayed on the display (page 82). N MULTI CH IN Press to the supplied jack ECM-AC2 optimizer microphone for movie ...
Operating Instructions
Page 7
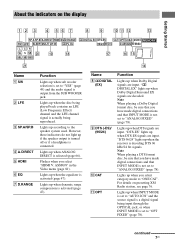
However, these indicators do not light up when the receiver is set to "OPT FIXED" (page 78). Flashes when ...XM Radio station, see page 76. qa qs qd SP.A SP.B A.DIRECT HDMI EQ D.RANGE SW LFE SLEEP MULTI CH IN ;PL IIx LCR SL S SR w; Lights up when dynamic range compression is a digital signal being ...channel signal is actually being input through the OPTICAL jack, or when INPUT MODE is set to "YES" (page 49) and the audio signal is not set to "ANALOG FIXED" (page 78). Note When playing a DTS format disc, be sure that INPUT MODE is connected. For details on the display...
However, these indicators do not light up when the receiver is set to "OPT FIXED" (page 78). Flashes when ...XM Radio station, see page 76. qa qs qd SP.A SP.B A.DIRECT HDMI EQ D.RANGE SW LFE SLEEP MULTI CH IN ;PL IIx LCR SL S SR w; Lights up when dynamic range compression is a digital signal being ...channel signal is actually being input through the OPTICAL jack, or when INPUT MODE is set to "YES" (page 49) and the audio signal is not set to "ANALOG FIXED" (page 78). Note When playing a DTS format disc, be sure that INPUT MODE is connected. For details on the display...
Operating Instructions
Page 10
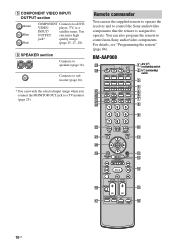
... * You can use the supplied remote to operate the receiver and to control the Sony audio/video components that the remote is assigned to operate. TUNING AUTO CAL wf wd 123 1 AV ?/1 (on/standby) switch 2 ?/1 (on/standby) ... MENU AMP qd - RM-AAP008 wl TV RM SET UP AV ?/1 ?/1 wk SYSTEM STANDBY VIDEO 1 VIDEO 2 VIDEO 3 DVD TV/SAT MD/TAPE SA-CD/CD TUNER PHONO MULTI CH SOURCE 2ND ZONE wj wh 2CH A.F.D. CATEGORY + REPLAY ...25, 27, 28). CLEAR 0/10 ENTER q; >10 MEMORY DISPLAY TOOLS wa qa V w; You OUTPUT can also program the remote to a TV monitor ...
... * You can use the supplied remote to operate the receiver and to control the Sony audio/video components that the remote is assigned to operate. TUNING AUTO CAL wf wd 123 1 AV ?/1 (on/standby) switch 2 ?/1 (on/standby) ... MENU AMP qd - RM-AAP008 wl TV RM SET UP AV ?/1 ?/1 wk SYSTEM STANDBY VIDEO 1 VIDEO 2 VIDEO 3 DVD TV/SAT MD/TAPE SA-CD/CD TUNER PHONO MULTI CH SOURCE 2ND ZONE wj wh 2CH A.F.D. CATEGORY + REPLAY ...25, 27, 28). CLEAR 0/10 ENTER q; >10 MEMORY DISPLAY TOOLS wa qa V w; You OUTPUT can also program the remote to a TV monitor ...
Operating Instructions
Page 12
... Press to start playback of the CD player, VCD player, DVD player, MD deck or LD player (multi-disc changer only). Name Function I Numeric buttons (number 5a)) Press to store a station. preset/tune .... Then, use the control buttons to display the menus of the VCR, satellite tuner, Bluray disc recorder, PSX, DVD/VIDEO COMBO, or DVD/HDD COMBO. select channel numbers of the VCR, DVD player,...menu operations. Then, use the control buttons to display the menu of Sony TV, press TV (wk), and then press MENU. To display the menus of the receiver. fast forward/rewind of the VCR, CD ...
... Press to start playback of the CD player, VCD player, DVD player, MD deck or LD player (multi-disc changer only). Name Function I Numeric buttons (number 5a)) Press to store a station. preset/tune .... Then, use the control buttons to display the menus of the VCR, satellite tuner, Bluray disc recorder, PSX, DVD/VIDEO COMBO, or DVD/HDD COMBO. select channel numbers of the VCR, DVD player,...menu operations. Then, use the control buttons to display the menu of Sony TV, press TV (wk), and then press MENU. To display the menus of the receiver. fast forward/rewind of the VCR, CD ...
Operating Instructions
Page 13
.... Press to enter the selection. O TV CH +a)/- Press to select preset TV channels. MUTING S RETURN/ EXIT O T Control buttons U DISPLAY Function Press TV (wk) and then press TV VOL +/- exit the menu while ... to select - preset stations. - To return to mute the sound. Press to the previous menu of Sony TV, press TV (wk), and then press RETURN/ EXIT O. To mute the sound of the VCR,...the volume level of all speakers at the same time. MASTER VOL +/- Press to select the media (for receiver operation, DVD TOP MENU qj or DVD MENU qj, press the control button V, v, B or b to...
.... Press to enter the selection. O TV CH +a)/- Press to select preset TV channels. MUTING S RETURN/ EXIT O T Control buttons U DISPLAY Function Press TV (wk) and then press TV VOL +/- exit the menu while ... to select - preset stations. - To return to mute the sound. Press to the previous menu of Sony TV, press TV (wk), and then press RETURN/ EXIT O. To mute the sound of the VCR,...the volume level of all speakers at the same time. MASTER VOL +/- Press to select the media (for receiver operation, DVD TOP MENU qj or DVD MENU qj, press the control button V, v, B or b to...
Operating Instructions
Page 14
... the channel entry mode, either one or two digits of the TV, press TV (wk) and then press -/--. >10 Press to serve as references when operating the receiver. wj MULTI CH ...Press to select the audio directly from the components connected to perform menu operations for XM radio. It also activate the TOOLS (qa), MENU (qd), RETURN/EXIT O (ql), and DISPLAY (wa) buttons to MULTI...select the category mode for Sony TVs only. a)The number 5, PRESET +, TV CH +, and H buttons have tactile dots. Press to light up the remote. To select the channel mode of the Blu-ray ...
... the channel entry mode, either one or two digits of the TV, press TV (wk) and then press -/--. >10 Press to serve as references when operating the receiver. wj MULTI CH ...Press to select the audio directly from the components connected to perform menu operations for XM radio. It also activate the TOOLS (qa), MENU (qd), RETURN/EXIT O (ql), and DISPLAY (wa) buttons to MULTI...select the category mode for Sony TVs only. a)The number 5, PRESET +, TV CH +, and H buttons have tactile dots. Press to light up the remote. To select the channel mode of the Blu-ray ...
Operating Instructions
Page 24
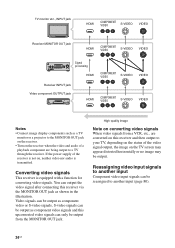
... jack HDMI COMPONENT VIDEO S-VIDEO VIDEO Receiver MONITOR OUT jack HDMI COMPONENT VIDEO S-VIDEO VIDEO Signal processing HDMI COMPONENT VIDEO S-VIDEO VIDEO Receiver INPUT jack Video component OUTPUT jack HDMI COMPONENT VIDEO S-VIDEO VIDEO Notes • Connect image display components such as a TV monitor or... a projector to the MONITOR OUT jack on the receiver. • Turn on the receiver when the video and audio of the receiver is not on, neither video nor audio is ...
... jack HDMI COMPONENT VIDEO S-VIDEO VIDEO Receiver MONITOR OUT jack HDMI COMPONENT VIDEO S-VIDEO VIDEO Signal processing HDMI COMPONENT VIDEO S-VIDEO VIDEO Receiver INPUT jack Video component OUTPUT jack HDMI COMPONENT VIDEO S-VIDEO VIDEO Notes • Connect image display components such as a TV monitor or... a projector to the MONITOR OUT jack on the receiver. • Turn on the receiver when the video and audio of the receiver is not on, neither video nor audio is ...
Operating Instructions
Page 25
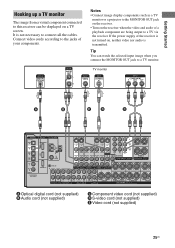
... cords according to connect all the cables. Tip You can watch the selected input image when you connect the MONITOR OUT jack to this receiver can be displayed on a TV screen. R SURROUND L + R FRONT A A Optical digital cord (not supplied) B Audio cord (not supplied) C Component video cord (not ... R IN IN PHONO SA-CD/CD R OUT IN MD/TAPE R R SUR FRONT SURROUND BACK MULTI CH IN SUB WOOFER R OUT ZONE 2 CENTER R SURROUND BACK SPEAKERS L + - If the power supply of the receiver is transmitted. R FRONT B SPEAKERS DVD IN SA-CD/ CD IN COAXIAL ASSIGNABLE (INPUT ONLY) ...
... cords according to connect all the cables. Tip You can watch the selected input image when you connect the MONITOR OUT jack to this receiver can be displayed on a TV screen. R SURROUND L + R FRONT A A Optical digital cord (not supplied) B Audio cord (not supplied) C Component video cord (not ... R IN IN PHONO SA-CD/CD R OUT IN MD/TAPE R R SUR FRONT SURROUND BACK MULTI CH IN SUB WOOFER R OUT ZONE 2 CENTER R SURROUND BACK SPEAKERS L + - If the power supply of the receiver is transmitted. R FRONT B SPEAKERS DVD IN SA-CD/ CD IN COAXIAL ASSIGNABLE (INPUT ONLY) ...
Operating Instructions
Page 27
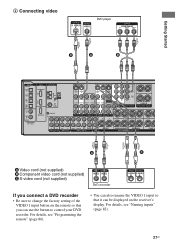
... BACK MULTI CH IN SUB WOOFER R OUT ZONE 2 CENTER R SURROUND BACK SPEAKERS L + - R SURROUND L + R FRONT A A C A Video cord (not supplied) B Component video cord (not supplied) C S-video cord (not supplied) DVD recorder If you can use the button to change the factory setting of the VIDEO 1 input button on the receiver's display. For...VIDEO L + - For details, see "Programming the remote" (page 86). • You can also rename the VIDEO 1 input so that it can be displayed on the remote so that you connect a DVD recorder • Be sure to control your DVD recorder.
... BACK MULTI CH IN SUB WOOFER R OUT ZONE 2 CENTER R SURROUND BACK SPEAKERS L + - R SURROUND L + R FRONT A A C A Video cord (not supplied) B Component video cord (not supplied) C S-video cord (not supplied) DVD recorder If you can use the button to change the factory setting of the VIDEO 1 input button on the receiver's display. For...VIDEO L + - For details, see "Programming the remote" (page 86). • You can also rename the VIDEO 1 input so that it can be displayed on the remote so that you connect a DVD recorder • Be sure to control your DVD recorder.
Operating Instructions
Page 33
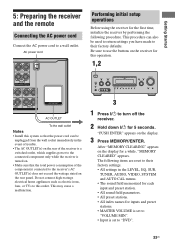
..., "MEMORY CLEARED" appears. The following procedure. CATEGORY + 2CH A.F.D. Performing initial setup operations Before using the receiver for 5 seconds. R OUND L + - AC power cord L + - TUNING + AUTO CAL MIC PHONES VIDEO 3 IN/PORTABLE AV IN VIDEO L AUDIO R DIGITAL(OPT) MULTI CHANNEL DECODING DISPLAY INPUT MODE INPUT SELECTOR MASTER VOLUME MEMORY/ CATEGORY ENTER MODE - This may cause a malfunction. Getting...
..., "MEMORY CLEARED" appears. The following procedure. CATEGORY + 2CH A.F.D. Performing initial setup operations Before using the receiver for 5 seconds. R OUND L + - AC power cord L + - TUNING + AUTO CAL MIC PHONES VIDEO 3 IN/PORTABLE AV IN VIDEO L AUDIO R DIGITAL(OPT) MULTI CHANNEL DECODING DISPLAY INPUT MODE INPUT SELECTOR MASTER VOLUME MEMORY/ CATEGORY ENTER MODE - This may cause a malfunction. Getting...
Operating Instructions
Page 34
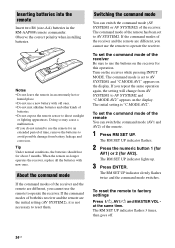
... or lighting apparatuses. To set to factory settings Press ?/1, AV ?/1 and MASTER VOL at the same time. Turn on the display. To reset the remote to AV SYSTEM1 and "C.MODE.AV1" appears on the receiver for an extended period of the receiver. The command mode is set the command mode of the ...remote. 1 Press RM SET UP. To set to AV SYSTEM2 and "C.MODE.AV2" appears on...
... or lighting apparatuses. To set to factory settings Press ?/1, AV ?/1 and MASTER VOL at the same time. Turn on the display. To reset the remote to AV SYSTEM1 and "C.MODE.AV1" appears on the receiver for an extended period of the receiver. The command mode is set the command mode of the ...remote. 1 Press RM SET UP. To set to AV SYSTEM2 and "C.MODE.AV2" appears on...
Operating Instructions
Page 35
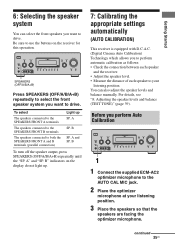
... your listening position. B" indicators on the receiver for this operation. ?/1 SPEAKERS (OFF/A/B/A+B) TONE MODE - TUNING + AUTO CAL MIC PHONES VIDEO 3 IN/PORTABLE AV IN VIDEO L AUDIO R DIGITAL(OPT) MULTI CHANNEL DECODING DISPLAY INPUT MODE INPUT SELECTOR MASTER VOLUME MEMORY/ CATEGORY... ENTER MODE - MOVIE MUSIC MULTI CH IN DIRECT 1 1 Connect the supplied ECM-AC2 optimizer ...
... your listening position. B" indicators on the receiver for this operation. ?/1 SPEAKERS (OFF/A/B/A+B) TONE MODE - TUNING + AUTO CAL MIC PHONES VIDEO 3 IN/PORTABLE AV IN VIDEO L AUDIO R DIGITAL(OPT) MULTI CHANNEL DECODING DISPLAY INPUT MODE INPUT SELECTOR MASTER VOLUME MEMORY/ CATEGORY... ENTER MODE - MOVIE MUSIC MULTI CH IN DIRECT 1 1 Connect the supplied ECM-AC2 optimizer ...
Operating Instructions
Page 36
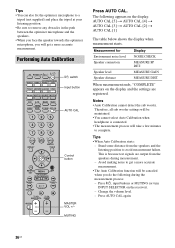
... Calibration cannot detect the sub woofer. Performing Auto Calibration TV RM SET UP AV ?/1 ?/1 SYSTEM STANDBY VIDEO 1 VIDEO 2 VIDEO 3 DVD TV/SAT MD/TAPE SA-CD/CD TUNER PHONO MULTI CH SOURCE 2ND ZONE 2CH A.F.D. CLEAR >10 DISPLAY 56 89 0/10 ENTER MEMORY TOOLS V < B B v RETURN/ EXIT... input buttons or MUTING (or turn INPUT SELECTOR on the display and the settings are output from the speakers and the listening position to complete. MUTING Press AUTO CAL. When measurement ends, "COMPLETE" appears on the receiver). - MOVIE MUSIC CATEGORY SLEEP MODE D. MEASURE GAIN MEASURE DIST...
... Calibration cannot detect the sub woofer. Performing Auto Calibration TV RM SET UP AV ?/1 ?/1 SYSTEM STANDBY VIDEO 1 VIDEO 2 VIDEO 3 DVD TV/SAT MD/TAPE SA-CD/CD TUNER PHONO MULTI CH SOURCE 2ND ZONE 2CH A.F.D. CLEAR >10 DISPLAY 56 89 0/10 ENTER MEMORY TOOLS V < B B v RETURN/ EXIT... input buttons or MUTING (or turn INPUT SELECTOR on the display and the settings are output from the speakers and the listening position to complete. MUTING Press AUTO CAL. When measurement ends, "COMPLETE" appears on the receiver). - MOVIE MUSIC CATEGORY SLEEP MODE D. MEASURE GAIN MEASURE DIST...
Operating Instructions
Page 37
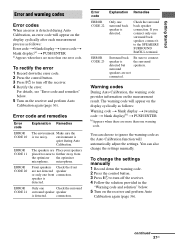
...placed too near to turn off the receiver. 4 Follow the solution provided in the "Warning code and solution" below . 5 Turn on the display cyclically after each measurement process as follows: Warning code t blank display t (warning code t blank display)b) t PUSH ENTER b)Appears when ...there are not detected speaker or only one surround back speaker is detected. connection. You can choose to turn off the receiver. 4 Rectify the error. Warning codes...
...placed too near to turn off the receiver. 4 Follow the solution provided in the "Warning code and solution" below . 5 Turn on the display cyclically after each measurement process as follows: Warning code t blank display t (warning code t blank display)b) t PUSH ENTER b)Appears when ...there are not detected speaker or only one surround back speaker is detected. connection. You can choose to turn off the receiver. 4 Rectify the error. Warning codes...
Operating Instructions
Page 39
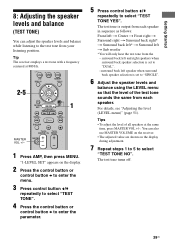
...then press MENU. Getting Started 8: Adjusting the speaker levels and balance (TEST TONE) You can also use MASTER VOLUME on the receiver. • The adjusted value are shown on the display. 2 Press the control button or control button b to enter the menu. 3 Press control button V/v repeatedly to select "...using the LEVEL menu so that the level of all speakers at 800 Hz. - /- - v RETURN/ EXIT MENU AMP 1 - Tip The receiver employs a test tone with a frequency centered at the same time, press MASTER VOL +/-. surround back left and right speakers when surround back speaker selection...
...then press MENU. Getting Started 8: Adjusting the speaker levels and balance (TEST TONE) You can also use MASTER VOLUME on the receiver. • The adjusted value are shown on the display. 2 Press the control button or control button b to enter the menu. 3 Press control button V/v repeatedly to select "...using the LEVEL menu so that the level of all speakers at 800 Hz. - /- - v RETURN/ EXIT MENU AMP 1 - Tip The receiver employs a test tone with a frequency centered at the same time, press MASTER VOL +/-. surround back left and right speakers when surround back speaker selection...
Operating Instructions
Page 40
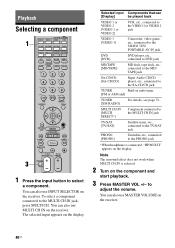
... connected to adjust the volume. to the MULTI CH IN jack, press MULTI CH. You can also use MULTI CH IN on the display. Selected input Components that can also use MASTER VOLUME on the receiver. You can [Display] be played back VIDEO 1 or VIDEO ...2 [VIDEO 1 or VIDEO 2] VCR, etc., connected to the VIDEO 1 or VIDEO 2 jack VIDEO 3 [VIDEO 3] Camcorder, video game, etc., connected to the VIDEO 3 IN/ PORTABLE AV...
... connected to adjust the volume. to the MULTI CH IN jack, press MULTI CH. You can also use MULTI CH IN on the display. Selected input Components that can also use MASTER VOLUME on the receiver. You can [Display] be played back VIDEO 1 or VIDEO ...2 [VIDEO 1 or VIDEO 2] VCR, etc., connected to the VIDEO 1 or VIDEO 2 jack VIDEO 3 [VIDEO 3] Camcorder, video game, etc., connected to the VIDEO 3 IN/ PORTABLE AV...
Operating Instructions
Page 42
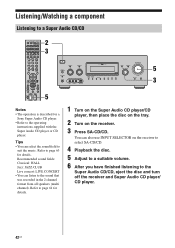
... have finished listening to suit the music. You can also use INPUT SELECTOR on the receiver. 3 Press SA-CD/CD. MOVIE MUSIC MULTI CH IN DIRECT 5 3 Notes • The operation is described for a Sony Super Audio CD player. • Refer to a Super Audio CD/CD TV RM SET... the Super Audio CD/CD, eject the disc and turn off the receiver and Super Audio CD player/ CD player. 42US TUNING + AUTO CAL MIC PHONES VIDEO 3 IN/PORTABLE AV IN VIDEO L AUDIO R DIGITAL(OPT) MULTI CHANNEL DECODING DISPLAY INPUT MODE INPUT SELECTOR MASTER VOLUME MEMORY/ CATEGORY ENTER MODE - CATEGORY...
... have finished listening to suit the music. You can also use INPUT SELECTOR on the receiver. 3 Press SA-CD/CD. MOVIE MUSIC MULTI CH IN DIRECT 5 3 Notes • The operation is described for a Sony Super Audio CD player. • Refer to a Super Audio CD/CD TV RM SET... the Super Audio CD/CD, eject the disc and turn off the receiver and Super Audio CD player/ CD player. 42US TUNING + AUTO CAL MIC PHONES VIDEO 3 IN/PORTABLE AV IN VIDEO L AUDIO R DIGITAL(OPT) MULTI CHANNEL DECODING DISPLAY INPUT MODE INPUT SELECTOR MASTER VOLUME MEMORY/ CATEGORY ENTER MODE - CATEGORY...
Operating Instructions
Page 43
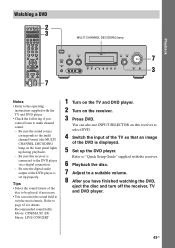
...LIVE CONCERT 1 Turn on the TV and DVD player. 2 Turn on this receiver is displayed. 5 Set up the DVD player. You can select the sound field to the multi channel format (the MULTI CHANNEL DECODING lamp on the front panel lights up properly. Playback Watching a DVD TV...AV IN VIDEO L AUDIO R DIGITAL(OPT) MULTI CHANNEL DECODING DISPLAY INPUT MODE INPUT SELECTOR MASTER VOLUME MEMORY/ CATEGORY ENTER MODE - Refer to "Quick Setup Guide" supplied with the TV and DVD player. • Check the following if you have finished watching the DVD, eject the disc and turn off the receiver...
...LIVE CONCERT 1 Turn on the TV and DVD player. 2 Turn on this receiver is displayed. 5 Set up the DVD player. You can select the sound field to the multi channel format (the MULTI CHANNEL DECODING lamp on the front panel lights up properly. Playback Watching a DVD TV...AV IN VIDEO L AUDIO R DIGITAL(OPT) MULTI CHANNEL DECODING DISPLAY INPUT MODE INPUT SELECTOR MASTER VOLUME MEMORY/ CATEGORY ENTER MODE - Refer to "Quick Setup Guide" supplied with the TV and DVD player. • Check the following if you have finished watching the DVD, eject the disc and turn off the receiver...


