
HDMI Control Guide
Page 5
... AMP MENU if the menu list does not appear on the TV screen. 5 Press V/v repeatedly to select "Settings." 6 Press or b to this receiver appears on the receiver and the TV. 3 Press AMP to decide. Refer to "3: Connecting the monitor" on the operating instructions. 2 Turn on the TV screen. The... menu list of the remote will vary according to models and areas. 1 Connect a TV monitor to enter the menu. 5GB HDMI CONTROL function is ...
... AMP MENU if the menu list does not appear on the TV screen. 5 Press V/v repeatedly to select "Settings." 6 Press or b to this receiver appears on the receiver and the TV. 3 Press AMP to decide. Refer to "3: Connecting the monitor" on the operating instructions. 2 Turn on the TV screen. The... menu list of the remote will vary according to models and areas. 1 Connect a TV monitor to enter the menu. 5GB HDMI CONTROL function is ...

HDMI Control Guide
Page 7
...7GB "AMP" if you remedy the problem. "TV+AMP" if you turn the TV off by using the HDMI CONTROL function, use the receiver's remote to the receiver. Change the input of "Preparing for HDMI CONTROL function" (page 4). No sound is compatible with the TV (System Power Off) When you... want to watch a program on the TV's remote, the receiver and the connected components turn off . See the operating instructions of the connected component. • If you want to listen to - You can...
...7GB "AMP" if you remedy the problem. "TV+AMP" if you turn the TV off by using the HDMI CONTROL function, use the receiver's remote to the receiver. Change the input of "Preparing for HDMI CONTROL function" (page 4). No sound is compatible with the TV (System Power Off) When you... want to watch a program on the TV's remote, the receiver and the connected components turn off . See the operating instructions of the connected component. • If you want to listen to - You can...

Operating Instructions
Page 3
... the remote. • "Neural-THX" and "neural THX" introduced in the Operating Instructions and displayed in this STR-DG2100 Multi Channel AV Receiver is a trademark of such marks by the Bluetooth SIG, Inc. In this manual describe the controls on the GUI menu screen mean Neural-THX Surround. You can also use of Sony Corporation. This receiver incorporates...
... the remote. • "Neural-THX" and "neural THX" introduced in the Operating Instructions and displayed in this STR-DG2100 Multi Channel AV Receiver is a trademark of such marks by the Bluetooth SIG, Inc. In this manual describe the controls on the GUI menu screen mean Neural-THX Surround. You can also use of Sony Corporation. This receiver incorporates...

Operating Instructions
Page 4
...the audio components ........20 4b: Connecting the video components .......25 5: Connecting the antennas (aerials 35 6: Preparing the receiver and the remote ....36 7: Operating the receiver using the GUI (Graphical User Interface 38 8: Setting the speakers 41 9: Calibrating the appropriate speaker settings automatically (Auto ... Using the sleep timer 103 Recording using the receiver 103 Using a bi-amplifier connection 104 Operating without connecting to the TV 105 Using the Remote Operating each component using the remote 114 Programming the remote 116 Clearing all the contents of the...
...the audio components ........20 4b: Connecting the video components .......25 5: Connecting the antennas (aerials 35 6: Preparing the receiver and the remote ....36 7: Operating the receiver using the GUI (Graphical User Interface 38 8: Setting the speakers 41 9: Calibrating the appropriate speaker settings automatically (Auto ... Using the sleep timer 103 Recording using the receiver 103 Using a bi-amplifier connection 104 Operating without connecting to the TV 105 Using the Remote Operating each component using the remote 114 Programming the remote 116 Clearing all the contents of the...

Operating Instructions
Page 6
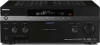
Status of parts Front panel To remove the cover Press PUSH. When you remove the cover, keep it to turn the receiver on the receiver, the receiver will be turned off (initial setting). On/Standby Press ?/1 on the remote to turn the receiver on or set it out of reach from children. When you press POWER on using the remote. You cannot turn the receiver on. Press POWER to the standby mode. Getting Started Description and location of the POWER button Off The receiver is turned off . 6GB
Status of parts Front panel To remove the cover Press PUSH. When you remove the cover, keep it to turn the receiver on the receiver, the receiver will be turned off (initial setting). On/Standby Press ?/1 on the remote to turn the receiver on or set it out of reach from children. When you press POWER on using the remote. You cannot turn the receiver on. Press POWER to the standby mode. Getting Started Description and location of the POWER button Off The receiver is turned off . 6GB
Operating Instructions
Page 7
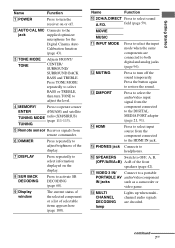
...BASS and TREBLE. TUNING E Remote sensor Receives signals from the component connected to select sound A.F.D. Press the button again to OFF, A, B, (OFF/A/B/A+B) A+B of the front speakers (page 42). P SPEAKERS Switch to restore the sound. R MULTI CHANNEL DECODING lamp Lights up when ...Press repeatedly to select information displayed on or off the sound temporarily. M DMPORT Press to select the audio/video input signal from remote commander. O PHONES jack Connects to activate SB DECODING (page 68). H SUR BACK DECODING Press to headphones. Q VIDEO 3 IN...
...BASS and TREBLE. TUNING E Remote sensor Receives signals from the component connected to select sound A.F.D. Press the button again to OFF, A, B, (OFF/A/B/A+B) A+B of the front speakers (page 42). P SPEAKERS Switch to restore the sound. R MULTI CHANNEL DECODING lamp Lights up when ...Press repeatedly to select information displayed on or off the sound temporarily. M DMPORT Press to select the audio/video input signal from remote commander. O PHONES jack Connects to activate SB DECODING (page 68). H SUR BACK DECODING Press to headphones. Q VIDEO 3 IN...

Operating Instructions
Page 11
... off all components, press ?/1 and AV ?/1 (A) at the same time, it will turn off the receiver and other Sony components (SYSTEM STANDBY). You can use . E AMP Press to control non-Sony components following the steps in "Programming the remote" (page 116). The buttons are factory assigned to select sound field (page 64). Press a pink...
... off all components, press ?/1 and AV ?/1 (A) at the same time, it will turn off the receiver and other Sony components (SYSTEM STANDBY). You can use . E AMP Press to control non-Sony components following the steps in "Programming the remote" (page 116). The buttons are factory assigned to select sound field (page 64). Press a pink...

Operating Instructions
Page 13
...to enable the TV operation. wl TV Press to skip a disc when using a multi-disc changer. Then use to control each component. Note In the SCREEN mode, press ... the volume level of the TV. TV VOL +/- Name Function X CLEAR Press to select - channel numbers of the VCR, satellite tuner, CD player or MD deck. - S MUTING Press to... this section may operate differently than described. 13GB wj SHIFT Press to light up the remote. W DISPLAY Press to continuous playback, etc. Press TV (wl), then press TV ...receiver turns off the sound temporarily.
...to enable the TV operation. wl TV Press to skip a disc when using a multi-disc changer. Then use to control each component. Note In the SCREEN mode, press ... the volume level of the TV. TV VOL +/- Name Function X CLEAR Press to select - channel numbers of the VCR, satellite tuner, CD player or MD deck. - S MUTING Press to... this section may operate differently than described. 13GB wj SHIFT Press to light up the remote. W DISPLAY Press to continuous playback, etc. Press TV (wl), then press TV ...receiver turns off the sound temporarily.

Operating Instructions
Page 36
... MODE and DMPORT to this outlet. This may cause a malfunction. 1 Press POWER to turn on the receiver. 3 Release the TONE MODE and DMPORT after a few seconds. 6: Preparing the receiver and the remote Connecting the AC power cord (mains lead) Connect the AC power cord (mains lead) to the... receiver's AC OUTLET(s) does not exceed the wattage stated on the rear panel. After "MEMORY CLEARING..." Performing initial...
... MODE and DMPORT to this outlet. This may cause a malfunction. 1 Press POWER to turn on the receiver. 3 Release the TONE MODE and DMPORT after a few seconds. 6: Preparing the receiver and the remote Connecting the AC power cord (mains lead) Connect the AC power cord (mains lead) to the... receiver's AC OUTLET(s) does not exceed the wattage stated on the rear panel. After "MEMORY CLEARING..." Performing initial...

Operating Instructions
Page 37
... the same command mode. continued 37GB Turn on the display. Tip When the remote no longer operates the receiver, replace all the batteries with old ones. • Do not mix manganese batteries and other Sony component respond to the same remote command, switch the command mode of time, remove the batteries to avoid possible...
... the same command mode. continued 37GB Turn on the display. Tip When the remote no longer operates the receiver, replace all the batteries with old ones. • Do not mix manganese batteries and other Sony component respond to the same remote command, switch the command mode of time, remove the batteries to avoid possible...

Operating Instructions
Page 46
...1 Confirm the measurement result. In this case, you can change the unit of the Sony listening room standard. When the measurement ends, a beep sounds and the measurement result appears on the remote when "Please Press ENTER." Tip Press on the TV screen. appears on warning and error... codes, see "Message list after auto calibration measurement" (page 48). 4 Press V/v repeatedly to one that matches that of distance use the receiver. The exit screen appears...
...1 Confirm the measurement result. In this case, you can change the unit of the Sony listening room standard. When the measurement ends, a beep sounds and the measurement result appears on the remote when "Please Press ENTER." Tip Press on the TV screen. appears on warning and error... codes, see "Message list after auto calibration measurement" (page 48). 4 Press V/v repeatedly to one that matches that of distance use the receiver. The exit screen appears...

Operating Instructions
Page 51
To cancel, press MUTING on the remote again or turn the receiver on again. To turn the knob quickly. button on the remote. Playback Tips • You can adjust the volume differently depending on the length of time you press and hold the button. To turn the volume... clockwise to turn the MASTER VOLUME knob. To activate the muting function Press MUTING on the remote. To avoid damaging your speakers Before you turn off the receiver, the muting function works when you turn off the receiver, be sure to raise the volume. To make a fine adjustment: press the button and ...
To cancel, press MUTING on the remote again or turn the receiver on again. To turn the knob quickly. button on the remote. Playback Tips • You can adjust the volume differently depending on the length of time you press and hold the button. To turn the volume... clockwise to turn the MASTER VOLUME knob. To activate the muting function Press MUTING on the remote. To avoid damaging your speakers Before you turn off the receiver, the muting function works when you turn off the receiver, be sure to raise the volume. To make a fine adjustment: press the button and ...

Operating Instructions
Page 91
Sony offers the following DIGITAL MEDIA PORT adapters: • TDM-BT1 Bluetooth™ Wireless Audio...DIGITAL MEDIA PORT adapter. • Before disconnecting the DIGITAL MEDIA PORT adapter, make sure to turn the receiver off using the remote. • Do not connect or disconnect the DIGITAL MEDIA PORT adapter to convert the resolution of analog ... the resolution of the output signals will be changed. Other Operations Converting analog video input signals This receiver allows you to /from the receiver while the system is turned on. • Depending on the type of DIGITAL MEDIA PORT adapter, ...
Sony offers the following DIGITAL MEDIA PORT adapters: • TDM-BT1 Bluetooth™ Wireless Audio...DIGITAL MEDIA PORT adapter. • Before disconnecting the DIGITAL MEDIA PORT adapter, make sure to turn the receiver off using the remote. • Do not connect or disconnect the DIGITAL MEDIA PORT adapter to convert the resolution of analog ... the resolution of the output signals will be changed. Other Operations Converting analog video input signals This receiver allows you to /from the receiver while the system is turned on. • Depending on the type of DIGITAL MEDIA PORT adapter, ...

Operating Instructions
Page 93
... sure that "iPod" is connected. TDM-NC1 You can also operate the components connected to the DIGITAL MEDIA PORT adapter using . For details on the remote of the receiver. Operating the component connected to the DIGITAL MEDIA PORT adapter To operate the TDM-iP1 or TDMNC1 using the GUI menu of the... receiver 1 Make sure that "System GUI" is connected. b)Displayed only when a DLNA server other than M-crew Server is selected in step 6 in "Selecting an operation screen ...
... sure that "iPod" is connected. TDM-NC1 You can also operate the components connected to the DIGITAL MEDIA PORT adapter using . For details on the remote of the receiver. Operating the component connected to the DIGITAL MEDIA PORT adapter To operate the TDM-iP1 or TDMNC1 using the GUI menu of the... receiver 1 Make sure that "System GUI" is connected. b)Displayed only when a DLNA server other than M-crew Server is selected in step 6 in "Selecting an operation screen ...

Operating Instructions
Page 114
Using the Remote Operating each component using the remote When you program the remote to control the following Sony or non-Sony components, you want to change the contents of the input list to match your component. If you can use the buttons on the remote that some buttons may not operate your particular components, see "Programming the remote" (page 116). 114GB Note, however, that are marked with circles.
Using the Remote Operating each component using the remote When you program the remote to control the following Sony or non-Sony components, you want to change the contents of the input list to match your component. If you can use the buttons on the remote that some buttons may not operate your particular components, see "Programming the remote" (page 116). 114GB Note, however, that are marked with circles.

Operating Instructions
Page 115
Using the Remote 115GB zz z z z* z z z z zz z z zz z DVD TOP MENU/ z zz z NIGHT MODE, DVD MENU/INPUT MODE F1/TV INPUT z zz z** z F2/RESOLUTION/ z zz z WIDE * LD player only. ** ... CH +/- Table of buttons used to control each component Component TV VCR DVD Blu-ray PSX Video Digital Digital DSS, Tape deck DAT CD Tuner Receiver DIGITAL player, Disc CD CATV satellite/ BST A/B deck player, MEDIA DVD/ Player player, terminal terrestrial MD PORT VHS LD (UC...
Using the Remote 115GB zz z z z* z z z z zz z z zz z DVD TOP MENU/ z zz z NIGHT MODE, DVD MENU/INPUT MODE F1/TV INPUT z zz z** z F2/RESOLUTION/ z zz z WIDE * LD player only. ** ... CH +/- Table of buttons used to control each component Component TV VCR DVD Blu-ray PSX Video Digital Digital DSS, Tape deck DAT CD Tuner Receiver DIGITAL player, Disc CD CATV satellite/ BST A/B deck player, MEDIA DVD/ Player player, terminal terrestrial MD PORT VHS LD (UC...

Operating Instructions
Page 116
...connected to control. Before you are valid. 4 Press ENTER. The remote can customize the remote to match the components connected to the VIDEO 2 IN jacks on the receiver. Tip When you cannot program the remote, such as a paper clip. 2 While the RM SET UP .... The procedure below to control nonSony components and also Sony components that : - You can even program the remote to control non-Sony components and also Sony components that a component accepts differs depending on the receiver and point the remote towards the receiver when performing the following procedure. 1 2 3 4 ...
...connected to control. Before you are valid. 4 Press ENTER. The remote can customize the remote to match the components connected to the VIDEO 2 IN jacks on the receiver. Tip When you cannot program the remote, such as a paper clip. 2 While the RM SET UP .... The procedure below to control nonSony components and also Sony components that : - You can even program the remote to control non-Sony components and also Sony components that a component accepts differs depending on the receiver and point the remote towards the receiver when performing the following procedure. 1 2 3 4 ...

Operating Instructions
Page 117
Notes • The numeric codes are based on this remote may be available when used with your particular component. To control a CD player Maker SONY DENON JVC KENWOOD MAGNAVOX MARANTZ ONKYO PANASONIC PHILIPS PIONEER TECHNICS YAMAHA Code(s) 101, 102, 103 104, 123 105, 106, 107 108, 109, 110 111, 116 ... an AIWA VCR does not work even though you fail to program your component will not respond to a component. There is a chance, however, that your remote using one numeric code may not be assigned to some or all of the codes. • All of the codes, try using other codes. If...
Notes • The numeric codes are based on this remote may be available when used with your particular component. To control a CD player Maker SONY DENON JVC KENWOOD MAGNAVOX MARANTZ ONKYO PANASONIC PHILIPS PIONEER TECHNICS YAMAHA Code(s) 101, 102, 103 104, 123 105, 106, 107 108, 109, 110 111, 116 ... an AIWA VCR does not work even though you fail to program your component will not respond to a component. There is a chance, however, that your remote using one numeric code may not be assigned to some or all of the codes. • All of the codes, try using other codes. If...

Operating Instructions
Page 119
...then press AV ?/1. Using the Remote 119GB Maker NOKIA RCA/PROSCAN BITA/HITACHI HUGHES JVC/Echostar/Dish Network MITSUBISHI SAMSUNG TOSHIBA Code(s) 851, 853, 854, 864 866, 871 868 867 873 872 875 869, 870 To control a cable box Maker SONY HAMLIN/REGAL JERROLD/G.I./ MOTOROLA JERROLD ...Disc Player Maker SONY Code(s) 310, 311, 312 To control a PSX Maker SONY Code(s) 313, 314, 315 Clearing all the programmed data) are cleared. The RM SET UP button flashes three times. 2 Release MASTER VOL -. All the contents of the remote's memory (i.e., all the contents of the remote's memory AV...
...then press AV ?/1. Using the Remote 119GB Maker NOKIA RCA/PROSCAN BITA/HITACHI HUGHES JVC/Echostar/Dish Network MITSUBISHI SAMSUNG TOSHIBA Code(s) 851, 853, 854, 864 866, 871 868 867 873 872 875 869, 870 To control a cable box Maker SONY HAMLIN/REGAL JERROLD/G.I./ MOTOROLA JERROLD ...Disc Player Maker SONY Code(s) 310, 311, 312 To control a PSX Maker SONY Code(s) 313, 314, 315 Clearing all the programmed data) are cleared. The RM SET UP button flashes three times. 2 Release MASTER VOL -. All the contents of the remote's memory (i.e., all the contents of the remote's memory AV...
Operating Instructions
Page 124
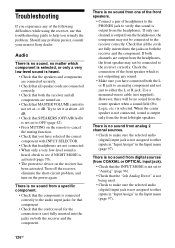
... no sound from digital sources (from analog 2 channel sources. • Check to the receiver correctly. There is no sound from COAXIAL or OPTICAL input jack). • Check that the INPUT MODE is not set to OFF (page 42). • Press MUTING on the remote to cancel the muting function. • Check ... • When only a very low-level sound is heard, check to see if NIGHT MODE is not outputting any problem persist, consult your nearest Sony dealer. Audio There is no sound, no sound from the center speaker when a sound field (Pro Logic, etc.) is output only from the headphones.
... no sound from digital sources (from analog 2 channel sources. • Check to the receiver correctly. There is no sound from COAXIAL or OPTICAL input jack). • Check that the INPUT MODE is not set to OFF (page 42). • Press MUTING on the remote to cancel the muting function. • Check ... • When only a very low-level sound is heard, check to see if NIGHT MODE is not outputting any problem persist, consult your nearest Sony dealer. Audio There is no sound, no sound from the center speaker when a sound field (Pro Logic, etc.) is output only from the headphones.


