
Operating Instructions
Page 18
... "ENTER" appears in the display for a while, then "CLEARED" appears. Speaker setup parameters The initial settings are reset to their factory defaults. Use the buttons on the receiver for the operation. 1 Press ?/1 to their factory settings. • All settings in the display. The setting is...adjustable. 4 Turn the -/+ jog dial to select the setting you want to set all of the speakers connected to this receiver. 1 Press ?/1 to turn off the receiver. 2 Hold down ?/1 for 5 seconds. The following procedure. This procedure can select a pre-defined speaker pattern (see ...
... "ENTER" appears in the display for a while, then "CLEARED" appears. Speaker setup parameters The initial settings are reset to their factory defaults. Use the buttons on the receiver for the operation. 1 Press ?/1 to their factory settings. • All settings in the display. The setting is...adjustable. 4 Turn the -/+ jog dial to select the setting you want to set all of the speakers connected to this receiver. 1 Press ?/1 to turn off the receiver. 2 Hold down ?/1 for 5 seconds. The following procedure. This procedure can select a pre-defined speaker pattern (see ...
Operating Instructions
Page 39
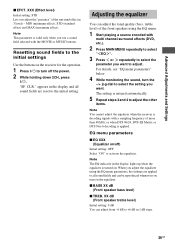
...encoded with a sampling frequency of the front speakers using the EQ menu parameters, the settings are reset to select the parameter you turn off ) Initial setting: OFF Select "ON" to turn on the receiver for the operation. 1 Press ?/1 to activate the equalizer. EQ menu parameters x EQ XXX ...(Equalizer on/off the power. 2 While holding down 2CH, press ?/1. Resetting sound fields to the initial settings Use the buttons on the equalizer...
...encoded with a sampling frequency of the front speakers using the EQ menu parameters, the settings are reset to select the parameter you turn off ) Initial setting: OFF Select "ON" to turn on the receiver for the operation. 1 Press ?/1 to activate the equalizer. EQ menu parameters x EQ XXX ...(Equalizer on/off the power. 2 While holding down 2CH, press ?/1. Resetting sound fields to the initial settings Use the buttons on the equalizer...
Operating Instructions
Page 50
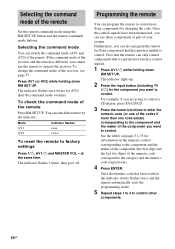
...You can program the remote to control nonSony components by the indicator. The indicator lights up. 2 Press the input button (including TV ?/1) for Sony components that accept infrared wireless control signals. 1 Press AV ?/1 while holding down RM SET UP. See the tables on the numeric code(s) ... holding down RM SET UP. You can also program the remote for the component you want to operate the receiver. Mode AV1 AV2 Indicator flashes once twice To reset the remote to control other components. 50GB at the same time. Once the control signals have been memorized, you...
...You can program the remote to control nonSony components by the indicator. The indicator lights up. 2 Press the input button (including TV ?/1) for Sony components that accept infrared wireless control signals. 1 Press AV ?/1 while holding down RM SET UP. See the tables on the numeric code(s) ... holding down RM SET UP. You can also program the remote for the component you want to operate the receiver. Mode AV1 AV2 Indicator flashes once twice To reset the remote to control other components. 50GB at the same time. Once the control signals have been memorized, you...
Operating Instructions
Page 51
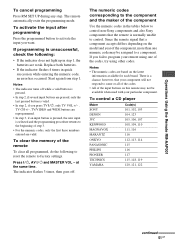
...; The numeric codes are valid. Replace both batteries. • If the indicator flashes 4 times in the tables below to control non-Sony components and also Sony components that the remote is selected and the programming procedure returns to a component. Start again from step 1. The indicator flashes 3 times,...the numeric codes in quick succession while entering the numeric code, an error has occurred. There is unsuccessful, check the following to reset the remote to activate the input you fail to program your particular component. To clear the memory of the remote To clear ...
...; The numeric codes are valid. Replace both batteries. • If the indicator flashes 4 times in the tables below to control non-Sony components and also Sony components that the remote is selected and the programming procedure returns to a component. Start again from step 1. The indicator flashes 3 times,...the numeric codes in quick succession while entering the numeric code, an error has occurred. There is unsuccessful, check the following to reset the remote to activate the input you fail to program your particular component. To clear the memory of the remote To clear ...
Operating Instructions
Page 57
...function button. If this problem persists, consult your nearest Sony dealer. If the problem persist Consult your nearest Sony dealer. Each time you press ?/1, the command mode switches between the remote and the receiver. • Replace all settings on the receiver. XXXX" in the remote with new ones, if ...MODE.AV1". (The initial setting is "C.MODE.AV2".) • Make sure you select the correct input on the power again. If you will be reset to "DEC. AUTO". To operate other components, press TOP MENU/GUIDE or AV MENU after a few seconds. Refer to the following table to ...
...function button. If this problem persists, consult your nearest Sony dealer. If the problem persist Consult your nearest Sony dealer. Each time you press ?/1, the command mode switches between the remote and the receiver. • Replace all settings on the receiver. XXXX" in the remote with new ones, if ...MODE.AV1". (The initial setting is "C.MODE.AV2".) • Make sure you select the correct input on the power again. If you will be reset to "DEC. AUTO". To operate other components, press TOP MENU/GUIDE or AV MENU after a few seconds. Refer to the following table to ...
Operating Instructions
Page 60
...when you are subject to 10 kHz (or 9 kHz), repeat the procedure. While holding down PRESET TUNING + or TUNING +, press ?/1. To reset the scale to change without notice. FM tuner section Tuning range 87.5 - 108.0 MHz Antenna FM wire antenna Antenna terminals 75 ohms, unbalanced Intermediate... the AM tuning scale to 9 kHz or 10 kHz. Design and specifications are using, see page 3. After tuning in any AM station, turn off the receiver. Video section Inputs/Outputs Video: S-video: 1 Vp-p, 75 ohms Y: 1 Vp-p, 75 ohms C: 0.286 Vp-p, 75 ohms 60GB COMPONENT VIDEO: Y: 1 Vp-p, 75 ...
...when you are subject to 10 kHz (or 9 kHz), repeat the procedure. While holding down PRESET TUNING + or TUNING +, press ?/1. To reset the scale to change without notice. FM tuner section Tuning range 87.5 - 108.0 MHz Antenna FM wire antenna Antenna terminals 75 ohms, unbalanced Intermediate... the AM tuning scale to 9 kHz or 10 kHz. Design and specifications are using, see page 3. After tuning in any AM station, turn off the receiver. Video section Inputs/Outputs Video: S-video: 1 Vp-p, 75 ohms Y: 1 Vp-p, 75 ohms C: 0.286 Vp-p, 75 ohms 60GB COMPONENT VIDEO: Y: 1 Vp-p, 75 ...
Operating Instructions
Page 62
...component 23 sound field 33-34 speaker system 43 SET UP menu 18 Sleep Timer 43 Sound field customizing 38 pre-programmed 33-34 resetting 39 selecting 33-34 Speaker crossover frequency 22 Speakers adjusting speaker levels and balance 22 connection 15 placement 15 Supplied accessories 60 T ...CUSTOMIZE parameters 40 EQ parameters 39 LEVEL parameters 38 SET UP parameters 18 speaker levels and balance 22 Automatic tuning 24 C Changing display 28 Clearing receiver's memory 18 CUSTOMIZE menu 40 D Digital Cinema Sound 33 Direct tuning 25 Dual Mono 41 Dubbing. See Recording EQ menu 39 I Indexing....
...component 23 sound field 33-34 speaker system 43 SET UP menu 18 Sleep Timer 43 Sound field customizing 38 pre-programmed 33-34 resetting 39 selecting 33-34 Speaker crossover frequency 22 Speakers adjusting speaker levels and balance 22 connection 15 placement 15 Supplied accessories 60 T ...CUSTOMIZE parameters 40 EQ parameters 39 LEVEL parameters 38 SET UP parameters 18 speaker levels and balance 22 Automatic tuning 24 C Changing display 28 Clearing receiver's memory 18 CUSTOMIZE menu 40 D Digital Cinema Sound 33 Direct tuning 25 Dual Mono 41 Dubbing. See Recording EQ menu 39 I Indexing....


