
Limited Warranty (U.S. Only)
Page 1
... or workmanship as fuses or batteries). REPAIR OR REPLACEMENT AS PROVIDED UNDER THIS WARRANTY IS THE EXCLUSIVE REMEDY OF THE CONSUMER. 4-557-173-02 General Stereo/Hifi Components/Tape Decks ® CD Players/Mini Disc Players/Audio Systems Hifi Audio LIMITED WARRANTY Sony Electronics Inc. ("Sony") warrants this Product is invalid if the factory applied serial number has been altered or removed from the Product. ACCESSORIES: Parts and labor for...
... or workmanship as fuses or batteries). REPAIR OR REPLACEMENT AS PROVIDED UNDER THIS WARRANTY IS THE EXCLUSIVE REMEDY OF THE CONSUMER. 4-557-173-02 General Stereo/Hifi Components/Tape Decks ® CD Players/Mini Disc Players/Audio Systems Hifi Audio LIMITED WARRANTY Sony Electronics Inc. ("Sony") warrants this Product is invalid if the factory applied serial number has been altered or removed from the Product. ACCESSORIES: Parts and labor for...
User Instructions
Page 2
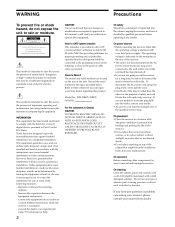
... your nearest Sony dealer. On power sources • Before operating the receiver, check that may cause harmful interference to operate this product. To disconnect the AC power cord, grasp the plug itself has been turned off and unplug the receiver. On operation Before connecting other for proper grounding and, in particular, specifies that to which can radiate radio frequency energy and, if not installed and used in...
... your nearest Sony dealer. On power sources • Before operating the receiver, check that may cause harmful interference to operate this product. To disconnect the AC power cord, grasp the plug itself has been turned off and unplug the receiver. On operation Before connecting other for proper grounding and, in particular, specifies that to which can radiate radio frequency energy and, if not installed and used in...

User Instructions
Page 3
...CURSOR MODE and SET UP Buttons 42 Index 43 3 Type of Dolby Laboratories Licensing Corporation. TABLE OF CONTENTS Hooking Up the Components 4 Unpacking 4 Antenna Hookups 5 Audio Component Hookups 6 Video Component Hookups 7 5.1 Input Hookups 9 Other Hookups 10 Hooking Up and Setting Up the Speaker System 13 Speaker System Hookup 14 Dolby Surround Setup 15 Before You Use Your Receiver 17 Location of Parts and Basic Amplifier Operations 20 Front Panel Parts Description 20 Enjoying Surround Sound 24 Selecting a Sound Field 25 Customizing Sound Fields 27 Receiving Broadcasts 29 Direct Tuning 30...
...CURSOR MODE and SET UP Buttons 42 Index 43 3 Type of Dolby Laboratories Licensing Corporation. TABLE OF CONTENTS Hooking Up the Components 4 Unpacking 4 Antenna Hookups 5 Audio Component Hookups 6 Video Component Hookups 7 5.1 Input Hookups 9 Other Hookups 10 Hooking Up and Setting Up the Speaker System 13 Speaker System Hookup 14 Dolby Surround Setup 15 Before You Use Your Receiver 17 Location of Parts and Basic Amplifier Operations 20 Front Panel Parts Description 20 Enjoying Surround Sound 24 Selecting a Sound Field 25 Customizing Sound Fields 27 Receiving Broadcasts 29 Direct Tuning 30...

User Instructions
Page 9
...of Dolby Digit al syst em hookup using t he 5.1/DVD INPUT jacks DVD player or LD player VIDEO OUT DIGITAL Dolby Digital (AC-3) decoder etc. 5.1/ DVD INPUT CURSOR MODE SET UP SURROUND BASS/ TREBLE INDEX g SPEAKERS OFF A B A+B DISPLAY DIRECT TUNING 1 2 3 4 5 PHONES - R L WIRELESS REAR SPEAKER IMPEDANCE SELECTOR FRONT 4 Ω 8 Ω FRONT + R - - TUNING + PRESET - To enjoy Multi-Channel Surround sound to its full extent, you can enjoy theater-quality Multi-Channel Surround sound in Dolby Digital (AC-3) decoder can be connected directly to these jacks, you...
...of Dolby Digit al syst em hookup using t he 5.1/DVD INPUT jacks DVD player or LD player VIDEO OUT DIGITAL Dolby Digital (AC-3) decoder etc. 5.1/ DVD INPUT CURSOR MODE SET UP SURROUND BASS/ TREBLE INDEX g SPEAKERS OFF A B A+B DISPLAY DIRECT TUNING 1 2 3 4 5 PHONES - R L WIRELESS REAR SPEAKER IMPEDANCE SELECTOR FRONT 4 Ω 8 Ω FRONT + R - - TUNING + PRESET - To enjoy Multi-Channel Surround sound to its full extent, you can enjoy theater-quality Multi-Channel Surround sound in Dolby Digital (AC-3) decoder can be connected directly to these jacks, you...
User Instructions
Page 10
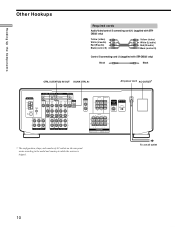
...- L + SPEAKERS REAR CENTER FRONT A + B IMPEDANCE USE 8-16 Ω FRONT A OR B IMPEDANCE USE 4-16 Ω * The configuration, shape, and number of AC outlets on the rear panel varies according to the model and country to which the receiver is shipped. Ho o k i n g Up t h e Co m p o n e n t s Ot her Hookups Required cords Audio/video/control S connecting cord (1) (supplied with STRDE625 only) Yellow (video) White (L/ audio) Red (R/ audio) Black (control S) Yellow (video) White (L/ audio) Red (R/ audio) Black (control S) Control S connecting cord (1) (supplied with STR-DE625 only...
...- L + SPEAKERS REAR CENTER FRONT A + B IMPEDANCE USE 8-16 Ω FRONT A OR B IMPEDANCE USE 4-16 Ω * The configuration, shape, and number of AC outlets on the rear panel varies according to the model and country to which the receiver is shipped. Ho o k i n g Up t h e Co m p o n e n t s Ot her Hookups Required cords Audio/video/control S connecting cord (1) (supplied with STRDE625 only) Yellow (video) White (L/ audio) Red (R/ audio) Black (control S) Yellow (video) White (L/ audio) Red (R/ audio) Black (control S) Control S connecting cord (1) (supplied with STR-DE625 only...
User Instructions
Page 11
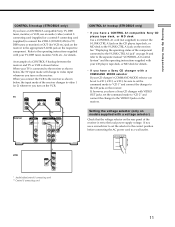
... t h e Co m p o n e n t s CONTROL S hookup (STR-DE625 only) If you turn on the VCR. Refer to the operating instructions supplied with VIDEO OUT jacks, set the command mode to "CD 1" and connect the changer to the receiver as shown below, the input mode of a CONTROL S hookup between the receiver and TV or VCR is set the selector to the correct position before connecting the AC power cord to video 1 (or 2) whenever you have a Sony CD changer...
... t h e Co m p o n e n t s CONTROL S hookup (STR-DE625 only) If you turn on the VCR. Refer to the operating instructions supplied with VIDEO OUT jacks, set the command mode to "CD 1" and connect the changer to the receiver as shown below, the input mode of a CONTROL S hookup between the receiver and TV or VCR is set the selector to the correct position before connecting the AC power cord to video 1 (or 2) whenever you have a Sony CD changer...

User Instructions
Page 13
... Dolby Surround sound. SET UP GENRE SOUND FIELD ON/ OFF CURSOR MODE SET UP SURROUND BASS/ TREBLE INDEX g SPEAKERS OFF A B A+B DISPLAY DIRECT TUNING 1 2 3 4 5 PHONES - Cursor buttons ( / ): Used to select "PRO LOGIC" when adjusting the speaker volume. M ODE button: Used to select the center mode after pressing the SET UP button. SOUND FIELD ON/ OFF button: Turns the sound field mode on or off. BALANCE control: Used to select "CINEMA" when adjusting the speaker volume. Hooking Up and Set t ing Up t he speaker syst em SET UP button: Used to display "CTR MODE...
... Dolby Surround sound. SET UP GENRE SOUND FIELD ON/ OFF CURSOR MODE SET UP SURROUND BASS/ TREBLE INDEX g SPEAKERS OFF A B A+B DISPLAY DIRECT TUNING 1 2 3 4 5 PHONES - Cursor buttons ( / ): Used to select "PRO LOGIC" when adjusting the speaker volume. M ODE button: Used to select the center mode after pressing the SET UP button. SOUND FIELD ON/ OFF button: Turns the sound field mode on or off. BALANCE control: Used to select "CINEMA" when adjusting the speaker volume. Hooking Up and Set t ing Up t he speaker syst em SET UP button: Used to display "CTR MODE...
User Instructions
Page 15
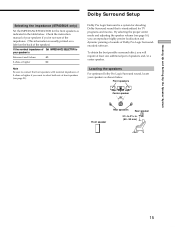
By selecting the proper center mode and adjusting the speaker volume (see page 21). Locat ing t he im pedance (STR-DE625 only) Set the IMPEDANCE SELECTOR for the front speakers as shown below . Dolby Pro Logic Surround is a system for decoding Dolby Surround sound that is Between 4 and 8 ohms 4Ω 8 ohms or higher 8Ω Note Be sure to connect the front speakers with nominal impedance of 8 ohms or higher if you can reproduce highly...
By selecting the proper center mode and adjusting the speaker volume (see page 21). Locat ing t he im pedance (STR-DE625 only) Set the IMPEDANCE SELECTOR for the front speakers as shown below . Dolby Pro Logic Surround is a system for decoding Dolby Surround sound that is Between 4 and 8 ohms 4Ω 8 ohms or higher 8Ω Note Be sure to connect the front speakers with nominal impedance of 8 ohms or higher if you can reproduce highly...

User Instructions
Page 16
... to turn off the test tone. Each mode is designed for 3CH LOGIC mode) in performance, you don't have Select So that is a signal that best suits the speakers you are equal in succession. z You can adjust the volume level from the front speakers Front and center 3CH LOGIC speakers, but no (3-STEREO) rear speaker The sound of the rear channel is produced by the receiver and used to select the center mode you w ant. A test tone is equivalent...
... to turn off the test tone. Each mode is designed for 3CH LOGIC mode) in performance, you don't have Select So that is a signal that best suits the speakers you are equal in succession. z You can adjust the volume level from the front speakers Front and center 3CH LOGIC speakers, but no (3-STEREO) rear speaker The sound of the rear channel is produced by the receiver and used to select the center mode you w ant. A test tone is equivalent...
User Instructions
Page 17
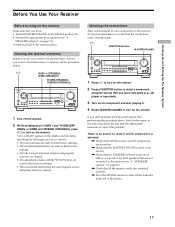
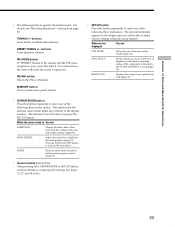
...BALANCE L R VIDEO 3 INPUT VIDEO L AUDIO R 1 Turn off the indicator to the left of preset stations and program sources) are cleared. • All adjustments made . 1/u FUNCTION buttons M ASTER VOLUM E CURSOR MODE SET UP SURROUND BASS/ TREBLE INDEX g SPEAKERS OFF A B A+B DISPLAY DIRECT TUNING 1 2 3 4 5 PHONES - TUNING + PRESET - Checking t he connect ions After connecting all the speaker cords are reset to the center position. If you did not obtain normal sound output after performing the procedure above, look for front speakers that are not connected to the receiver...
...BALANCE L R VIDEO 3 INPUT VIDEO L AUDIO R 1 Turn off the indicator to the left of preset stations and program sources) are cleared. • All adjustments made . 1/u FUNCTION buttons M ASTER VOLUM E CURSOR MODE SET UP SURROUND BASS/ TREBLE INDEX g SPEAKERS OFF A B A+B DISPLAY DIRECT TUNING 1 2 3 4 5 PHONES - TUNING + PRESET - Checking t he connect ions After connecting all the speaker cords are reset to the center position. If you did not obtain normal sound output after performing the procedure above, look for front speakers that are not connected to the receiver...

User Instructions
Page 20
... program source. Notes • After you have turned the MASTER VOLUME control to the leftmost position to avoid damaging you speakers. 2 FUNCTION buttons Press one of the buttons and controls on the front panel and explains basic amplifier operations. 20 Front Panel Part s Descript ion 1 1/u sw itch Press to the 5.1/DVD INPUT jacks (see "3 5.1/DVD INPUT button" on page 21). To select Press VCR VIDEO 1 or VIDEO 2 (STRDE625) VIDEO (STR-DE525) Camcorder or video game VIDEO 3 (STR-DE625 only) TV, DBS tuner...
... program source. Notes • After you have turned the MASTER VOLUME control to the leftmost position to avoid damaging you speakers. 2 FUNCTION buttons Press one of the buttons and controls on the front panel and explains basic amplifier operations. 20 Front Panel Part s Descript ion 1 1/u sw itch Press to the 5.1/DVD INPUT jacks (see "3 5.1/DVD INPUT button" on page 21). To select Press VCR VIDEO 1 or VIDEO 2 (STRDE625) VIDEO (STR-DE525) Camcorder or video game VIDEO 3 (STR-DE625 only) TV, DBS tuner...

User Instructions
Page 22
...button indication or frequency** v Sound field applied to the program source. ! The following buttons to change the information on the display window as follows: v Index name of the front speakers. Front Panel Part s Descript ion ! ! ! 0 CURSOR MODE SET UP SURROUND BASS/ TREBLE INDEX g SPEAKERS OFF A B A+B DISPLAY DIRECT TUNING 1 2 3 4 5 PHONES - Numeric buttons (1 to select "CINEMA" or "MUSIC" sound field group. TUNING + SLEEP FM MODE FM/AM MEMORY SHIFT 6 7 8 9 9 VIDEO 1 FUNCTION VIDEO 2 VIDEO 3 TV/DBS TAPE/MD CD TUNER PHONO 5.1/DVD INPUT TONE BASS...
...button indication or frequency** v Sound field applied to the program source. ! The following buttons to change the information on the display window as follows: v Index name of the front speakers. Front Panel Part s Descript ion ! ! ! 0 CURSOR MODE SET UP SURROUND BASS/ TREBLE INDEX g SPEAKERS OFF A B A+B DISPLAY DIRECT TUNING 1 2 3 4 5 PHONES - Numeric buttons (1 to select "CINEMA" or "MUSIC" sound field group. TUNING + SLEEP FM MODE FM/AM MEMORY SHIFT 6 7 8 9 9 VIDEO 1 FUNCTION VIDEO 2 VIDEO 3 TV/DBS TAPE/MD CD TUNER PHONO 5.1/DVD INPUT TONE BASS...
User Instructions
Page 23
... selected cursor mode lights up to the S-LINK CONTROL A1 jack (page 36) REAR GAIN Increase the range of the rear and center speakers (page 27) BASS/TREBLE Adjust the tone (bass/treble) for the front speakers (page 27). SET UP button Press this button. When you will not have the stereo effect but the sound is improved. The indicator for preset stations and program sources (page 34) ! PRESET TUNING +/ - The indicator turns off when you press the SET UP button...
... selected cursor mode lights up to the S-LINK CONTROL A1 jack (page 36) REAR GAIN Increase the range of the rear and center speakers (page 27) BASS/TREBLE Adjust the tone (bass/treble) for the front speakers (page 27). SET UP button Press this button. When you will not have the stereo effect but the sound is improved. The indicator for preset stations and program sources (page 34) ! PRESET TUNING +/ - The indicator turns off when you press the SET UP button...

User Instructions
Page 24
... MODE SET UP SURROUND BASS/ TREBLE INDEX g SPEAKERS OFF A B A+B DISPLAY DIRECT TUNING 1 2 3 4 5 PHONES - You can enjoy the sound of surround sound simply by incorporating Digital Cinema Sound technology. To enjoy Dolby Pro Logic Surround sound fully, do the procedure on videos or laser discs. TUNING + PRESET - The CINEMA-genre sound fields are designed to select the center mode and adjust the speaker volume. TUNING + SLEEP FM MODE FM/AM MEMORY SHIFT 6 7 8 9 9 VIDEO 1 FUNCTION VIDEO 2 VIDEO 3 TV/DBS TAPE/MD CD TUNER PHONO 5.1/DVD INPUT TONE...
... MODE SET UP SURROUND BASS/ TREBLE INDEX g SPEAKERS OFF A B A+B DISPLAY DIRECT TUNING 1 2 3 4 5 PHONES - You can enjoy the sound of surround sound simply by incorporating Digital Cinema Sound technology. To enjoy Dolby Pro Logic Surround sound fully, do the procedure on videos or laser discs. TUNING + PRESET - The CINEMA-genre sound fields are designed to select the center mode and adjust the speaker volume. TUNING + SLEEP FM MODE FM/AM MEMORY SHIFT 6 7 8 9 9 VIDEO 1 FUNCTION VIDEO 2 VIDEO 3 TV/DBS TAPE/MD CD TUNER PHONO 5.1/DVD INPUT TONE...

User Instructions
Page 25
... but t ons used t o enjoy surround sound CURSOR M ODE button: Press repeatedly to light up the SURROUND indicator or BASS/TREBLE indicator to make the actual setting. Brief descript ions of the tuner, the sound fields for AM or FM band and for all the preset stations are turned off . Cursor buttons ( / / / ): After pressing the CURSOR MODE button or SET UP button, use these buttons to customize a sound field. TONE ON/ OFF button: Turns the tone effect on...
... but t ons used t o enjoy surround sound CURSOR M ODE button: Press repeatedly to light up the SURROUND indicator or BASS/TREBLE indicator to make the actual setting. Brief descript ions of the tuner, the sound fields for AM or FM band and for all the preset stations are turned off . Cursor buttons ( / / / ): After pressing the CURSOR MODE button or SET UP button, use these buttons to customize a sound field. TONE ON/ OFF button: Turns the tone effect on...

User Instructions
Page 33
...1 0 MUTING • 9 • • 10 • BALANCE L R VIDEO 3 INPUT VIDEO L AUDIO R SET UP SLEEP TUNER 5.1/ DVD INPUT Brief descript ions of but t ons t hat appear in order to index preset stations or program sources. SLEEP button: Used to the 5.1/DVD INPUT jacks. Other Operations CURSOR M ODE Cursor buttons CURSOR MODE SET UP SURROUND BASS/ TREBLE INDEX g SPEAKERS OFF A B A+B DISPLAY DIRECT TUNING 1 2 3 4 5 PHONES - TUNER button: Press to select the tuner. 5.1/ DVD INPUT button: Press to select the component connected to set the sleep timer.
...1 0 MUTING • 9 • • 10 • BALANCE L R VIDEO 3 INPUT VIDEO L AUDIO R SET UP SLEEP TUNER 5.1/ DVD INPUT Brief descript ions of but t ons t hat appear in order to index preset stations or program sources. SLEEP button: Used to the 5.1/DVD INPUT jacks. Other Operations CURSOR M ODE Cursor buttons CURSOR MODE SET UP SURROUND BASS/ TREBLE INDEX g SPEAKERS OFF A B A+B DISPLAY DIRECT TUNING 1 2 3 4 5 PHONES - TUNER button: Press to select the tuner. 5.1/ DVD INPUT button: Press to select the component connected to set the sleep timer.

User Instructions
Page 34
... the receiver's display when a station or program source is selected. If you are not familiar with how to tune in preset stations, see "Tuning to preset stations" on page 32. 3 Press CURSOR M ODE repeatedly until the INDEX indicator lights up to Step 3. 2 Tune in the preset station you normally would using the controls on each component. Recording Your receiver makes it . TUNING + SLEEP FM MODE FM/AM MEMORY SHIFT 6 7 8 9 9 VIDEO 1 FUNCTION VIDEO 2 VIDEO 3 TV/DBS TAPE/MD CD TUNER PHONO 5.1/DVD INPUT TONE BASS BOOST SOUND...
... the receiver's display when a station or program source is selected. If you are not familiar with how to tune in preset stations, see "Tuning to preset stations" on page 32. 3 Press CURSOR M ODE repeatedly until the INDEX indicator lights up to Step 3. 2 Tune in the preset station you normally would using the controls on each component. Recording Your receiver makes it . TUNING + SLEEP FM MODE FM/AM MEMORY SHIFT 6 7 8 9 9 VIDEO 1 FUNCTION VIDEO 2 VIDEO 3 TV/DBS TAPE/MD CD TUNER PHONO 5.1/DVD INPUT TONE BASS BOOST SOUND...

User Instructions
Page 36
... be connected to TAPE/ MD, VIDEO 2, or CD (see page 20). appears for about 8 seconds each time you to select "GAIN UP." Increasing t he out put level Repeat the procedure above, selecting "GAIN NORM" in the display. 2 Press the cursor buttons ( / ) to make following adjustments. Ot her Operat ions 36 Adjust m ent s Using t he SET UP But t on The SET UP button allows you change the operation mode Turn...
... be connected to TAPE/ MD, VIDEO 2, or CD (see page 20). appears for about 8 seconds each time you to select "GAIN UP." Increasing t he out put level Repeat the procedure above, selecting "GAIN NORM" in the display. 2 Press the cursor buttons ( / ) to make following adjustments. Ot her Operat ions 36 Adjust m ent s Using t he SET UP But t on The SET UP button allows you change the operation mode Turn...

User Instructions
Page 38
... TV screen or m onit or. / Select the appropriate function on the receiver. / Press the TV/VIDEO button on the supplied remote to set your TV to the appropriate input mode. / Move your TV away from the audio components. Severe hum or noise is set or fluorescent light. / Move your TV away from the audio components. / Make sure you set the tuning interval correctly (when tuning in AM stations with direct tuning) (see...
... TV screen or m onit or. / Select the appropriate function on the receiver. / Press the TV/VIDEO button on the supplied remote to set your TV to the appropriate input mode. / Move your TV away from the audio components. Severe hum or noise is set or fluorescent light. / Move your TV away from the audio components. / Make sure you set the tuning interval correctly (when tuning in AM stations with direct tuning) (see...

User Instructions
Page 43
...pre-programmed 24-26 resetting 27 selecting 25 Speakers adjusting rear and center speaker volume 27 adjusting volume 16, 27 connection 14 impedance 15 increasing rear speaker output level 36 locating 15 selecting center mode 16 selecting front speakers 21 Station index. See Direct tuning using preset stations. Index A Adjusting brightness of the display 36 rear and center speaker volume 27 speaker volume 16 tone 27 Automatic tuning 31 B Basic amplifier operations 20-22 Battery 4 C Center mode 16 Changing delay time 27 display 22 effect level 27 Checking the connections 17 Clearing receiver...
...pre-programmed 24-26 resetting 27 selecting 25 Speakers adjusting rear and center speaker volume 27 adjusting volume 16, 27 connection 14 impedance 15 increasing rear speaker output level 36 locating 15 selecting center mode 16 selecting front speakers 21 Station index. See Direct tuning using preset stations. Index A Adjusting brightness of the display 36 rear and center speaker volume 27 speaker volume 16 tone 27 Automatic tuning 31 B Basic amplifier operations 20-22 Battery 4 C Center mode 16 Changing delay time 27 display 22 effect level 27 Checking the connections 17 Clearing receiver...


