Technical Background
Page 37
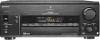
... IIx Yes Yes 7.1-channel Yes Yes Yes Yes Yes Yes 7.1 -/2/1 4/2 5/2 To Component 3/1 2 Subwoofer Yes 1/1 Yes/Yes 1 2/2 Audio out Yes Yes Yes - ES Receivers v1.0 Page 37 Features and specifications Feature Power output, all channels driven into 8 ohms, 20 to 20,000 Hz S-Master Pro Amplifier 32-bit S-Master.../upgrade 12-volt trigger outputs Multi-Zone/Room Capability 2nd Room output 3rd Room output On screen display Remote Features Preprogrammed LCD Learning & Macro 2-way Touch-screen Second-room remote STRDA7100ES 170 watts x7 Yes Yes Yes Yes Yes Yes Yes IIx Yes Yes 7.1-channel Yes Yes (Two...
... IIx Yes Yes 7.1-channel Yes Yes Yes Yes Yes Yes 7.1 -/2/1 4/2 5/2 To Component 3/1 2 Subwoofer Yes 1/1 Yes/Yes 1 2/2 Audio out Yes Yes Yes - ES Receivers v1.0 Page 37 Features and specifications Feature Power output, all channels driven into 8 ohms, 20 to 20,000 Hz S-Master Pro Amplifier 32-bit S-Master.../upgrade 12-volt trigger outputs Multi-Zone/Room Capability 2nd Room output 3rd Room output On screen display Remote Features Preprogrammed LCD Learning & Macro 2-way Touch-screen Second-room remote STRDA7100ES 170 watts x7 Yes Yes Yes Yes Yes Yes Yes IIx Yes Yes 7.1-channel Yes Yes (Two...
Technical Background
Page 38
... with some brands or models. Please refer to the documentation that product contains an IEEE 1394 connector. dts is a trademark of Sony. i.LINK is a trademark of their respective owners. 1. Multi-brand remote may not communicate with the device having an i.LINK connector for information on compatibility, operating conditions and proper connection. 2. Features... notice. Dolby, Dolby Digital and Pro Logic are subject to designate that comes with each other trademarks are property of Digital Theater Systems Corporation. ES Receivers v1.0 Page 38
... with some brands or models. Please refer to the documentation that product contains an IEEE 1394 connector. dts is a trademark of Sony. i.LINK is a trademark of their respective owners. 1. Multi-brand remote may not communicate with the device having an i.LINK connector for information on compatibility, operating conditions and proper connection. 2. Features... notice. Dolby, Dolby Digital and Pro Logic are subject to designate that comes with each other trademarks are property of Digital Theater Systems Corporation. ES Receivers v1.0 Page 38

Operating Instructions
Page 3
... channel surround displays 36 Customizing sound fields 38 Adjusting the equalizer 42 Receiving Broadcasts Direct tuning 44 Automatic tuning 44 Preset tuning 45 Other Operations ...using SURROUND, LEVEL, EQ, and SET UP buttons .. 87 Adjustable parameters for each sound field 90 * STR-DA5ES only. "Dolby", "Pro Logic" and the double-D symbol are trademarks of Dolby Laboratories. ** "DTS",... trademarks of settings using the remote* Before you use your remote 53 Location of parts and basic remote operations 54 Using the lists 62 Using the remote RM-US105 75 Additional Information ...
... channel surround displays 36 Customizing sound fields 38 Adjusting the equalizer 42 Receiving Broadcasts Direct tuning 44 Automatic tuning 44 Preset tuning 45 Other Operations ...using SURROUND, LEVEL, EQ, and SET UP buttons .. 87 Adjustable parameters for each sound field 90 * STR-DA5ES only. "Dolby", "Pro Logic" and the double-D symbol are trademarks of Dolby Laboratories. ** "DTS",... trademarks of settings using the remote* Before you use your remote 53 Location of parts and basic remote operations 54 Using the lists 62 Using the remote RM-US105 75 Additional Information ...

Operating Instructions
Page 4
... stated otherwise. Tip The instructions in stereo (L/R) (page 28). You can reproduce the sound of the front panel. It can also use of audio formats and modes This receiver is used for example, "STR-DA5ES only". In this manual, the STR-DA5ES (area code U) is compatible with the remote (STR-DA3ES). Check your remote, see the illustration below). For...
... stated otherwise. Tip The instructions in stereo (L/R) (page 28). You can reproduce the sound of the front panel. It can also use of audio formats and modes This receiver is used for example, "STR-DA5ES only". In this manual, the STR-DA5ES (area code U) is compatible with the remote (STR-DA3ES). Check your remote, see the illustration below). For...

Operating Instructions
Page 25
Notes • The adjusted value are in your main listening position (page 71). 4 Press TEST TONE again to turn on the receiver. 2 Press TEST TONE on the remote. • You can output the test tone or sound source from each speaker. If you do the following to verify that the ...panel using the LEVEL menu (when the test tone is output, the receiver switches to the LEVEL menu automatically), we recommend you follow the procedure described above and adjust the speaker levels from your listening position using the remote. • When you select analog audio using the MULTI/ 2CH ANALOG...
Notes • The adjusted value are in your main listening position (page 71). 4 Press TEST TONE again to turn on the receiver. 2 Press TEST TONE on the remote. • You can output the test tone or sound source from each speaker. If you do the following to verify that the ...panel using the LEVEL menu (when the test tone is output, the receiver switches to the LEVEL menu automatically), we recommend you follow the procedure described above and adjust the speaker levels from your listening position using the remote. • When you select analog audio using the MULTI/ 2CH ANALOG...

Operating Instructions
Page 29
...the volume using the 2ND ROOM OUT jacks (2nd room) 1 (STR-DA5ES) Press 2ND/3RD ROOM repeatedly to select "2ND ROOM". (STR-DA3ES) Press 2ND ROOM. 2 Turn the jog dial to select the analog audio signals. Set the remote to select the analog audio signals. Basic Operations Listening to the sound ...Stereo amplifier SPEAKERS You can output the different source to the 2nd room and the 3rd room. 1 Set the SPEAKER switch to "MAIN + 3RD ROOM". For details, see pages 14 and 18. To output the sound using the remote. To output the sound using the SPEAKERS terminals (3rd room) (For STR-DA5ES...
...the volume using the 2ND ROOM OUT jacks (2nd room) 1 (STR-DA5ES) Press 2ND/3RD ROOM repeatedly to select "2ND ROOM". (STR-DA3ES) Press 2ND ROOM. 2 Turn the jog dial to select the analog audio signals. Set the remote to select the analog audio signals. Basic Operations Listening to the sound ...Stereo amplifier SPEAKERS You can output the different source to the 2nd room and the 3rd room. 1 Set the SPEAKER switch to "MAIN + 3RD ROOM". For details, see pages 14 and 18. To output the sound using the remote. To output the sound using the SPEAKERS terminals (3rd room) (For STR-DA5ES...

Operating Instructions
Page 30
... ROOM SP" (or "2ND ROOM SP") to "OFF" in another room (continued) (For STR-DA3ES) The same source is output to the 2nd and the 3rd room. 1 Set the SPEAKER switch to the instruction manual supplied with the remote. The audio source changes cyclically as follows: SOURCE* t VIDEO 1 t VIDEO 2 t VIDEO 3 t ...Press repeatedly to change the information on the remote whose command mode is set to "MAIN + 3RD ROOM" (or "MAIN + 2ND ROOM"), then turn the jog dial to adjust the brightness of the sound from the speakers. (The indicator also turns off the receiver when the SPEAKER switch is set to ...
... ROOM SP" (or "2ND ROOM SP") to "OFF" in another room (continued) (For STR-DA3ES) The same source is output to the 2nd and the 3rd room. 1 Set the SPEAKER switch to the instruction manual supplied with the remote. The audio source changes cyclically as follows: SOURCE* t VIDEO 1 t VIDEO 2 t VIDEO 3 t ...Press repeatedly to change the information on the remote whose command mode is set to "MAIN + 3RD ROOM" (or "MAIN + 2ND ROOM"), then turn the jog dial to adjust the brightness of the sound from the speakers. (The indicator also turns off the receiver when the SPEAKER switch is set to ...

Operating Instructions
Page 44
..., but the sound will not be lower than the entered value, press TUNING -. • If "STEREO" flashes in . 2 Press FM/AM to select the FM or AM band. 3 (For STR-DA5ES) Select TUNER from the FUNCTION list, then select "DIRECT TUNING" from low to 10 kHz.) 1 b3 b5 b0 If .... The last received station is received normally, press FM MODE to turn on the remote. 4 Press the numeric buttons to improve the sound. again. 44 Receiving Broadcasts Before receiving broadcasts, make sure you can let the receiver scan all when an FM broadcast is tuned in. 2 Press FM/AM to select the FM or AM band...
..., but the sound will not be lower than the entered value, press TUNING -. • If "STEREO" flashes in . 2 Press FM/AM to select the FM or AM band. 3 (For STR-DA5ES) Select TUNER from the FUNCTION list, then select "DIRECT TUNING" from low to 10 kHz.) 1 b3 b5 b0 If .... The last received station is received normally, press FM MODE to turn on the remote. 4 Press the numeric buttons to improve the sound. again. 44 Receiving Broadcasts Before receiving broadcasts, make sure you can let the receiver scan all when an FM broadcast is tuned in. 2 Press FM/AM to select the FM or AM band...

Operating Instructions
Page 45
...can store the station, start again from step 3. 5 Press MEMORY again to preset using the supplied remote. Each time you have tuned in . 2 Select the preset station you want. The receiver will also scan all the stations that you can be sure to preset another station. Presetting radio ...before "MEMORY" goes out. 4 Press PRESET TUNING + or PRESET TUNING - Scanning the preset stations 1 Rotate FUNCTION to select TUNER. Up to 30 FM or AM stations can preset them by entering its 2-character preset code using Direct Tuning (page 44) or Automatic Tuning (page 44). 3 Press MEMORY...
...can store the station, start again from step 3. 5 Press MEMORY again to preset using the supplied remote. Each time you have tuned in . 2 Select the preset station you want. The receiver will also scan all the stations that you can be sure to preset another station. Presetting radio ...before "MEMORY" goes out. 4 Press PRESET TUNING + or PRESET TUNING - Scanning the preset stations 1 Rotate FUNCTION to select TUNER. Up to 30 FM or AM stations can preset them by entering its 2-character preset code using Direct Tuning (page 44) or Automatic Tuning (page 44). 3 Press MEMORY...

Operating Instructions
Page 50
... 2 Sony receivers in sequence. • "PHASE AUDIO" output the source sound instead of the on -screen display vertically. 50 Therefore, connect the CONTROL A1 jacks of the on -screen display. Adjustments using the SET UP button (continued) x 2-way remote (2 WAY REMOTE) (STR-DA5ES only) This receiver is ...shipped from the factory with the 2 way remote control system set to "OFF" cannot be sure to perform the following operation to limit response...
... 2 Sony receivers in sequence. • "PHASE AUDIO" output the source sound instead of the on -screen display vertically. 50 Therefore, connect the CONTROL A1 jacks of the on -screen display. Adjustments using the SET UP button (continued) x 2-way remote (2 WAY REMOTE) (STR-DA5ES only) This receiver is ...shipped from the factory with the 2 way remote control system set to "OFF" cannot be sure to perform the following operation to limit response...

Operating Instructions
Page 51
...compatibility as this case, however, older components will not be compatible with the new functions. • Do not operate a 2 way remote control unit when the CONTROL A1 jacks are compatible with components with CONTROL A1 , and can be controlled may cause the application to simplify... both ways, so there is upgraded to the Operating Instructions supplied with your component(s). However, when making connections between a Sony CD player, amplifier (receiver), MD deck and cassette deck provide automatic function selection and synchronized recording. Refer to each component.
...compatibility as this case, however, older components will not be compatible with the new functions. • Do not operate a 2 way remote control unit when the CONTROL A1 jacks are compatible with components with CONTROL A1 , and can be controlled may cause the application to simplify... both ways, so there is upgraded to the Operating Instructions supplied with your component(s). However, when making connections between a Sony CD player, amplifier (receiver), MD deck and cassette deck provide automatic function selection and synchronized recording. Refer to each component.

Operating Instructions
Page 53
...; If you would like to turn off the receiver's 2 way remote system, set the COMMAND MODE. Remote Component When using a home entertainment system comprised of communication between the remote and the receiver. If you use the remote for an extended period of time, remove the ...US105: pages 75-81 For the remote (RM-PP505L) supplied with STR-DA3ES, refer to the following pages respectively. Thus, operations are supplied with STR-DA5ES (RM-LJ305, RM-US105). Operations using the remote Operations using the remote (STR-DA5ES only) Two remotes are performed as a result of several...
...; If you would like to turn off the receiver's 2 way remote system, set the COMMAND MODE. Remote Component When using a home entertainment system comprised of communication between the remote and the receiver. If you use the remote for an extended period of time, remove the ...US105: pages 75-81 For the remote (RM-PP505L) supplied with STR-DA3ES, refer to the following pages respectively. Thus, operations are supplied with STR-DA5ES (RM-LJ305, RM-US105). Operations using the remote Operations using the remote (STR-DA5ES only) Two remotes are performed as a result of several...

Operating Instructions
Page 54
... MAIN ENTER MENU SLEEP 0 EXIT/RETURN ENTER/ EXECUTE 9 0 qa qs qd qf qg qh qj qk 54 Before you use your receiver. Location of parts and basic remote operations wj wh ws wg wf AV ?/1 SYSTEM STANDBY SOUND FIELD FUNCTION ?/1 SET UP PUSH ENTER h SUB H X x . >...SKIP - + 6.1CH DECODING MASTER VOL + MUTING - 1 2 3 4 5 6 7 8 v Open up the remote At the time of the remote while it on. 2 Point the remote towards the receiver and press SOUND FIELD, FUNCTION, or SUB. When the communication ends, the remote is customized and provides the operation lists that it can control your...
... MAIN ENTER MENU SLEEP 0 EXIT/RETURN ENTER/ EXECUTE 9 0 qa qs qd qf qg qh qj qk 54 Before you use your receiver. Location of parts and basic remote operations wj wh ws wg wf AV ?/1 SYSTEM STANDBY SOUND FIELD FUNCTION ?/1 SET UP PUSH ENTER h SUB H X x . >...SKIP - + 6.1CH DECODING MASTER VOL + MUTING - 1 2 3 4 5 6 7 8 v Open up the remote At the time of the remote while it on. 2 Point the remote towards the receiver and press SOUND FIELD, FUNCTION, or SUB. When the communication ends, the remote is customized and provides the operation lists that it can control your...

Operating Instructions
Page 55
...Characters other than letters of this button is same as the NIGHT MODE button on the receiver. See the table on page 58 for information on the buttons you can use to ... as the ON SCREEN button on the receiver. Press again to revert back to match your particular components, do the procedure "Programming the Remote" on or off. 3 SET UP... button Press to display the set up or down to select an item from the list, and then press to control each component. Searches tracks in the display window on the main unit. 2 ?/1 switch Press to turn the receiver...
...Characters other than letters of this button is same as the NIGHT MODE button on the receiver. See the table on page 58 for information on the buttons you can use to ... as the ON SCREEN button on the receiver. Press again to revert back to match your particular components, do the procedure "Programming the Remote" on or off. 3 SET UP... button Press to display the set up or down to select an item from the list, and then press to control each component. Searches tracks in the display window on the main unit. 2 ?/1 switch Press to turn the receiver...

Operating Instructions
Page 56
.... Location of parts and basic renite operations (continued) qa DIMMER button The function of this button is same as the AUDIO SPLIT button on the receiver. qk Cursor buttons (V/v/B/b) After pressing MAIN MENU, use the cursor buttons to select a menu item, press ENTER/EXECUTE to make specific settings. ql ENTER button... press the key to the previous menu or exit the menu while VCR, DVD, or SAT menu is same as the DIMMER button on the remote. If the list has disappeared before you go on to step 3, press any of the cursor buttons to restore the list. 3 Move the easy scroll...
.... Location of parts and basic renite operations (continued) qa DIMMER button The function of this button is same as the AUDIO SPLIT button on the receiver. qk Cursor buttons (V/v/B/b) After pressing MAIN MENU, use the cursor buttons to select a menu item, press ENTER/EXECUTE to make specific settings. ql ENTER button... press the key to the previous menu or exit the menu while VCR, DVD, or SAT menu is same as the DIMMER button on the remote. If the list has disappeared before you go on to step 3, press any of the cursor buttons to restore the list. 3 Move the easy scroll...

Operating Instructions
Page 57
...AV ?/1 switch Press to turn off the components that the corresponding buttons are not found on the receiver. For details on programming procedure, see "qk Cursor buttons (V/v/B/b)," "ENTER/ EXECUTE button," and ... to display VCR, DVD, or SAT menu on or off the main component and other Sony audio/video components (SYSTEM STANDBY). On some components, pressing 0 selects 10. Press again to...or track number of the AV ?/1 switch changes automatically each time you have selected VCR, the remote is set the VCR input mode to the component information. ws SUB button While operating a ...
...AV ?/1 switch Press to turn off the components that the corresponding buttons are not found on the receiver. For details on programming procedure, see "qk Cursor buttons (V/v/B/b)," "ENTER/ EXECUTE button," and ... to display VCR, DVD, or SAT menu on or off the main component and other Sony audio/video components (SYSTEM STANDBY). On some components, pressing 0 selects 10. Press again to...or track number of the AV ?/1 switch changes automatically each time you have selected VCR, the remote is set the VCR input mode to the component information. ws SUB button While operating a ...

Operating Instructions
Page 58
... and basic renite operations (continued) Table of buttons used to control each component When you program the remote to control the following Sony or non-Sony components, you press the button, see the table on the remote that some buttons may not operate your component. Note, however, that are marked with circles. Component Button...
... and basic renite operations (continued) Table of buttons used to control each component When you program the remote to control the following Sony or non-Sony components, you press the button, see the table on the remote that some buttons may not operate your component. Note, however, that are marked with circles. Component Button...

Operating Instructions
Page 59
... buttons are not found on page 61. Repeats current track or programmed tracks. For details on the menu operation, see the tip on the remote. Operations using the remote Table of operations that appear when you press the SUB button Press SUB to display a list of the TV. Component Item(s) Function VCR...
... buttons are not found on page 61. Repeats current track or programmed tracks. For details on the menu operation, see the tip on the remote. Operations using the remote Table of operations that appear when you press the SUB button Press SUB to display a list of the TV. Component Item(s) Function VCR...

Operating Instructions
Page 61
..." (for the title menu) or "SET UP" (for non-Sony LD players. Select when you select a component. - Note If you have programmed the remote to control nonSony components, note the following procedure to perform title and...remote and move the easy scroll key to select "TITLE" or "SET UP", then press the key to enter the selection. To display the DVD menu, use the AV MENU button. c) Only with Sony...on the DVD player. For details, see "wd AV MENU button" on page 57. Operations using the remote a) "SIDE A/B" appears for the set up menu), then press the key to enter the selection. 4 ...
..." (for the title menu) or "SET UP" (for non-Sony LD players. Select when you select a component. - Note If you have programmed the remote to control nonSony components, note the following procedure to perform title and...remote and move the easy scroll key to select "TITLE" or "SET UP", then press the key to enter the selection. To display the DVD menu, use the AV MENU button. c) Only with Sony...on the DVD player. For details, see "wd AV MENU button" on page 57. Operations using the remote a) "SIDE A/B" appears for the set up menu), then press the key to enter the selection. 4 ...

Operating Instructions
Page 63
A display example CD1 Sony Selected component Category Maker of the component indication continued 63 Depending on the component that appears is compatible with the jacks on page 72. For details, see "Using the auto power function" on the receiver. Note If you have to do an ...procedures after selecting a component If you selected tuner Do the procedure below to select a component from the receiver (see "Programming the Remote" on page 64. • You can set the remote to automatically turn on a component when it is actually connected to the jacks on this page. MD...
A display example CD1 Sony Selected component Category Maker of the component indication continued 63 Depending on the component that appears is compatible with the jacks on page 72. For details, see "Using the auto power function" on the receiver. Note If you have to do an ...procedures after selecting a component If you selected tuner Do the procedure below to select a component from the receiver (see "Programming the Remote" on page 64. • You can set the remote to automatically turn on a component when it is actually connected to the jacks on this page. MD...


