
HDMI Control Guide
Page 5
The menu list of the remote will vary according to models and areas. 1 Connect a TV monitor to enable receiver operation. 4 Press SHIFT and then MENU. HDMI CONTROL function is activated. To set HDMI CONTROL 2 4 3 AMP MENU 5-12 4 7 Press V/v repeatedly to select "HDMI." 8 ... does not appear on the TV screen. 5 Press V/v repeatedly to select "Settings." 6 Press or b to decide. Note The location, label of this receiver appears on the receiver and the TV. 3 Press AMP to this receiver. Refer to "3: Connecting the monitor" on the operating instructions. 2 Turn on the TV screen.
The menu list of the remote will vary according to models and areas. 1 Connect a TV monitor to enable receiver operation. 4 Press SHIFT and then MENU. HDMI CONTROL function is activated. To set HDMI CONTROL 2 4 3 AMP MENU 5-12 4 7 Press V/v repeatedly to select "HDMI." 8 ... does not appear on the TV screen. 5 Press V/v repeatedly to select "Settings." 6 Press or b to decide. Note The location, label of this receiver appears on the receiver and the TV. 3 Press AMP to this receiver. Refer to "3: Connecting the monitor" on the operating instructions. 2 Turn on the TV screen.

HDMI Control Guide
Page 7
...in HDMI settings menu to watch a program on before using the System Power Off function. continued 7GB "AMP" if you want to - TV AV ?/1 Press TV, then press AV ?/1. The HDMI CONTROL function does not work. • Check the HDMI connection (page 3). • Make sure "HDMI Control" is set...the AC power cord, or there is compatible with the HDMI CONTROL function. • Check the HDMI CONTROL settings on the TV's remote, the receiver and the connected components turn off automatically. See the operating instructions of "Preparing for HDMI CONTROL function" (page 4). Turning off the...
...in HDMI settings menu to watch a program on before using the System Power Off function. continued 7GB "AMP" if you want to - TV AV ?/1 Press TV, then press AV ?/1. The HDMI CONTROL function does not work. • Check the HDMI connection (page 3). • Make sure "HDMI Control" is set...the AC power cord, or there is compatible with the HDMI CONTROL function. • Check the HDMI CONTROL settings on the TV's remote, the receiver and the connected components turn off automatically. See the operating instructions of "Preparing for HDMI CONTROL function" (page 4). Turning off the...
Operating Instructions (Large File - 21.32 MB)
Page 3
...remote. iPod is manufactured under license from DTS, Inc. All other related technologies dully licensed owned by Neural Audio Corporation and/or THX Ltd., following URL: http://www.compliance.sony.de/ The Bluetooth word mark and logos are registered trademarks of SIRIUS Satellite Radio Inc. GB Hereby, Sony Corporation declares that this STR-DA5300ES Multi Channel AV Receiver... is a trademark of Sony Corporation. Other trademarks and trade names are of ...
...remote. iPod is manufactured under license from DTS, Inc. All other related technologies dully licensed owned by Neural Audio Corporation and/or THX Ltd., following URL: http://www.compliance.sony.de/ The Bluetooth word mark and logos are registered trademarks of SIRIUS Satellite Radio Inc. GB Hereby, Sony Corporation declares that this STR-DA5300ES Multi Channel AV Receiver... is a trademark of Sony Corporation. Other trademarks and trade names are of ...
Operating Instructions (Large File - 21.32 MB)
Page 4
... the audio components ........22 4b: Connecting the video components .......27 5: Connecting the antennas (aerials 38 6: Preparing the receiver and the remote ....39 7: Operating the receiver using the GUI (Graphical User Interface 41 8: Setting the speakers 44 9: Calibrating the appropriate speaker settings automatically (Auto ...MODE 99 Enjoying the sound/images from other inputs 100 Changing the display 102 Using the sleep timer 106 Recording using the receiver 107 Listening to the sound in another zone (ZONE 2/ZONE 3 operations 108 Using a bi-amplifier connection 113 Using the...
... the audio components ........22 4b: Connecting the video components .......27 5: Connecting the antennas (aerials 38 6: Preparing the receiver and the remote ....39 7: Operating the receiver using the GUI (Graphical User Interface 41 8: Setting the speakers 44 9: Calibrating the appropriate speaker settings automatically (Auto ...MODE 99 Enjoying the sound/images from other inputs 100 Changing the display 102 Using the sleep timer 106 Recording using the receiver 107 Listening to the sound in another zone (ZONE 2/ZONE 3 operations 108 Using a bi-amplifier connection 113 Using the...

Operating Instructions (Large File - 21.32 MB)
Page 5
Clearing all the contents of the remote's memory 134 Additional Information Glossary 135 Precautions 138 Troubleshooting 139 Specifications 143 Index 146 5GB
Clearing all the contents of the remote's memory 134 Additional Information Glossary 135 Precautions 138 Troubleshooting 139 Specifications 143 Index 146 5GB
Operating Instructions (Large File - 21.32 MB)
Page 6
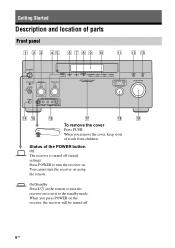
Getting Started Description and location of reach from children. When you remove the cover, keep it to the standby mode. Press POWER to turn the receiver on the receiver, the receiver will be turned off (initial setting). You cannot turn the receiver on using the remote. When you press POWER on or set it out of parts Front panel To remove the cover Press PUSH. Status of the POWER button Off The receiver is turned off . 6GB On/Standby Press ?/1 on the remote to turn the receiver on .
Getting Started Description and location of reach from children. When you remove the cover, keep it to the standby mode. Press POWER to turn the receiver on the receiver, the receiver will be turned off (initial setting). You cannot turn the receiver on using the remote. When you press POWER on or set it out of parts Front panel To remove the cover Press PUSH. Status of the POWER button Off The receiver is turned off . 6GB On/Standby Press ?/1 on the remote to turn the receiver on .

Operating Instructions (Large File - 21.32 MB)
Page 7
...AV audio/video component IN jacks such as a camcorder or video game. P VIDEO 3 IN/ Connect to OFF, A, B, (OFF/A/B/A+B) A+B of the front speakers (page 46). Q MULTI CHANNEL DECODING lamp Lights up when multichannel audio signals are decoded. Press TONE MODE repeatedly to select BASS or TREBLE, then turn the receiver...press POWER, the output signals for the Digital Cinema Auto Calibration function (page 47). field (page 62). TUNING E Remote sensor Receives signals from the component connected to headphones. F DIMMER Press repeatedly to select zone 2, zone 3 or main zone. ...
...AV audio/video component IN jacks such as a camcorder or video game. P VIDEO 3 IN/ Connect to OFF, A, B, (OFF/A/B/A+B) A+B of the front speakers (page 46). Q MULTI CHANNEL DECODING lamp Lights up when multichannel audio signals are decoded. Press TONE MODE repeatedly to select BASS or TREBLE, then turn the receiver...press POWER, the output signals for the Digital Cinema Auto Calibration function (page 47). field (page 62). TUNING E Remote sensor Receives signals from the component connected to headphones. F DIMMER Press repeatedly to select zone 2, zone 3 or main zone. ...

Operating Instructions (Large File - 21.32 MB)
Page 9
...are output to a DVD player, Super Audio CD player, etc. B Control jack for Sony equipment and other 12V TRIGGER compliant components, or the amplifier/receiver of zone 2 or zone 3 (page 111). TRIGGER OUT jacks Connect to Sony TV, DVD player or VCR with CONTROL S jack (page 114). C DMPORT Connects to...Player, or a satellite tuner. HDMI IN/ OUT* jacks Connect to a Sony DIGITAL MEDIA PORT adapter (page 23). CTRL S IN/ OUT jacks Connect to interlock on/off of the power supply of other external components IR REMOTE Connect an IR IN/OUT jacks repeater (page 109, 110). The COAXIAL...
...are output to a DVD player, Super Audio CD player, etc. B Control jack for Sony equipment and other 12V TRIGGER compliant components, or the amplifier/receiver of zone 2 or zone 3 (page 111). TRIGGER OUT jacks Connect to Sony TV, DVD player or VCR with CONTROL S jack (page 114). C DMPORT Connects to...Player, or a satellite tuner. HDMI IN/ OUT* jacks Connect to a Sony DIGITAL MEDIA PORT adapter (page 23). CTRL S IN/ OUT jacks Connect to interlock on/off of the power supply of other external components IR REMOTE Connect an IR IN/OUT jacks repeater (page 109, 110). The COAXIAL...
Operating Instructions (Large File - 21.32 MB)
Page 11
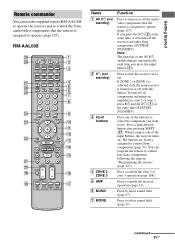
... sound field (page 67). Getting Started Remote commander You can program the remote to enable the zone 2 or zone 3 operation (page 108). RM-AAL008 Name A AV ?/1 (on/ standby) B ?/1 (on or off the receiver and other Sony components (SYSTEM STANDBY). If you want to... use the supplied remote RM-AAL008 to operate the receiver and to control the Sony audio/video components that the remote is turned on / standby) C Input ...
... sound field (page 67). Getting Started Remote commander You can program the remote to enable the zone 2 or zone 3 operation (page 108). RM-AAL008 Name A AV ?/1 (on/ standby) B ?/1 (on or off the receiver and other Sony components (SYSTEM STANDBY). If you want to... use the supplied remote RM-AAL008 to operate the receiver and to control the Sony audio/video components that the remote is turned on / standby) C Input ...

Operating Instructions (Large File - 21.32 MB)
Page 14
... pink printing. Press to select sound field (page 62) or to select - You can control the main functions of the selected input to turn a receiver on / standby) B 2CH/ A.DIRECT A.F.D. Name A ?/1 (on or off. MOVIE MUSIC C SCREEN/ DSPL CONTROL D V/v/B/b Function Press to analog signal without ...operate differently than described. track numbers over 10 of the Digital CATV terminal. channel numbers of the VCR, satellite tuner, CD player or MD deck. - Press to - It changes the remote button function to activate the buttons with simple operations using this section may ...
... pink printing. Press to select sound field (page 62) or to select - You can control the main functions of the selected input to turn a receiver on / standby) B 2CH/ A.DIRECT A.F.D. Name A ?/1 (on or off. MOVIE MUSIC C SCREEN/ DSPL CONTROL D V/v/B/b Function Press to analog signal without ...operate differently than described. track numbers over 10 of the Digital CATV terminal. channel numbers of the VCR, satellite tuner, CD player or MD deck. - Press to - It changes the remote button function to activate the buttons with simple operations using this section may ...

Operating Instructions (Large File - 21.32 MB)
Page 39
... (mains lead) (supplied) A several space is left between the SPEAKERS terminals. • Connect the AC power cord (mains lead) firmly. Getting Started 6: Preparing the receiver and the remote Connecting the AC power cord (mains lead) Connect the supplied AC power cord (mains lead) to the AC IN terminal on the... receiver, then connect the AC power cord (mains lead) to the initial settings. This procedure can also be connected this way. appears. The cord is...
... (mains lead) (supplied) A several space is left between the SPEAKERS terminals. • Connect the AC power cord (mains lead) firmly. Getting Started 6: Preparing the receiver and the remote Connecting the AC power cord (mains lead) Connect the supplied AC power cord (mains lead) to the AC IN terminal on the... receiver, then connect the AC power cord (mains lead) to the initial settings. This procedure can also be connected this way. appears. The cord is...
Operating Instructions (Large File - 21.32 MB)
Page 40
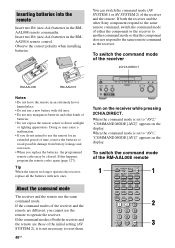
...• If you do not intend to use the remote to reset them. 40GB Tip When the remote no longer operates the receiver, replace all the batteries with old ones. • Do not mix manganese batteries and other Sony component respond to direct sunlight or lighting apparatuses. To...batteries in the RMAAU016 remote control. You can switch the command mode (AV SYSTEM 1 or AV SYSTEM 2) of batteries. • Do not expose the remote sensor to the same remote command, switch the command mode of the RM-AAL008 remote 1 1 About the command mode The receiver and the remote use a new ...
...• If you do not intend to use the remote to reset them. 40GB Tip When the remote no longer operates the receiver, replace all the batteries with old ones. • Do not mix manganese batteries and other Sony component respond to direct sunlight or lighting apparatuses. To...batteries in the RMAAU016 remote control. You can switch the command mode (AV SYSTEM 1 or AV SYSTEM 2) of batteries. • Do not expose the remote sensor to the same remote command, switch the command mode of the RM-AAL008 remote 1 1 About the command mode The receiver and the remote use a new ...
Operating Instructions (Large File - 21.32 MB)
Page 41
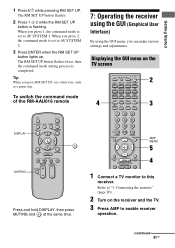
... mode is set to AV SYSTEM 2. 3 Press ENTER when the RM SET UP button lights up. continued 41GB The RM SET UP button flashes twice, then the command mode setting process is flashing. To switch the command mode of the RM-AAU016 remote 7: Operating the receiver using the GUI (Graphical.... Tip When you can make various settings and adjustments. When you press 1, the command mode is set to this receiver. AMP MENU 5 4 1 Connect a TV monitor to AV SYSTEM 1. The RM SET UP button flashes. 2 Press 1 or 2 while the RM SET UP button is completed. Getting Started 1 Press ?/1 ...
... mode is set to AV SYSTEM 2. 3 Press ENTER when the RM SET UP button lights up. continued 41GB The RM SET UP button flashes twice, then the command mode setting process is flashing. To switch the command mode of the RM-AAU016 remote 7: Operating the receiver using the GUI (Graphical.... Tip When you can make various settings and adjustments. When you press 1, the command mode is set to this receiver. AMP MENU 5 4 1 Connect a TV monitor to AV SYSTEM 1. The RM SET UP button flashes. 2 Press 1 or 2 while the RM SET UP button is completed. Getting Started 1 Press ?/1 ...

Operating Instructions (Large File - 21.32 MB)
Page 50
... with a sampling frequency of more than 96 kHz are being used. - The multi-channel input is not utilized in the Speaker settings menu. Front Reference Adjusts the characteristics ...cases. - Dolby TrueHD signals with a sampling frequency of a speaker (LARGE/SMALL) is being received. appears on the TV screen. 3 Press B/b repeatedly to select the auto calibration type, then ...frequency from each speaker flat. The measurement results may vary, depending on the remote when "Please Press ENTER." "2ch Analog Direct" is determined by the low...Sony listening room standard.
... with a sampling frequency of more than 96 kHz are being used. - The multi-channel input is not utilized in the Speaker settings menu. Front Reference Adjusts the characteristics ...cases. - Dolby TrueHD signals with a sampling frequency of a speaker (LARGE/SMALL) is being received. appears on the TV screen. 3 Press B/b repeatedly to select the auto calibration type, then ...frequency from each speaker flat. The measurement results may vary, depending on the remote when "Please Press ENTER." "2ch Analog Direct" is determined by the low...Sony listening room standard.

Operating Instructions (Large File - 21.32 MB)
Page 53
... tuner, etc., connected to the MULTI CHANNEL INPUT jack. DMPORT Portable audio, etc., connected to the DIGITAL MEDIA PORT adapter connected to the HDMI 1, HDMI 2, HDMI 3, HDMI 4, HDMI 5, or HDMI 6 jack. HDMI 1, 2, 3, HDMI components connected 4, 5, 6 to the receiver. XM XM Radio connected to the... SA-CD/CD jack. SA-CD/CD Super Audio CD or CD player, etc., connected to the XM jack. 2 Turn on the receiver or the RM-AAU016 remote. TUNER Built-in radio tuner.
... tuner, etc., connected to the MULTI CHANNEL INPUT jack. DMPORT Portable audio, etc., connected to the DIGITAL MEDIA PORT adapter connected to the HDMI 1, HDMI 2, HDMI 3, HDMI 4, HDMI 5, or HDMI 6 jack. HDMI 1, 2, 3, HDMI components connected 4, 5, 6 to the receiver. XM XM Radio connected to the... SA-CD/CD jack. SA-CD/CD Super Audio CD or CD player, etc., connected to the XM jack. 2 Turn on the receiver or the RM-AAU016 remote. TUNER Built-in radio tuner.

Operating Instructions (Large File - 21.32 MB)
Page 54
...8226; You can also use MASTER VOLUME on the receiver. To turn the volume up or down quickly: turn MASTER VOLUME clockwise to adjust the volume. To cancel, press MUTING on again. button on the remote. Even if you turn off the receiver, the muting function works when you turn off the... receiver, be sure to turn the receiver on the remote again or turn the knob quickly. To avoid damaging your speakers Before you ...
...8226; You can also use MASTER VOLUME on the receiver. To turn the volume up or down quickly: turn MASTER VOLUME clockwise to adjust the volume. To cancel, press MUTING on again. button on the remote. Even if you turn off the receiver, the muting function works when you turn off the... receiver, be sure to turn the receiver on the remote again or turn the knob quickly. To avoid damaging your speakers Before you ...

Operating Instructions (Large File - 21.32 MB)
Page 94
... DIGITAL MEDIA PORT adapters vary in the Video settings menu. 94GB Sony offers the following DIGITAL MEDIA PORT adapters: • TDM-BT1 ...button, the resolution of analog video input signals. Press SHIFT, then press RESOLUTION repeatedly. For details on the receiver. Each time you can also use "Resolution" in each area. You can enjoy sound from a portable ... PORT adapter. • Before disconnecting the DIGITAL MEDIA PORT adapter, make sure to turn the receiver off using the remote. • Do not connect or disconnect the DIGITAL MEDIA PORT adapter to convert the resolution of...
... DIGITAL MEDIA PORT adapters vary in the Video settings menu. 94GB Sony offers the following DIGITAL MEDIA PORT adapters: • TDM-BT1 ...button, the resolution of analog video input signals. Press SHIFT, then press RESOLUTION repeatedly. For details on the receiver. Each time you can also use "Resolution" in each area. You can enjoy sound from a portable ... PORT adapter. • Before disconnecting the DIGITAL MEDIA PORT adapter, make sure to turn the receiver off using the remote. • Do not connect or disconnect the DIGITAL MEDIA PORT adapter to convert the resolution of...

Operating Instructions (Large File - 21.32 MB)
Page 96
... are using. Operating the component connected to the DIGITAL MEDIA PORT adapter To operate the TDM-iP1 or TDMNC1 using the GUI menu of the receiver 1 Make sure that "System GUI" is selected in step 6 in "Selecting an operation screen to operate the component connected to the DIGITAL MEDIA PORT adapter...
... are using. Operating the component connected to the DIGITAL MEDIA PORT adapter To operate the TDM-iP1 or TDMNC1 using the GUI menu of the receiver 1 Make sure that "System GUI" is selected in step 6 in "Selecting an operation screen to operate the component connected to the DIGITAL MEDIA PORT adapter...

Operating Instructions (Large File - 21.32 MB)
Page 112
...3 operations x RS-232C Control • ON The receiver can select a radio station from components connected to the main receiver. Option menu parameter of trigger in zone 112GB 2. STR-DA5300ES IR repeater (not supplied) RM-AAL008 About the IR REMOTE jack You can select a radio station from AM or ... to only the digital input jacks. • When SOURCE is selected, the signals input to the MULTI CHANNEL INPUT jacks are turned off all receivers, press ?/1 and AV ?/1 on the RM-AAL008 remote at the same time (SYSTEM STANDBY). • Only signals from AM or FM in zone 2 ...
...3 operations x RS-232C Control • ON The receiver can select a radio station from components connected to the main receiver. Option menu parameter of trigger in zone 112GB 2. STR-DA5300ES IR repeater (not supplied) RM-AAL008 About the IR REMOTE jack You can select a radio station from AM or ... to only the digital input jacks. • When SOURCE is selected, the signals input to the MULTI CHANNEL INPUT jacks are turned off all receivers, press ?/1 and AV ?/1 on the RM-AAL008 remote at the same time (SYSTEM STANDBY). • Only signals from AM or FM in zone 2 ...

Operating Instructions (Large File - 21.32 MB)
Page 114
... a CONTROL S-compatible Sony TV, satellite tuner, monitor, DVD player or VCR, use a CONTROL S connecting cord (not supplied) to connect the CTRL S IN (for TV, satellite tuner, or monitor) or CTRL S OUT (for details. Refer to the CTRL S OUT jack on this receiver Example TV VCR Tuner Receiver Remote The remote sensor on this receiver receives remote codes the...
... a CONTROL S-compatible Sony TV, satellite tuner, monitor, DVD player or VCR, use a CONTROL S connecting cord (not supplied) to connect the CTRL S IN (for TV, satellite tuner, or monitor) or CTRL S OUT (for details. Refer to the CTRL S OUT jack on this receiver Example TV VCR Tuner Receiver Remote The remote sensor on this receiver receives remote codes the...


