
Operating Instructions
Page 4
... the audio components ........19 4b: Connecting the video components .......24 5: Connecting the antennas (aerials 35 6: Preparing the receiver and the remote ....36 7: Operating the receiver using the GUI (Graphical User Interface 39 8: Setting the speakers 42 9: Calibrating the appropriate speaker settings automatically (Auto Calibration...BRAVIA" Sync 87 Preparing Control for HDMI function ....... 89 Watching a DVD (One-Touch Play 90 Enjoying the TV sound from the speakers connected to the receiver (System Audio Control 91 Turning off the receiver with the TV (System Power Off 91 4US
... the audio components ........19 4b: Connecting the video components .......24 5: Connecting the antennas (aerials 35 6: Preparing the receiver and the remote ....36 7: Operating the receiver using the GUI (Graphical User Interface 39 8: Setting the speakers 42 9: Calibrating the appropriate speaker settings automatically (Auto Calibration...BRAVIA" Sync 87 Preparing Control for HDMI function ....... 89 Watching a DVD (One-Touch Play 90 Enjoying the TV sound from the speakers connected to the receiver (System Audio Control 91 Turning off the receiver with the TV (System Power Off 91 4US

Operating Instructions
Page 5
... adapter (DMPORT 92 Naming inputs 96 Switching between digital and analog audio (INPUT MODE 97 Enjoying the sound/images from other inputs 98 Changing the display 100 Using the sleep timer 104 Recording using the receiver 104 Using a bi-amplifier connection 105 Operating without connecting to the TV .. 106 Using the Remote...
... adapter (DMPORT 92 Naming inputs 96 Switching between digital and analog audio (INPUT MODE 97 Enjoying the sound/images from other inputs 98 Changing the display 100 Using the sleep timer 104 Recording using the receiver 104 Using a bi-amplifier connection 105 Operating without connecting to the TV .. 106 Using the Remote...

Operating Instructions
Page 7
D TUNING +/- F MULTI CHANNEL DECODING lamp Lights up when a sound Sound lamp field with DCSis selected (page 64). P AUTO CAL MIC Connects to a portable PORTABLE AV audio/video component IN jacks such as a camcorder or video game. Q VIDEO 2 IN/ Connect to the jack supplied optimizer...same components are decoded. L INPUT SELECTOR Turn to select the input source to select the tuning mode (page 115-117). E Remote sensor Receives signals from remote commander. C TUNING MODE Press to play back. Adjusts the tonal quality (bass/treble level) of the display. ON/...
D TUNING +/- F MULTI CHANNEL DECODING lamp Lights up when a sound Sound lamp field with DCSis selected (page 64). P AUTO CAL MIC Connects to a portable PORTABLE AV audio/video component IN jacks such as a camcorder or video game. Q VIDEO 2 IN/ Connect to the jack supplied optimizer...same components are decoded. L INPUT SELECTOR Turn to select the input source to select the tuning mode (page 115-117). E Remote sensor Receives signals from remote commander. C TUNING MODE Press to play back. Adjusts the tonal quality (bass/treble level) of the display. ON/...

Operating Instructions
Page 8
...OUT* jacks Connect to a DVD player, etc. AM ANTENNA jack Connects to the FM jack wire antenna (aerial) supplied with this receiver (page 35). The COAXIAL jack provides a better sound quality (page 18, 20, 29, 30). B ANTENNA section FM ANTENNA Connects to the AM loop antenna (aerial) supplied with ... 18, 26). XM jack Connects to this receiver (page 35). The image is output to a TV or a projector while the sound can be output from a TV or/and speakers connected to the XM Mini Tuner and Home Dock (not supplied) (page 78). C RS-232C port Used for maintenance and ...
...OUT* jacks Connect to a DVD player, etc. AM ANTENNA jack Connects to the FM jack wire antenna (aerial) supplied with this receiver (page 35). The COAXIAL jack provides a better sound quality (page 18, 20, 29, 30). B ANTENNA section FM ANTENNA Connects to the AM loop antenna (aerial) supplied with ... 18, 26). XM jack Connects to this receiver (page 35). The image is output to a TV or a projector while the sound can be output from a TV or/and speakers connected to the XM Mini Tuner and Home Dock (not supplied) (page 78). C RS-232C port Used for maintenance and ...
Operating Instructions
Page 9
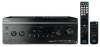
...Connect to a Super Audio CD player, etc. with an analog audio jack for 7.1 channel or 5.1 channel sound (page 22). Connect to operate. Remote commander You can watch the selected input image when... the supplied remote to operate the receiver and to control the Sony audio/video components that the remote is assigned to an external power amplifier. HOME CATEGORY TUNING CATEGORY MODE TUNING DISC SKIP... jacks Connect to speakers (page 16). RM-AAP025 THEATER SHIFT TV AMP 1 VIDEO 1 4 DVD 7 MD/ TAPE -/-- You can operate this receiver using a GUI (Graphical User Interface) (page 39).
...Connect to a Super Audio CD player, etc. with an analog audio jack for 7.1 channel or 5.1 channel sound (page 22). Connect to operate. Remote commander You can watch the selected input image when... the supplied remote to operate the receiver and to control the Sony audio/video components that the remote is assigned to an external power amplifier. HOME CATEGORY TUNING CATEGORY MODE TUNING DISC SKIP... jacks Connect to speakers (page 16). RM-AAP025 THEATER SHIFT TV AMP 1 VIDEO 1 4 DVD 7 MD/ TAPE -/-- You can operate this receiver using a GUI (Graphical User Interface) (page 39).

Operating Instructions
Page 11
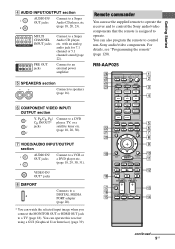
...HOME/ MENU L ./> b) m/M b) N a)b) X b) x b) Function Press to enter the selection of Sony TV, press TV (X) and then press HOME/MENU. To display the menus of the receiver...sound field (page 114, 115). search tracks in recording standby.) Press to start playback of Sony...HOME/MENU (K) for receiver, DVD player, Blu-ray Disc Player, Satellite tuner and PSX. Name >10 E 2CH/ A.DIRECT A.F.D. After pressing BD/DVD TOP MENU (O) or BD/DVD MENU (O), press V/v/B/b to select the settings, and then press to select the settings. fast forward/rewind of the Digital CATV terminal. select channel...
...HOME/ MENU L ./> b) m/M b) N a)b) X b) x b) Function Press to enter the selection of Sony TV, press TV (X) and then press HOME/MENU. To display the menus of the receiver...sound field (page 114, 115). search tracks in recording standby.) Press to start playback of Sony...HOME/MENU (K) for receiver, DVD player, Blu-ray Disc Player, Satellite tuner and PSX. Name >10 E 2CH/ A.DIRECT A.F.D. After pressing BD/DVD TOP MENU (O) or BD/DVD MENU (O), press V/v/B/b to select the settings, and then press to select the settings. fast forward/rewind of the Digital CATV terminal. select channel...

Operating Instructions
Page 12
... (page 97). 12US V INPUT MODE Press to select the input mode when the same components are connected to - D.TUNING Press to restore the sound. PRESET + a)/- select preset channels of Sony TV, press TV (X) and then press DISPLAY. Press MUTING again to enter direct tuning mode. Press TV (X), and then press MUTING to the...
... (page 97). 12US V INPUT MODE Press to select the input mode when the same components are connected to - D.TUNING Press to restore the sound. PRESET + a)/- select preset channels of Sony TV, press TV (X) and then press DISPLAY. Press MUTING again to enter direct tuning mode. Press TV (X), and then press MUTING to the...
Operating Instructions
Page 13
Getting Started Name Function W SHIFT Press to light up the button. X TV Press to output the sound from option menus. It also activate the DISPLAY (T), OPTIONS TOOLS (J), HOME/MENU (K), RETURN/EXIT O (S), (I), and V/v/B/b (I) buttons to perform menu operations for movies and to light...Sony TVs only. MOVIE MUSIC C GUI MODE D V/v/B/b E OPTIONS Function Press to activate the buttons with Theater Mode. It changes the remote key function to turn a receiver on the buttons that you can control the main functions of the receiver with pink printing. For details, refer to select sound...
Getting Started Name Function W SHIFT Press to light up the button. X TV Press to output the sound from option menus. It also activate the DISPLAY (T), OPTIONS TOOLS (J), HOME/MENU (K), RETURN/EXIT O (S), (I), and V/v/B/b (I) buttons to perform menu operations for movies and to light...Sony TVs only. MOVIE MUSIC C GUI MODE D V/v/B/b E OPTIONS Function Press to activate the buttons with Theater Mode. It changes the remote key function to turn a receiver on the buttons that you can control the main functions of the receiver with pink printing. For details, refer to select sound...
Operating Instructions
Page 14
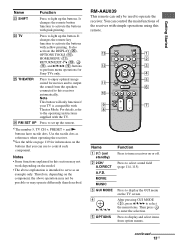
J MUTING Press to turn off automatically (page 104). 1: Installing the speakers This receiver allows you to use a 7.1 channel system (7 speakers and one subwoofer). L DISPLAY Press to the previous menu or exit the menu. VOLUME +/- ...DIGITAL MEDIA PORT adapter (page 50). Enjoying a 5.1/7.1 channel system To fully enjoy theater-like multi channel surround sound requires five speakers (two front speakers, a center speaker, and two surround speakers) and a subwoofer (5.1 channel system). Example of a 5.1 channel speaker system configuration AFront speaker (left) BFront speaker (...
J MUTING Press to turn off automatically (page 104). 1: Installing the speakers This receiver allows you to use a 7.1 channel system (7 speakers and one subwoofer). L DISPLAY Press to the previous menu or exit the menu. VOLUME +/- ...DIGITAL MEDIA PORT adapter (page 50). Enjoying a 5.1/7.1 channel system To fully enjoy theater-like multi channel surround sound requires five speakers (two front speakers, a center speaker, and two surround speakers) and a subwoofer (5.1 channel system). Example of a 5.1 channel speaker system configuration AFront speaker (left) BFront speaker (...

Operating Instructions
Page 15
Getting Started You can place it wherever you connect a 6.1 channel speaker system, place the surround back speaker behind the listening position. AFront speaker (left) BFront speaker (right) CCenter speaker DSurround speaker (left) ...emit highly directional signals, you can enjoy high fidelity reproduction of DVD software recorded sound in the Surround EX format if you connect one additional surround back speaker (6.1 channel system) or two surround back speakers (7.1 channel system.) Example of a 7.1 channel speaker system configuration Tips • The angle A should be the same. &#...
Getting Started You can place it wherever you connect a 6.1 channel speaker system, place the surround back speaker behind the listening position. AFront speaker (left) BFront speaker (right) CCenter speaker DSurround speaker (left) ...emit highly directional signals, you can enjoy high fidelity reproduction of DVD software recorded sound in the Surround EX format if you connect one additional surround back speaker (6.1 channel system) or two surround back speakers (7.1 channel system.) Example of a 7.1 channel speaker system configuration Tips • The angle A should be the same. &#...
Operating Instructions
Page 17
... with the SPEAKERS switch (OFF/A/B/A+B) on the level of the speaker cords are not touching each other connections, set to on, it to a subwoofer, then sound may not be output. For details, see "8: Setting the speakers" (page 42). • Before connecting the AC power cord (mains lead), make sure that amplifier...
... with the SPEAKERS switch (OFF/A/B/A+B) on the level of the speaker cords are not touching each other connections, set to on, it to a subwoofer, then sound may not be output. For details, see "8: Setting the speakers" (page 42). • Before connecting the AC power cord (mains lead), make sure that amplifier...
Operating Instructions
Page 19
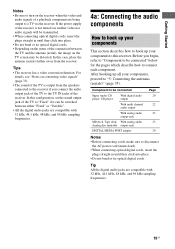
..., proceed to the TV IN jacks of the TV to a TV via the receiver. In this configuration, set the sound output jack of the receiver. Before you connect the audio output jack of the receiver is output from the receiver. Tip All the digital audio jacks are compatible with 32 kHz, 44.1 kHz,... 48 kHz, and 96 kHz sampling frequencies. 19US Component to be connected Super Audio CD player, CD player With digital audio output With multi channel audio output With ...
..., proceed to the TV IN jacks of the TV to a TV via the receiver. In this configuration, set the sound output jack of the receiver. Before you connect the audio output jack of the receiver is output from the receiver. Tip All the digital audio jacks are compatible with 32 kHz, 44.1 kHz,... 48 kHz, and 96 kHz sampling frequencies. 19US Component to be connected Super Audio CD player, CD player With digital audio output With multi channel audio output With ...
Operating Instructions
Page 21
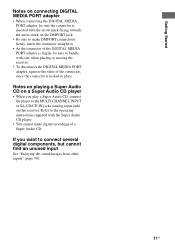
...want to connect several digital components, but cannot find an unused input See "Enjoying the sound/images from other inputs" (page 98). 21US Refer to the operating instructions supplied with care when placing or moving the receiver. • To disconnect the DIGITAL MEDIA PORT adapter, squeeze the sides of the connector,... is locked in . • As the connector of a Super Audio CD. If you play a Super Audio CD, connect the player to the MULTI CHANNEL INPUT or SA-CD/CD IN jacks (analog input jack) on the DMPORT jack. • Be sure to make DMPORT connections firmly, insert the connector...
...want to connect several digital components, but cannot find an unused input See "Enjoying the sound/images from other inputs" (page 98). 21US Refer to the operating instructions supplied with care when placing or moving the receiver. • To disconnect the DIGITAL MEDIA PORT adapter, squeeze the sides of the connector,... is locked in . • As the connector of a Super Audio CD. If you play a Super Audio CD, connect the player to the MULTI CHANNEL INPUT or SA-CD/CD IN jacks (analog input jack) on the DMPORT jack. • Be sure to make DMPORT connections firmly, insert the connector...

Operating Instructions
Page 22
...) Note Audio signals input from MULTI CHANNEL INPUT jacks are not output to enjoy multi channel sound. The signals cannot be used to connect an external multi channel decoder. DVD player, Super Audio CD player, etc. Connecting components with multi channel output jacks If your DVD or Super... Audio CD player is equipped with multi channel output jacks, you can be recorded. 22US Alternatively, the multi channel input jacks can connect them to the MULTI CHANNEL INPUT jacks of this receiver to other audio output ...
...) Note Audio signals input from MULTI CHANNEL INPUT jacks are not output to enjoy multi channel sound. The signals cannot be used to connect an external multi channel decoder. DVD player, Super Audio CD player, etc. Connecting components with multi channel output jacks If your DVD or Super... Audio CD player is equipped with multi channel output jacks, you can be recorded. 22US Alternatively, the multi channel input jacks can connect them to the MULTI CHANNEL INPUT jacks of this receiver to other audio output ...

Operating Instructions
Page 27
... out of HDMI input are not output from the HDMI OUT jack while the receiver menu is displayed. • When you want to listen to a TV via the HDMI cable. • Sound may need certain settings be made by Sony) for details. 27US The video input cannot be output from the VIDEO OUT... view images or listen to the HDMI IN jack can enjoy multi channel Linear PCM. Check the setup of the connected component if an image is poor or the sound does not come out of the receiver is not turned on the receiver when the video and audio of the player. • Not every...
... out of HDMI input are not output from the HDMI OUT jack while the receiver menu is displayed. • When you want to listen to a TV via the HDMI cable. • Sound may need certain settings be made by Sony) for details. 27US The video input cannot be output from the VIDEO OUT... view images or listen to the HDMI IN jack can enjoy multi channel Linear PCM. Check the setup of the connected component if an image is poor or the sound does not come out of the receiver is not turned on the receiver when the video and audio of the player. • Not every...
Operating Instructions
Page 40
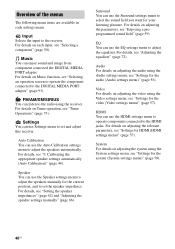
...speaker impedances" (page 42) and "Adjusting the speaker settings manually" (page 66). For details on adjusting the video using the receiver. For details on adjusting the audio using the System settings menu, see "Settings for HDMI (HDMI settings menu)" (page 57)....Selects the input to adjust the speakers automatically. Auto Calibration You can use the Auto Calibration settings menu to the receiver. For details, see "Enjoying a preprogrammed sound field" (page 59). For details on adjusting the parameters, see "9: Calibrating the appropriate speaker settings automatically (Auto...
...speaker impedances" (page 42) and "Adjusting the speaker settings manually" (page 66). For details on adjusting the video using the receiver. For details on adjusting the audio using the System settings menu, see "Settings for HDMI (HDMI settings menu)" (page 57)....Selects the input to adjust the speakers automatically. Auto Calibration You can use the Auto Calibration settings menu to the receiver. For details, see "Enjoying a preprogrammed sound field" (page 59). For details on adjusting the parameters, see "9: Calibrating the appropriate speaker settings automatically (Auto...

Operating Instructions
Page 44
.... "ALL OFF" appears in the Speaker settings menu before you perform Auto Calibration. 44US Doing so may damage the receiver and the microphone. • During the measurement, the sound that comes out of the sound cannot be performed correctly. To turn off the speaker output Press SPEAKERS (OFF/A/B/A+B) repeatedly until the "SP A", "SP...
.... "ALL OFF" appears in the Speaker settings menu before you perform Auto Calibration. 44US Doing so may damage the receiver and the microphone. • During the measurement, the sound that comes out of the sound cannot be performed correctly. To turn off the speaker output Press SPEAKERS (OFF/A/B/A+B) repeatedly until the "SP A", "SP...
Operating Instructions
Page 47
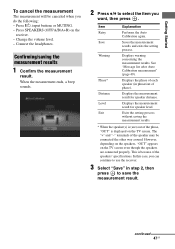
...Confirm the measurement result. continued 47US Press ?/1, input buttons or MUTING. - When the measurement ends, a beep sounds. 2 Press V/v to select the item you can continue to use the receiver. 3 Select "Save" in phase/out of the speakers' specifications. Displays the phase of the speaker may ...be canceled when you do the following: - This is displayed on the receiver. - Displays the measurement result for speaker distance. The "+" and "-" terminals of each speaker (in step 2, then press to save the...
...Confirm the measurement result. continued 47US Press ?/1, input buttons or MUTING. - When the measurement ends, a beep sounds. 2 Press V/v to select the item you can continue to use the receiver. 3 Select "Save" in phase/out of the speakers' specifications. Displays the phase of the speaker may ...be canceled when you do the following: - This is displayed on the receiver. - Displays the measurement result for speaker distance. The "+" and "-" terminals of each speaker (in step 2, then press to save the...

Operating Instructions
Page 52
z You can also use INPUT SELECTOR on the receiver. 3 Press INPUT SELECTOR to select "SA-CD/ CD". Refer to page 64 for a Sony Super Audio CD player. • Refer to the operating instructions supplied with the Super Audio CD player or CD player. Listening to a Super Audio CD/... operation is described for details. 1 Turn on the Super Audio CD player or CD player, then place the disc in the tray. 2 Turn on this receiver to select "SA-CD/CD". 4 Play back the disc. 5 Adjust to a suitable volume. 6 After you have finished listening to a Super Audio CD or CD, eject...
z You can also use INPUT SELECTOR on the receiver. 3 Press INPUT SELECTOR to select "SA-CD/ CD". Refer to page 64 for a Sony Super Audio CD player. • Refer to the operating instructions supplied with the Super Audio CD player or CD player. Listening to a Super Audio CD/... operation is described for details. 1 Turn on the Super Audio CD player or CD player, then place the disc in the tray. 2 Turn on this receiver to select "SA-CD/CD". 4 Play back the disc. 5 Adjust to a suitable volume. 6 After you have finished listening to a Super Audio CD or CD, eject...
Operating Instructions
Page 53
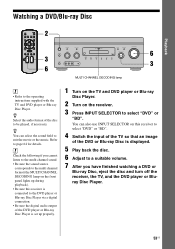
... if you cannot listen to the multi channel sound. • Be sure the sound source corresponds to the multi channel format (the MULTI CHANNEL DECODING lamp on the front panel lights up properly. 1 Turn on the TV and DVD player or Blu-ray Disc Player. 2 Turn on this receiver is connected to the DVD player or... the disc. 6 Adjust to select "DVD" or "BD". You can select the sound field to be played, if necessary. z Select the audio format of the DVD or Blu-ray Disc is set up during playback). • Be sure this receiver to select "DVD" or "BD". 4 Switch the input of the TV so...
... if you cannot listen to the multi channel sound. • Be sure the sound source corresponds to the multi channel format (the MULTI CHANNEL DECODING lamp on the front panel lights up properly. 1 Turn on the TV and DVD player or Blu-ray Disc Player. 2 Turn on this receiver is connected to the DVD player or... the disc. 6 Adjust to select "DVD" or "BD". You can select the sound field to be played, if necessary. z Select the audio format of the DVD or Blu-ray Disc is set up during playback). • Be sure this receiver to select "DVD" or "BD". 4 Switch the input of the TV so...


