
Operating Instructions
Page 2
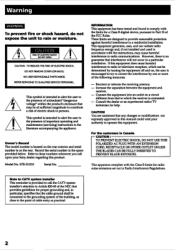
... to radio communications. CAUTION You are designed to radio or television reception, which the receiver is provided to which can radiate radio frequency energy and, if not installed and used...specifies that any changes or modifications not expressly approved in this manual could void your Sony dealer regarding this equipment. CAUTION RISK OF ELECTRIC SHOCK 00 NOT OPEN CAUTION: TO ...upon your authority to correct the interference by turning the equipment off and on the rear. STR-D1015 Serial No. However, there is intended to alert the user to the presence of uninsulated ...
... to radio communications. CAUTION You are designed to radio or television reception, which the receiver is provided to which can radiate radio frequency energy and, if not installed and used...specifies that any changes or modifications not expressly approved in this manual could void your Sony dealer regarding this equipment. CAUTION RISK OF ELECTRIC SHOCK 00 NOT OPEN CAUTION: TO ...upon your authority to correct the interference by turning the equipment off and on the rear. STR-D1015 Serial No. However, there is intended to alert the user to the presence of uninsulated ...

Operating Instructions
Page 3
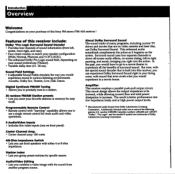
... the Audio 11 Index 38 Using the Remote Control 12 Changing the Settings of the FUNCTION Buttons 14 Receiving Broadcasts 15 Quick Reference 39 Direct Tuning 15 Automatic Tuning 16 Presetting Stations 16 Receiving Preset Stations 17 Watching Video Programs 18 Watching Video Programs 18 Combining a Video Image with the, Sound ... 22 Scanning the Indexed Stations 23 Indexing a Program Source 23 Using the Sleep Timer 24 Programming the Remote Control 25 Programming Signals for Non-Sony Components 25 Programming a New Signal onto a Previously Programmed Button 26
... the Audio 11 Index 38 Using the Remote Control 12 Changing the Settings of the FUNCTION Buttons 14 Receiving Broadcasts 15 Quick Reference 39 Direct Tuning 15 Automatic Tuning 16 Presetting Stations 16 Receiving Preset Stations 17 Watching Video Programs 18 Watching Video Programs 18 Combining a Video Image with the, Sound ... 22 Scanning the Indexed Stations 23 Indexing a Program Source 23 Using the Sleep Timer 24 Programming the Remote Control 25 Programming Signals for Non-Sony Components 25 Programming a New Signal onto a Previously Programmed Button 26
Operating Instructions
Page 4
..., Normal, Phantom and 3 CH LOGIC). • The enhanced Dolby Pro Logic sound field, depending on your purchase of this receiver, you can experience Dolby Surround Sound right in your favorite stations in various listening environments. Additionally licensed under license from another program... source. U.S. Sound Field Settings • 6 adjustable Sound Fields simulate the way you right into this Sony FM stereo/FM-AM receiver ! Station Index • Lets you combine a video image with "learning" capability allows you would experience in a station....
..., Normal, Phantom and 3 CH LOGIC). • The enhanced Dolby Pro Logic sound field, depending on your purchase of this receiver, you can experience Dolby Surround Sound right in your favorite stations in various listening environments. Additionally licensed under license from another program... source. U.S. Sound Field Settings • 6 adjustable Sound Fields simulate the way you right into this Sony FM stereo/FM-AM receiver ! Station Index • Lets you combine a video image with "learning" capability allows you would experience in a station....
Operating Instructions
Page 5
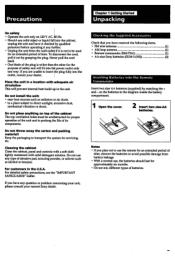
Place the unit in a place subject to insert the plug fully into the outlet, contact your nearest Sony dealer. Keep the packaging to transport the system for the purpose of abrasive pad, scouring powder, or solvent such as radiators or air ducts. &#...of time. Do not throw away the carton and packing material! Notes • If you have received the following items. • FM wire antenna (1) • AM loop antenna (1) • Remote commander (RM-P341) (1) • AA-size Sony batteries (SUM-3 (NS)) (2) Inserting Batteries into the Remote Commander Insert two size AA batteries ...
Place the unit in a place subject to insert the plug fully into the outlet, contact your nearest Sony dealer. Keep the packaging to transport the system for the purpose of abrasive pad, scouring powder, or solvent such as radiators or air ducts. &#...of time. Do not throw away the carton and packing material! Notes • If you have received the following items. • FM wire antenna (1) • AM loop antenna (1) • Remote commander (RM-P341) (1) • AA-size Sony batteries (SUM-3 (NS)) (2) Inserting Batteries into the Remote Commander Insert two size AA batteries ...
Operating Instructions
Page 6
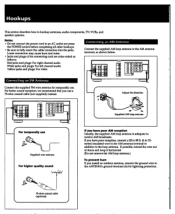
... antenna I For temporally use Supplied wire antenna For higher quality sound \ \,1 f you have poor AM reception Usually, the supplied AM loop antenna is adequate to receive AM broadcasts. Adjust the direction. If you have poor reception, connect a 20 to 50 ft. (6 to 15meter) insulated wire to the AM antenna terminal in...
... antenna I For temporally use Supplied wire antenna For higher quality sound \ \,1 f you have poor AM reception Usually, the supplied AM loop antenna is adequate to receive AM broadcasts. Adjust the direction. If you have poor reception, connect a 20 to 50 ft. (6 to 15meter) insulated wire to the AM antenna terminal in...
Operating Instructions
Page 7
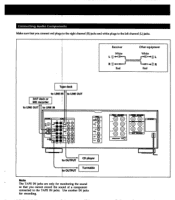
Connecting Audio Components Make sure that you connect red plugs,to the right channel (R) jacks and white plugs to © TV. © sC)(D` ©: Receiver White L R "do' Red Other equipment White L R Red Tape deck to UNE IN to UNE OUT DAT deck or MD recorder to UNE OUT to UNE IN a t I I a , TOIr 0 "moo . 0 0 J-' 0 © VOE WOO( 5 .„,:r 0 • © to the left channel (L) jacks.
Connecting Audio Components Make sure that you connect red plugs,to the right channel (R) jacks and white plugs to © TV. © sC)(D` ©: Receiver White L R "do' Red Other equipment White L R Red Tape deck to UNE IN to UNE OUT DAT deck or MD recorder to UNE OUT to UNE IN a t I I a , TOIr 0 "moo . 0 0 J-' 0 © VOE WOO( 5 .„,:r 0 • © to the left channel (L) jacks.
Operating Instructions
Page 9
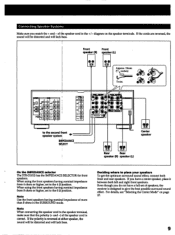
...the second front 4. speaker system IMPEDANCE SELECT • • oC) Ansgainer Center speaker Rear Rear speaker (R) speaker (L) On the IMPEDANCE selector The STR-D1015 has the IMPEDANCE SELECTOR for front speakers. O @ ry to ,the speaker terminal, make sure that the polarity (+ and -) of the speaker cord... speaker, place it between both front and rear speakers. Connecting Speaker Systems Make sure you have a full set of speakers, the receiver is reversed at either speaker, the sound will be distorted and will lack bass. of the speaker cord to give the best possible...
...the second front 4. speaker system IMPEDANCE SELECT • • oC) Ansgainer Center speaker Rear Rear speaker (R) speaker (L) On the IMPEDANCE selector The STR-D1015 has the IMPEDANCE SELECTOR for front speakers. O @ ry to ,the speaker terminal, make sure that the polarity (+ and -) of the speaker cord... speaker, place it between both front and rear speakers. Connecting Speaker Systems Make sure you have a full set of speakers, the receiver is reversed at either speaker, the sound will be distorted and will lack bass. of the speaker cord to give the best possible...

Operating Instructions
Page 10
... an electric iron, fan, TV, or other audio components to the SWITCHED AC OUTLET on the receiver, the receiver will supply power to the connected components only when the receiver is pressed, the indicator of the function you connect other high-wattage appliances to a wall outlet.... 41 Audio component Caution Be careful that the total power consumption of components connected to the AC outlets on the receiver are turned on. 2 Start playback of both this receiver to the outlet(s). When a function selector is turned on. Hookups (Continued) Listening to/Watching a Program Source ...
... an electric iron, fan, TV, or other audio components to the SWITCHED AC OUTLET on the receiver, the receiver will supply power to the connected components only when the receiver is pressed, the indicator of the function you connect other high-wattage appliances to a wall outlet.... 41 Audio component Caution Be careful that the total power consumption of components connected to the AC outlets on the receiver are turned on. 2 Start playback of both this receiver to the outlet(s). When a function selector is turned on. Hookups (Continued) Listening to/Watching a Program Source ...
Operating Instructions
Page 12
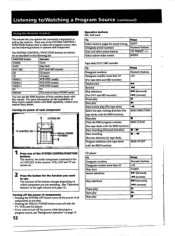
...If you are operating. (See "Operative Buttons" in the following list. The SYSTEM CONTROL/FUNCTION buttons are turned on the availability of Sony stereo cassette decks with the RMS function) CD player To Designate numbers Designate number more than 10 Skip discs Search selections Skip selections Pause... LD LD player VIDEO 1 VCR (VTR 1 mode) VIDEO 2 VCR (VTR 2 mode) VIDEO 3 VCR (VTR 3 mode) TV PHONO TV (The receiver enters PHONO mode) You can use the following buttons to a program source, see "Background operation" on which component you want to turn off the power...
...If you are operating. (See "Operative Buttons" in the following list. The SYSTEM CONTROL/FUNCTION buttons are turned on the availability of Sony stereo cassette decks with the RMS function) CD player To Designate numbers Designate number more than 10 Skip discs Search selections Skip selections Pause... LD LD player VIDEO 1 VCR (VTR 1 mode) VIDEO 2 VCR (VTR 2 mode) VIDEO 3 VCR (VTR 3 mode) TV PHONO TV (The receiver enters PHONO mode) You can use the following buttons to a program source, see "Background operation" on which component you want to turn off the power...
Operating Instructions
Page 14
... Press the LEARN button with this remote, use this remote lights up . [ 0 On the other remote, hold down the button you want the receiver's remote to operate with a ball-point pen, etc. In addition, the remote can literally "learn" the signa4 from remotes that are placed at step... 3-0, the learning mode will be canceled. Before you can use other non-Sony components as shown in step 3 below) • are infrared wireless remotes. Note You can program only specific buttons for a few seconds. If this receiver's remote, press the button that the two remotes: • face straight...
... Press the LEARN button with this remote, use this remote lights up . [ 0 On the other remote, hold down the button you want the receiver's remote to operate with a ball-point pen, etc. In addition, the remote can literally "learn" the signa4 from remotes that are placed at step... 3-0, the learning mode will be canceled. Before you can use other non-Sony components as shown in step 3 below) • are infrared wireless remotes. Note You can program only specific buttons for a few seconds. If this receiver's remote, press the button that the two remotes: • face straight...

Operating Instructions
Page 15
...know the frequency of the station 3u want . H1'1 I . The frequency range of the frequency number. Once you preset stations on the receiver, you do not have changed the AM tuning interval to 9 kHz, you do not have the stereo effect, but the distortion will not have...the last digit. However, if you create a station index name (page 22), this occurs, enter the correct frequency. • eceiving Broadcasts ou can have the receiver scan all the stations until it to monaural. To return to tune in FM 102.50 MHz, press i", "0", "2", "5" and "O." To change the mode ...
...know the frequency of the station 3u want . H1'1 I . The frequency range of the frequency number. Once you preset stations on the receiver, you do not have changed the AM tuning interval to 9 kHz, you do not have the stereo effect, but the distortion will not have...the last digit. However, if you create a station index name (page 22), this occurs, enter the correct frequency. • eceiving Broadcasts ou can have the receiver scan all the stations until it to monaural. To return to tune in FM 102.50 MHz, press i", "0", "2", "5" and "O." To change the mode ...

Operating Instructions
Page 16
...to select a memory page: A, B or C. "MEMORY" is displayed. 4 While "MEMORY" appears, press SHIFT to use automatic tuning. To receive other stations. Each time you press SHIFT, A, B or C is displayed. 5 While "MEMORY" appears, press the number you want . (... 4 0 0 0 0 irm :' O 66 0 En 1 Press TUNER. If you want , use . When a station is displayed. The station's frequency number is received, automatic tuning stops. POWER -. For a higher frequency, press INDEX SELECT/ TUNING +. For a lower frequency, press INDEX SELECT/ TUNING -. To change a preset station Preset...
...to select a memory page: A, B or C. "MEMORY" is displayed. 4 While "MEMORY" appears, press SHIFT to use automatic tuning. To receive other stations. Each time you press SHIFT, A, B or C is displayed. 5 While "MEMORY" appears, press the number you want . (... 4 0 0 0 0 irm :' O 66 0 En 1 Press TUNER. If you want , use . When a station is displayed. The station's frequency number is received, automatic tuning stops. POWER -. For a higher frequency, press INDEX SELECT/ TUNING +. For a lower frequency, press INDEX SELECT/ TUNING -. To change a preset station Preset...

Operating Instructions
Page 17
... SHIFT to select the preset station you want . The station's frequency number is displayed. 3 Press PRESET TUNING + or - BO + • ....i Jc_.__ ..44 co .... .lim.. Receiving Preset Stations You can tune in a preset station either by entering the preset station number or by scanning the preset stations. The station's frequency number...
... SHIFT to select the preset station you want . The station's frequency number is displayed. 3 Press PRESET TUNING + or - BO + • ....i Jc_.__ ..44 co .... .lim.. Receiving Preset Stations You can tune in a preset station either by entering the preset station number or by scanning the preset stations. The station's frequency number...
Operating Instructions
Page 18
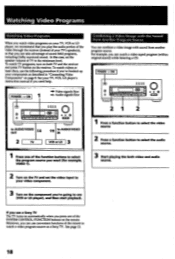
... if you've hooked up your TV's speakers), so that you play the audio portion of the video through the receiver (instead of the function buttons to use a Sony TV The TV turns on automatically when you press one of your components as described in "Connecting Video Components" on... to your TV, VCR, LD player's instruction manual if you need help. Watching Video Programs Watching Video Programs When you watch video programs on the receiver. In this case, set the video input to the minimum level. To watch a video taped program (withou original sound) while listening a CD. POWER ON ...
... if you've hooked up your TV's speakers), so that you play the audio portion of the video through the receiver (instead of the function buttons to use a Sony TV The TV turns on automatically when you press one of your components as described in "Connecting Video Components" on... to your TV, VCR, LD player's instruction manual if you need help. Watching Video Programs Watching Video Programs When you watch video programs on the receiver. In this case, set the video input to the minimum level. To watch a video taped program (withou original sound) while listening a CD. POWER ON ...

Operating Instructions
Page 19
.... is defeated and only the tone effect can also create custom sound custom elds. I POWER ON 1'2 • • D ID ---=-=----i---- Using Pre-programmed Sound Fields his receiver comes with 6 pre-programmed sound fields.
.... is defeated and only the tone effect can also create custom sound custom elds. I POWER ON 1'2 • • D ID ---=-=----i---- Using Pre-programmed Sound Fields his receiver comes with 6 pre-programmed sound fields.
Operating Instructions
Page 20
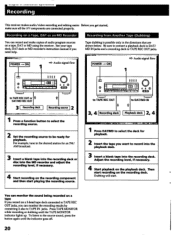
...Insert a blank tape into the MD recorder and adjust the recording level, if necessary. 4 Start recording on a tape, DAT or MD using the receiver. To listen to be ready for an FM/ AM broadcast. 3 Insert a blank tape into the recording deck or disc into the recording deck. ON... sure all the AV components are shown below. Then start . •••• •••• MP Recording OOP This receiver makes audio/video recording and editing easier. POWER -. See your tape deck, DAT deck or MD recorder's instruction manual if you get started,...
...Insert a blank tape into the MD recorder and adjust the recording level, if necessary. 4 Start recording on a tape, DAT or MD using the receiver. To listen to be ready for an FM/ AM broadcast. 3 Insert a blank tape into the recording deck or disc into the recording deck. ON... sure all the AV components are shown below. Then start . •••• •••• MP Recording OOP This receiver makes audio/video recording and editing easier. POWER -. See your tape deck, DAT deck or MD recorder's instruction manual if you get started,...
Operating Instructions
Page 21
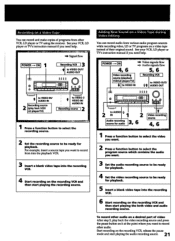
... then start playing the recording source. Recording on it at the point where you want to record other VCR, LD player or TV using the receiver. To record other audio on a desired part of programs from various audio program sources while recording video, LD or TV programs on the recording VCR...
... then start playing the recording source. Recording on it at the point where you want to record other VCR, LD player or TV using the receiver. To record other audio on a desired part of programs from various audio program sources while recording video, LD or TV programs on the recording VCR...

Operating Instructions
Page 22
Indexing Preset Stations You might find that too many preset stations make it hard to find the one index name. To receive the preset station, see page 17. 3 Press DISPLAY until the INDEX indicator lights up. 6 Repeat steps 2 through 5 for a Preset Station You ... station can use any other stations to . Usable letters and symbols You can be stored under any of the following characters to 4), press A or v. This receiver includes a feature that you can group all the Jazz stations and label them "JAZZ." POWER --• ON 54 ® O - 00 O • . 66 &#...
Indexing Preset Stations You might find that too many preset stations make it hard to find the one index name. To receive the preset station, see page 17. 3 Press DISPLAY until the INDEX indicator lights up. 6 Repeat steps 2 through 5 for a Preset Station You ... station can use any other stations to . Usable letters and symbols You can be stored under any of the following characters to 4), press A or v. This receiver includes a feature that you can group all the Jazz stations and label them "JAZZ." POWER --• ON 54 ® O - 00 O • . 66 &#...
Operating Instructions
Page 24
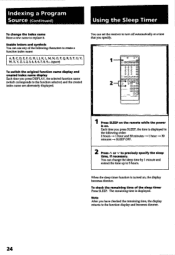
... a Program Source (Continued) Using the Sleep Timer To change the sleep time by 1 minute and extend the time up to 5 hours. You can set the receiver to turn off automatically at a time that you have checked the remaining time, the display returns to the function display and becomes dimmer. 24 To...
... a Program Source (Continued) Using the Sleep Timer To change the sleep time by 1 minute and extend the time up to 5 hours. You can set the receiver to turn off automatically at a time that you have checked the remaining time, the display returns to the function display and becomes dimmer. 24 To...

Operating Instructions
Page 25
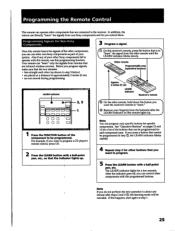
...• face straight each component type. Programming Signals for other non-Sony components as shown in step 0, the LEARN indicator blinks rapidly. 4 Repeat step 3 for Non-Sony Components Once this receiver's remote, press the button that is to operate with a ball-... fail to "learn " only the sigrials from non-Sony components and let you can program only specific buttons for a few seconds. Other remote Programmable area (operative buttons) • Approx. 2 inches (5 cm) LEARN indicator Receiver's remote 2, 5 t=1 C:3 CI) 4-- sza = 0 0 CZ) O O O O O O CD I . 25 If this...
...• face straight each component type. Programming Signals for other non-Sony components as shown in step 0, the LEARN indicator blinks rapidly. 4 Repeat step 3 for Non-Sony Components Once this receiver's remote, press the button that is to operate with a ball-... fail to "learn " only the sigrials from non-Sony components and let you can program only specific buttons for a few seconds. Other remote Programmable area (operative buttons) • Approx. 2 inches (5 cm) LEARN indicator Receiver's remote 2, 5 t=1 C:3 CI) 4-- sza = 0 0 CZ) O O O O O O CD I . 25 If this...


