

Limited Warranty (U.S. Only)
Page 1
... dealer, call : Sony Customer Information Services Center 1-800-222-7669 or visit the Sony Web Site: www.sony.com For an accessory or part not available from your convenience, Sony Electronics Inc. 4-557-173-02 General Stereo/Hifi Components/Tape Decks ® CD Players/Mini Disc Players/Audio Systems Hifi Audio LIMITED WARRANTY Sony Electronics Inc. ("Sony") warrants this Product is valid only in Japan PARTS: In addition, Sony will repair or replace the Product...
... dealer, call : Sony Customer Information Services Center 1-800-222-7669 or visit the Sony Web Site: www.sony.com For an accessory or part not available from your convenience, Sony Electronics Inc. 4-557-173-02 General Stereo/Hifi Components/Tape Decks ® CD Players/Mini Disc Players/Audio Systems Hifi Audio LIMITED WARRANTY Sony Electronics Inc. ("Sony") warrants this Product is valid only in Japan PARTS: In addition, Sony will repair or replace the Product...
Operating Instructions
Page 3
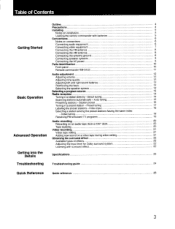
...video equipment Connecting the FM antenna 7 8 Connecting the AM antenna 8 Connecting the antenna ground 8 Connecting speaker systems 9 Connecting the AC power 9 Parts identification 10 Front panel 10 Remote commander RM-S103 11 Audio adjustment 12 Adjusting volume 12 Adjusting tone quality 12 Adjusting left and right sound balance 12 Reinforcing the bass 12 Selecting the speaker system 12 Selecting a program source 13 Radio reception 14 Basic Operation Tuning in a preset station - Direct tuning Scanning stations automatically - Auto tuning 14 15 Presetting...
...video equipment Connecting the FM antenna 7 8 Connecting the AM antenna 8 Connecting the antenna ground 8 Connecting speaker systems 9 Connecting the AC power 9 Parts identification 10 Front panel 10 Remote commander RM-S103 11 Audio adjustment 12 Adjusting volume 12 Adjusting tone quality 12 Adjusting left and right sound balance 12 Reinforcing the bass 12 Selecting the speaker system 12 Selecting a program source 13 Radio reception 14 Basic Operation Tuning in a preset station - Direct tuning Scanning stations automatically - Auto tuning 14 15 Presetting...
Operating Instructions
Page 4
... benzine. Tuner • Precise tuning is produced in broadcast station is displayed. • The current selection/operation is displayed to clearly indicate what is wider than the other for an extended period of time. expands sound just like listening to it is a FM Stereo/FM-AM receiver and audio/video control center. On cleaning the cabinet Clean the cabinet, panel and controls with a soft cloth lightly moistened with...
... benzine. Tuner • Precise tuning is produced in broadcast station is displayed. • The current selection/operation is displayed to clearly indicate what is wider than the other for an extended period of time. expands sound just like listening to it is a FM Stereo/FM-AM receiver and audio/video control center. On cleaning the cabinet Clean the cabinet, panel and controls with a soft cloth lightly moistened with...

Operating Instructions
Page 5
... station. 2 Turn off the power. 3 Press POWER while pressing the " -t " PRESET TUNING button. When the batteries are run down, the remote commander will be used for the proper operation of the unit and to prolong the life of the cabinet. Changing the AM tuning interval The AM tuning interval is based on a g kHz interval, make the following adjustments. 1 Turn on top of its components. Installing Notes on Installation...
... station. 2 Turn off the power. 3 Press POWER while pressing the " -t " PRESET TUNING button. When the batteries are run down, the remote commander will be used for the proper operation of the unit and to prolong the life of the cabinet. Changing the AM tuning interval The AM tuning interval is based on a g kHz interval, make the following adjustments. 1 Turn on top of its components. Installing Notes on Installation...
Operating Instructions
Page 9
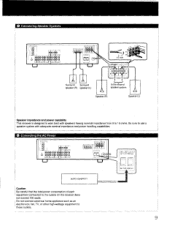
... the receiver does not exceed 100 watts. SW ITC. 0 lOPYI MAX F =- I AC 120 V 60 Hz 9 O-OOOOO 00000 O 000000 00000 A 15mm A A Surround Surround speaker (R) speaker (L) to the second speaker system Speaker (R) Speaker (L) Speaker impedance and power capability This receiver is designed to work best with speakers having nominal impedance from -8 to 16 ohms. Be sure to use a speaker system with adequate nominal impedance and power handling capabilities. 0 Connecting the AC Power OOOO 411$7.074. Connecting Speaker Systems...
... the receiver does not exceed 100 watts. SW ITC. 0 lOPYI MAX F =- I AC 120 V 60 Hz 9 O-OOOOO 00000 O 000000 00000 A 15mm A A Surround Surround speaker (R) speaker (L) to the second speaker system Speaker (R) Speaker (L) Speaker impedance and power capability This receiver is designed to work best with speakers having nominal impedance from -8 to 16 ohms. Be sure to use a speaker system with adequate nominal impedance and power handling capabilities. 0 Connecting the AC Power OOOO 411$7.074. Connecting Speaker Systems...

Operating Instructions
Page 10
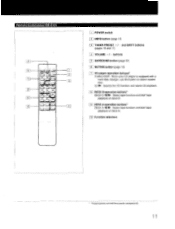
...AUDIO button [ 1 INDEX SELECT button 7 INDEX TUNING +/- buttons 1 8 1 Display window [Ai PRESET TUNING +/- buttons 10] FM MODE button FIT FM/AM button T2I MEMORY button A Numeric buttons 14 DISPLAY MODE button (FREO/INDEX) 10 51 TUNING DIRECT button L16I SHIFT button 117] VOLUME control A INPUT BALANCE control LI 9j BALANCE control 1201 MUTING switch and indicator 121] BASS/TREBLE TONE controls 122 DBFB (Dynamic Bass Feed Back) button and indicator } 23 j CURSOR MODE operation buttons 1241 CURSOR MODE selectors and indicators Function selectors and TAPE 2 MONITOR indicator HEADPHONES jack...
...AUDIO button [ 1 INDEX SELECT button 7 INDEX TUNING +/- buttons 1 8 1 Display window [Ai PRESET TUNING +/- buttons 10] FM MODE button FIT FM/AM button T2I MEMORY button A Numeric buttons 14 DISPLAY MODE button (FREO/INDEX) 10 51 TUNING DIRECT button L16I SHIFT button 117] VOLUME control A INPUT BALANCE control LI 9j BALANCE control 1201 MUTING switch and indicator 121] BASS/TREBLE TONE controls 122 DBFB (Dynamic Bass Feed Back) button and indicator } 23 j CURSOR MODE operation buttons 1241 CURSOR MODE selectors and indicators Function selectors and TAPE 2 MONITOR indicator HEADPHONES jack...
Operating Instructions
Page 11
... with a multi-disc changer, use this button to select loaded disc. Function selectors * These buttons control Sony audio components. 11 rE DECK A operation buttons* DECK A 4III/10-: Select tape function and start tape playback on deck A. CD PP.: Selects the CD function and starts CD playback. 18 I DECK B operation buttons* DECK B Select tape function and start tape playback on deck B. Remote Commander RM-S103 loo 1 O nj0 I2I . L_I CI 0 O 14 1 0 a [-I1 POWER switch DBFB button (page 12) 131 TUNER PRESET +/- and SHIFT buttons (pages 16 and 17) r-4i VOLUME +/-
... with a multi-disc changer, use this button to select loaded disc. Function selectors * These buttons control Sony audio components. 11 rE DECK A operation buttons* DECK A 4III/10-: Select tape function and start tape playback on deck A. CD PP.: Selects the CD function and starts CD playback. 18 I DECK B operation buttons* DECK B Select tape function and start tape playback on deck B. Remote Commander RM-S103 loo 1 O nj0 I2I . L_I CI 0 O 14 1 0 a [-I1 POWER switch DBFB button (page 12) 131 TUNER PRESET +/- and SHIFT buttons (pages 16 and 17) r-4i VOLUME +/-
Operating Instructions
Page 12
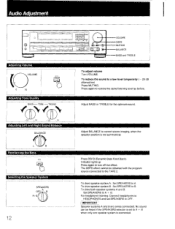
...No sound can be obtained with the program source connected to A + B when only one speaker system is connected. Press again to a low level temporarily (- 20 dB attenuation) Press MUTING. To drive both speaker systems A and B: Set SPEAKERS to turn off the effect. DBFB MUTING I I I I I CiC11C:1 . C1C1 C=1=1C1 VOLUME C1C1C11=1 - - - Indicator lights up Press again to A + B. Audio Adjustment I (cID (D) ® BALANCE BASS and TREBLE Adjusting Volume VOLUME -2OdB 0 10 Adjusting Tone Quality BASS -TONE ---TREBLE To adjust volume Turn VOLUME. Reinforcing the Bass...
...No sound can be obtained with the program source connected to A + B when only one speaker system is connected. Press again to a low level temporarily (- 20 dB attenuation) Press MUTING. To drive both speaker systems A and B: Set SPEAKERS to turn off the effect. DBFB MUTING I I I I I CiC11C:1 . C1C1 C=1=1C1 VOLUME C1C1C11=1 - - - Indicator lights up Press again to A + B. Audio Adjustment I (cID (D) ® BALANCE BASS and TREBLE Adjusting Volume VOLUME -2OdB 0 10 Adjusting Tone Quality BASS -TONE ---TREBLE To adjust volume Turn VOLUME. Reinforcing the Bass...

Operating Instructions
Page 13
Phono record Radio broadcast Compact disc DAT programs Taped programs Video programs FUNCTION selector to be pressed PHONO TUNER CD DAT TAPE1, TAPE2 MONITOR VIDEO1, VIDEO2/LD 2 Start the selected program. 3 Adjust the volume. VOLUME 0 13 Selecting a Program Source LPOWER - ON 3 E= ds DEG aD Turntable system CD player Tape deck DAT 2 VCR LD player r 1 Select the progam source.
Phono record Radio broadcast Compact disc DAT programs Taped programs Video programs FUNCTION selector to be pressed PHONO TUNER CD DAT TAPE1, TAPE2 MONITOR VIDEO1, VIDEO2/LD 2 Start the selected program. 3 Adjust the volume. VOLUME 0 13 Selecting a Program Source LPOWER - ON 3 E= ds DEG aD Turntable system CD player Tape deck DAT 2 VCR LD player r 1 Select the progam source.

Operating Instructions
Page 14
... unit receives an FM stereo program, the STEREO indicator goes on in the receivable frequency range The entered digits (up to the stereo mode, press FM MODE again. 4 Enter the frequency. Tuning intervals for AM) blink in a Station Directly - To return to 3 digits for direct tuning are the followings: FM: 50 kHz interval AM: 10 kHz interval (changeable to the 9 kHz interval) When the entered number is displayed. Radio Reception Tuning in the frequency display...
... unit receives an FM stereo program, the STEREO indicator goes on in the receivable frequency range The entered digits (up to the stereo mode, press FM MODE again. 4 Enter the frequency. Tuning intervals for AM) blink in a Station Directly - To return to 3 digits for direct tuning are the followings: FM: 50 kHz interval AM: 10 kHz interval (changeable to the 9 kHz interval) When the entered number is displayed. Radio Reception Tuning in the frequency display...

Operating Instructions
Page 16
... 2, select the STEREO or MONO mode with the FM MODE button, if necessary. TUNER 2 Tune in the desired station. (See "Auto Tuning" or "Direct Tuning".) 3 MEMOR MEMORY indicator appears for a few seconds. 4 While the MEMORY indicator is on , press the desired number. 0 Repeat above steps for presetting other desired stations. 16 o 3 5 4 _ 5,5 a) (1) ID 0 1 Replacing a preset station Preset another station on the number of 30 FM/AM stations can be memorized in the station presetting. Radio Reception Presetting Stations...
... 2, select the STEREO or MONO mode with the FM MODE button, if necessary. TUNER 2 Tune in the desired station. (See "Auto Tuning" or "Direct Tuning".) 3 MEMOR MEMORY indicator appears for a few seconds. 4 While the MEMORY indicator is on , press the desired number. 0 Repeat above steps for presetting other desired stations. 16 o 3 5 4 _ 5,5 a) (1) ID 0 1 Replacing a preset station Preset another station on the number of 30 FM/AM stations can be memorized in the station presetting. Radio Reception Presetting Stations...

Operating Instructions
Page 17
PRESET TUNING -I > 2 Select the desired preset station. If they are erased, store the stations again. 17 Preset Tuning iMethod Le- Tuning in a Preset Station - For higher preset number A1 AO B1 BO + co-.1 .4- 2 Select the memory page (A, B, or C). 3 IMPORTANT The memorized station is maintained for approximately one month even if the power cord is disconnected from the AC power source. POWER ON I 2 0 Method B POWER ON 0 1 -4 1 1 TUNER TUNER oO (I) CD I For lower preset number 4„.. I-
PRESET TUNING -I > 2 Select the desired preset station. If they are erased, store the stations again. 17 Preset Tuning iMethod Le- Tuning in a Preset Station - For higher preset number A1 AO B1 BO + co-.1 .4- 2 Select the memory page (A, B, or C). 3 IMPORTANT The memorized station is maintained for approximately one month even if the power cord is disconnected from the AC power source. POWER ON I 2 0 Method B POWER ON 0 1 -4 1 1 TUNER TUNER oO (I) CD I For lower preset number 4„.. I-

Operating Instructions
Page 18
.... Radio Reception Labeling the Preset Stations - To correct a previously memorized index name. 1 Press CURSOR MODE INDEX twice so that the index name flashes. 2 Press or V to call up to the desired character. 4 Select the character with 6, or '7. 5 Proceed with Direct, Auto, or Preset Tuning. 3 IN EX 4 Create an index name. To display the frequency and index name of preset stations Each time the FREQ/INDEX button...
.... Radio Reception Labeling the Preset Stations - To correct a previously memorized index name. 1 Press CURSOR MODE INDEX twice so that the index name flashes. 2 Press or V to call up to the desired character. 4 Select the character with 6, or '7. 5 Proceed with Direct, Auto, or Preset Tuning. 3 IN EX 4 Create an index name. To display the frequency and index name of preset stations Each time the FREQ/INDEX button...

Operating Instructions
Page 19
... Tuning POWER ON 23 0 o (5 Receiving FM Simulcast TV programs POWER ON TV tuner or VCR I VIDEO I or VIDEO 2 IN Monitor TV 2 MON TOR VIDEO OUT 1 (ID 1) !am 1 TUNER 2 Select the index name. CI TUNER uzz, 6 19 INDEX SELECT 3 Select the desired station. Selecting a Station among the Preset Stations having the Same Index - According to video inputs connected to an equipment to which the VHF antenna is connected. 2 Turn on the monitor TV. 3 Select the desired program on the TV tuner...
... Tuning POWER ON 23 0 o (5 Receiving FM Simulcast TV programs POWER ON TV tuner or VCR I VIDEO I or VIDEO 2 IN Monitor TV 2 MON TOR VIDEO OUT 1 (ID 1) !am 1 TUNER 2 Select the index name. CI TUNER uzz, 6 19 INDEX SELECT 3 Select the desired station. Selecting a Station among the Preset Stations having the Same Index - According to video inputs connected to an equipment to which the VHF antenna is connected. 2 Turn on the monitor TV. 3 Select the desired program on the TV tuner...
Operating Instructions
Page 20
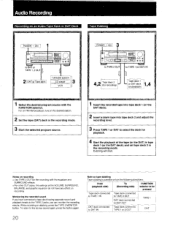
... recording mode. 3 Start the selected program source. 1 Insert the recorded tape into tape deck 1 (or the DAT deck). 2 Insert a blank tape into tape deck 2 and adjust the recording level. 3 Press TAPE 1 or DAT to select the deck for playback. 4 Start the playback of the VOLUME, SURROUND, BALANCE, and graphic equalizer do not have connected a tape deck having separate record and playback heads to the TAPE 2 jacks, you have any effect on an Audio Tape Deck or DAT Deck Tape Dubbing POWER...
... recording mode. 3 Start the selected program source. 1 Insert the recorded tape into tape deck 1 (or the DAT deck). 2 Insert a blank tape into tape deck 2 and adjust the recording level. 3 Press TAPE 1 or DAT to select the deck for playback. 4 Start the playback of the VOLUME, SURROUND, BALANCE, and graphic equalizer do not have connected a tape deck having separate record and playback heads to the TAPE 2 jacks, you have any effect on an Audio Tape Deck or DAT Deck Tape Dubbing POWER...

Operating Instructions
Page 22
... square on the display. 3 Select a program source with the function selector and start playback. 4 Adjust the INPUT BALANCE control until the monaural sound, such as a dialogue, heard from the surround speakers is memorized each time after adjusting with the CURSOR MODE buttons. They will resume. The normal sound without surround effect will be obtained with Surround Effect ars-cwWwwwireitelatawerfars.w, snmkslcsa,s,InwswA- To turn off the surround effect Press SURROUND ON/OFF again...
... square on the display. 3 Select a program source with the function selector and start playback. 4 Adjust the INPUT BALANCE control until the monaural sound, such as a dialogue, heard from the surround speakers is memorized each time after adjusting with the CURSOR MODE buttons. They will resume. The normal sound without surround effect will be obtained with Surround Effect ars-cwWwwwireitelatawerfars.w, snmkslcsa,s,InwswA- To turn off the surround effect Press SURROUND ON/OFF again...

Operating Instructions
Page 23
... Video section Inputs Outputs VIDEO 1,2: 1 Vp-p 75 ohms VIDEO 1, MONITOR: 1 Vp-p 75 ohms FM tuner section Frequency range Antenna terminals Sensitivity at 50 dB Usable sensitivity S/N Mono Stereo Harmonic Mono distortion at 1 kHz Stereo IM distortion Mono Stereo Separation Frequency response Selectivity Capture ratio AM suppression ratio Image response ratio IF response ratio Spurious response ratio RF intermodulation at 800 kHz Auto tuning threshold Low High 87.5 - 108.0 MHz 300 ohms, balanced...
... Video section Inputs Outputs VIDEO 1,2: 1 Vp-p 75 ohms VIDEO 1, MONITOR: 1 Vp-p 75 ohms FM tuner section Frequency range Antenna terminals Sensitivity at 50 dB Usable sensitivity S/N Mono Stereo Harmonic Mono distortion at 1 kHz Stereo IM distortion Mono Stereo Separation Frequency response Selectivity Capture ratio AM suppression ratio Image response ratio IF response ratio Spurious response ratio RF intermodulation at 800 kHz Auto tuning threshold Low High 87.5 - 108.0 MHz 300 ohms, balanced...
Operating Instructions
Page 24
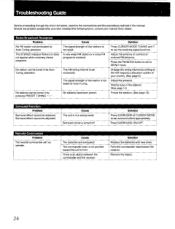
... Auto-Tuning. Solution Replace the batteries with new ones. Point the commander head toward the unit's front. The signal strength of your nearest Sony dealer. Directly tune in by pressing PRESET TUNING +/-. Surround effect cannot be obtained. Adjust the antenna or connect an external FM antenna. Change the tuning interval according to the AM frequency allocation system of the station is in the manual. Remote Commander Problem The remote commander will not operate...
... Auto-Tuning. Solution Replace the batteries with new ones. Point the commander head toward the unit's front. The signal strength of your nearest Sony dealer. Directly tune in by pressing PRESET TUNING +/-. Surround effect cannot be obtained. Adjust the antenna or connect an external FM antenna. Change the tuning interval according to the AM frequency allocation system of the station is in the manual. Remote Commander Problem The remote commander will not operate...
Operating Instructions
Page 25
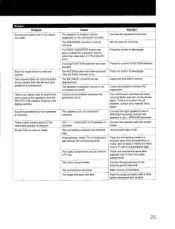
... connections are not shielded type. One channel does not transmit audio, or the volume from the audio components. The audio components are used at a very low volume. Connect the ground wire to disengage. Make secure connections. The MUTING button has been pressed. The TAPE 2 MONITOR button has been pressed for a program source other than tape deck 2. (The indicator is obscure. A short-circuit problem activates the protective circuit. The connecting cords are loose. There is lack of sound...
... connections are not shielded type. One channel does not transmit audio, or the volume from the audio components. The audio components are used at a very low volume. Connect the ground wire to disengage. Make secure connections. The MUTING button has been pressed. The TAPE 2 MONITOR button has been pressed for a program source other than tape deck 2. (The indicator is obscure. A short-circuit problem activates the protective circuit. The connecting cords are loose. There is lack of sound...

Operating Instructions
Page 27
... audio program source. EDIT AUDIO Select the desired audio p ogram source. Release pause on the equipment to the playback mode. ON POWER Select an index name TUNER .00 1,10EXT SELECT INDEX TUNING T Video Operations Video tape editing ON POWER Turn on both playback-side VCR and VCR 1. 27 Set VCR 2 to be used. At the desired point, set the playback-side VCR and VCR 1 .4 to the recording mode. Tuning in a categorized station-index tuning Ex.) Tuning in a station...
... audio program source. EDIT AUDIO Select the desired audio p ogram source. Release pause on the equipment to the playback mode. ON POWER Select an index name TUNER .00 1,10EXT SELECT INDEX TUNING T Video Operations Video tape editing ON POWER Turn on both playback-side VCR and VCR 1. 27 Set VCR 2 to be used. At the desired point, set the playback-side VCR and VCR 1 .4 to the recording mode. Tuning in a categorized station-index tuning Ex.) Tuning in a station...

