Operating Guide
Page 12
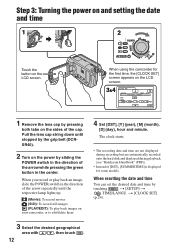
...direction of the cap. Step 3: Turning the power on and setting the date and time 1 2 Touch the button on your camcorder, or to edit/delete them 4 Set [DST], [Y] (year), [M] (month), [D] (day), hour and minute. Pull the lens cap string down until stopped by the grip belt (DCRSR40.... The clock starts. • The recording date and time are not displayed during recording but are automatically recorded onto the hard disk and displayed during playback (see "Handycam Handbook" (PDF)). • Instead of the arrow while pressing the green button in the direction of [DST], [SUMMERTIME]...
...direction of the cap. Step 3: Turning the power on and setting the date and time 1 2 Touch the button on your camcorder, or to edit/delete them 4 Set [DST], [Y] (year), [M] (month), [D] (day), hour and minute. Pull the lens cap string down until stopped by the grip belt (DCRSR40.... The clock starts. • The recording date and time are not displayed during recording but are automatically recorded onto the hard disk and displayed during playback (see "Handycam Handbook" (PDF)). • Instead of the arrow while pressing the green button in the direction of [DST], [SUMMERTIME]...
Handycam Handbook
Page 25
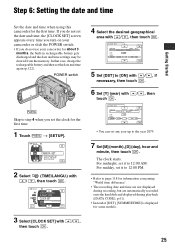
... it to the year 2079. 7 Set [M] (month), [D] (day), hour and minute, then touch . POWER switch Skip to page 118 for information concerning "World time difference". • The recording date and time are not displayed during recording, but are automatically recorded onto the hard disk and displayed during ...If you set the date and time again (p.122). Step 6: Setting the date and time Getting Started Set the date and time when using this camcorder for the first time. 1 Touch t [SETUP]. 60min CAMERA SET PROGRAM AE SPOT METER EXPOSURE OK 2 Select (TIME/LANGU.) with / , then...
... it to the year 2079. 7 Set [M] (month), [D] (day), hour and minute, then touch . POWER switch Skip to page 118 for information concerning "World time difference". • The recording date and time are not displayed during recording, but are automatically recorded onto the hard disk and displayed during ...If you set the date and time again (p.122). Step 6: Setting the date and time Getting Started Set the date and time when using this camcorder for the first time. 1 Touch t [SETUP]. 60min CAMERA SET PROGRAM AE SPOT METER EXPOSURE OK 2 Select (TIME/LANGU.) with / , then...
Handycam Handbook
Page 120
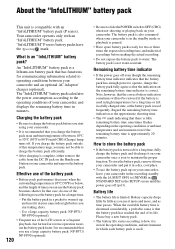
...• If the battery pack is not used in high temperatures for a long time, fully charge the battery pack and discharge it on your camcorder once a year to charge the battery pack efficiently. • After charging is paused. • Have spare battery packs ready for two or three times the ... the operating conditions, and environment in a pocket to use the battery pack up , and insert it from the DC IN jack on the Handycam Station or your camcorder and put it in a dry, cool place. • To use the battery pack for communicating information related to 86°F) until the ...
...• If the battery pack is not used in high temperatures for a long time, fully charge the battery pack and discharge it on your camcorder once a year to charge the battery pack efficiently. • After charging is paused. • Have spare battery packs ready for two or three times the ... the operating conditions, and environment in a pocket to use the battery pack up , and insert it from the DC IN jack on the Handycam Station or your camcorder and put it in a dry, cool place. • To use the battery pack for communicating information related to 86°F) until the ...

