User Guide
Page 2
...time Tab 32 Installation Tab 33 Initialize Tab 34 System log Tab 35 Access log Tab 35 Setting the Camera Image and Audio - Network Menu .....46 Network Tab 46 Dynamic IP address notification Tab - Setting a tour 57 Sending an Image via e-mail 26 Sending a monitor image to... (SNC-DM110 / DM160 / DS60 / CM120 / CS20 only 38 Video codec Tab 40 Streaming Tab 44 Configuring the Network - Basic setting of Contents Overview Features 4 How to Use This User's Guide 5 System Requirements 5 Preparation Assigning the IP Address to the Camera 6 Assigning an IP address using the IP Setup...
...time Tab 32 Installation Tab 33 Initialize Tab 34 System log Tab 35 Access log Tab 35 Setting the Camera Image and Audio - Network Menu .....46 Network Tab 46 Dynamic IP address notification Tab - Setting a tour 57 Sending an Image via e-mail 26 Sending a monitor image to... (SNC-DM110 / DM160 / DS60 / CM120 / CS20 only 38 Video codec Tab 40 Streaming Tab 44 Configuring the Network - Basic setting of Contents Overview Features 4 How to Use This User's Guide 5 System Requirements 5 Preparation Assigning the IP Address to the Camera 6 Assigning an IP address using the IP Setup...
User Guide
Page 3
...Others Using the Supplied IP Setup Program 78 Starting the IP Setup Program 78 Bandwidth control Tab 78 Date time Tab 79 Rebooting the Camera 79 Using the SNC audio upload tool - Masking a Camera Image 87 Installing the SNC privacy masking tool ..........87 Using the SNC privacy masking tool ...88 Using the Custom Homepage Installer 89 Uploading the homepage to the camera using the Custom Homepage Installer 89 Assigning the IP Address to the Computer ......... 80 Using the SNC audio upload tool 80 Using the SNC video player - Setting the image memory function 65 Alarm recording Tab...
...Others Using the Supplied IP Setup Program 78 Starting the IP Setup Program 78 Bandwidth control Tab 78 Date time Tab 79 Rebooting the Camera 79 Using the SNC audio upload tool - Masking a Camera Image 87 Installing the SNC privacy masking tool ..........87 Using the SNC privacy masking tool ...88 Using the Custom Homepage Installer 89 Uploading the homepage to the camera using the Custom Homepage Installer 89 Assigning the IP Address to the Computer ......... 80 Using the SNC audio upload tool 80 Using the SNC video player - Setting the image memory function 65 Alarm recording Tab...
User Guide
Page 6
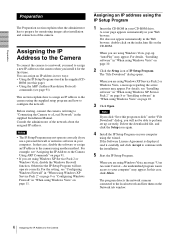
... file, and click the Setup icon again. 4 Install the IP Setup Program on page 11. An unidentified program wants access to the local network and lists them on the CD-ROM. The program detects the network cameras connected to your computer using Windows Vista, pop-up correctly. If...using Windows XP Service Pack 2" on page 9 or "Configuring Windows Firewall" in the supplied Installation Manual. Assigning the IP Address to the Camera To connect the camera to a network, you are using the supplied setup program and how to perform set up "AutoPlay" may not operate correctly if ...
... file, and click the Setup icon again. 4 Install the IP Setup Program on page 11. An unidentified program wants access to the local network and lists them on the CD-ROM. The program detects the network cameras connected to your computer using Windows Vista, pop-up correctly. If...using Windows XP Service Pack 2" on page 9 or "Configuring Windows Firewall" in the supplied Installation Manual. Assigning the IP Address to the Camera To connect the camera to a network, you are using the supplied setup program and how to perform set up "AutoPlay" may not operate correctly if ...

User Guide
Page 7
... "admin." Normally, select 80 for this step. To specify the IP address manually: Select Use the following DNS server address, and type the Primary DNS server address and Secondary DNS server address in the relevant boxes. The network settings for the selected camera are assigned automatically. Preparation Note When you want to the...
... "admin." Normally, select 80 for this step. To specify the IP address manually: Select Use the following DNS server address, and type the Primary DNS server address and Secondary DNS server address in the relevant boxes. The network settings for the selected camera are assigned automatically. Preparation Note When you want to the...

User Guide
Page 8
...; When you select Save in the clipboard. Display sample: SNC-DM160 If message "File Download - Preparation If "Setting OK" is displayed, the IP address is correctly assigned. 12 To access the camera directly, double-click the camera name in the network tab. * DHCP stands for a fixed IP address. When you hold down Ctrl and press a, you...
...; When you select Save in the clipboard. Display sample: SNC-DM160 If message "File Download - Preparation If "Setting OK" is displayed, the IP address is correctly assigned. 12 To access the camera directly, double-click the camera name in the network tab. * DHCP stands for a fixed IP address. When you hold down Ctrl and press a, you...

User Guide
Page 9
The software installation starts. Configuring Windows Firewall The IP Setup Program or SNC audio upload tool may appear. If " Internet Explorer - If you want to the Camera Installing ActiveX Control During installation of Windows Firewall. (No cameras are shown in the list even if they are detected.) In this case, operate as follows: Example: In...
The software installation starts. Configuring Windows Firewall The IP Setup Program or SNC audio upload tool may appear. If " Internet Explorer - If you want to the Camera Installing ActiveX Control During installation of Windows Firewall. (No cameras are shown in the list even if they are detected.) In this case, operate as follows: Example: In...

User Guide
Page 10
In this case, operate as IP Setup Program from CD-ROM. Then the IP Setup Program is completed, the cameras connected in the local network are displayed in the CD-ROM. Note If you install software such as follows: Example: In case of IP Setup Program If pop-up "AutoPlay" appears when a CD-ROM is inserted...
In this case, operate as IP Setup Program from CD-ROM. Then the IP Setup Program is completed, the cameras connected in the local network are displayed in the CD-ROM. Note If you install software such as follows: Example: In case of IP Setup Program If pop-up "AutoPlay" appears when a CD-ROM is inserted...

User Guide
Page 11
... you will not be able to the Camera In this case, click Allow. If message "Internet Explorer - If "Internet Explorer - If message "User Account Control - Configuring Windows Firewall The IP Setup Program or SNC audio upload tool may appear. Installing ActiveX... Control During installation of Windows Firewall. (No cameras are detected.) In this case, operate as IP Setup Program, message "User Account Control - If message "...
... you will not be able to the Camera In this case, click Allow. If message "Internet Explorer - If "Internet Explorer - If message "User Account Control - Configuring Windows Firewall The IP Setup Program or SNC audio upload tool may appear. Installing ActiveX... Control During installation of Windows Firewall. (No cameras are detected.) In this case, operate as IP Setup Program, message "User Account Control - If message "...

User Guide
Page 12
If you want to the Camera When the above procedure is added to the Program or port list. 12 Assigning the IP Address to keep Windows Firewall On, continue with the following steps. 5 Select the "Exceptions" tab. 6 Select Add Program.... 7 If the Add Program dialog appears, select IP Setup Program and click OK. Then the IP Setup Program is completed, the cameras connected in the local network are displayed in the IP Setup Program. 4 Select Off in the list. Preparation The cameras will be displayed in the "General" tab. 8 Click OK.
If you want to the Camera When the above procedure is added to the Program or port list. 12 Assigning the IP Address to keep Windows Firewall On, continue with the following steps. 5 Select the "Exceptions" tab. 6 Select Add Program.... 7 If the Add Program dialog appears, select IP Setup Program and click OK. Then the IP Setup Program is completed, the cameras connected in the local network are displayed in the IP Setup Program. 4 Select Off in the list. Preparation The cameras will be displayed in the "General" tab. 8 Click OK.

User Guide
Page 13
Preparation The welcome page of the network camera is displayed. Display sample: SNC-DM160 2 Click Enter. When you click Yes, ActiveX control is installed and the main viewer is displayed on the Web browser. Use Internet Explorer as ... Options and click the Security tab. 2 Click the Internet icon (when using the camera via a local network). 13 Accessing the Camera Using the Web Browser Accessing the Camera Using the Web Browser After the IP address has been assigned to the camera, check that case, disable Automatic configuration and set the security level of the Internet...
Preparation The welcome page of the network camera is displayed. Display sample: SNC-DM160 2 Click Enter. When you click Yes, ActiveX control is installed and the main viewer is displayed on the Web browser. Use Internet Explorer as ... Options and click the Security tab. 2 Click the Internet icon (when using the camera via a local network). 13 Accessing the Camera Using the Web Browser Accessing the Camera Using the Web Browser After the IP address has been assigned to the camera, check that case, disable Automatic configuration and set the security level of the Internet...

User Guide
Page 17
...) and UDP multicast techniques are adopted for reading the usual Web page. Display sample: SNC-DM160 Note If the welcome page does not start correctly, the security level of the .... If a firewall is installed between the camera and the computer, the video/audio may be reduced. By selecting it, the network communications load of the network camera is selected. Notes • The function may...applet viewer when the video codec is installed between the camera and the computer, or depending on your computer and type the IP address of reading Web pages, you select an item including...
...) and UDP multicast techniques are adopted for reading the usual Web page. Display sample: SNC-DM160 Note If the welcome page does not start correctly, the security level of the .... If a firewall is installed between the camera and the computer, the video/audio may be reduced. By selecting it, the network communications load of the network camera is selected. Notes • The function may...applet viewer when the video codec is installed between the camera and the computer, or depending on your computer and type the IP address of reading Web pages, you select an item including...

User Guide
Page 30
...System menu has six tabs: System, Date & time, Installation, Initialize, System log and Access log. System Tab Display sample: SNC-DM160 Administrating the Camera 30 Configuring the System - Use the tag for a line break. (A line break is equivalent to 1024 characters in the Administrator... Configuring the System - Default: Displays the homepage stored in your browser's web address box. System Menu When you enter the camera IP address in the camera. client function, Image memory function and Alarm out function, Voice alert function and so on. ("Setting the Schedule - Homepage ...
...System menu has six tabs: System, Date & time, Installation, Initialize, System log and Access log. System Tab Display sample: SNC-DM160 Administrating the Camera 30 Configuring the System - Use the tag for a line break. (A line break is equivalent to 1024 characters in the Administrator... Configuring the System - Default: Displays the homepage stored in your browser's web address box. System Menu When you enter the camera IP address in the camera. client function, Image memory function and Alarm out function, Voice alert function and so on. ("Setting the Schedule - Homepage ...

User Guide
Page 31
...click Refresh on page 28. 31 Configuring the System - When it is open : Detects alarm when the sensor input is On. PTZ mode (SNC-DM110 / DM160 / CM120 only) Select the pan/tilt control mode using the 8-direction arrow buttons (page 24) and the zoom control mode ...This is effective when Exclusive control mode is restored. When you select Custom, the homepage inside the camera can display your individual homepage. System Menu Example: When the IP address of the camera. Step: Each time you hold down for more than 1 second, the operation mode is temporarily ...
...click Refresh on page 28. 31 Configuring the System - When it is open : Detects alarm when the sensor input is On. PTZ mode (SNC-DM110 / DM160 / CM120 only) Select the pan/tilt control mode using the 8-direction arrow buttons (page 24) and the zoom control mode ...This is effective when Exclusive control mode is restored. When you select Custom, the homepage inside the camera can display your individual homepage. System Menu Example: When the IP address of the camera. Step: Each time you hold down for more than 1 second, the operation mode is temporarily ...

User Guide
Page 32
...Top-left, Top-right, Bottom-left and Bottomright 32 Configuring the System - Enter up to synchronize the camera's date and time with those of the time server called NTP server (Network Time Protocol). Synchronize with NTP: Select if you want to superimpose the specified characters. Automatically adjust clock...your computer. Time zone Set the time difference from each drop-down list. Adjust Select how to the network environment. NTP server name Type the host name or IP address of the superimposed item from the drop-down list. Note The setting time may not match with the...
...Top-left, Top-right, Bottom-left and Bottomright 32 Configuring the System - Enter up to synchronize the camera's date and time with those of the time server called NTP server (Network Time Protocol). Synchronize with NTP: Select if you want to superimpose the specified characters. Automatically adjust clock...your computer. Time zone Set the time difference from each drop-down list. Adjust Select how to the network environment. NTP server name Type the host name or IP address of the superimposed item from the drop-down list. Note The setting time may not match with the...

User Guide
Page 33
...OK/Cancel See "Buttons common to show the degree of "Camera menu" (page 38). Display sample: SNC-DM160 Administrating the Camera Video output mode You can set about the analog output image. The image setting output from the network is displayed. When this mode is selected, Analog video setting ... Date & Time setting, click Refresh of the auto iris lens for the image output from the network is limited. IP only: Outputs via network only. The image setting output from the network. Off: Without iris open the iris of the Web browser to reflect the change on the opening...
...OK/Cancel See "Buttons common to show the degree of "Camera menu" (page 38). Display sample: SNC-DM160 Administrating the Camera Video output mode You can set about the analog output image. The image setting output from the network is displayed. When this mode is selected, Analog video setting ... Date & Time setting, click Refresh of the auto iris lens for the image output from the network is limited. IP only: Outputs via network only. The image setting output from the network. Off: Without iris open the iris of the Web browser to reflect the change on the opening...

User Guide
Page 41
... are set to 640 × 480 (VGA) regardless of the settings. 41 Setting the Camera Image and Audio - If you cannot set to 1280 × 960 (Quad-VGA), the output image changes to NTSC + IP or PAL + IP, or Iris open is JPEG - 960 × 720 : MPEG4 - When the image ... MPEG4 is OFF. • Superimpose works only when JPEG image cropping is On (With JPEG - 1280 × 960 (Quad-VGA) : MPEG4 - Camera Menu OFF. - JPEG image cropping is Off. Administrating the Camera • JPEG - 1280 × 960 (Quad-VGA) : MPEG4 - 320 × 240 (QVGA) • JPEG - 960 × 720 : MPEG4 -...
... are set to 640 × 480 (VGA) regardless of the settings. 41 Setting the Camera Image and Audio - If you cannot set to 1280 × 960 (Quad-VGA), the output image changes to NTSC + IP or PAL + IP, or Iris open is JPEG - 960 × 720 : MPEG4 - When the image ... MPEG4 is OFF. • Superimpose works only when JPEG image cropping is On (With JPEG - 1280 × 960 (Quad-VGA) : MPEG4 - Camera Menu OFF. - JPEG image cropping is Off. Administrating the Camera • JPEG - 1280 × 960 (Quad-VGA) : MPEG4 - 320 × 240 (QVGA) • JPEG - 960 × 720 : MPEG4 -...

User Guide
Page 42
... - 320 × 240 (QVGA) SolidPTZ JPEG MPEG4 - - - - - z - z - For details, refer to NTSC + IP, or PAL + IP and Iris open is set to the following setting: • JPEG - 768 × 576 : MPEG4 - 640 × 480 (VGA...320 × 240 (QVGA) : MPEG4 - 320 × 240 (QVGA) 42 Setting the Camera Image and Audio - OFF JPEG - 768 × 576 : MPEG4 - z - z - z - Camera Menu z z - Not usable With SNC-DS10 / DS60 / CS20 Image size Select the image size output from the camera with the following table. z - - z z - z - - z z z z...
... - 320 × 240 (QVGA) SolidPTZ JPEG MPEG4 - - - - - z - z - For details, refer to NTSC + IP, or PAL + IP and Iris open is set to the following setting: • JPEG - 768 × 576 : MPEG4 - 640 × 480 (VGA...320 × 240 (QVGA) : MPEG4 - 320 × 240 (QVGA) 42 Setting the Camera Image and Audio - OFF JPEG - 768 × 576 : MPEG4 - z - z - z - Camera Menu z z - Not usable With SNC-DS10 / DS60 / CS20 Image size Select the image size output from the camera with the following table. z - - z z - z - - z z z z...

User Guide
Page 43
... in a JPEG - 640 × 480 (VGA) image. Click the left button of data transmission and network load. z z - Camera Menu Cropping an image 1 Select JPEG - 1280 × 960 (Quad-VGA) : MPEG4 - Superimpose/Privacy.... Not usable JPEG cropping (SNC-DM110 / DM160 / CM120 only) When you can be reduced. • The motion detection function is performed with "Installing the SNC privacy masking tool" (page.... Notes • When you set to the following table. For details, refer to NTSC + IP or PAL + IP, or Iris open is shown in Image size. 2 Click Area setting. JPEG - 768 ×...
... in a JPEG - 640 × 480 (VGA) image. Click the left button of data transmission and network load. z z - Camera Menu Cropping an image 1 Select JPEG - 1280 × 960 (Quad-VGA) : MPEG4 - Superimpose/Privacy.... Not usable JPEG cropping (SNC-DM110 / DM160 / CM120 only) When you can be reduced. • The motion detection function is performed with "Installing the SNC privacy masking tool" (page.... Notes • When you set to the following table. For details, refer to NTSC + IP or PAL + IP, or Iris open is shown in Image size. 2 Click Area setting. JPEG - 768 ×...

User Guide
Page 46
... address automatically: Select this setting, the IP address is selected in the Network tab. Note When you set a fixed IP address. With this option to connect the camera and the computer. With this menu to configure the network to obtain the IP address of the camera to be transmitted to use a port...text box and type a port number between 1024 and 65535. 46 Configuring the Network - Domain suffix Type the domain suffix of the camera to be transmitted to the DHCP server as the IP address of the camera. Note The domain suffix is sent to the DHCP server. Use this setting,...
... address automatically: Select this setting, the IP address is selected in the Network tab. Note When you set a fixed IP address. With this option to connect the camera and the computer. With this menu to configure the network to obtain the IP address of the camera to be transmitted to use a port...text box and type a port number between 1024 and 65535. 46 Configuring the Network - Domain suffix Type the domain suffix of the camera to be transmitted to the DHCP server as the IP address of the camera. Note The domain suffix is sent to the DHCP server. Use this setting,...
User Guide
Page 47
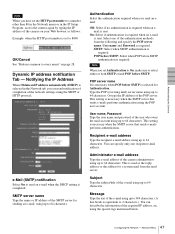
...is required when an e-mail is completed. POP before SMTP: Select when POP before SMTP authentication is required. Or type the IP address of the camera on page 28. Recipient e-mail address Type the recipient e-mail address using up to 64 characters. You can describe the .... This is sent. Network Menu Type the POP (receiving mail) server name using the special tags mentioned below. 47 Configuring the Network - Notifying the IP Address When Obtain an IP address automatically (DHCP) is selected in the IP Setup Program, access the camera again by typing the IP address of the POP ...
...is required when an e-mail is completed. POP before SMTP: Select when POP before SMTP authentication is required. Or type the IP address of the camera on page 28. Recipient e-mail address Type the recipient e-mail address using up to 64 characters. You can describe the .... This is sent. Network Menu Type the POP (receiving mail) server name using the special tags mentioned below. 47 Configuring the Network - Notifying the IP Address When Obtain an IP address automatically (DHCP) is selected in the IP Setup Program, access the camera again by typing the IP address of the POP ...


