
User Guide
Page 2
... Sensors ....... 5 How to Use This User's Guide 6 System Requirements 6 Preparation Connecting to a Computer or a Network 7 Connecting the Camera to a Computer 7 Connecting the Camera to a Local Network ...... 7 Assigning the IP Address to the Camera 8 Assigning an IP address using the IP Setup Program 8 When using Windows XP Service Pack 2 ........ 10 When using Windows Vista 12 Accessing the...
... Sensors ....... 5 How to Use This User's Guide 6 System Requirements 6 Preparation Connecting to a Computer or a Network 7 Connecting the Camera to a Computer 7 Connecting the Camera to a Local Network ...... 7 Assigning the IP Address to the Camera 8 Assigning an IP address using the IP Setup Program 8 When using Windows XP Service Pack 2 ........ 10 When using Windows Vista 12 Accessing the...
User Guide
Page 3
...Supplied Setup Program 58 Starting the Setup Program 58 Bandwidth Control Tab 58 Date time Tab 59 PPPoE Tab 59 Rebooting the Camera 60 Using the SNC audio upload tool - Transmitting Audio to Camera (SNC-CS11 only 60 Installing the SNC audio upload tool 60 Connecting the Camera to the Camera Using... Buffer - Setting the Schedule - Playing Video File Recorded on Camera ..... 66 Downloading the SNC video player 66 Using the SNC video player 66 Using the Custom Homepage Installer 67 Uploading the homepage to the camera using the Custom Homepage Installer 67 Assigning the IP Address to ...
...Supplied Setup Program 58 Starting the Setup Program 58 Bandwidth Control Tab 58 Date time Tab 59 PPPoE Tab 59 Rebooting the Camera 60 Using the SNC audio upload tool - Transmitting Audio to Camera (SNC-CS11 only 60 Installing the SNC audio upload tool 60 Connecting the Camera to the Camera Using... Buffer - Setting the Schedule - Playing Video File Recorded on Camera ..... 66 Downloading the SNC video player 66 Using the SNC video player 66 Using the Custom Homepage Installer 67 Uploading the homepage to the camera using the Custom Homepage Installer 67 Assigning the IP Address to ...
User Guide
Page 8
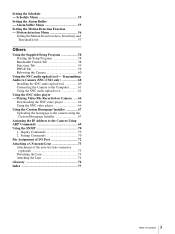
... appear automatically in "When using Windows Vista" on the Network tab window. 8 Assigning the IP Address to continue with the installation. 5 Start the IP Setup Program. The program detects the network cameras connected to the local network and lists them on page 12. 3 Click Open. Preparation... Assigning the IP Address to the Camera To connect the camera to a network, you need to assign a new IP address ...
... appear automatically in "When using Windows Vista" on the Network tab window. 8 Assigning the IP Address to continue with the installation. 5 Start the IP Setup Program. The program detects the network cameras connected to the local network and lists them on page 12. 3 Click Open. Preparation... Assigning the IP Address to the Camera To connect the camera to a network, you need to assign a new IP address ...
User Guide
Page 10
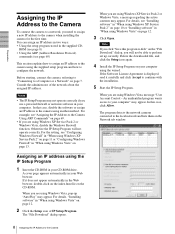
...Yes. Security Warning" dialog, you select Save in the Web browser. Delete the downloaded file, and click the Setup icon again. IP address: 192.168.0.100 Subnet mask: 255.0.0.0 The welcome page of the network camera is displayed in the "File Download - When using Windows XP Service Pack 2 Installing software A warning message ..., the welcome page does not appear after step 12. In this case, try to perform installation correctly. Preparation Tip The factory setting of the camera network is as follows: If message "Information Bar" appears, click OK. 10 Assigning the IP Address to the...
...Yes. Security Warning" dialog, you select Save in the Web browser. Delete the downloaded file, and click the Setup icon again. IP address: 192.168.0.100 Subnet mask: 255.0.0.0 The welcome page of the network camera is displayed in the "File Download - When using Windows XP Service Pack 2 Installing software A warning message ..., the welcome page does not appear after step 12. In this case, try to perform installation correctly. Preparation Tip The factory setting of the camera network is as follows: If message "Information Bar" appears, click OK. 10 Assigning the IP Address to the...

User Guide
Page 11
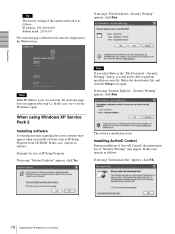
...from the Start menu of Windows. 2 Select Security Center of the working field. If " Internet Explorer - Configuring Windows Firewall The IP Setup Program or SNC audio upload tool may not operate correctly depending on the bar and select Install ActiveX Control.... 3 Select Windows Firewall and select Off in the... On, continue with the following steps. 4 Select the "Exceptions" tab. 5 Select Add Program.... 11 Assigning the IP Address to the Camera Security Warning" appears, click Install. Preparation If the information bar appears, click on the configuration of Windows Firewall. (No...
...from the Start menu of Windows. 2 Select Security Center of the working field. If " Internet Explorer - Configuring Windows Firewall The IP Setup Program or SNC audio upload tool may not operate correctly depending on the bar and select Install ActiveX Control.... 3 Select Windows Firewall and select Off in the... On, continue with the following steps. 4 Select the "Exceptions" tab. 5 Select Add Program.... 11 Assigning the IP Address to the Camera Security Warning" appears, click Install. Preparation If the information bar appears, click on the configuration of Windows Firewall. (No...

User Guide
Page 12
...browser will not open automatically. If pop-up "AutoPlay" appears when a CD-ROM is completed, the cameras connected in the local network are displayed in the CD-ROM. In this case, operate as IP Setup Program from CD-ROM. If message "Internet Explorer" appears, click Yes. When the above procedure is ...list. 7 Click OK. In this case, double-click the "index.htm" file in the IP Setup Program. 6 In the Add Program dialog, select IP Setup Program and click OK. Then the IP Setup Program is added to the Camera Note If you install software such as follows: Example: In case of IP...
...browser will not open automatically. If pop-up "AutoPlay" appears when a CD-ROM is completed, the cameras connected in the local network are displayed in the CD-ROM. In this case, operate as IP Setup Program from CD-ROM. If message "Internet Explorer" appears, click Yes. When the above procedure is ...list. 7 Click OK. In this case, double-click the "index.htm" file in the IP Setup Program. 6 In the Add Program dialog, select IP Setup Program and click OK. Then the IP Setup Program is added to the Camera Note If you install software such as follows: Example: In case of IP...

User Guide
Page 13
Security Warning" appears, click Run. An unidentified program wants access to the Camera In this case, click Allow. Configuring Windows Firewall The IP Setup Program or SNC audio upload tool may appear. If message "Internet Explorer - "User Account Control - Security Warning" appears, click Install... software such as follows: Example: In case of IP Setup Program 1 Select Control Panel from the Start menu of ActiveX Control starts. Installing ActiveX Control During installation of Windows Firewall. (No cameras are shown in the list even if they are detected.)...
Security Warning" appears, click Run. An unidentified program wants access to the Camera In this case, click Allow. Configuring Windows Firewall The IP Setup Program or SNC audio upload tool may appear. If message "Internet Explorer - "User Account Control - Security Warning" appears, click Install... software such as follows: Example: In case of IP Setup Program 1 Select Control Panel from the Start menu of ActiveX Control starts. Installing ActiveX Control During installation of Windows Firewall. (No cameras are shown in the list even if they are detected.)...

User Guide
Page 14
... in the local network are displayed in the list. Preparation The cameras will be displayed in the IP Setup Program. 14 Accessing the Camera Using the Web Browser Accessing the Camera Using the Web Browser When the IP address has been assigned to the Program or port list. 8 Click OK. 2 Click Enter. SNC-CS11 When the above...
... in the local network are displayed in the list. Preparation The cameras will be displayed in the IP Setup Program. 14 Accessing the Camera Using the Web Browser Accessing the Camera Using the Web Browser When the IP address has been assigned to the Program or port list. 8 Click OK. 2 Click Enter. SNC-CS11 When the above...

User Guide
Page 27
...that you change the setting. Basic Operations of the Administrator menu. Click English or Japanese at the factory for the Administrator. How to setup the Administrator menu 1 Log in the main viewer. 3 Enter the user name and password for Administrator. The user name "admin" and...27 Basic Operations of the welcome page. 3 Click Setting in the main viewer to display the Administrator menu. Administrating the Camera Administrating the Camera The Administrating the Camera section explains how to set all functions to suit the user's needs. Example: System menu 5 Select the tab above...
...that you change the setting. Basic Operations of the Administrator menu. Click English or Japanese at the factory for the Administrator. How to setup the Administrator menu 1 Log in the main viewer. 3 Enter the user name and password for Administrator. The user name "admin" and...27 Basic Operations of the welcome page. 3 Click Setting in the main viewer to display the Administrator menu. Administrating the Camera Administrating the Camera The Administrating the Camera section explains how to set all functions to suit the user's needs. Example: System menu 5 Select the tab above...

User Guide
Page 38
...IP address automatically (DHCP) is set the fixed address as FQDN (Fully Qualified Domain Suffix) information when Host name is selected in the Network tab. Secondary DNS server Type the IP address of PPPoE Connection Use it when you have set to 8000 OK/Cancel See "Buttons ... number between 1024 and 65535. This setting is valid only when Obtain an IP address automatically (DHCP) is selected in the IP Setup Program, access the camera again by PPPoE function, IP address obtained at PPPoE connection is widely used . Password Type the password for the authentication necessary for ...
...IP address automatically (DHCP) is set the fixed address as FQDN (Fully Qualified Domain Suffix) information when Host name is selected in the Network tab. Secondary DNS server Type the IP address of PPPoE Connection Use it when you have set to 8000 OK/Cancel See "Buttons ... number between 1024 and 65535. This setting is valid only when Obtain an IP address automatically (DHCP) is selected in the IP Setup Program, access the camera again by PPPoE function, IP address obtained at PPPoE connection is widely used . Password Type the password for the authentication necessary for ...
User Guide
Page 58
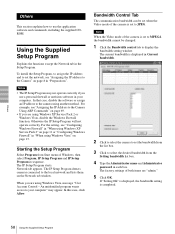
... factory settings of the camera is completed. When you are using another method. Otherwise the IP Setup Program will not operate correctly. If "Setting OK" is displayed, the bandwidth setting is set the network, see "Assigning the IP address to the Camera" on page 13. ...Setup Program Explains the functions except the Network tab in the Setup Program. For the setting, see "Assigning the IP Address to the local network and lists them on page 69. • If you are "admin." 5 Click OK. The IP Setup Program detects cameras connected to the Camera Using ARP Commands" on the Network...
... factory settings of the camera is completed. When you are using another method. Otherwise the IP Setup Program will not operate correctly. If "Setting OK" is displayed, the bandwidth setting is set the network, see "Assigning the IP address to the Camera" on page 13. ...Setup Program Explains the functions except the Network tab in the Setup Program. For the setting, see "Assigning the IP Address to the local network and lists them on page 69. • If you are "admin." 5 Click OK. The IP Setup Program detects cameras connected to the Camera Using ARP Commands" on the Network...
User Guide
Page 59
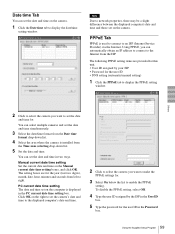
Note Due to network properties, there may be a slight difference between the displayed computer's date and time and those set the date and time on the camera. 1 Click the Date time tab to right. Using PPPoE, you can select multiple cameras and set the date and time simultaneously. 3 Select the date/time ... want to an ISP (Internet Service Provider) via the Internet. PPPoE Tab PPPoE is displayed in the Password box. 59 Using the Supplied Setup Program The following PPPoE setting items are for the user ID • DNS setting (automatic/manual setting) 1 Click the PPPoE tab to enable ...
Note Due to network properties, there may be a slight difference between the displayed computer's date and time and those set the date and time on the camera. 1 Click the Date time tab to right. Using PPPoE, you can select multiple cameras and set the date and time simultaneously. 3 Select the date/time ... want to an ISP (Internet Service Provider) via the Internet. PPPoE Tab PPPoE is displayed in the Password box. 59 Using the Supplied Setup Program The following PPPoE setting items are for the user ID • DNS setting (automatic/manual setting) 1 Click the PPPoE tab to enable ...
User Guide
Page 60
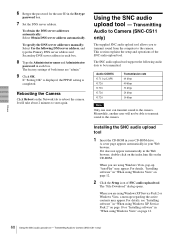
... Reboot on page 12. 2 Click the Setup icon of SNC audio upload tool. This section explains the setup and operations of both items are using Windows Vista" on the Network tab to the camera. Installing the SNC audio upload tool 1 Insert the CD-ROM in your Web browser. For details,...box. 7 Set the DNS server address. When you to transmit sound from the computer to Camera (SNC-CS11 only) The factory settings of the SNC audio upload tool. Transmitting Audio to Camera (SNC-CS11 only) The supplied SNC audio upload tool allows you are "admin." 9 Click OK. Meanwhile, another user will ...
... Reboot on page 12. 2 Click the Setup icon of SNC audio upload tool. This section explains the setup and operations of both items are using Windows Vista" on the Network tab to the camera. Installing the SNC audio upload tool 1 Insert the CD-ROM in your Web browser. For details,...box. 7 Set the DNS server address. When you to transmit sound from the computer to Camera (SNC-CS11 only) The factory settings of the SNC audio upload tool. Transmitting Audio to Camera (SNC-CS11 only) The supplied SNC audio upload tool allows you are "admin." 9 Click OK. Meanwhile, another user will ...
User Guide
Page 61
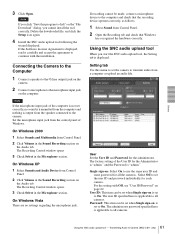
..., no settings regarding the microphone jack. Single sign-on the Audio tab. Delete the downloaded file, and click the Setup icon again. 4 Install the SNC audio upload tool following the wizard displayed. On Windows XP 1 Select Sounds and Audio Device from Control Panel. 2 ...SNC audio upload tool When you click "Save this menu to set to transmit audio from the control panel of the computer is "admin." Others 3 Click Open. If recording cannot be set when Single sign-on page 62. User ID: This item can be made, connect a microphone device to Camera (SNC-CS11...
..., no settings regarding the microphone jack. Single sign-on the Audio tab. Delete the downloaded file, and click the Setup icon again. 4 Install the SNC audio upload tool following the wizard displayed. On Windows XP 1 Select Sounds and Audio Device from Control Panel. 2 ...SNC audio upload tool When you click "Save this menu to set to transmit audio from the control panel of the computer is "admin." Others 3 Click Open. If recording cannot be set when Single sign-on page 62. User ID: This item can be made, connect a microphone device to Camera (SNC-CS11...
User Guide
Page 66
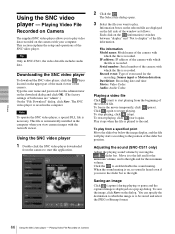
This section explains the setup and operations of the slider bar position. Downloading the SNC video player To download the SNC video player, click the Player located on , no sound is saved in SNC-CS11, the video data file includes audio data. The SNC video player is heard even if you to play . ... move the slider bar to play video data recorded on a pop-up dialog. Serial number: Serial number of the camera. Click again to the end. Adjusting the sound (SNC-CS11 only) Adjust the playing sound volume by moving the slider bar. Saving an image Click (capture) during playing or ...
This section explains the setup and operations of the slider bar position. Downloading the SNC video player To download the SNC video player, click the Player located on , no sound is saved in SNC-CS11, the video data file includes audio data. The SNC video player is heard even if you to play . ... move the slider bar to play video data recorded on a pop-up dialog. Serial number: Serial number of the camera. Click again to the end. Adjusting the sound (SNC-CS11 only) Adjust the playing sound volume by moving the slider bar. Saving an image Click (capture) during playing or ...

User Guide
Page 69
... rebooted automatically in two minutes. 13 Click Finish to assign a new IP address, using the supplied IP Setup Program. Assigning the IP Address to the Camera Using ARP Commands This section explains how to assign an IP address to the camera using ARP (Address Resolution Protocol) commands without using the following ARP commands.
... rebooted automatically in two minutes. 13 Click Finish to assign a new IP address, using the supplied IP Setup Program. Assigning the IP Address to the Camera Using ARP Commands This section explains how to assign an IP address to the camera using ARP (Address Resolution Protocol) commands without using the following ARP commands.

User Guide
Page 78
... security setting 42 Security Warning 10, 11, 13 sending images 46 Serial number 29 serial number 29 Setting 21 Setup Program 58 sharpness 35 SMTP server 39 SNC audio upload tool 60 SNC video player 66 SNMP 70 Software version 29 software version 29, 30 special tags 40 subnet mask 37 System 28... mode 41 voice alert number select 64 volume 21 W welcome page 14, 18, 29 Windows Firewall 11 Windows Vista 12 Windows XP Service Pack 2.......... 10 Sony Corporation
... security setting 42 Security Warning 10, 11, 13 sending images 46 Serial number 29 serial number 29 Setting 21 Setup Program 58 sharpness 35 SMTP server 39 SNC audio upload tool 60 SNC video player 66 SNMP 70 Software version 29 software version 29, 30 special tags 40 subnet mask 37 System 28... mode 41 voice alert number select 64 volume 21 W welcome page 14, 18, 29 Windows Firewall 11 Windows Vista 12 Windows XP Service Pack 2.......... 10 Sony Corporation
