
User Guide
Page 2
...5 How to Use This User's Guide 6 System Requirements 6 Preparation Connecting to a Computer or a Network 7 Connecting the Camera to a Computer 7 Connecting the Camera to a Local Network ...... 7 Assigning the IP Address to the Camera 8 Assigning an IP address using the IP Setup Program 8 When using Windows XP Service Pack 2 ...System Tab 29 Date & time Tab 30 Initialize Tab 31 System log Tab 31 Access log tab 32 Setting the Camera Image and Audio - Network Menu .....37 Network Tab 37 PPPoE Tab - Setting the FTP Client Function 46 Alarm sending Tab - Setting the e-Mail (SMTP)...
...5 How to Use This User's Guide 6 System Requirements 6 Preparation Connecting to a Computer or a Network 7 Connecting the Camera to a Computer 7 Connecting the Camera to a Local Network ...... 7 Assigning the IP Address to the Camera 8 Assigning an IP address using the IP Setup Program 8 When using Windows XP Service Pack 2 ...System Tab 29 Date & time Tab 30 Initialize Tab 31 System log Tab 31 Access log tab 32 Setting the Camera Image and Audio - Network Menu .....37 Network Tab 37 PPPoE Tab - Setting the FTP Client Function 46 Alarm sending Tab - Setting the e-Mail (SMTP)...
User Guide
Page 4
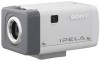
...other legal rights, and the responsibility for making sure you are monitoring can be viewed or used by a third-party via the network. • SONY IS NOT RESPONSIBLE, AND ASSUMES ABSOLUTELY NO LIABILITY TO YOU OR ANYONE ELSE, FOR SERVICE INTERRUPTIONS OR DISCONTINUATIONS OR EVEN SERVICE CANCELLATION...is the most appropriate for a monitoring camera. Features This product is a risk that the image or audio you set up. No further authentication is provided nor should keep in installation. • SNC-CS10: Two power inputs of AC 24V/DC 12V • SNC-CS11: Three power inputs of lens ...
...other legal rights, and the responsibility for making sure you are monitoring can be viewed or used by a third-party via the network. • SONY IS NOT RESPONSIBLE, AND ASSUMES ABSOLUTELY NO LIABILITY TO YOU OR ANYONE ELSE, FOR SERVICE INTERRUPTIONS OR DISCONTINUATIONS OR EVEN SERVICE CANCELLATION...is the most appropriate for a monitoring camera. Features This product is a risk that the image or audio you set up. No further authentication is provided nor should keep in installation. • SNC-CS10: Two power inputs of AC 24V/DC 12V • SNC-CS11: Three power inputs of lens ...
User Guide
Page 6
...Manual (printed matter) The supplied Installation Manual describes the names and functions of parts and controls of the Network Camera, connecting examples and how to operate the SNCCS10 or SNC-CS11 Network Camera from the ones which appear as portrayed on the computer display. As this section gives tips on your... screen. Overview How to Use This User's Guide This User's Guide explains how to set up the camera. Printing the User's ...
...Manual (printed matter) The supplied Installation Manual describes the names and functions of parts and controls of the Network Camera, connecting examples and how to operate the SNCCS10 or SNC-CS11 Network Camera from the ones which appear as portrayed on the computer display. As this section gives tips on your... screen. Overview How to Use This User's Guide This User's Guide explains how to set up the camera. Printing the User's ...

User Guide
Page 7
... after installation and connection of a computer. SNC-CS11 (rear) LAN SEE INSTRUCTION MANUAL 1234 NTSC PAL TEST OUT NETWORK POWER CLASS 2 WIRING - 1 DC 12V AC 24V + 2 Connecting the Camera to a Local Network Using a commercially available network cable, connect the LAN port on the camera to the network, use a commercially available network cable (cross cable). Preparation Preparation The Preparation...
... after installation and connection of a computer. SNC-CS11 (rear) LAN SEE INSTRUCTION MANUAL 1234 NTSC PAL TEST OUT NETWORK POWER CLASS 2 WIRING - 1 DC 12V AC 24V + 2 Connecting the Camera to a Local Network Using a commercially available network cable, connect the LAN port on the camera to the network, use a commercially available network cable (cross cable). Preparation Preparation The Preparation...
User Guide
Page 8
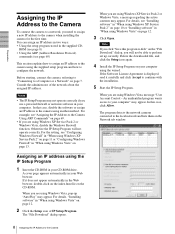
...Windows Vista" on page 13. When you are using Windows Vista, pop-up correctly. Preparation Assigning the IP Address to the Camera To connect the camera to a network, you will not operate correctly. Consult the administrator of IP Setup Program. When you are using Windows Vista, message "User .... ROM (see page 8) • Using the ARP (Address Resolution Protocol) commands (see "Assigning the IP Address to the Camera Using ARP Commands" on the Network tab window. 8 Assigning the IP Address to perform set up "AutoPlay" may appear. Otherwise the IP Setup Program will not...
...Windows Vista" on page 13. When you are using Windows Vista, pop-up correctly. Preparation Assigning the IP Address to the Camera To connect the camera to a network, you will not operate correctly. Consult the administrator of IP Setup Program. When you are using Windows Vista, message "User .... ROM (see page 8) • Using the ARP (Address Resolution Protocol) commands (see "Assigning the IP Address to the Camera Using ARP Commands" on the Network tab window. 8 Assigning the IP Address to perform set up "AutoPlay" may appear. Otherwise the IP Setup Program will not...
User Guide
Page 9
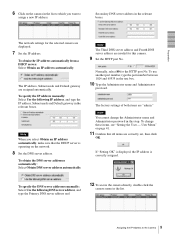
To change the Administrator name and Administrator password in this camera. 9 Set the HTTP port No. If "Setting OK" is displayed, the IP address is operating on the network. 8 Set the DNS server address. To specify the IP address manually: Select Use the following DNS server address, and type ...the Primary DNS server address and 12 To access the camera directly, double-click the camera name in the list. 9 Assigning the...
To change the Administrator name and Administrator password in this camera. 9 Set the HTTP port No. If "Setting OK" is displayed, the IP address is operating on the network. 8 Set the DNS server address. To specify the IP address manually: Select Use the following DNS server address, and type ...the Primary DNS server address and 12 To access the camera directly, double-click the camera name in the list. 9 Assigning the...
User Guide
Page 10
... downloaded file, and click the Setup icon again. IP address: 192.168.0.100 Subnet mask: 255.0.0.0 The welcome page of the network camera is displayed in the "File Download - In this case, try to perform installation correctly. The software installation starts. If message "Internet... Explorer - Preparation Tip The factory setting of the camera network is as follows: Example: In case of IP Setup Program If message "Internet Explorer" appears, click Yes. Security Warning" dialog, you...
... downloaded file, and click the Setup icon again. IP address: 192.168.0.100 Subnet mask: 255.0.0.0 The welcome page of the network camera is displayed in the "File Download - In this case, try to perform installation correctly. The software installation starts. If message "Internet... Explorer - Preparation Tip The factory setting of the camera network is as follows: Example: In case of IP Setup Program If message "Internet Explorer" appears, click Yes. Security Warning" dialog, you...

User Guide
Page 12
... dialog, select IP Setup Program and click OK. When the above procedure is added to view files, Web browser will not be able to the Camera Note If you click Open folder to the Programs and Services list. 7 Click OK. Preparation Note If you select Save in the IP Setup Program.... Then the IP Setup Program is completed, the cameras connected in the local network are displayed in the "File Download - If pop-up "AutoPlay" appears when a CD-ROM is inserted into the CD-ROM drive, click Install...
... dialog, select IP Setup Program and click OK. When the above procedure is added to view files, Web browser will not be able to the Camera Note If you click Open folder to the Programs and Services list. 7 Click OK. Preparation Note If you select Save in the IP Setup Program.... Then the IP Setup Program is completed, the cameras connected in the local network are displayed in the "File Download - If pop-up "AutoPlay" appears when a CD-ROM is inserted into the CD-ROM drive, click Install...

User Guide
Page 14
The welcome page of the camera in the list. SNC-CS11 When the above procedure is displayed in your computer. Then the IP Setup Program is displayed. The main viewer is added to the camera, check that you want to keep Windows Firewall On, continue with the following steps. 5 Select the "...in the Web browser. Preparation The cameras will be displayed in the URL box. Use Internet Explorer as the Web browser. 1 Start the Web browser on the computer and type the IP address of the network camera is completed, the cameras connected in the local network are displayed in the IP Setup...
The welcome page of the camera in the list. SNC-CS11 When the above procedure is displayed in your computer. Then the IP Setup Program is displayed. The main viewer is added to the camera, check that you want to keep Windows Firewall On, continue with the following steps. 5 Select the "...in the Web browser. Preparation The cameras will be displayed in the URL box. Use Internet Explorer as the Web browser. 1 Start the Web browser on the computer and type the IP address of the network camera is completed, the cameras connected in the local network are displayed in the IP Setup...
User Guide
Page 15
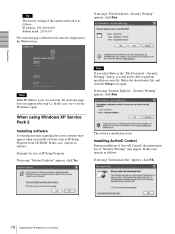
...up blocker on your network administrator. • When you install ActiveX Control, you should be lower. • The Web page displayed when you use antivirus software or other software described above on page 13. 15 Accessing the Camera Using the Web Browser Preparation SNC-CS10 When the main viewer... is correctly displayed, the IP address assignment is enabled in to the camera uses JavaScript. To display the welcome page and the main viewer ...
...up blocker on your network administrator. • When you install ActiveX Control, you should be lower. • The Web page displayed when you use antivirus software or other software described above on page 13. 15 Accessing the Camera Using the Web Browser Preparation SNC-CS10 When the main viewer... is correctly displayed, the IP address assignment is enabled in to the camera uses JavaScript. To display the welcome page and the main viewer ...

User Guide
Page 16
Select weather the audio from the camera microphone is sent or not. (SNC-CS11 only) Accord date and time of the camera with the initial condition of this network camera. Set the access right of the image sent from the camera. Administrator menu White balance (page 34) Video mode (page 32) ...computer. Preparation Basic Configuration by the Administrator You can also set various functions according to the install position, network condition or purpose of the image sent from the camera (MPEG 4 or JPEG). Select the brightness of the user for sending the monitor image attached to the ...
Select weather the audio from the camera microphone is sent or not. (SNC-CS11 only) Accord date and time of the camera with the initial condition of this network camera. Set the access right of the image sent from the camera. Administrator menu White balance (page 34) Video mode (page 32) ...computer. Preparation Basic Configuration by the Administrator You can also set various functions according to the install position, network condition or purpose of the image sent from the camera (MPEG 4 or JPEG). Select the brightness of the user for sending the monitor image attached to the ...

User Guide
Page 17
... in MPEG4 mode only) Control the audio z (SNC-CS11 only) Control the setting z menu User Full Light View z - - z 2) - - Not usable function 1) This function is usable with the Java applet viewer. The functions of the camera User Light View zz zz - - Each type of this network camera including camera setting. Function Administrator Full Monitor a live image...
... in MPEG4 mode only) Control the audio z (SNC-CS11 only) Control the setting z menu User Full Light View z - - z 2) - - Not usable function 1) This function is usable with the Java applet viewer. The functions of the camera User Light View zz zz - - Each type of this network camera including camera setting. Function Administrator Full Monitor a live image...

User Guide
Page 18
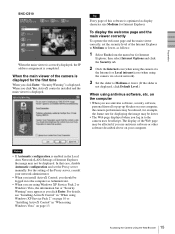
... depending on the Video mode (page 32) of the welcome page. 4 Click Enter. With the ActiveX viewer (MPEG4) The welcome page of the network camera is displayed in to Medium or higher. For details, see "About Viewers" on Step 1 above.) When the Video mode is JPEG Control the... camera from the main viewer. Welcome Page Operating the Camera Logging in as a User 1 Start the Web browser on the computer and type the IP address of the camera you can select ActiveX viewer or Java applet viewer. See illustration on...
... depending on the Video mode (page 32) of the welcome page. 4 Click Enter. With the ActiveX viewer (MPEG4) The welcome page of the network camera is displayed in to Medium or higher. For details, see "About Viewers" on Step 1 above.) When the Video mode is JPEG Control the... camera from the main viewer. Welcome Page Operating the Camera Logging in as a User 1 Start the Web browser on the computer and type the IP address of the camera you can select ActiveX viewer or Java applet viewer. See illustration on...

User Guide
Page 19
..., check whether the effective Java version has been installed successfully and Java (Sun) is enabled in the Local Area Network (LAN) Settings of Internet Explorer, the camera image may not be displayed directly from the welcome page. 1 Select the viewer language on the welcome page. Notes...disable Automatic configuration and set at the bottom of the Administrator menu (page 32). Welcome Page You can monitor the image in the network camera using ActiveX Control. The Administrator mode menu appears in to the Video mode setting in Check "Use JRE 1.6.0_01 for the Administrator...
..., check whether the effective Java version has been installed successfully and Java (Sun) is enabled in the Local Area Network (LAN) Settings of Internet Explorer, the camera image may not be displayed directly from the welcome page. 1 Select the viewer language on the welcome page. Notes...disable Automatic configuration and set at the bottom of the Administrator menu (page 32). Welcome Page You can monitor the image in the network camera using ActiveX Control. The Administrator mode menu appears in to the Video mode setting in Check "Use JRE 1.6.0_01 for the Administrator...

User Guide
Page 22
... 3, 4, 5, 6, 8, 10, 15, 20, 25 and 30 fps. The number of frames transmitted per second. Date and time is set to log in on network environments and camera settings (image size and image quality settings). 22 Controlling the Monitor Image Note The frame rate options indicate the maximum number of frames that... can monitor the camera image on the monitor window of the window. 2 Select the frame rate (only when the camera Video mode is displayed at the maximum speed of the connected line (30 fps maximum). ...
... 3, 4, 5, 6, 8, 10, 15, 20, 25 and 30 fps. The number of frames transmitted per second. Date and time is set to log in on network environments and camera settings (image size and image quality settings). 22 Controlling the Monitor Image Note The frame rate options indicate the maximum number of frames that... can monitor the camera image on the monitor window of the window. 2 Select the frame rate (only when the camera Video mode is displayed at the maximum speed of the connected line (30 fps maximum). ...

User Guide
Page 26
...function can be reduced. By selecting it, the network transmission load of reading Web page, you use personal firewall software or antivirus software on page 13. 1 Display the main viewer. 2 Click TCP/UDP transmission selector icon. Operating the Camera 3 Click one of the video data as ...the transmission port, RTP (Real-time Transport Protocol) and UDP multicast techniques are using Windows Vista" on your computer. depending on the network environment, the video may not play properly when UDP (Unicast) is the protocol used . HTTP is selected. Switching TCP/UDP Transmission ...
...function can be reduced. By selecting it, the network transmission load of reading Web page, you use personal firewall software or antivirus software on page 13. 1 Display the main viewer. 2 Click TCP/UDP transmission selector icon. Operating the Camera 3 Click one of the video data as ...the transmission port, RTP (Real-time Transport Protocol) and UDP multicast techniques are using Windows Vista" on your computer. depending on the network environment, the video may not play properly when UDP (Unicast) is the protocol used . HTTP is selected. Switching TCP/UDP Transmission ...

User Guide
Page 28
Camera Displays Camera menu for setting the network connection. ("Configuring the Network - Network Displays the network menu for setting the camera image and audio. ("Setting the Camera Image and Audio - e-Mail (SMTP) Menu" on page 43) FTP client Displays the FTP client menu for setting the user name and the password to log in SNC-CS11. The functions of the...
Camera Displays Camera menu for setting the network connection. ("Configuring the Network - Network Displays the network menu for setting the camera image and audio. ("Setting the Camera Image and Audio - e-Mail (SMTP) Menu" on page 43) FTP client Displays the FTP client menu for setting the user name and the password to log in SNC-CS11. The functions of the...

User Guide
Page 30
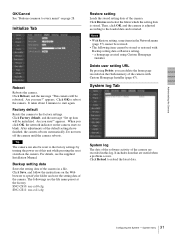
...selected time zone. System menu Date & time format Select the format of the camera is installed. Synchronize with PC: Select if synchronizing the camera's date and time with those of the time sever called NTP server (Network Time Protocol). Time zone Set the time difference from the drop-down list....Buttons common to the NTP server' time, between 1 and 24 hours. To display your favorite homepage. Store the HTML file in the built-in the camera Select /index.html. For use of the Custom Homepage Installer, see page 67. 1 Select User Setting/ user/. 2 Type the path of year, month...
...selected time zone. System menu Date & time format Select the format of the camera is installed. Synchronize with PC: Select if synchronizing the camera's date and time with those of the time sever called NTP server (Network Time Protocol). Time zone Set the time difference from the drop-down list....Buttons common to the NTP server' time, between 1 and 24 hours. To display your favorite homepage. Store the HTML file in the built-in the camera Select /index.html. For use of the Custom Homepage Installer, see page 67. 1 Select User Setting/ user/. 2 Type the path of year, month...
User Guide
Page 31
...Tab System log The data of the software activity of the camera are recorded in the Network menu (page 37) cannot be restored. • The following item cannot be reset to blink. Factory default Resets the camera to specify the folder and save the setting data of this...to the factory settings. appears. appears. Do not turn off the camera until the camera reboots. SNC-CS10: snc-cs10.cfg SNC-CS11: snc-cs11.cfg Restore setting Loads the stored setting data of the default settings have finished, the camera reboots automatically. It includes data that are the file name preset at ...
...Tab System log The data of the software activity of the camera are recorded in the Network menu (page 37) cannot be restored. • The following item cannot be reset to blink. Factory default Resets the camera to specify the folder and save the setting data of this...to the factory settings. appears. appears. Do not turn off the camera until the camera reboots. SNC-CS10: snc-cs10.cfg SNC-CS11: snc-cs11.cfg Restore setting Loads the stored setting data of the default settings have finished, the camera reboots automatically. It includes data that are the file name preset at ...

User Guide
Page 33
... 65534. Microphone (SNC-CS11 only) Select whether you can be selected. It is initially set Multicast address, Multicast video port number and Multicast audio port number properly. Specify an even number from this network camera. Select On to send the audio from 1024 to the ceiling. Click the left button of ... is reduced and a higher frame rate is displayed. 2 Set the Cropping to On, the image of the composite video signal output from the network camera. 640 × 480 (VGA), 480 × 360, 384 × 288, 320 × 240 (QVGA), 256 × 192 or 160 × 120 (QQVGA) can ...
... 65534. Microphone (SNC-CS11 only) Select whether you can be selected. It is initially set Multicast address, Multicast video port number and Multicast audio port number properly. Specify an even number from this network camera. Select On to send the audio from 1024 to the ceiling. Click the left button of ... is reduced and a higher frame rate is displayed. 2 Set the Cropping to On, the image of the composite video signal output from the network camera. 640 × 480 (VGA), 480 × 360, 384 × 288, 320 × 240 (QVGA), 256 × 192 or 160 × 120 (QQVGA) can ...

