
User Guide
Page 2
... Tab 31 System log Tab 31 Access log tab 32 Setting the Camera Image and Audio - Setting the Image Memory Function when Detecting the Alarm 49 Periodical recording Tab - Notifying the IP Address 39 Setting the User - Trigger Menu 53 2 Table of ... Guide 6 System Requirements 6 Preparation Connecting to a Computer or a Network 7 Connecting the Camera to a Computer 7 Connecting the Camera to a Local Network ...... 7 Assigning the IP Address to the Camera 8 Assigning an IP address using the IP Setup Program 8 When using Windows XP Service Pack 2 ........ 10 When using Windows Vista 12...
... Tab 31 System log Tab 31 Access log tab 32 Setting the Camera Image and Audio - Setting the Image Memory Function when Detecting the Alarm 49 Periodical recording Tab - Notifying the IP Address 39 Setting the User - Trigger Menu 53 2 Table of ... Guide 6 System Requirements 6 Preparation Connecting to a Computer or a Network 7 Connecting the Camera to a Computer 7 Connecting the Camera to a Local Network ...... 7 Assigning the IP Address to the Camera 8 Assigning an IP address using the IP Setup Program 8 When using Windows XP Service Pack 2 ........ 10 When using Windows Vista 12...
User Guide
Page 3
... player 66 Using the Custom Homepage Installer 67 Uploading the homepage to the camera using the Custom Homepage Installer 67 Assigning the IP Address to the Computer ......... 61 Using the SNC audio upload tool 61 Using the SNC video player - Alarm buffer Menu 55 Setting the Motion Detection Function - Motion detection Menu 56 Setting...
... player 66 Using the Custom Homepage Installer 67 Uploading the homepage to the camera using the Custom Homepage Installer 67 Assigning the IP Address to the Computer ......... 61 Using the SNC audio upload tool 61 Using the SNC video player - Alarm buffer Menu 55 Setting the Motion Detection Function - Motion detection Menu 56 Setting...
User Guide
Page 8
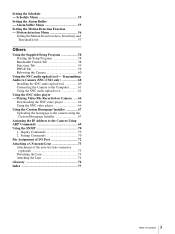
... 2 or Windows Vista, disable the Windows Firewall function. For example, see page 69) This section explains how to assign an IP address to the camera using Windows Vista" on page 10 or "Installing software" in your computer. For details, "Installing software" in "When using ... The program detects the network cameras connected to the local network and lists them on page 7. Preparation Assigning the IP Address to the Camera To connect the camera to a network, you need to assign a new IP address to the Camera Before starting, connect the camera, referring to "Connecting to your...
... 2 or Windows Vista, disable the Windows Firewall function. For example, see page 69) This section explains how to assign an IP address to the camera using Windows Vista" on page 10 or "Installing software" in your computer. For details, "Installing software" in "When using ... The program detects the network cameras connected to the local network and lists them on page 7. Preparation Assigning the IP Address to the Camera To connect the camera to a network, you need to assign a new IP address to the Camera Before starting, connect the camera, referring to "Connecting to your...
User Guide
Page 9
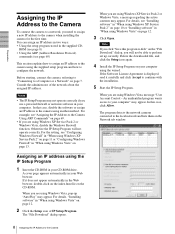
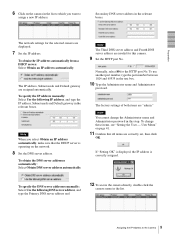
... mask and Default gateway are "admin." Note When you want to the Camera Normally, select 80 for the selected camera are correctly set, then click OK. If "Setting OK" is displayed, the IP address is operating on page 41. 11 Confirm that the DHCP server is...: Select Obtain DNS server address automatically. Preparation 6 Click on the camera in the list. 9 Assigning the IP Address to assign a new IP address. To obtain the IP address automatically from a DHCP server: Select Obtain an IP address automatically. To change the Administrator name and Administrator password in the...
... mask and Default gateway are "admin." Note When you want to the Camera Normally, select 80 for the selected camera are correctly set, then click OK. If "Setting OK" is displayed, the IP address is operating on page 41. 11 Confirm that the DHCP server is...: Select Obtain DNS server address automatically. Preparation 6 Click on the camera in the list. 9 Assigning the IP Address to assign a new IP address. To obtain the IP address automatically from a DHCP server: Select Obtain an IP address automatically. To change the Administrator name and Administrator password in the...
User Guide
Page 10
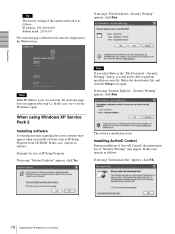
.... Note If you install software such as follows: If message "Information Bar" appears, click OK. 10 Assigning the IP Address to the Camera If message "Internet Explorer - In this case, operate as follows. Security Warning" appears, click Run. If message "File Download... A warning message regarding the active contents may appear. Installing ActiveX Control During installation of the camera network is as follows: Example: In case of the network camera is not set the IP address again. The software installation starts. Preparation Tip The factory setting of ActiveX Control, the...
.... Note If you install software such as follows: If message "Information Bar" appears, click OK. 10 Assigning the IP Address to the Camera If message "Internet Explorer - In this case, operate as follows. Security Warning" appears, click Run. If message "File Download... A warning message regarding the active contents may appear. Installing ActiveX Control During installation of the camera network is as follows: Example: In case of the network camera is not set the IP address again. The software installation starts. Preparation Tip The factory setting of ActiveX Control, the...

User Guide
Page 11
... the following steps. 4 Select the "Exceptions" tab. 5 Select Add Program.... 11 Assigning the IP Address to the Camera If " Internet Explorer - Configuring Windows Firewall The IP Setup Program or SNC audio upload tool may not operate correctly depending on the bar and select Install ActiveX Control.... 3 Select... or the Motion detection menu appears. Preparation If the information bar appears, click on the configuration of Windows Firewall. (No cameras are shown in the list even if they are detected.) In this case, confirm the Windows Firewall configuration as follows: Example: ...
... the following steps. 4 Select the "Exceptions" tab. 5 Select Add Program.... 11 Assigning the IP Address to the Camera If " Internet Explorer - Configuring Windows Firewall The IP Setup Program or SNC audio upload tool may not operate correctly depending on the bar and select Install ActiveX Control.... 3 Select... or the Motion detection menu appears. Preparation If the information bar appears, click on the configuration of Windows Firewall. (No cameras are shown in the list even if they are detected.) In this case, confirm the Windows Firewall configuration as follows: Example: ...

User Guide
Page 12
... the Add Program dialog, select IP Setup Program and click OK. If message "Internet Explorer" appears, click Yes. Then the IP Setup Program is completed, the cameras connected in the local network are displayed in the IP Setup Program. In this case, operate as IP Setup Program from CD-ROM. ...Security Warning" appears, click Run. 12 Assigning the IP Address to the Camera Note If you click...
... the Add Program dialog, select IP Setup Program and click OK. If message "Internet Explorer" appears, click Yes. Then the IP Setup Program is completed, the cameras connected in the local network are displayed in the IP Setup Program. In this case, operate as IP Setup Program from CD-ROM. ...Security Warning" appears, click Run. 12 Assigning the IP Address to the Camera Note If you click...

User Guide
Page 13
...confirm the Windows Firewall configuration as follows: Example: In case of IP Setup Program 1 Select Control Panel from the Start menu of Windows Firewall. (No cameras are detected.) In this case, operate as IP Setup Program, message "User Account Control - Windows needs your computer"... Control During installation of ActiveX Control starts. Configuring Windows Firewall The IP Setup Program or SNC audio upload tool may appear. An unidentified program wants access to your permission to the Camera The installation of ActiveX Control, the information bar or "Security Warning...
...confirm the Windows Firewall configuration as follows: Example: In case of IP Setup Program 1 Select Control Panel from the Start menu of Windows Firewall. (No cameras are detected.) In this case, operate as IP Setup Program, message "User Account Control - Windows needs your computer"... Control During installation of ActiveX Control starts. Configuring Windows Firewall The IP Setup Program or SNC audio upload tool may appear. An unidentified program wants access to your permission to the Camera The installation of ActiveX Control, the information bar or "Security Warning...

User Guide
Page 14
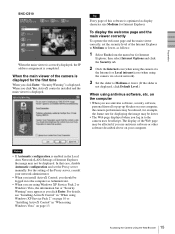
... assigned to the Program or port list. 8 Click OK. 2 Click Enter. Then the IP Setup Program is completed, the cameras connected in the local network are displayed in the IP Setup Program. 14 Accessing the Camera Using the Web Browser Use Internet Explorer as the Web browser. 1 Start the Web browser ... the Web browser installed in the URL box. The main viewer is displayed in the list. SNC-CS11 When the above procedure is added to the camera, check that you want to keep Windows Firewall On, continue with the following steps. 5 Select the "Exceptions" tab. 6 Select Add Program.... 7 If...
... assigned to the Program or port list. 8 Click OK. 2 Click Enter. Then the IP Setup Program is completed, the cameras connected in the local network are displayed in the IP Setup Program. 14 Accessing the Camera Using the Web Browser Use Internet Explorer as the Web browser. 1 Start the Web browser ... the Web browser installed in the URL box. The main viewer is displayed in the list. SNC-CS11 When the above procedure is added to the camera, check that you want to keep Windows Firewall On, continue with the following steps. 5 Select the "Exceptions" tab. 6 Select Add Program.... 7 If...
User Guide
Page 15
... the main viewer correctly, set the Proxy server manually. Preparation SNC-CS10 When the main viewer is correctly displayed, the IP address assignment is displayed for Internet Explorer, then select Internet Options and click the Security tab. 2 Click the Internet icon (when using the camera via the Internet) or Local intranet icon (when using...
... the main viewer correctly, set the Proxy server manually. Preparation SNC-CS10 When the main viewer is correctly displayed, the IP address assignment is displayed for Internet Explorer, then select Internet Options and click the Security tab. 2 Click the Internet icon (when using the camera via the Internet) or Local intranet icon (when using...

User Guide
Page 18
..."About Viewers" on page 15 and check the security level. 18 Logging in as a User 1 Start the Web browser on the computer and type the IP address of the Internet Explorer may not select other viewers. (MPEG4 is set to JPEG, you can only select ActiveX viewer, and may be set... viewer correctly" on page 19. Welcome Page Logging in to Homepage - Note If the Welcome page does not activate correctly, the security level of the camera you can select ActiveX viewer or Java applet viewer. The usable viewers differ depending on Step 1 above.) When the Video mode is default. Welcome page...
..."About Viewers" on page 15 and check the security level. 18 Logging in as a User 1 Start the Web browser on the computer and type the IP address of the Internet Explorer may not select other viewers. (MPEG4 is set to JPEG, you can only select ActiveX viewer, and may be set... viewer correctly" on page 19. Welcome Page Logging in to Homepage - Note If the Welcome page does not activate correctly, the security level of the camera you can select ActiveX viewer or Java applet viewer. The usable viewers differ depending on Step 1 above.) When the Video mode is default. Welcome page...

User Guide
Page 29
... 48) FTP server Displays the FTP Server menu for the operations when you click the trigger button in the Web address box of the camera. ("Downloading Images from the Viewer Page - Image memory Menu" on the Administrator menu, the System menu appears. The System menu is composed ...output Displays the alarm out menu for a line break. (A line break is displayed. System menu When you enter the IP address of the camera in the main viewer. ("Setting the Operations from the Camera - The characters typed here are System, Date & time, Initialization, System Log and Access Log. Use the tag ...
... 48) FTP server Displays the FTP Server menu for the operations when you click the trigger button in the Web address box of the camera. ("Downloading Images from the Viewer Page - Image memory Menu" on the Administrator menu, the System menu appears. The System menu is composed ...output Displays the alarm out menu for a line break. (A line break is displayed. System menu When you enter the IP address of the camera in the main viewer. ("Setting the Operations from the Camera - The characters typed here are System, Date & time, Initialization, System Log and Access Log. Use the tag ...

User Guide
Page 30
..., hour, minutes and seconds from the drop-down list. Example: When the IP address of the camera is installed from the drop-down list. Note After you select User Setting/ user/, the ... inside the camera can be displayed on the camera. 30 Configuring the System - You can display your computer. Select the lower 2-digits of this unit. NTP server name Type the host name or IP address of ... time, between 1 and 24 hours. Keep current setting: Select if you want to adjust the camera's time referring to the daylight saving time of the HTML file in flash memory using the time ...
..., hour, minutes and seconds from the drop-down list. Example: When the IP address of the camera is installed from the drop-down list. Note After you select User Setting/ user/, the ... inside the camera can be displayed on the camera. 30 Configuring the System - You can display your computer. Select the lower 2-digits of this unit. NTP server name Type the host name or IP address of ... time, between 1 and 24 hours. Keep current setting: Select if you want to adjust the camera's time referring to the daylight saving time of the HTML file in flash memory using the time ...

User Guide
Page 37
...Configuring the Network - Network Tab This section provides the menus for connecting the camera through the network cable. IP address is displayed. Note When you set . IP address Type the IP address of the camera. Are you click Network on the internet. Network Menu When you sure?" Use...OK. To reset to connect the camera and the computer. Network Menu Administrating the Camera MAC address Displays the MAC address of the camera. is assigned automatically. Select it when the IP address is installed on the network. Obtain an IP address automatically (DHCP) DHCP server ...
...Configuring the Network - Network Tab This section provides the menus for connecting the camera through the network cable. IP address is displayed. Note When you set . IP address Type the IP address of the camera. Are you click Network on the internet. Network Menu When you sure?" Use...OK. To reset to connect the camera and the computer. Network Menu Administrating the Camera MAC address Displays the MAC address of the camera. is assigned automatically. Select it when the IP address is installed on the network. Obtain an IP address automatically (DHCP) DHCP server ...

User Guide
Page 38
...the default gateway. Obtain DNS server address automatically Select this when you connect to the network by typing the IP address of the camera on your Web browser as the IP address of the camera to be set the HTTP port number to the DHCP server as the authentication and connection system. This ...) is displayed. Note The domain suffix is sent to a number other than 80 in the Network menu or in the IP Setup Program, access the camera again by PPPoE function, IP address obtained at PPPoE connection is selected in the Network tab. Note When you want to obtain the address of the...
...the default gateway. Obtain DNS server address automatically Select this when you connect to the network by typing the IP address of the camera on your Web browser as the IP address of the camera to be set the HTTP port number to the DHCP server as the authentication and connection system. This ...) is displayed. Note The domain suffix is sent to a number other than 80 in the Network menu or in the IP Setup Program, access the camera again by PPPoE function, IP address obtained at PPPoE connection is selected in the Network tab. Note When you want to obtain the address of the...

User Guide
Page 39
... e-Mails performs authentication using the special tags mentioned below. 39 Configuring the Network - Administrator e-Mail address Type the e-Mail address of the acquired IP address, etc. Administrating the Camera Re-type password To comfirm the password, re-type the password typed in Authentication. Type the POP (receiving mail) server name up to...
... e-Mails performs authentication using the special tags mentioned below. 39 Configuring the Network - Administrator e-Mail address Type the e-Mail address of the acquired IP address, etc. Administrating the Camera Re-type password To comfirm the password, re-type the password typed in Authentication. Type the POP (receiving mail) server name up to...

User Guide
Page 40
...completed. Use this function, you described in the text or parameter. Administrating the Camera HTTP notification Select On to output a command to every menu" on page 28. Using this tag to embed the IP address acquired by the DHCP, such as follows: http://ip_address[:port]/path?parameter ...ip_address: Type the IP address or host name of the URL that you can configure a useful system, for the parameters. URL Specify the URL to send HTTP request, using up to embed the camera's model name (SNCCS10, SNC-CS11) in the text or parameter. 40...
...completed. Use this function, you described in the text or parameter. Administrating the Camera HTTP notification Select On to output a command to every menu" on page 28. Using this tag to embed the IP address acquired by the DHCP, such as follows: http://ip_address[:port]/path?parameter ...ip_address: Type the IP address or host name of the URL that you can configure a useful system, for the parameters. URL Specify the URL to send HTTP request, using up to embed the camera's model name (SNCCS10, SNC-CS11) in the text or parameter. 40...
User Guide
Page 42
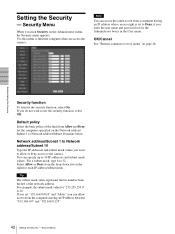
... You can specify up to limit the computers that can access the camera. Setting the Security - Use this menu to 10 IP addresses and subnet mask values. Network address/Subnet 1 to Network address/Subnet 10 Type the IP addresses and subnet mask values you do not wish to Network address/Subnet...24" and "Allow," you click Security on page 28. OK/Cancel See "Buttons common to 32. If you want to the camera. Security Menu When you can access the camera even from the drop-down list on the Network address/ Subnet 1 to use the security function, select Off. Administrating the...
... You can specify up to limit the computers that can access the camera. Setting the Security - Use this menu to 10 IP addresses and subnet mask values. Network address/Subnet 1 to Network address/Subnet 10 Type the IP addresses and subnet mask values you do not wish to Network address/Subnet...24" and "Allow," you click Security on page 28. OK/Cancel See "Buttons common to 32. If you want to the camera. Security Menu When you can access the camera even from the drop-down list on the Network address/ Subnet 1 to use the security function, select Off. Administrating the...

User Guide
Page 43
...POP server. The common setting options are displayed below. Type the POP (receiving mail) server name up to 64 characters, or type the IP address of the camera may be sent periodically. Recipient e-Mail address Type the recipient e-Mail address up to 64 characters. e-Mail (SMTP) Menu By using e-...the alarm tab is set Authentication to On, make sure to 64 characters, or the IP address of the e-Mail up to select either or both SMTP or/and POP before SMTP is required. Administrating the Camera Sending an Image via mail - Setting the e-Mail (SMTP) Function e-Mail (SMTP)...
...POP server. The common setting options are displayed below. Type the POP (receiving mail) server name up to 64 characters, or type the IP address of the camera may be sent periodically. Recipient e-Mail address Type the recipient e-Mail address up to 64 characters. e-Mail (SMTP) Menu By using e-...the alarm tab is set Authentication to On, make sure to 64 characters, or the IP address of the e-Mail up to select either or both SMTP or/and POP before SMTP is required. Administrating the Camera Sending an Image via mail - Setting the e-Mail (SMTP) Function e-Mail (SMTP)...

User Guide
Page 46
... characters. Setting the FTP Client Function Password Type the password for the FTP server. Administrating the Camera FTP client function To activate the FTP client function, select On. FTP server name Type the ... client function. Alarm sending Select On to send the image file to 64 characters, or the IP address of three tabs Common, Alarm sending and Periodical sending. Remote path Type the path to... user name for the FTP server. FTP client menu is being transmitted by the built-in SNC-CS11, the image file including audio data can send the image file which has been shot ...
... characters. Setting the FTP Client Function Password Type the password for the FTP server. Administrating the Camera FTP client function To activate the FTP client function, select On. FTP server name Type the ... client function. Alarm sending Select On to send the image file to 64 characters, or the IP address of three tabs Common, Alarm sending and Periodical sending. Remote path Type the path to... user name for the FTP server. FTP client menu is being transmitted by the built-in SNC-CS11, the image file including audio data can send the image file which has been shot ...


