Operating Instructions
Page 3
... etc. - Do not put anything heavy on the AC power cord or pull on the bottom of the front panel. On AC adapter • Use the supplied AC adapter (AC-NX1W) for this product is damaged, ...AC adapter in the player. • Do not place any objects on the player, or do , your Sony dealer regarding this player in a confined space, such as doing so may generate heat and cause a malfunction.... a bookshelf or an AV cabinet. • Do not connect the AC adapter to prevent the AC power cord being damaged. Contains FCC ID : AK8DWMW038 Owner's Record The model and serial numbers are not going...
... etc. - Do not put anything heavy on the AC power cord or pull on the bottom of the front panel. On AC adapter • Use the supplied AC adapter (AC-NX1W) for this product is damaged, ...AC adapter in the player. • Do not place any objects on the player, or do , your Sony dealer regarding this player in a confined space, such as doing so may generate heat and cause a malfunction.... a bookshelf or an AV cabinet. • Do not connect the AC adapter to prevent the AC power cord being damaged. Contains FCC ID : AK8DWMW038 Owner's Record The model and serial numbers are not going...
Operating Instructions
Page 4
... A polarized plug has two blades with dry cloth. 7) Do not block any questions or problems concerning your player, please consult your nearest Sony dealer. If you risk permanent damage to this apparatus during lightning storms or when unused for reuse or recycling purposes. Important Safety Instructions 1) Read... Clean the cabinet, panel, and controls with the apparatus. Install in any type of abrasive pad, scouring powder or solvent such as power-supply cord or plug is capable of the player and the HDMI connector by the manufacturer, or sold with a soft cloth. Do not use...
... A polarized plug has two blades with dry cloth. 7) Do not block any questions or problems concerning your player, please consult your nearest Sony dealer. If you risk permanent damage to this apparatus during lightning storms or when unused for reuse or recycling purposes. Important Safety Instructions 1) Read... Clean the cabinet, panel, and controls with the apparatus. Install in any type of abrasive pad, scouring powder or solvent such as power-supply cord or plug is capable of the player and the HDMI connector by the manufacturer, or sold with a soft cloth. Do not use...
Operating Instructions
Page 9
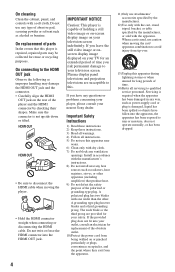
Hookups and Settings Hookups and Settings Step 1: Preparing the Player Checking the supplied accessories Check that you have the following items: • Audio/video cable (phono plug ×3) (1) • AC power cord (1) • AC adapter (1) • Remote control (remote) (1) • Size AA (R6) batteries (2) Preparing the remote Insert two Size AA (R6) batteries by matching the 3 and # ends on the batteries to the markings inside the battery compartment. 9
Hookups and Settings Hookups and Settings Step 1: Preparing the Player Checking the supplied accessories Check that you have the following items: • Audio/video cable (phono plug ×3) (1) • AC power cord (1) • AC adapter (1) • Remote control (remote) (1) • Size AA (R6) batteries (2) Preparing the remote Insert two Size AA (R6) batteries by matching the 3 and # ends on the batteries to the markings inside the battery compartment. 9
Operating Instructions
Page 10
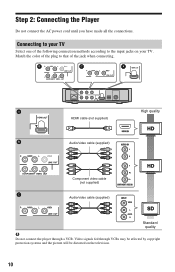
... methods according to your TV. Step 2: Connecting the Player Do not connect the AC power cord until you have made all the connections. HDMI cable (not supplied) Audio/video cable (supplied) High quality Component video cable (not supplied) Audio/video cable (supplied) Standard quality b Do not connect the player through VCRs may be affected by...
... methods according to your TV. Step 2: Connecting the Player Do not connect the AC power cord until you have made all the connections. HDMI cable (not supplied) Audio/video cable (supplied) High quality Component video cable (not supplied) Audio/video cable (supplied) Standard quality b Do not connect the player through VCRs may be affected by...
Operating Instructions
Page 12
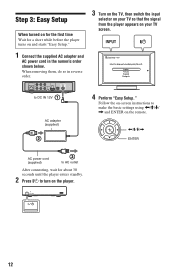
Follow the on your TV screen. to make the basic settings using When removing them, do so in the numeric order shown below. Step 3: Easy Setup When turned on for the first time Wait for a short while before the player turns on and starts "Easy Setup." 1 Connect the supplied AC adapter and AC power cord in reverse order. 3 Turn on the TV, then switch the input selector on your TV so that the signal from the player appears on -screen instructions to DC IN 12V AC adapter (supplied) 4 Perform "Easy Setup."
Follow the on your TV screen. to make the basic settings using When removing them, do so in the numeric order shown below. Step 3: Easy Setup When turned on for the first time Wait for a short while before the player turns on and starts "Easy Setup." 1 Connect the supplied AC adapter and AC power cord in reverse order. 3 Turn on the TV, then switch the input selector on your TV so that the signal from the player appears on -screen instructions to DC IN 12V AC adapter (supplied) 4 Perform "Easy Setup."
Operating Instructions
Page 25
.... , Press RETURN to return to a TV through an AV amplifier (receiver), - The message "A new software version has been found on again. , If power failure occurs, set "Control for HDMI" to "Off," then set "Control for HDMI" function. - the connected component's setting for the "Control for HDMI"... last stopped playing. , The resume point may be cleared from the player. - If the player still does not respond to the instruction manual supplied with the component. - Playback does not start from the beginning of the AV amplifier (receiver) so that "Control for HDMI" is set "...
.... , Press RETURN to return to a TV through an AV amplifier (receiver), - The message "A new software version has been found on again. , If power failure occurs, set "Control for HDMI" to "Off," then set "Control for HDMI" function. - the connected component's setting for the "Control for HDMI"... last stopped playing. , The resume point may be cleared from the player. - If the player still does not respond to the instruction manual supplied with the component. - Playback does not start from the beginning of the AV amplifier (receiver) so that "Control for HDMI" is set "...

Operating Instructions
Page 26
... This DivX Certified® device must be registered in the device setup menu. Specifications and design are subject to 80 % 26 Supplied accessories See page 9. Go to vod.divx.com with this code to complete the registration process and learn more information and software ... V DC Wireless Wireless LAN standard: IEEE802.11b/g/n Frequency range: 2.4 GHz band: Channels 1-11 Modulation: DS-SS Modem and OFDM Modem General Power requirements: AC adapter: 110 - 240 V AC, 50/60 Hz Power consumption (approx.): 14 W Dimensions (approx.): 185 mm × 193 mm × 40 mm (17 3/8 in. × 7 5/8 in....
... This DivX Certified® device must be registered in the device setup menu. Specifications and design are subject to 80 % 26 Supplied accessories See page 9. Go to vod.divx.com with this code to complete the registration process and learn more information and software ... V DC Wireless Wireless LAN standard: IEEE802.11b/g/n Frequency range: 2.4 GHz band: Channels 1-11 Modulation: DS-SS Modem and OFDM Modem General Power requirements: AC adapter: 110 - 240 V AC, 50/60 Hz Power consumption (approx.): 14 W Dimensions (approx.): 185 mm × 193 mm × 40 mm (17 3/8 in. × 7 5/8 in....
Operating Instructions
Page 27
...player with the TV's remote if the "Control for HDMI" function may not work . Refer to the instruction manual supplied with the TV. • When connecting the Sony TV that is compatible with the BRAVIA Sync features using the HDMI cable, the TV's video mode switches to folders ...TV using the HDMI cable, the speaker output also switches automatically. For details on the TV is switched to the instruction manual supplied with a Sony AV amplifier (receiver) using -TV- [/1 or the power button on the connected TV is compatible with the TV. Refer to folders in the DLNA server: -
...player with the TV's remote if the "Control for HDMI" function may not work . Refer to the instruction manual supplied with the TV. • When connecting the Sony TV that is compatible with the BRAVIA Sync features using the HDMI cable, the TV's video mode switches to folders ...TV using the HDMI cable, the speaker output also switches automatically. For details on the TV is switched to the instruction manual supplied with a Sony AV amplifier (receiver) using -TV- [/1 or the power button on the connected TV is compatible with the TV. Refer to folders in the DLNA server: -


